Deep Dive: How to configure dashboards and panels
This guide provides an overview of best practice configuration for dashboard pages, panels, and design elements. There are many further configuration settings which impact user experience that will be explored. The objective is to showcase recommendations to realise the optimum look and feel.
Design Settings
The branded skin designs are produced and loaded in the system by Scheer IMC. Once loaded, there are some further design settings that can be configured in the GUI.
In the Design function, edit the design to check the following settings:
-
Description tab
-
Activate the new navigation: It is recommended to tick this checkbox.
-
Activate the new Learning status: It is recommended to tick this checkbox.
-
-
Settings tab
-
Settings for languages: This selection field determines whether only Text or Text and flag are displayed under the Select language option.
-
Display course list in Learning Status: It is recommended to select List view.
-
Content in catalogue: It is recommended to select List view.
-
-
Default images tab
This is where default images for all newly created objects can be loaded; e.g. creating a new Course. For existing objects the default images must be directly replaced in the objects.
Changes to skin designs such as colours, fonts and logos must be performed by Scheer IMC. To discuss possibilities or request a change, lodge a support ticket.
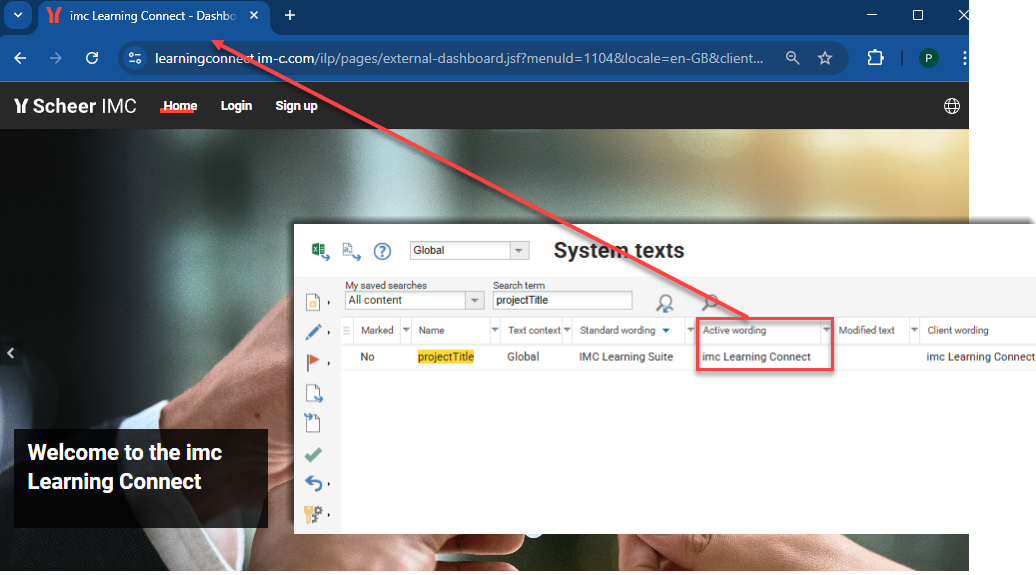
System Texts
The platform name displayed in the browser tab is configured in the System texts function by editing the projectTitle bundle. For multi-client systems requiring different names, the client context field can be changed from ‘Global’ to the specific client.
The account welcome email is another important system text that can be updated. Whilst not design related, the welcome email is important because it contains the login data for the system. This email is triggered when the Send login data checkbox is ticked in the Access and security tab of the Clients function.
The welcome email is configurable in the System texts function by editing the dbsMail_contenttemplate70002Subject and dbsMail_contenttemplate70002Body bundles.
Any wording changes must be activated to be visible.
The dbsMail bundles do not currently support the client-context specific updates.
Dashboard Configuration
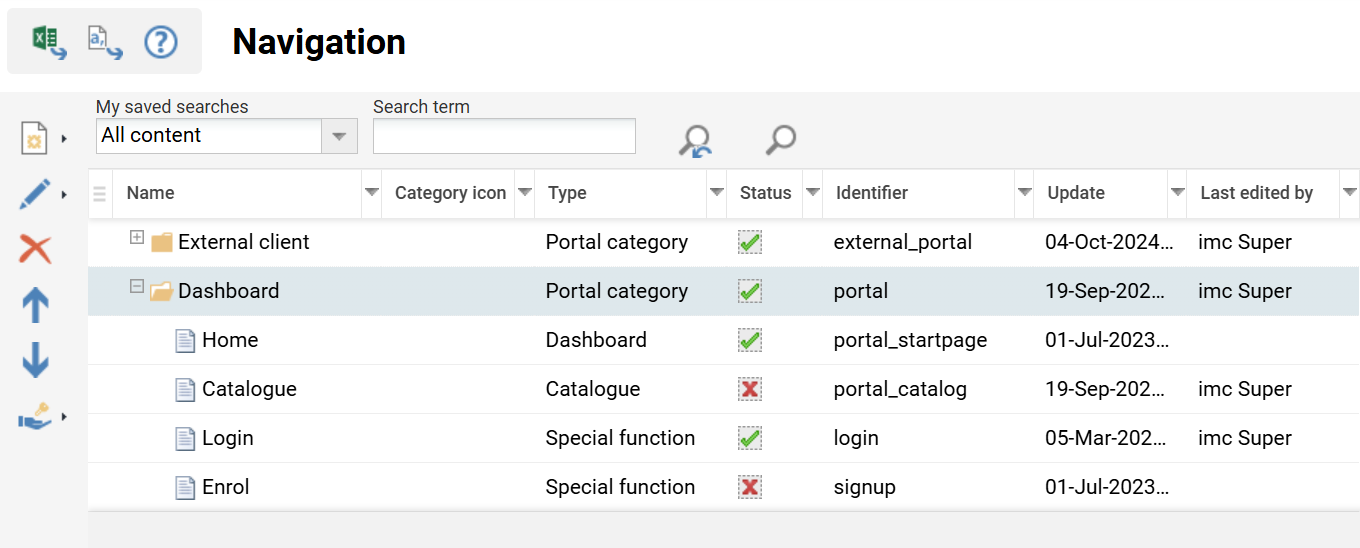
An external dashboard is generally configured for each client (if multi-client); especially where the customer requires different designs, URLs or authentication methods. This requires an External Dashboard page and Navigation Portal category to be created for each client. The vanilla database configuration contains a single portal category, linked to Client ID 1, and has the external dashboard page with ID 6 assigned.
Portal Category
In the Navigation function, edit the Portal category for the Client. Ensure that the Client* field of the Description tab has the correct client selected. If a News panel and a Catalogue are to be displayed on the portal screens, populate the Client to news and catalogue-search query permissions field.
External Dashboard Pages
When creating an external dashboard page ensure that Clearance is provided to the intended Client. The recommended panels for external dashboard pages include:
-
Header (ID 167)
-
Homepage login (ID 160)
-
News (ID 100)
The placement of the Homepage login panel directly below the Header panel will result in an overlapped display. In this case, the positioning of the login box can be configured by editing the Homepage login panel.
The External Dashboard pages still do not support the React dashboard designs. This means the new Slider panel with adaptable height can not yet be utilised.
External Catalogues
External catalogues can display content offerings prior to login or sign-up. This function is often configured in extended enterprise scenarios where the customer offers training to the public.
If required,
-
Go to the Navigation function
-
Highlight the relevant Portal category ‘type’ folder
-
Click Create icon and select Menu
-
In the Menu type field select Catalogue
-
Add a main catalogue
Ensure the Client linked in the Portal category has Clearance on the catalogue.
Login Page and Options
If a separate Login page is desired, create a new Menu in the Portal category of the Client. Special function is preselected for the Menu type* field. Select the Login option in the Special function* field. The displayed options on the Login page and Login panel are inherited from the Clients function in the Access and security tab. There are many settings that can be displayed including:
-
Authentication types
-
Reset password
-
Stay logged in
-
Self-registration
Custom text for each authentication type can be defined in the Clients function in the Authentication Methods tab. This text is ideal for explaining the login methods when multiple are active.
Internal Dashboards
Multiple internal dashboard pages can be configured in the Dashboard pages function. Typical uses for internal dashboards include:
-
Specific learner groups
-
System roles
-
Functions
-
General information pages
The internal dashboard pages must be linked in the Navigation function to Menus with the Menu type* of Dashboard. Access rights are granted to Groups for the Navigation point menu and the same groups would require Execute Clearance on the linked dashboard page.
Failing to provide Clearance to the Groups (or Client) can result in Access Forbidden errors being displayed to users accessing the dashboard menu.
Examples of typical internal dashboards are provided below.
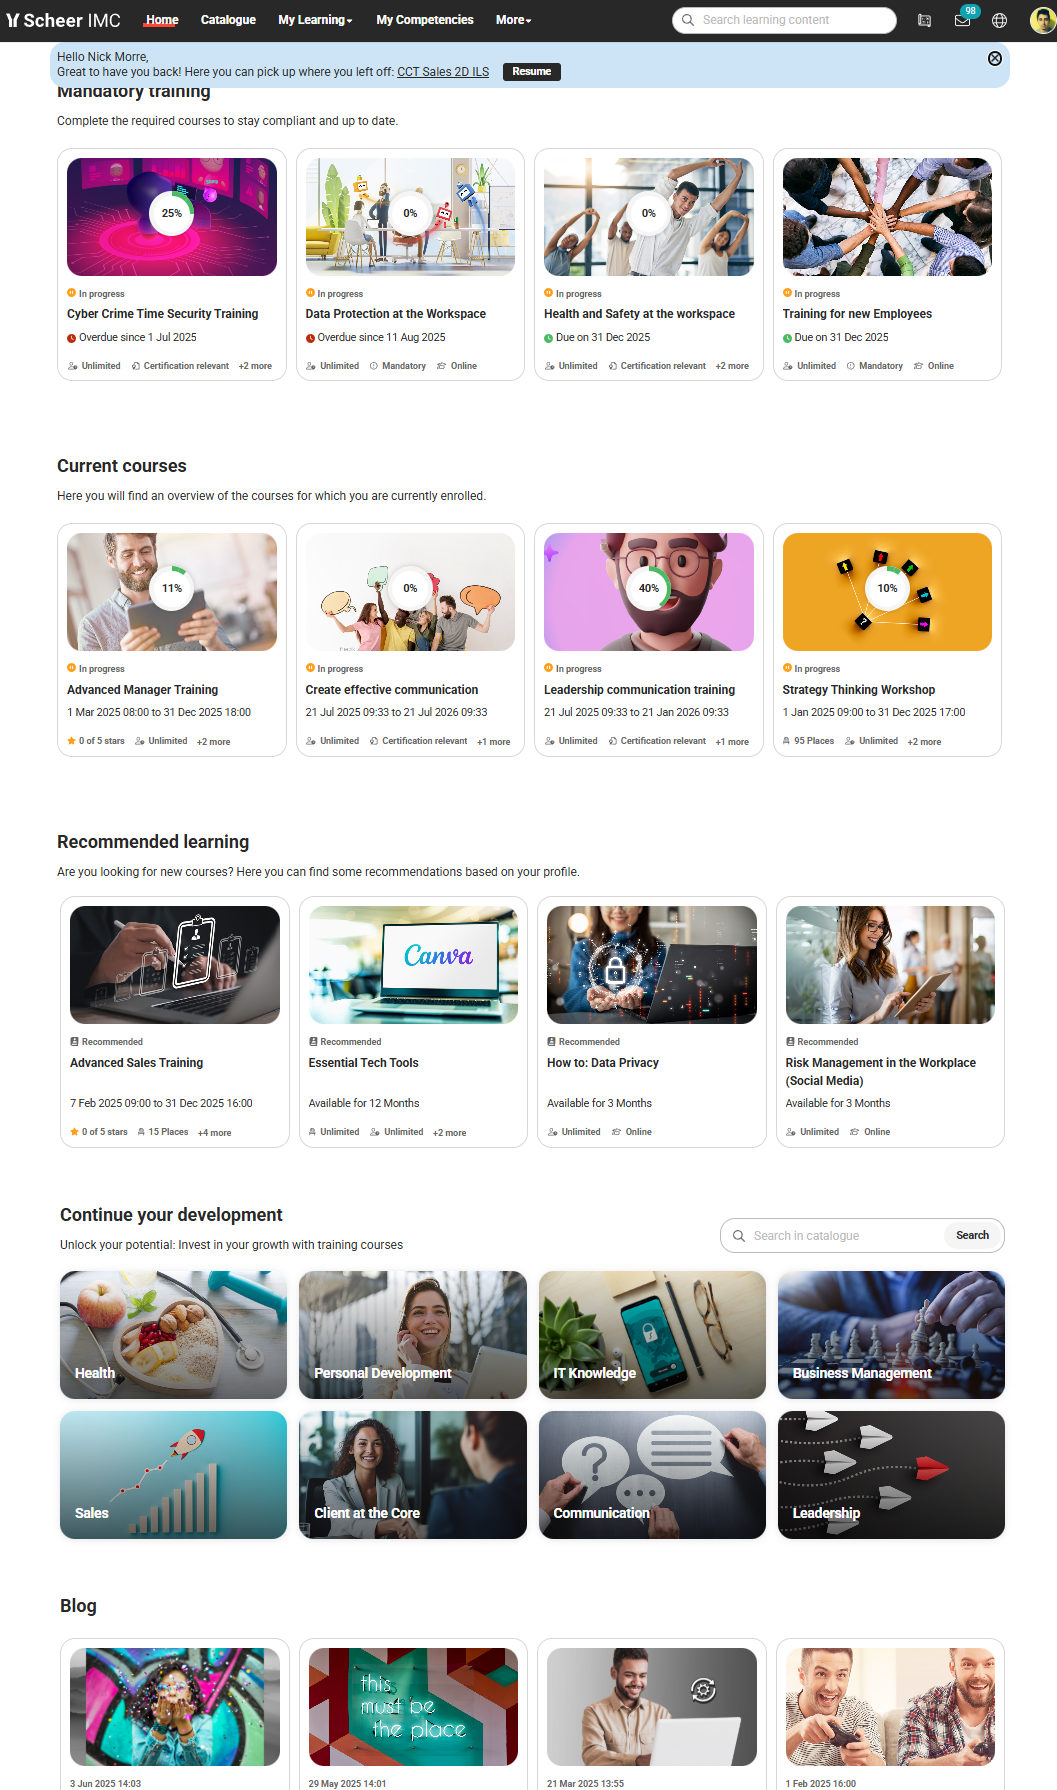
Learner Dashboard
Learner dashboards are highly important as they generally display immediately after login. The recommendation is to prioritise relevant content such as mandatory courses, current training, catalogue entry, and recommendations. It’s important that there is always at least one panel visible.
Welcome Messages
Welcome messages can be activated for Learner dashboards to provide a personalised experience. The options include:
-
Display welcome message for initial registration
-
Display welcome message with resume action
-
Display general welcome message
These are activated in the Dashboard pages function by editing the internal dashboard and ticking desired Welcome message checkboxes in the Description tab.
Recommended Learner Panels
-
Slider panel - optional if further branding or imagery is desired - always display
-
Mandatory training (Duplicate of Current courses) - hide empty
-
Current contents (also considers Learning paths) - hide empty
-
Catalogue entry / Top contents / Catalogue - always display
-
Recommendations - hide empty
-
News - hide empty
-
Bookshelf - always display
If enabled. This can also be on an own dashboard.
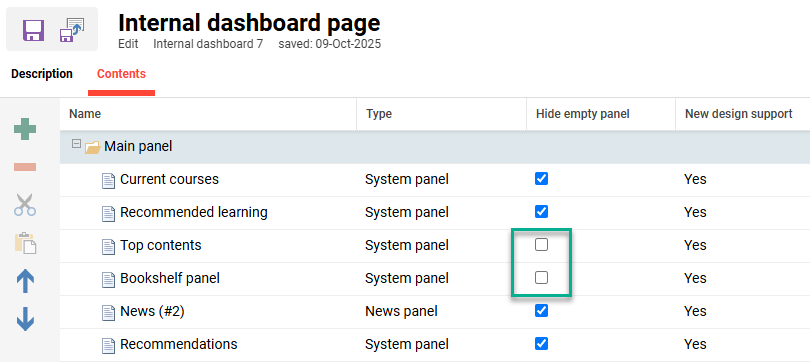
Hiding Empty Panels
Hiding empty panels is great for keeping a cleaner dashboard; However, it must be ensured there is at least one panel set as ‘Always visible’ to avoid a completely blank dashboard.
Supervisor Dashboard
The Management tasks (ID 8) internal dashboard page is assigned to the Managers category. This dashboard provides Supervisors with an instant view of outstanding tasks and a snapshot of staff training activities.
Recommended Supervisor Panels
-
Booking requests - always display
-
Job profile requests - hide empty
if Skills & Competencies license is enabled -
Due date consideration (Supervisor) - always display
-
Course progress (Supervisor) - always display
-
Skills (Supervisor) - always display
if Skills & Competencies license is enabled -
User panel (showing staff)
Administrator Dashboard
An Administrator internal dashboard can be configured, but is not available by default. Creating an administrator dashboard requires:
-
In the Dashboard pages function:
-
Create an internal dashboard page
-
Assign required panels and Save
-
Grant Clearance on the dashboard to required groups
-
-
In the Navigation function:
-
Highlight the Admin folder (Type Category).
-
Click the Create icon and select the Menu option.
-
Populate the fields in the Description tab.
-
In the Menu type* field select the Dashboard option.
-
In the Dashboard* field select the previously created dashboard.
-
-
Add required groups to the Access rights tab.
These should match those that were granted Clearance.
-
Given there are many different administrator roles, the Administrator dashboard can be configured to display panels by clearance. This can be done by ticking the Show panels according to clearances checkbox in the Description tab when creating the dashboard page.
Recommended Administrator Panels
As all administrators will have access to a learner dashboard, the administrator dashboard is recommended to include panels specific for the administrator role.
-
Quick Links - Configurable with images that link to functions or external locations
-
Booking requests
-
Translation status
-
Report panels (as required)
Information Pages
Internal dashboards are often created when customers require additional pages containing generic information. Information pages are commonly assigned in the Navigation function to a Footer or the Main navigation for all categories folder. Information can be created within panels including:
-
Default panel
-
Feature plug in panel
-
News
-
Slider
Start Pages
Start pages are an important configuration to improve the user experience. Defining start pages helps ensure users land on relevant pages according to their system role or last click action. Configuration settings are possible at three levels: Client, Navigation (Role Category), and Group.
Client Start Pages
The Clients function Settings tab contains two settings to define External and Internal start pages:
External Start Pages
The External start page field enables selecting a portal category menu. This menu will be displayed when the client specific URL is called or when the design logo is clicked before login. For multi-client systems this allows each Client can have their own external start page.
The recommended configuration for Client 1 is to display the external Home dashboard (ID 6) that is nested in the Client’s Portal category navigation structure. These start pages are created as menus in the Navigation function within the relevant Portal category for each client.
Internal Start Pages
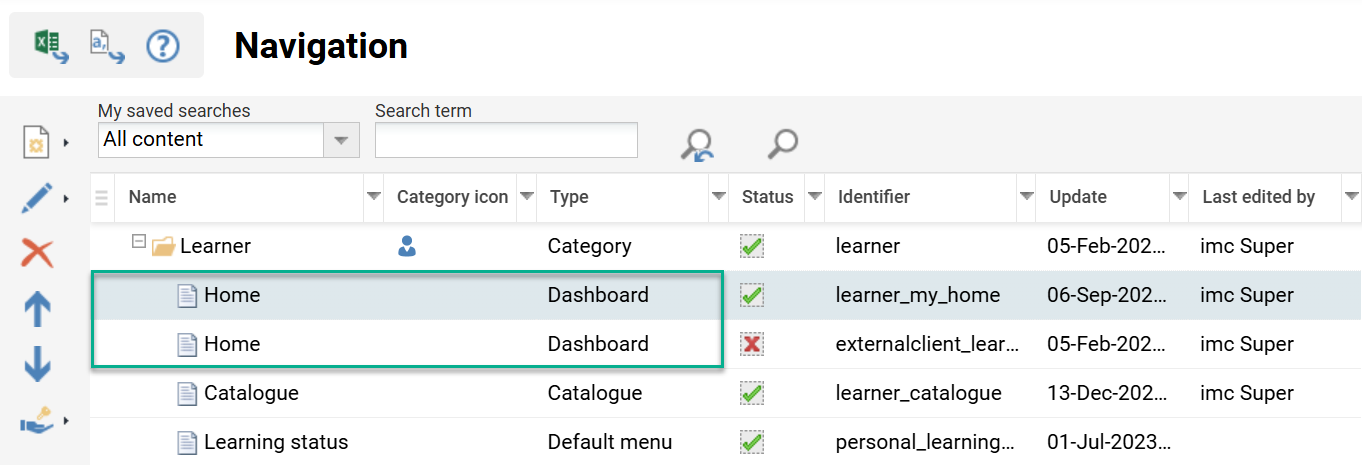
The Internal start page field provides a default start page for users of the client when no other landing pages are configured, or when the design logo is clicked after login. One internal start page can be defined per client. The recommended configuration for Client 1 is to display the internal Home dashboard (ID 7) that is nested in the navigation Learner category.

Group Initial Homepages
Initial homepages are used to direct users in role-based groups to specific pages or functions after login. The initial homepages are configurable by editing a group and in the Initial homepage field selecting the desired page. The group will require navigation access rights to the menu. If the menu is a dashboard clearance will also be required. Group specific Initial homepages override client specific internal start pages and learner home pages.
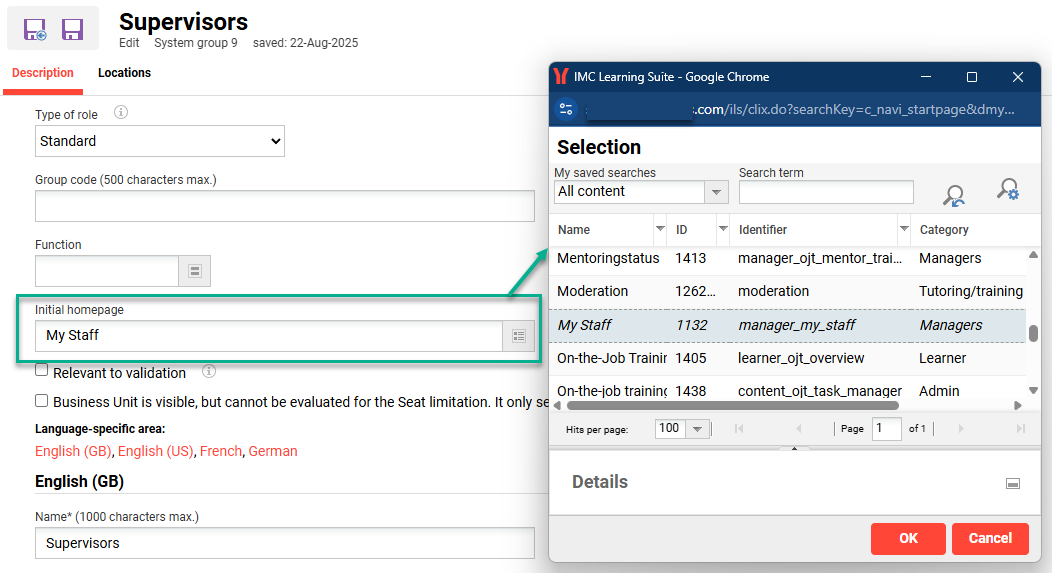
It’s recommended to configure initial homepages for groups such as Supervisors (ID 9) or Tutors (ID 5) that regularly access the system for administration purposes. For example, set the initial homepage of the Supervisor (ID 9) group to be the My Staff function, or the Tutors (ID 5) group to be the Course overview function.
Where a user belongs to multiple groups that have Initial homepages defined, there is no easily identifiable logic to know which homepage will take precedence. This is actually based on the first group the user was assigned to.
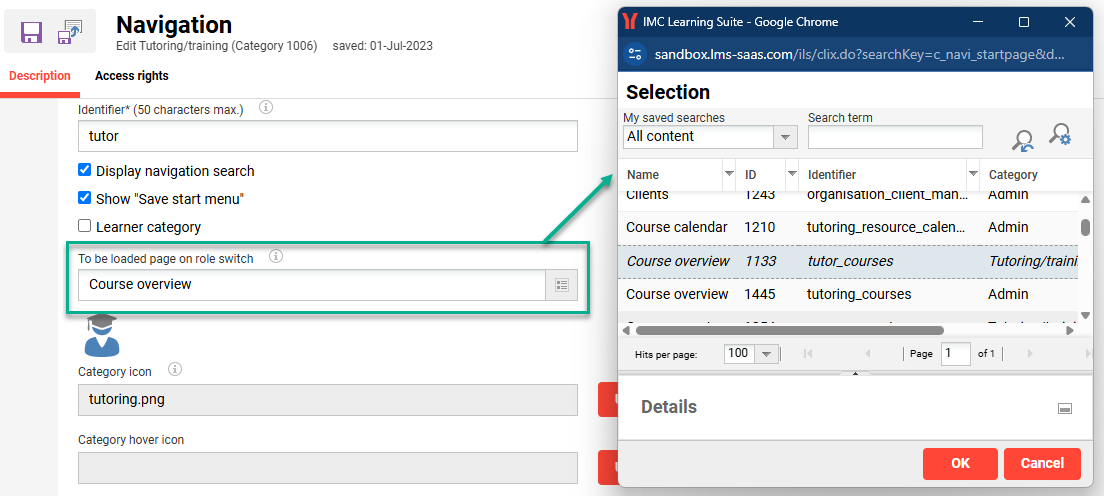
Role Selection Landing Pages
When a user switches roles using the Categories switch icon it’s possible to automatically redirect them to a specific page. For example, a user could land on the internal learner dashboard after login and then be automatically redirected to the Courses function when switching to their Content Administrator role. Role switch start pages are configurable by:
-
Going to the Navigation function
-
Editing a navigation Category
-
Updating the To be loaded page on role switch field in the Description tab
Advanced Panel Configurations
The following panels when assigned to dashboards may require further configuration:
Header (167)
The Header panel is intended for use on external dashboard pages. This panel is commonly used as an image slider with overlays including text elements and the Homepage login panel. Text overlays are added in the Contents tab by creating Text elements after images with Source code as below:
<div class="decorative-subheadline">Welcome to the</div>
<div class="decorative-headline margin-top-1">IMC Learning Suite LMS</div>
The automatic transition time between slider images is defined in the Configuration function Slider panel settings menu. Here the Change interval* field is in milliseconds.
Homepage Login (160)
The Homepage login panel inherits login display options from the linked Client access settings. This determines what login options and text is displayed. Editing this panel allows adjusting the positioning of the panel when overlayed on the Header panel.
Slider (187)
The Slider panel was updated in IP25 with React framework to provide more configuration options including Height. Other display options relate to width, text position, auto adapting image to match height, and enabling an infinite slider.
As of IP26 the Slider panel can’t be used on External dashboards as the React framework is not yet supported.
Current Courses (161)
The Current courses panel enables filtering by Identification, Learning mode, and Enrolment status. By default all learning modes will be considered and current enrolment statuses which are Enrolled and Started. This panel is commonly duplicated to courses of display specific learning modes or statuses; an example is below:
Mandatory Courses
The Current courses panel is normally duplicated to create a Mandatory courses panel. Courses are generally considered mandatory when the Identification is set as either Required or Compliance. The Show due date checkbox would be ticked and the View folder will include the Current statuses.
Current Contents (184)
The Current Contents panel is ideal for customers that deliver both Learning paths and Courses. In this panel can both learning object type, as well a course templates, can be displayed simultaneously. The alternative would be to use both the Current courses (161) and Learning path (111) panels. The settings enable defining the tile display option, number of shown contents, learning modes, content types, and enrolment statuses.
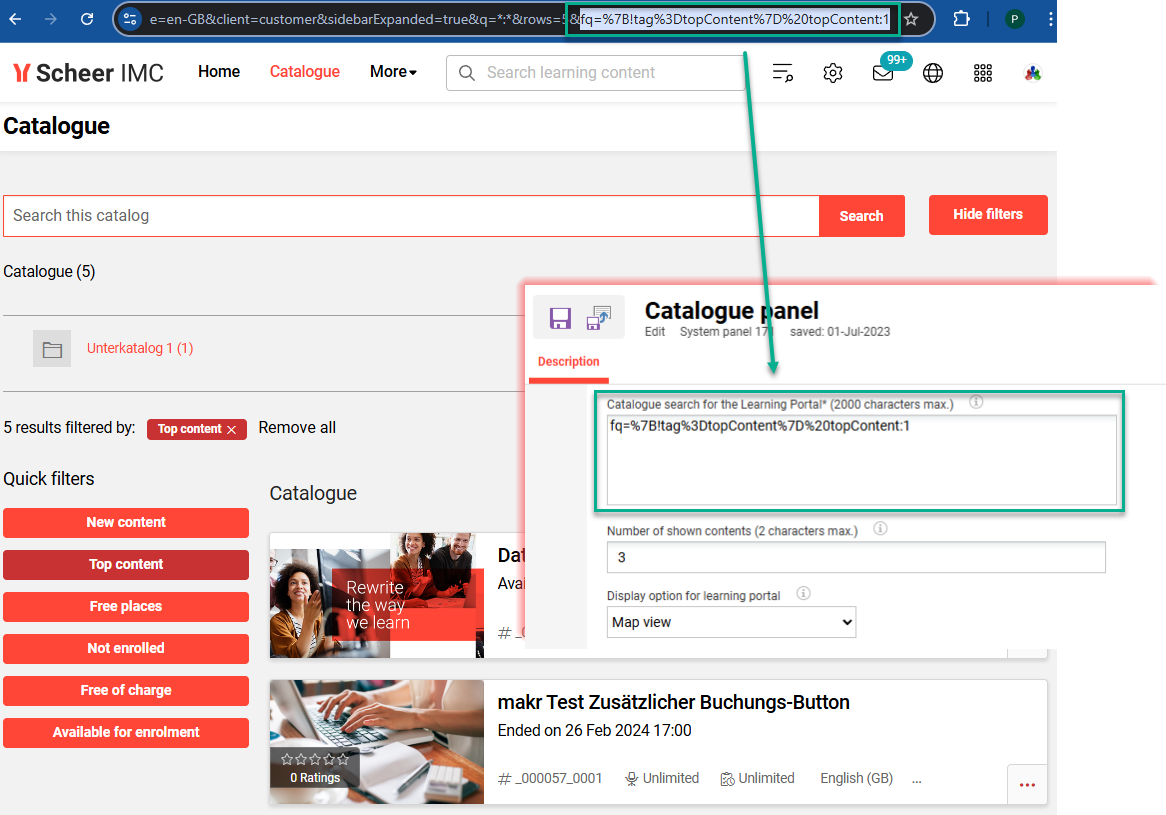
Catalogue Panel (171)
The Catalogue panel returns catalogue contents based on a specific search query whilst considering the user clearances. The Catalogue search for the Learning Portal* field is where the query string is entered and this acts like a filter. This query string can be attained by conducting a catalogue search with desired filter criteria and copying part of the URL from “fq=”. The default value in the Vanilla configuration returns Top Contents with the query “fq={!tag=topContent} topContent:1”.
Recommendation Engine
The Learning Suite has a Recommendation engine function where an algorithm suggests courses for the learner to complete. This function requires duplication of the Catalogue panel (ID 171), then in the Catalogue search for the Learning Portal* field entering the term recommender.
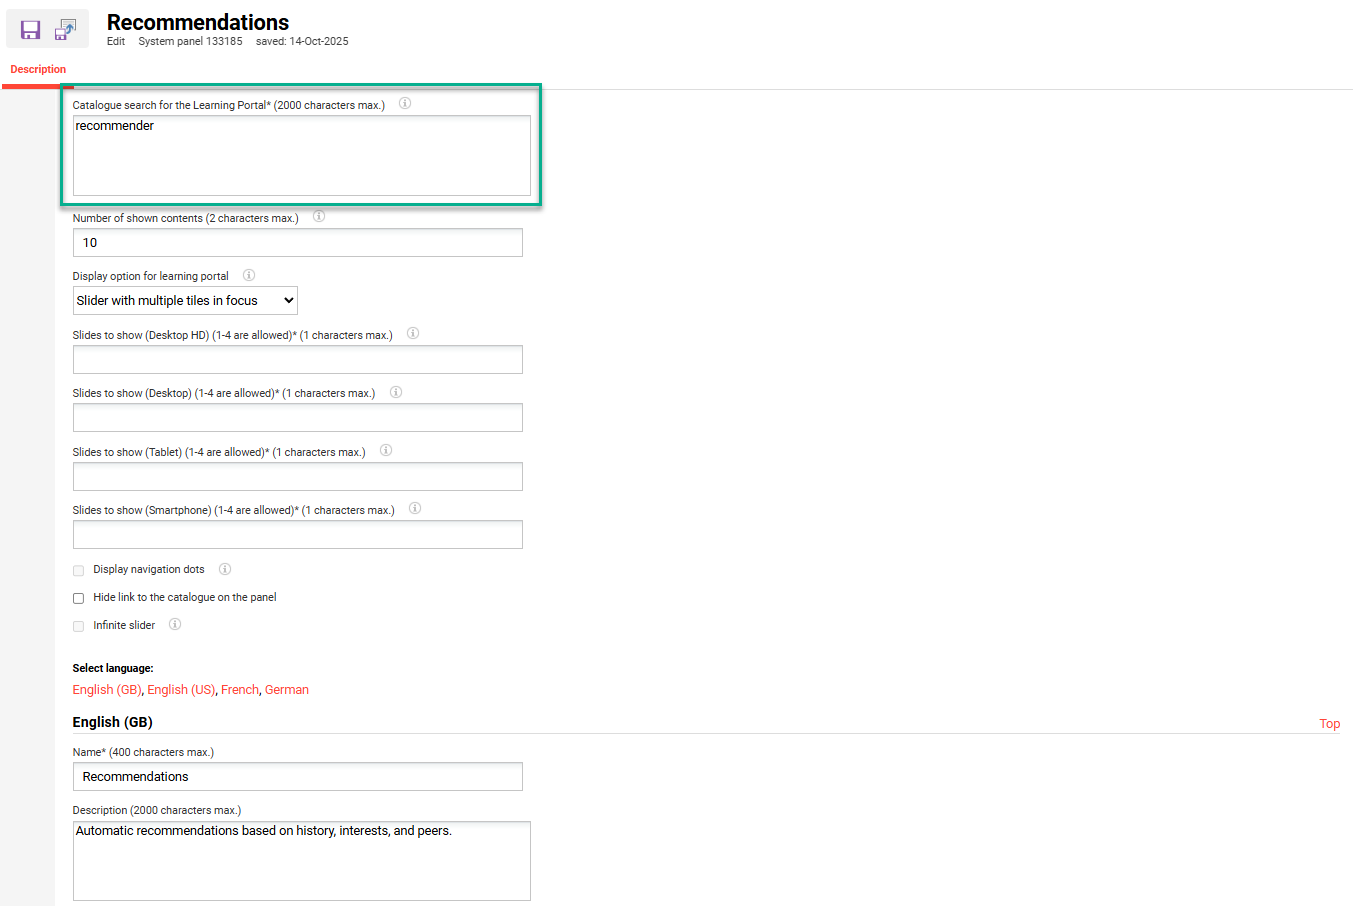
The algorithm considers the learners' course history, interests, and popular items based on similar groups. The interests can be set in the User Profile if the Interests (REC_INTERESTS) personal attribute is assigned. Interests are mapped to Classifications linked to courses and media assigned to the catalogues.
Entry into the Catalogue (139464)
This is a panel type that can be created in the Panels function. The key differences to the Catalogue panel (171) is that it can include a catalogue Search bar and display Classification-based search tiles. These options provide a nice visual display and are ideal for customers that utilise Classifications. A tile will be displayed for each assigned Classification with the image and/or text label.
Feedback Panel (176)
A visual panel that enables users to lodge general system feedback or suggestions. Configuration enables upload of a background image, info-text defined, and personal attributes assigned to be included in the feedback email. The feedback recipient is configurable per client in the Clients function E-mail addresses tab by populating the Email address for user feedback field.
Quick Links (188)
Introduced in IP25 the Quick Links panel is a great visual panel that displays images that link to system functions or external locations. For new systems installed from IP26 and beyond there is a generic Quick Links panel aimed for administrators.
Booking Requests (173)
The Booking requests panel is often duplicated to provide Supervisor or Administrator specific versions. Duplication additionally allows separating Internal course requests from External course requests.
Bookshelf (105)
The Bookshelf panel panel contains settings to define the number of contents displayed and the layout. Utilising the Bookshelf though first requires activation in the Clients function Settings tab.
Feature plug in Panels
These panels are very flexible and can be used where full HTML or other code is required. Essentially entire pages, or even functions, can be created using Feature plug in panels.
Feature plug in panels are quite technical and generally not offered in projects. Instead they can either be developed by the customer or custom ordered.
Other Considerations
The following functions can additionally be utilised to produce a more aesthetically pleasing system look and feel.
News
Configuring regular news items to welcome users and alert of important events. News articles are great as they:
-
are assignable to both External and Internal dashboards.
-
allow targeting to specific audiences (Users, Groups, Clients).
-
provide great visuals with inclusion of images or videos.
-
enable timings to ensure only current news is displayed.
Displaying news on the external dashboards requires Clearance to the Client on the news item and the Navigation portal category to be linked to the client.
Announcements
The Announcements function allows communicating important information in a pop-up window to specific users or groups upon login. For example, an initial Welcome announcement with an image or video can be a nice introduction to all learners to the system. Another example could be advising users of an upcoming maintenance window or important event.
When creating announcements, enabling the Do not show again setting will allow users to choose not to receive the same announcement on their next login.
This function might not be available by default. If not, please find further information and setup instructions at 14.23 Feature Highlights.
Notifications
The standard notifications emails are written in plain text with minimal information. These can be updated with html to include branding if required. The notifications can be configured individually in the Notification function by editing required notifications. It’s additionally possible to configure Client and Provider specific notifications.
Enrolment Messages
The enrolment message emails can be branded using html. The emails are configured in the Enrolment message texts function. Where client or provider specific branding is needed, the enrolment message text templates will need to be duplicated, and client or provider specific enrolment messages (triggers) created.
Footer
Adding a Footer in the Navigation can compliment branding. A Footer is ideal for displaying further links to information pages or external locations.
Summary
Many functions can be utilised, and settings configured, to maximise the look and feel of the Learning Suite. Ensuring all learning objects contain high quality, consistent and relevant images is also important. For any questions or support requests, please raise a ticket with the Scheer IMC Service Desk.
📋 Related Articles