Introduction
The imc Learning Suite is a role-based learning management system where a user is assigned to groups that provide privileges to both functions and objects. There is a level above groups known as Clients, and all users must be assigned to at least one client where their master-client determines many important platform settings. The purpose of this document is to provide a detailed overview of multi-client functionality and configuration possibilities that are available in the imc Learning Suite. Being an extremely comprehensive Learning Management System with a large range of functions and advanced configurability; this document will focus only on the functional areas directly impacted by multi-client configuration possibilities and requirements.
Multi-Client Overview
A multi-client system essentially refers to using one system to serve multiple customers; this is more commonly referred to as ‘multi-tenancy’. With multi-tenancy there is a separation of data which can be through physical separation or logical separation.
-
Physical separation: would generally see a software application server shared by multiple customers, but each customer would have own database and content servers.
-
Logical separation: would see multiple customers (normally related) share the same database and content server, with access control list functionality at the application level controlling the separation. Many clients of Scheer IMC have this configuration.
The imc Learning Suite LMS can offer both forms of multi-tenancy. Customers who opt for Scheer IMC’s ‘Cloud’ SaaS hosting, instead of a dedicated architecture, will be on a multi-tenant architecture where the application servers are shared by many customers, but the database and content server are physically separated for each customer. Then there are customers who use a single instance on a dedicated LMS instance to serve multiple organisations with logical separation of data and content through an advanced multi-client configuration and use of access control list functionality (clearances). Scheer IMC have many customers globally with logically configured multi-client systems; these are usually for a parent organisation with multiple subsidiaries or an association providing a branded system to member organisations.
This document will provide a detailed overview, including configuration options, of the multi-client ‘logical’ separation functionality in the imc Learning Suite.
Multi-Client Benefits
The main benefit of a multi-tenanted system is predominantly around cost savings due to reduced architecture fees; this is true for both physically and logically separated systems. With logically separated systems there can be additional benefits such as shorter project implementation time if there is an existing system in place being extended, reduced project costs, utilising pre-configured objects, sharing of learning content, and ability to move users between related clients should users change organisation.
When to Use a Multi-Client Separation
Before proceeding with a logical separation it must first be determined if a multi-client configuration is really needed; this is because the configuration can be timely and is often not required. For example, a simple requirement of internal and external users can be achieved using separately groups. Below is a list of scenarios where a multi-client setup would be required:
-
Different user groups require different designs as each client can support a single design.
-
Different user groups require different user profiles with different personal attributes.
-
Multiple SAML or OIDC authentication interfaces are required as each client can support only one of each interface.
-
A desire to restrict platform languages per geographic region in a system used in many countries.
-
Multiple URLs and public access pages are required.
-
A need for different system wording to display for different groups.
Multi-Client Considerations
From a functional point of view, the bulk of functions and interfaces in the imc Learning Suite are designed to support client specific scenarios. This means that each client in a logical separated multi-client system can have a unique configuration setup and own interfaces to differentiate the experience from other clients. There are some restrictions though such as user provisioning with SCIM API where only a single mapping is possible and many platform wide configuration settings. The largest consideration for a logically separation there needs to be a default client and system owner with full visibility; for a physical separation the update schedule is determined by Scheer IMC and a true STAGE environment to pre-test patches prior to a PROD update is not currently supported.
Multi-Client User Experience
From a learner perspective there will be no real identifiable differences with a logically separated multi-client system compared with a stand alone single client system. The system would be specific to their organisation in terms of the skin design, platform wording, user profile fields, system emails, catalogue content, dashboard content, and news items. Even if a user was assigned to multiple clients there would still be a master-client that determines the default design and profile settings, but there could be additional catalogues and even dashboards depending on configuration.
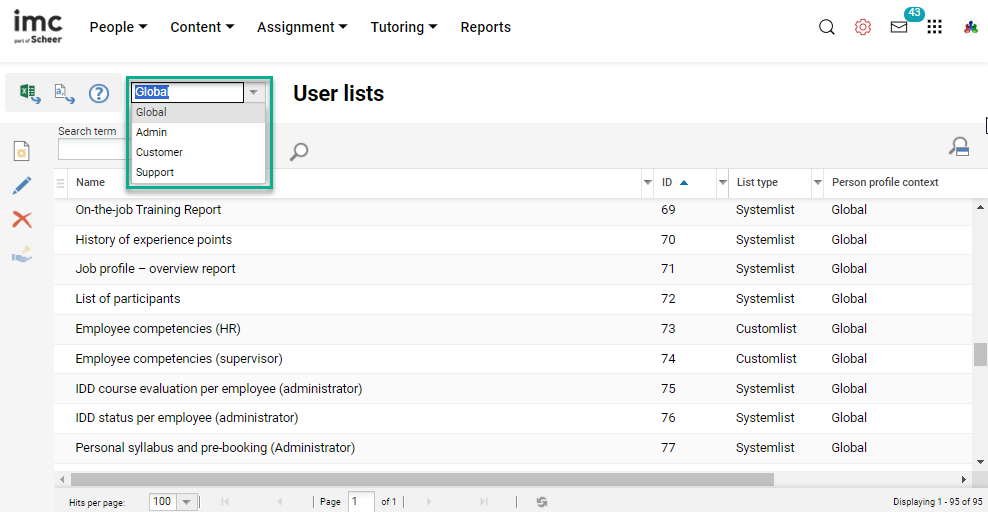
In terms of the Administrator experience there are some important differences with a logically separated system. The first would be in many user related functions there is a Client context selection field to select whether changes are to be ‘Global’ or client specific. Functions with the Client context include Users, User lists, Profiles, and Staff pool. Super administrators or system administrators in the default system client will be able to configure changes for any client context including global, but administrators in sub-clients would only be able to configure changes for their own client.
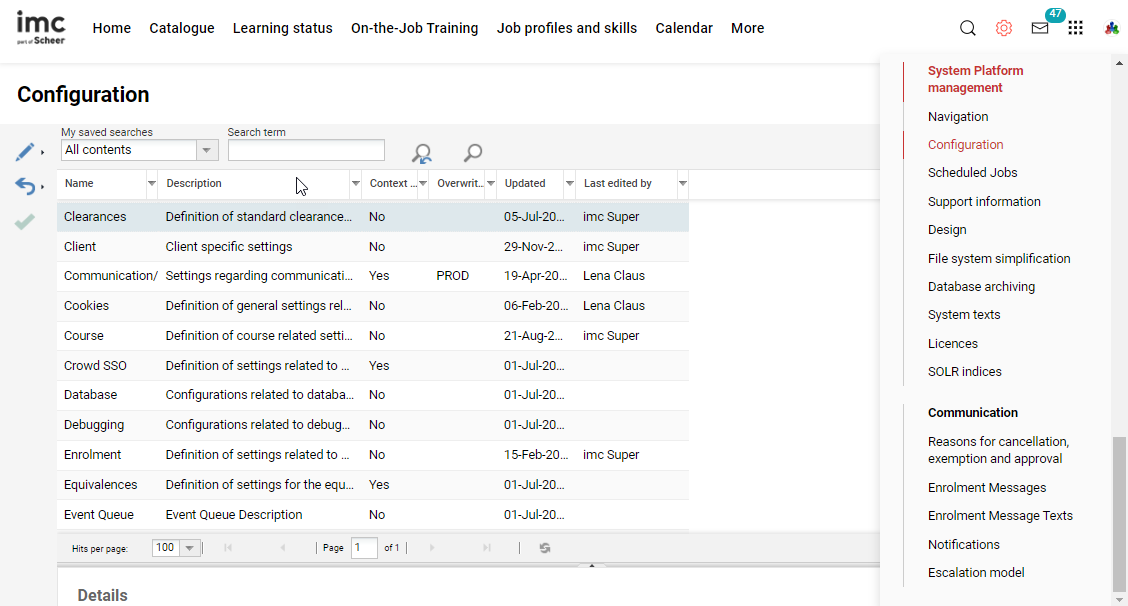
The only functions not recommended to be accessible by administrators of sub-clients is the Settings > Configuration manager as this contains hundreds of platform wide settings that can effect all clients. The settings here are recommended to be managed by Scheer IMC, especially the ones relating to interfaces such as SAML, LDAP, SCIM, and csv batch imports. All other functions consider strong access right control with Clearances to determine which users, groups, or clients are able to access each object to varying levels.
Access Control List / Clearances
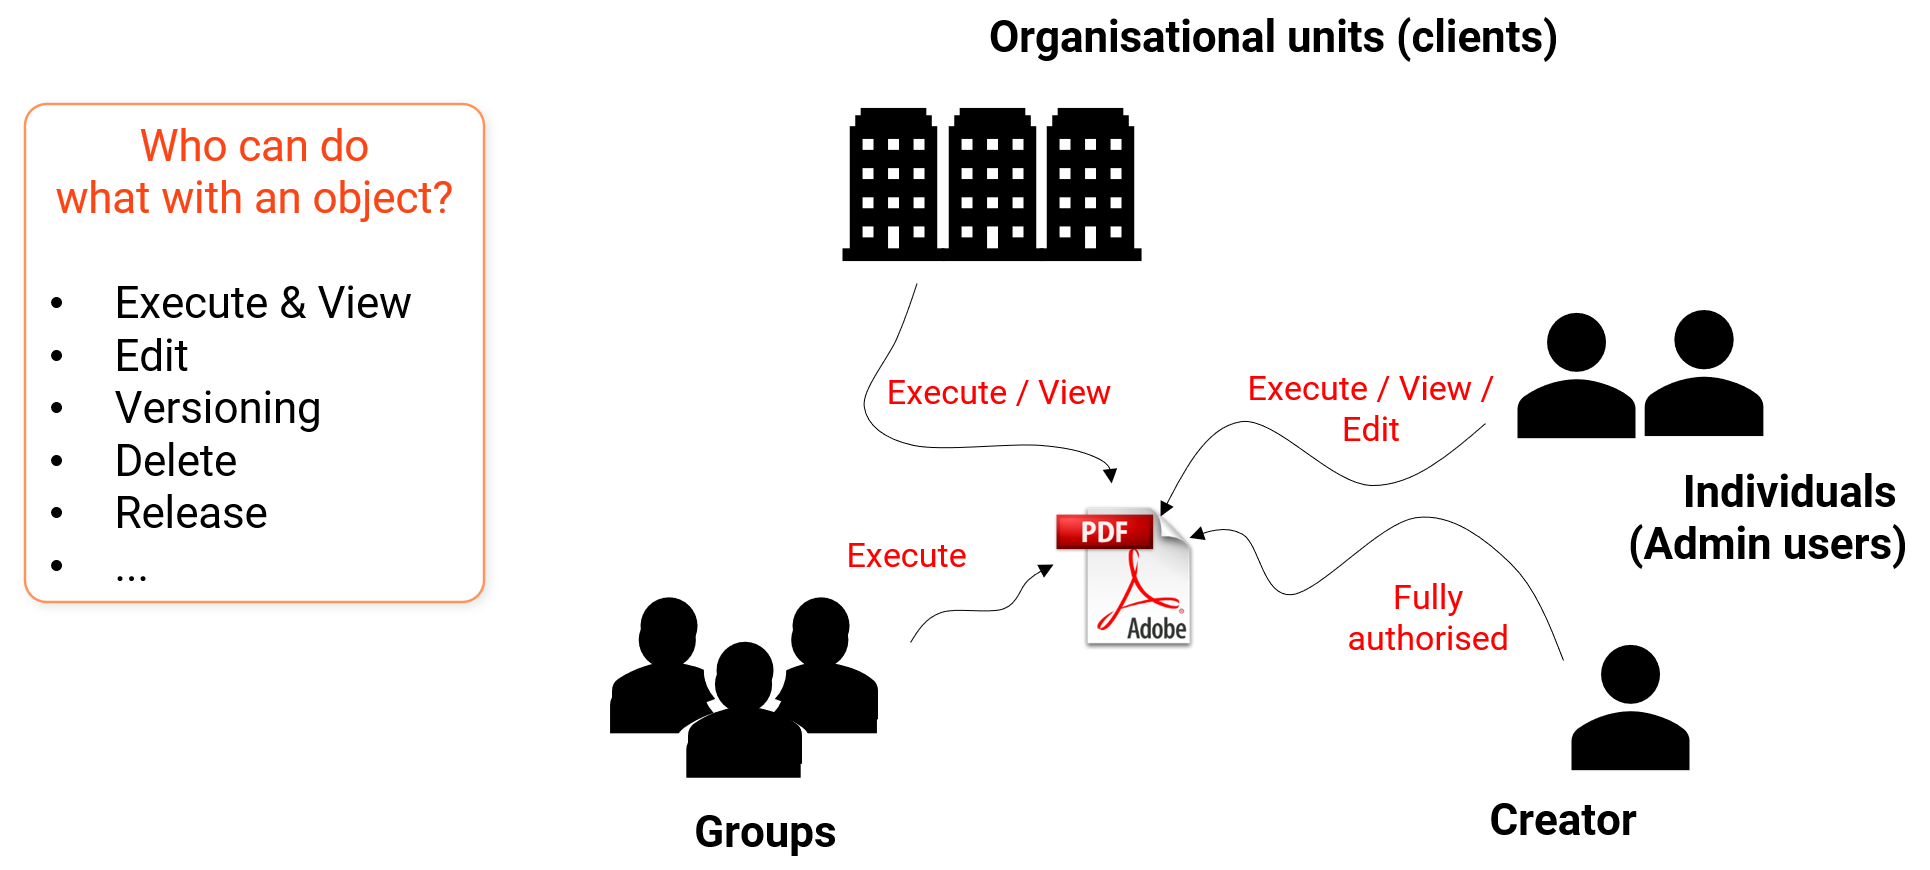
Access control is governed by the Clearances function that regulates the level of access individual users, groups, and clients have to any object; whether it be learning content, training catalogues, report, dashboards, or users. Different types of objects contain varying clearance possibilities, but minimum available access rights on all objects would include Execute/View, Edit and Delete. In a logically separated multi-client environment the configuration of clearances, and especially default clearances, is paramount to a successful setup.
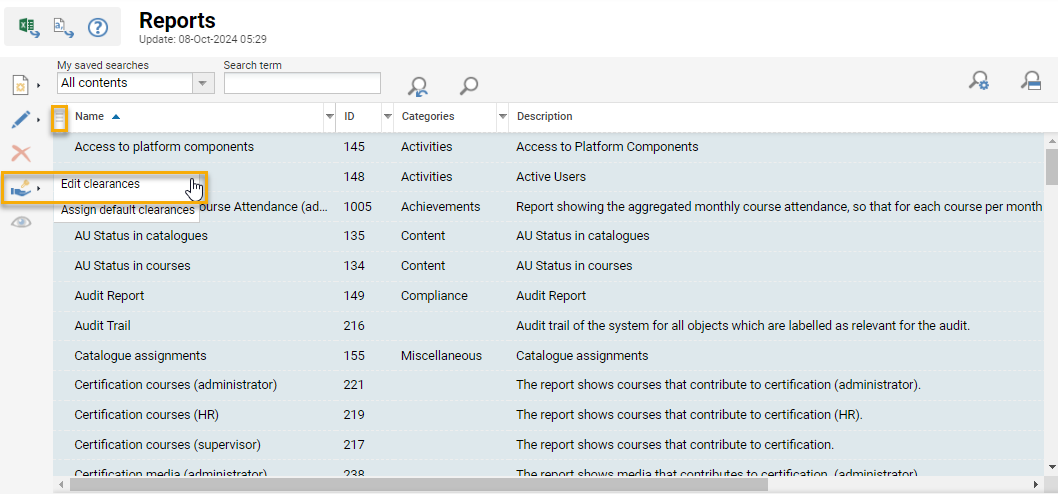
Clearances can be granted automatically by configured business rules or granted manually by administrators when objects are created. In the administrative functions viewing or assigning access permissions to objects is possible via the Clearance icon. When creating an object the creator receives full unrestricted clearance and when manually assigning clearances to other users the creator will only be able to select individual users and groups that they have clearance to view in the LMS.
Roles Concept
The imc Learning Suite is a role-based system where users are assigned to roles (represented by groups) that provide privileges to both functions and objects. To keep the navigation simple, a user that is assigned to more than just a learner role is able to toggle between roles by clicking the Role switch icon. Any number of role-based groups can be configured with as little as one function to a system administrator group with access to all functions. When a user is assigned to multiple roles they receive the sum of all access rights their assigned groups have access rights and clearance to. With logically separated multi-client systems, the configuration of additional user groups or roles is very important to ensure a clear division of user assignment and access privileges. This allows the use of unique navigations for each client, automatic assignment of clearances to client administrators on objects or users created for that client.
Multi-Client ‘Base’ Configurations
Now that the multi-client system concept has been introduced, it’s now time to learn how to configure a multi-client system. The division is largely achievable through powerful access control list (Clearances) functionality that provides logical separation by determining which objects or users are visible in the system to whom and to what level; mostly by automated rules. At various points in the system, client-specific settings can be defined to create a unique environment; e.g., own interfaces, design, user profiles, business rules, groups, navigation, dashboards, license settings, wording and even email settings. This chapter will provide a detailed overview of the key configuration areas.
Design Requirements
Where a new client requires a new design, it is recommended to gather the customer design requirements as early as possible. This is because the creation of the design can take a few weeks to complete by the Scheer IMC Design team. Generally either a corporate style guide, a sample system URL, and logos is needed.
Public URL (SSL)
Sub-clients can either access their space via an own domain or a parameter on the main system domain. Configuring a parameter of the main domain is simple, but where a sub-client desires a different domain the customer will need to supply an own SSL certificate and setup forwarding. Given the customer will likely need to order the new domain or setup a sub-domain on an existing domain and order a related SSL certificate, it’s best to ensure this process starts early.
The SSL certificate must be supplied to Scheer IMC in the following format:
-
SSL must be at least 2048 bit
-
Encryption algorithm at least SHA-2
-
File format: we prefer .pfx which includes the private key as well (password protected). We accept other formats as long as they include all necessary files.
-
All intermediates and root certificates should be provided.
-
Common Name should match to the URL they are going to use
-
Version of files should match into IIS7 or higher
-
If required, Scheer IMC is able make CSR requests on the customer’s behalf, but the customer must order the SSL certificate at a certificate center they choose. In this case the Scheer IMC Hosting team will need the following information:
Full qualified domain name (FQDN) such like www.foo.bar
For the request itself we´ll need the following additionally information:
-
Common name
-
Organisation
-
Organisational Unit
-
City / locality
-
State / province
-
Country / region
The customer will also be responsible for forwarding the external FQDN to the Azure Deployment C Name provided by Scheer IMC. The C Name method is used as each Azure system uses a dynamic (non persistent) IP address.
Multi-Client Context Configuration
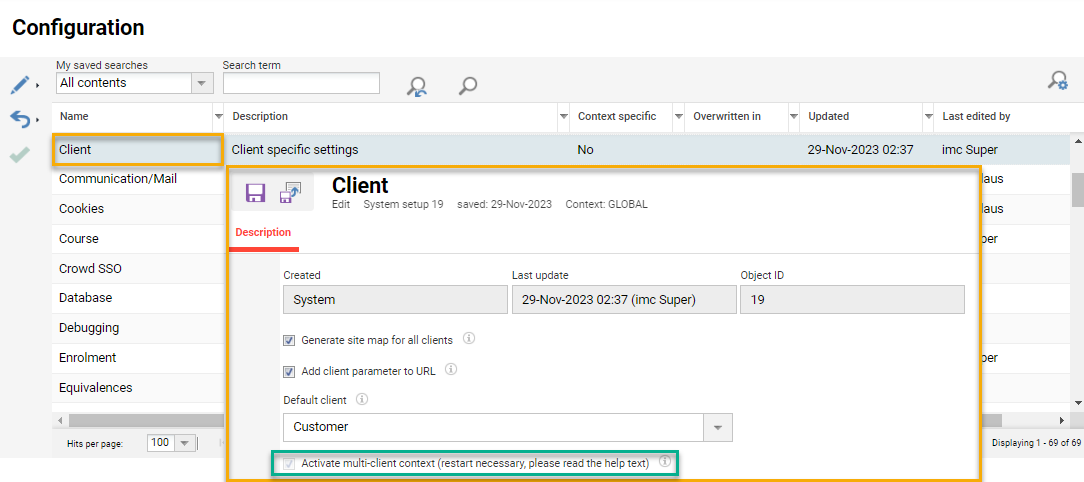
When commencing a multi-client configuration, the first step is to access the Settings > Configuration manager and edit the Client option to activate the setting Activate multi-client context. This is an important setting to enable many client-specific configurations including client specific business rules and client context selection in various user related functions such as profiles and user lists. Otherwise, personal identifiers are assigned to all clients and not to a specific one. Please note that once activated the setting will remain active.
Client Creation
The next step is to create the required number of clients. Essentially there’ll be a master client and sub-clients used to logically divide the single system. Any number of Clients can be created with their own specific configuration settings, wordings, rules, interfaces, and branded skin designs. The Client function is typically configured by Scheer IMC Business Consultants given the amount of important settings, but configuration can be performed by system administrators as well. When creating a client, all tabs and settings will be available, but if editing a client all will only be available if editing the 'Global' context.
Each tab and key configuration settings for creating a client are explained below:
-
Description:
In addition to general administrative fields, the 'Design' of the client is selected on the Description tab (described later). The 'Logout URL' to which the client user is sent after logging off from the system is also defined; this can be an external URL and if left blank will logout to the 'External Start Page' for the client. -
E-mail addresses:
There are two sections to the E-mail addresses tab which are the Sender's e-mail address and Recipient of system e-mails.-
Sender’s e-mail address fields are used to adjust alter details of enrolment messages and notifications for trainings delivered by Providers that have been linked to the Client. While it is possible to configure Provider specific Enrolment Messages (triggers & texts) and Notifications with the same fields manually populated, it is much easier updating the four fields and the Learning Suite will automatically adjust the details on standard mails when a Provider linked to a Client is detected.
-
Recipient of system e-mails section contains matching recipient fields to the defaults configured in Settings > Configuration > Communication/Mail. If values are defined in the Client then these will take precedence over the default values. In the case of a multi-client system, multiple receivers can receive generic emails such as log files.
-
-
Languages:
If several languages are licensed on the system the relevant platform languages can be defined for each client. Only the languages added here are displayed for this client and if languages are added one must be ticked as 'Default' to save. This can be useful where clients are used to represent geographical separated tenants in a global organisation. -
Settings:
This tab summarises various configuration possibilities that all have effects on the client. Detailed information on the individual functions and settings can be taken from the online help i information icons per field. Below are setting descriptions for fields without the i icon:-
Public learner front-end URL*: The URL entered here is used for links in the learner frontend (e.g. links directly from the catalogue manager). Please note that the URL must end with "/ilp".
-
Platform URL: Base URL of platform can be used in account emails.
-
External start page: Allows to choose a portal navigation menu item as external start page. If a client navigation is set, the client navigation is used as external start page. If no navigation is set, the most left navigation entry is used as external start page. If there is no navigation entry defined, the system URL is used as external start page.
-
Internal start page: Allows to choose a navigation menu as the internal start page for the logo. If a group navigation is set, the group navigation is used as internal start page. If a client navigation is set, the client navigation is used as internal start page. If no navigation is set, the most left navigation entry is used as internal start page. If there is no navigation entry defined, the system URL is used as internal start page.
-
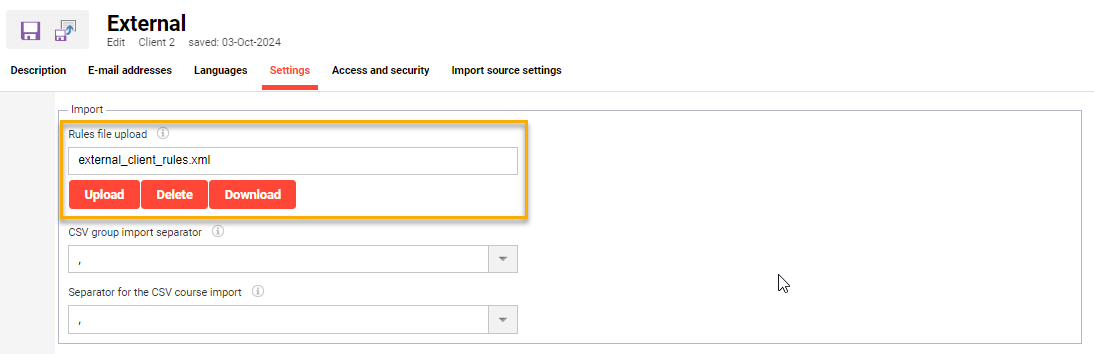
Rules file upload: Allows to upload a client-specific user import rules file that is used instead of the system-wide user import rule file.
-
-
Access and security:
This tab summarises various configuration settings, all of which have an impact on the client setup in terms of access and security; e.g., account enrolment or authentication workflows and access parameters. Detailed information on the individual settings can be found in the online help i icons.-
Display function for self-registration in the portal: This setting enables users accessing the portal login page for the client to 'Register' for an account.
-
Send login data: This setting must be enabled to send new users credentials via email after their accounts have been registered. This will only occur if a generator has been defined to create the local Login or Password.
-
Client selection: Setting in the ‘URL template’ section that defines how the client will be accessible. When selecting HOSTNAME the Platform URL is used to select the client, the PARAMETER defines that the client will be selected via the URL parameter "client", and the CONTEXTPATH application is used to select the client.
-
Selection template: Defines either the URL or the parameter is used to select the client, e.g. portal.im-c.de (for HOSTNAME) and anonymous (for PARAMETER). In case of CONTEXTPATH pattern should be defined as /abc or ROOT if the application doesn’t have a context.
-
-
Import source settings:
For local authentication the rules for generating and validating the Login and Password can be configured for each client. In addition, various rules can be defined for each import source (LOCAL, CSV, SCIM) and context (BACKEND, FRONTEND, GLOBAL, IMPORTWIZARD, SCHEDULE, SELFREGISTRATION).
Client Sub-Settings
Once the client is saved, there are some additional function specific settings in the Clients function that can be configured for each client. These are Catalogue settings, Learning area settings, Competence settings, Tile settings, and Easy media upload settings; of these only the latter really needs to be configured if the Easy Course Creation or Channels function are to be used.

System Role Groups
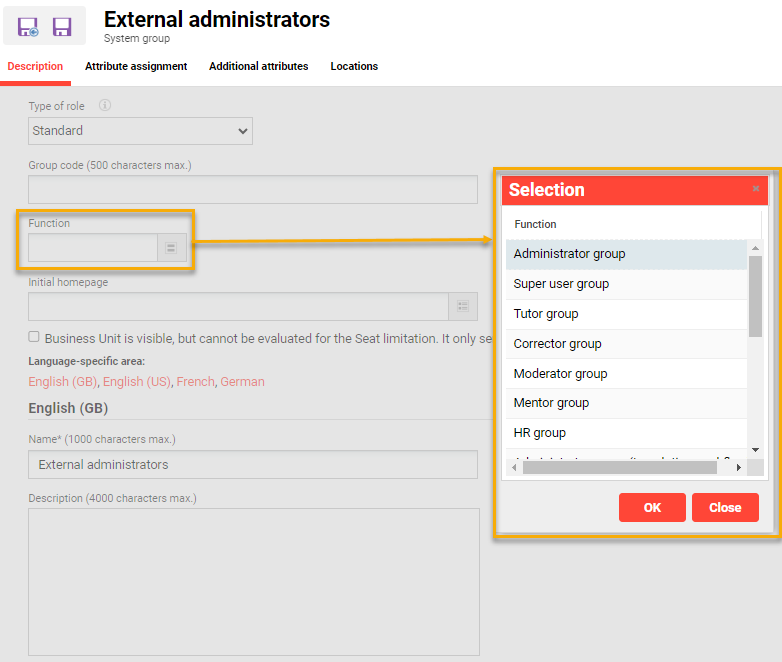
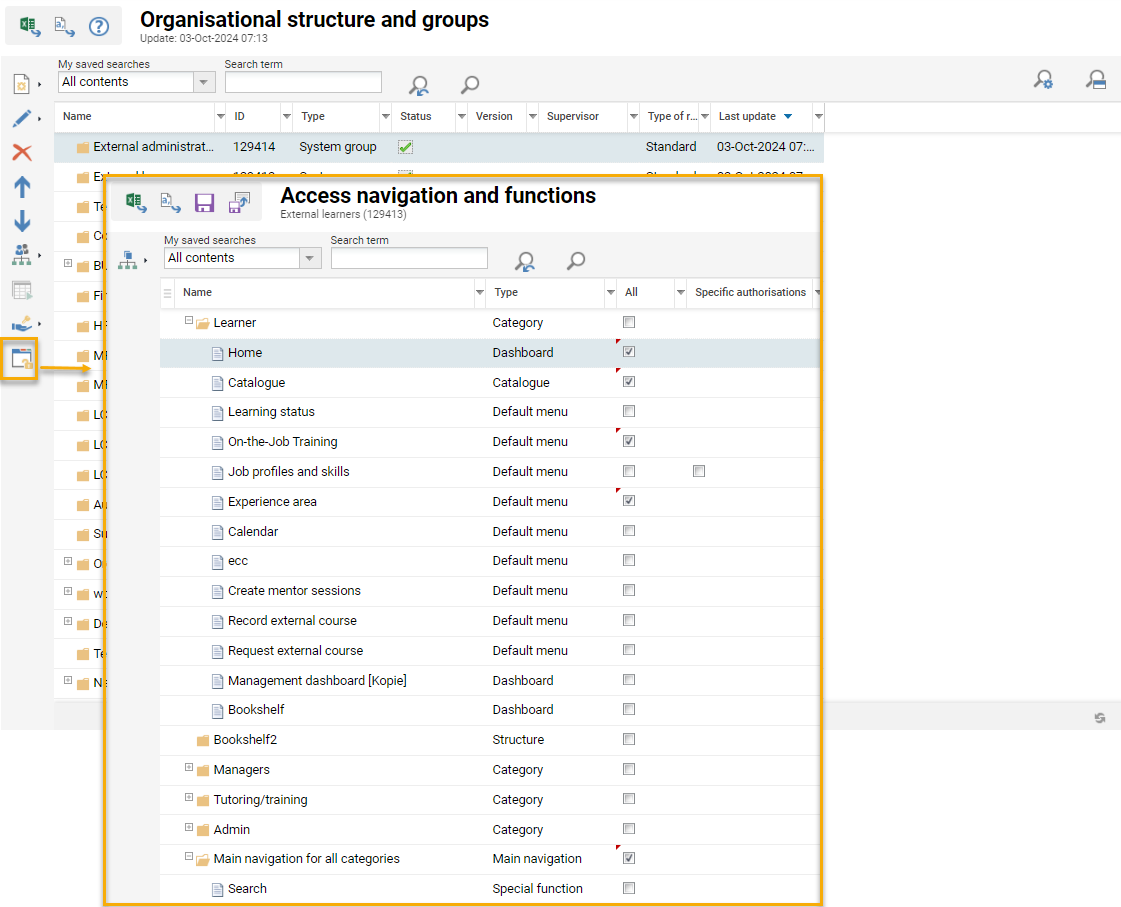
Each client would be configured with entirely own system groups for defining roles; e.g., Learner, Supervisor, Tutor, Course administrator, and System administrator. This is done in the Organisation structure and groups function by creating new ‘System groups’ where the name and functions of each group are defined. Creating the groups early in the configuration is recommended as the default clearances to objects and business rules to assign users or grant clearances on users can be established.
When creating new role groups it is important to configure the ‘Access navigation and functions’ to give access to required menus. For Learner and Supervisor groups this would be further altered once new navigations menus for internal dashboard pages and catalogues are configured (described later).
The final step when creating new roles is to configure the Clearances to ensure the new client administrator groups have clearance on their own groups. Also remove any other unwanted Clearances that may have been assigned due to default rules (described next).
Object Clearance Rules
Default clearances for objects created by users within each client can be configured in the Configuration > Clearances function. These clearance rules would normally be configured by the Scheer IMC Business Consulting team or system owner after the client specific groups have been created.
When creating new rules there will be many options to select from and the Groups option is the required option. This will allow defining which group/s will receive specific levels of clearance to objects, except users, created by users below to the client selected in the Valid for client select field.

Once the rules have been created for all required administrator groups, click the Save and close icon.
Objects Clearances
Another consideration with clearances is that the new client administrator groups will require at minimum ‘Execute’ clearance for many ‘type’ objects for functions they have access rights to. For example; the following functions require selection of a type:
-
Course templates > Course type
-
Learning path templates > Learning path type
-
Media > Media types
-
Course > Course room types
The assignment of ‘Execute’ clearance ensures the new client administrator group can use standard type objects, but can not make changes that could effect other existing clients. Alternatively, new client specific objects can be created for each client to allow the client to make changes to their own type objects and other pre-defined objects such as:
-
Learning modes
-
Cancellation reasons
-
Enrolment message texts
-
Enrolment message triggers
-
Enrolment forms
-
System texts
-
Panels
All these objects can be configured by customer administrators.
User Profile Management
Each client is able to have own user profiles that contain personal attributes specific to their tenant. Configuration here is important to ensure only relevant fields are displayed to describe users in each client. Creating client specific personal attributes early in the configuration is recommended to enables these to be used in business rules.
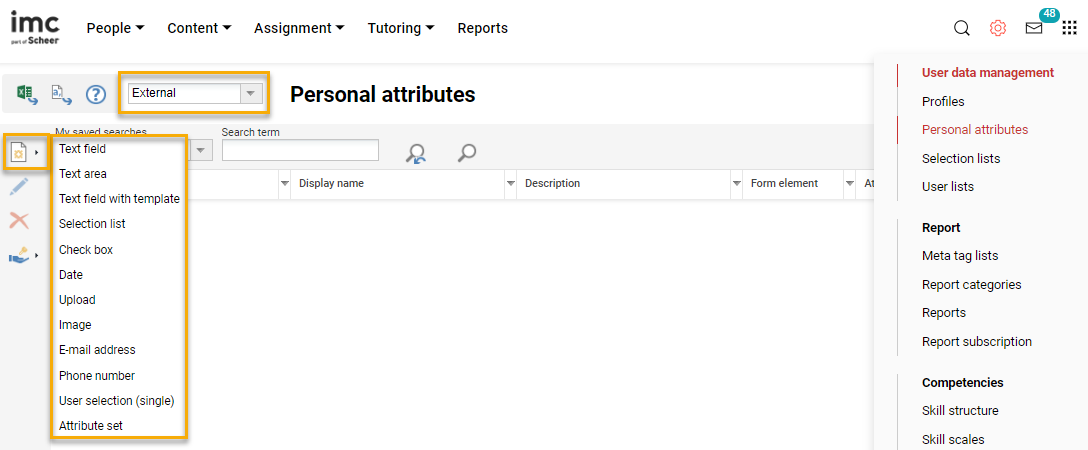
Personal Attributes
Personal attributes are the fields on user profiles, enrolment forms, reports, and within functions that are used to describe users. Any number of personal attributes can be created and they can be created client specific. To create client specific personal attributes, simply change the client context selection from ‘Global’ to the new client. Personal attributes that are created client specific will only display when editing profiles and user lists in the match client context.
The final step when creating new personal attributes is to configure the Clearances to ensure the new client administrator groups have clearance and remove any other unwanted Clearances that may have been assigned due to default rules. It is also recommended to provide ‘Execute’ clearance to the new client administrator group on all ‘Global’ personal attributes.
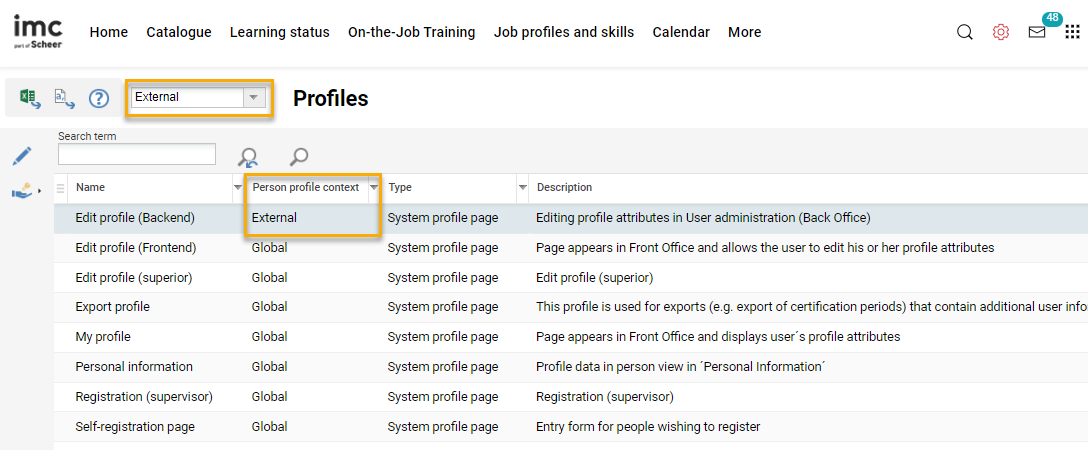
User Profiles
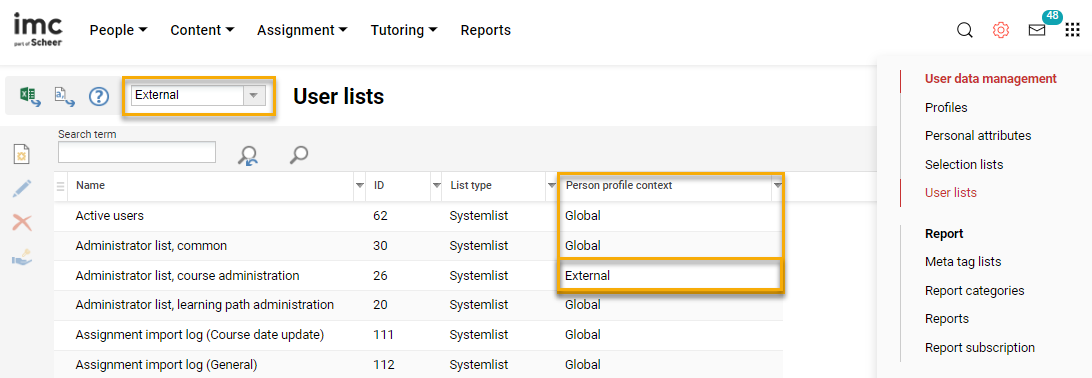
There are multiple Profiles used to display or allow editing of a user’s personal attributes. These can also be configured client specific by changing the client context from ‘Global’ to the new client. When the client context is changed the ‘Person profile context’ column will display the current context in use for the client. If a client has been selected, when highlighting and editing a profile that has a ‘Global’ context it will change to the specific once saved. Using client specific profiles ensures that only relevant personal attributes are displayed for each client.
The final step when configuring client specific profiles is to configure the Clearances to ensure the new client administrator groups have clearance and remove any other unwanted Clearances that may have been assigned due to default rules. It’s recommended to make each of the ‘Global’ profiles client specific prior to adjusting clearances; an important note is that a client specific administrator will only be able to edit profiles in their own context.
Client Import Rules
Business rules can be written to automatically assign users to clients, assign users to groups, assign job profiles, set profile attributes, and grant clearances on users. These rules are generally based on personal attribute values and process immediately when a new user is created or an existing user is updated. Once the new client, associated groups, and personal attributes have been configured, the rules can essentially be written.
The business rules are written in a specific XML format and can be very detailed for some clients where there are very specific assignments or clearances to be granted. Below is a very basic example of assigning users to CLIENT_ID of 2, assigning users in the client to the external learner group with ID 129413, and granting clearance on all users to the client administrator group with ID 129414.
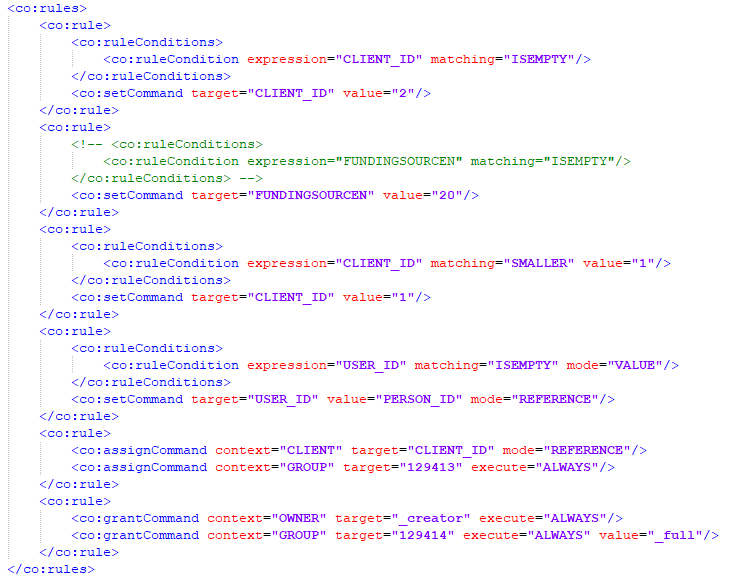
Once the xml ile is created for the new client, it can be uploaded via the Clients function, within the Settings tab, in the Rules file upload field. When uploading the file and saving, the Learning Suite will validate the XML against a set of schemas. If the file is valid there will be a ‘Successfully saved’ message, but if invalid there will be an error message at the top of tab.
There are many rule possibilities that can be configured and this is best performed by or discussed with an Scheer IMC Business Consultant. A basic sample file is embedded below:

User Assignment to Clients
In addition to automatic assignment of users to clients via business rules, it’s also possible to manually assign or import via csv files. The visibility of Clients to users differs to other objects and is not actually regulated by Clearances; instead, users with access to the Client manager only see Clients to which they are already assigned (unless a super administrator). A given administrator can only assign other users to those clients or select those clients at other points in the system such as in the Users > Assignment to client function.
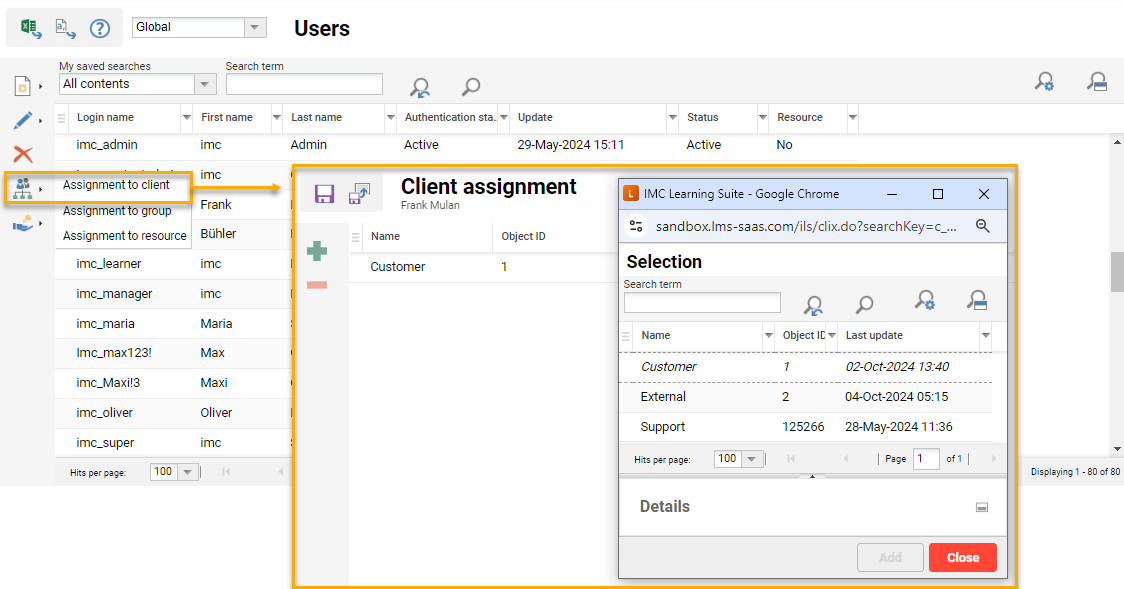
Users can be assigned to multiple clients as seen above, but each user must have a master-client that determines various aspects such as displayed design and user profile. An interesting point to consider though, is that a user master-client once set can only be changed via rules. A common scenario where a user might need to belong to two clients is where is system is split between internal and external clients; e.g., the internal client for staff, the external client for customers, and select internal users are in external administrator groups that need assignment to the client to see the client.
Dashboard Page Creation
It would normally be required, and is recommended, to create new dashboard pages for each client in the Dashboard pages function. Creating own dashboards provides flexibility in the configuration possibilities and prevents undesired changes being applied as could occur if there are shared dashboards. The same applies to some configurable standard system dashboard panels, such as catalogue entry or course panels, where duplication to have own panels can prevent undesired changes. With panels, it’s recommended to provide client administrators with ‘Execute’ clearance on standard panels and ‘Owner/Unrestricted’ only for their own panels.
Portal Dashboard Pages
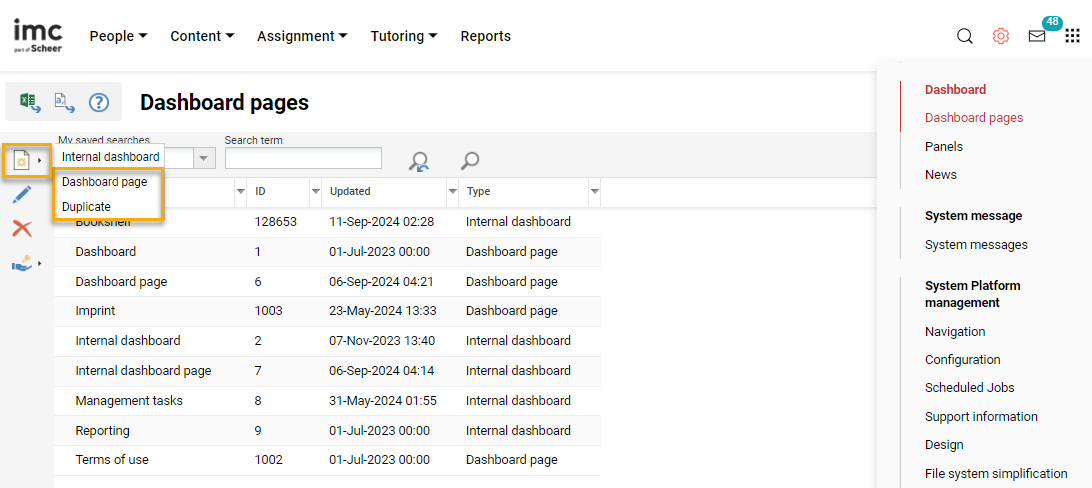
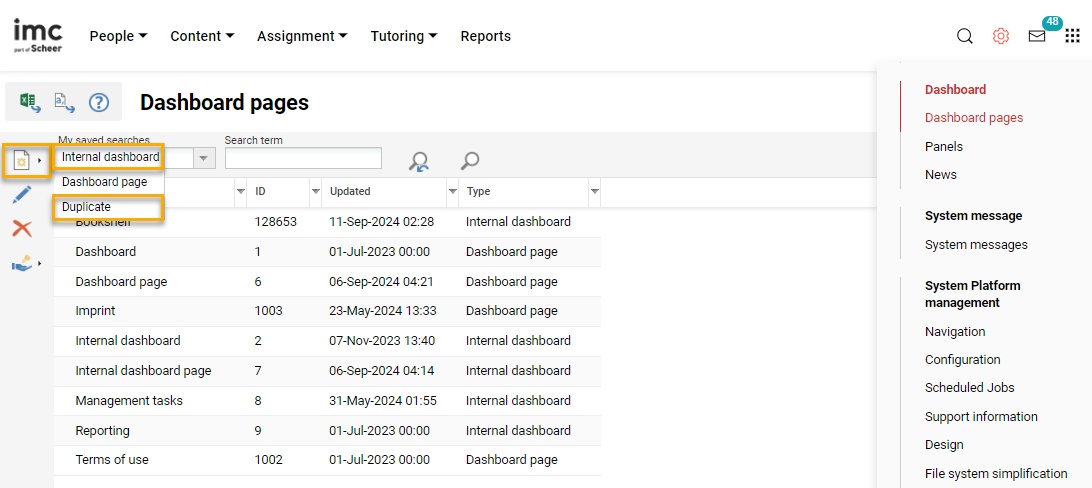
Portal ‘Dashboard pages’ are displayed before login on publicly available pages; e.g., where a user would land when entering the public URL for the client. These dashboard pages commonly contain a branded image banner with a login panel, maybe a news or catalogue panels, and other static information. Creating a portal dashboard page can be done by either selecting Dashboard page or highlighting an existing dashboard page an clicking Duplicate.
Once the new dashboard page has been saved, provide ‘Owner/Unrestricted’ clearance to the new client administrator group and ‘Execute clearance to the new client.
Internal Dashboard
The Internal dashboards are where users would normally land after a successful login. These dashboard pages commonly display a series of panels with training information related to the user such as their enrolled courses, recommended learning, and promoted contents. Creating an internal dashboard page can be done by either selecting Internal dashboard or highlighting an existing internal dashboard and clicking Duplicate.
Once the new internal dashboard has been saved, provide ‘Owner/Unrestricted’ clearance to the new client administrator group and ‘Execute clearance to the new client or client learner groups; clearance is required to display the dashboard.
Catalogues
The new client will need to have own catalogues to promote their training offering and training material. This will require the creation of at least one ‘Main’ catalogue and possibly a second if a separate catalogue is desired to promote training on external portal pages before login.
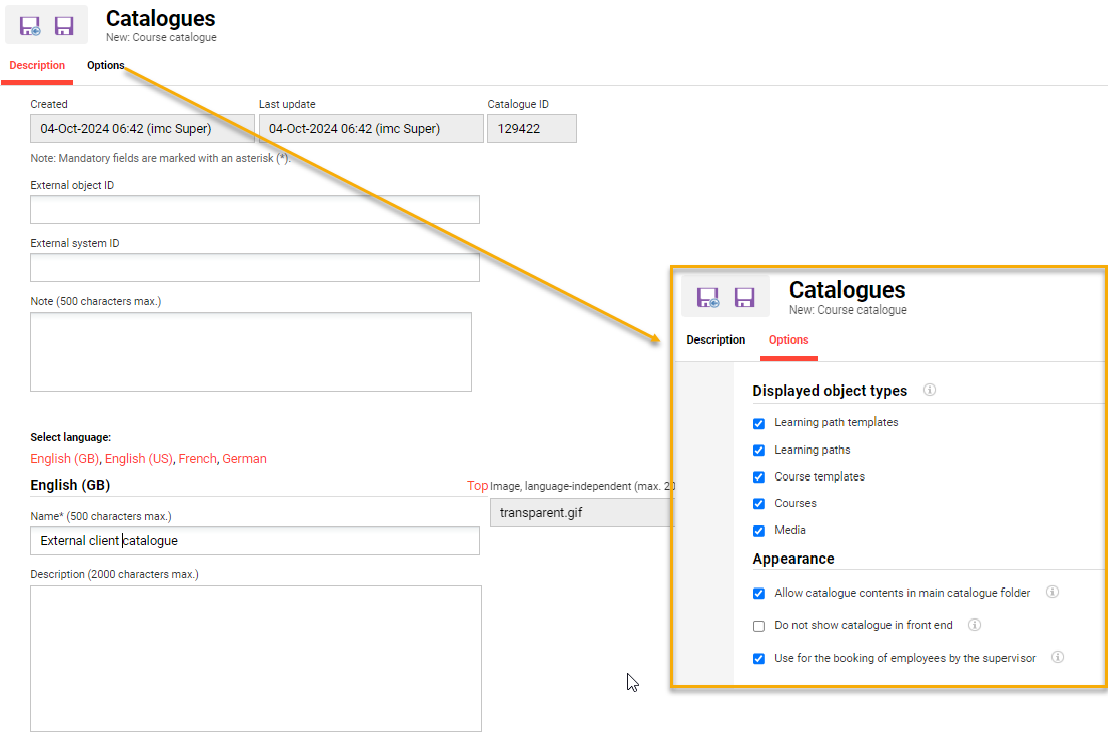
Once the new catalogues are created, assign the Clearances. The new client administrator group will require ‘Owner/Unrestricted’ clearance to ensure the administrators can make changes and assign content. The client learner groups and/or the client will also require ‘Execute’ clearance; the assignment of clearance to the client is more common for catalogue being promoted on portal pages.
Navigation Configuration
Once the new dashboard pages and catalogues have been created, the next step will be to create navigation entries for these to be linked. Generally a new portal navigation category with new portal menus would be created and existing internal categories updated with new menus.
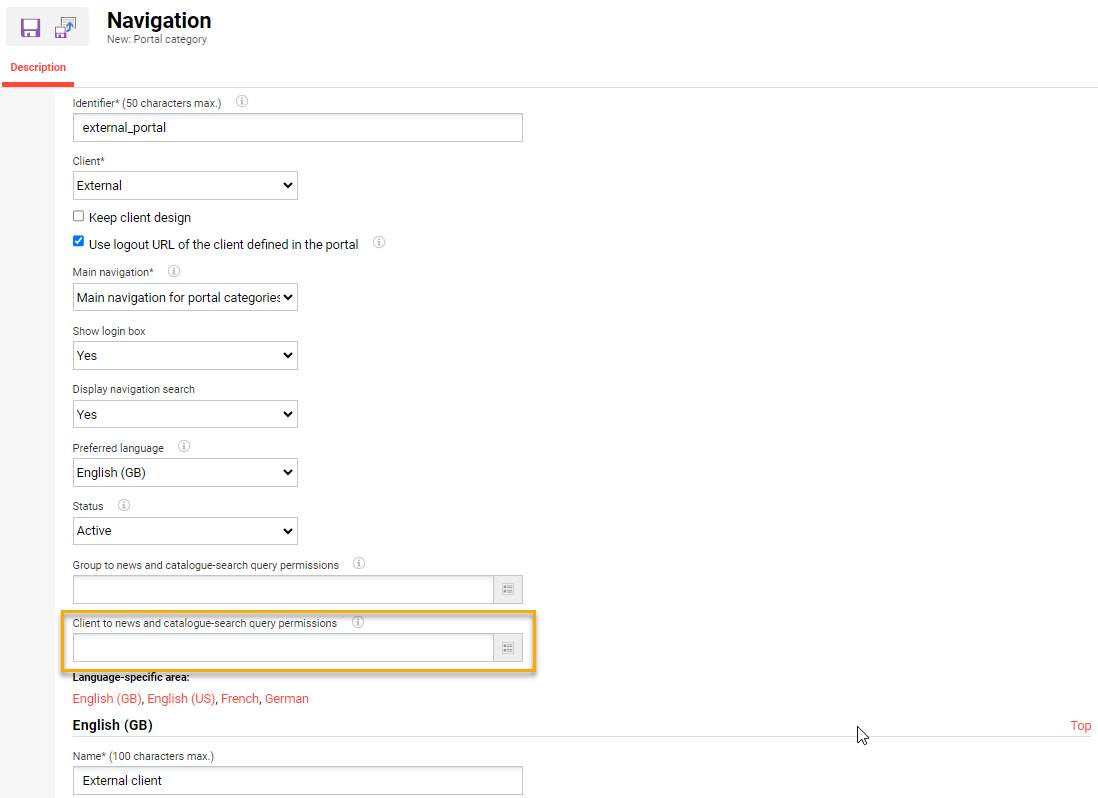
Portal Navigation
For each client a ‘Portal category’ is first created which contains various settings to link the portal space to a client. To configure, enter a unique value in the Identifier* field (e.g. external_portal), select the client, in ‘Main navigation*’ select ‘Main navigation for portal categories’, in ‘Client to news and catalogue-search query permissions’ select the new client, and then name portal category. Once saved, grant full clearance to the new client administrator group.
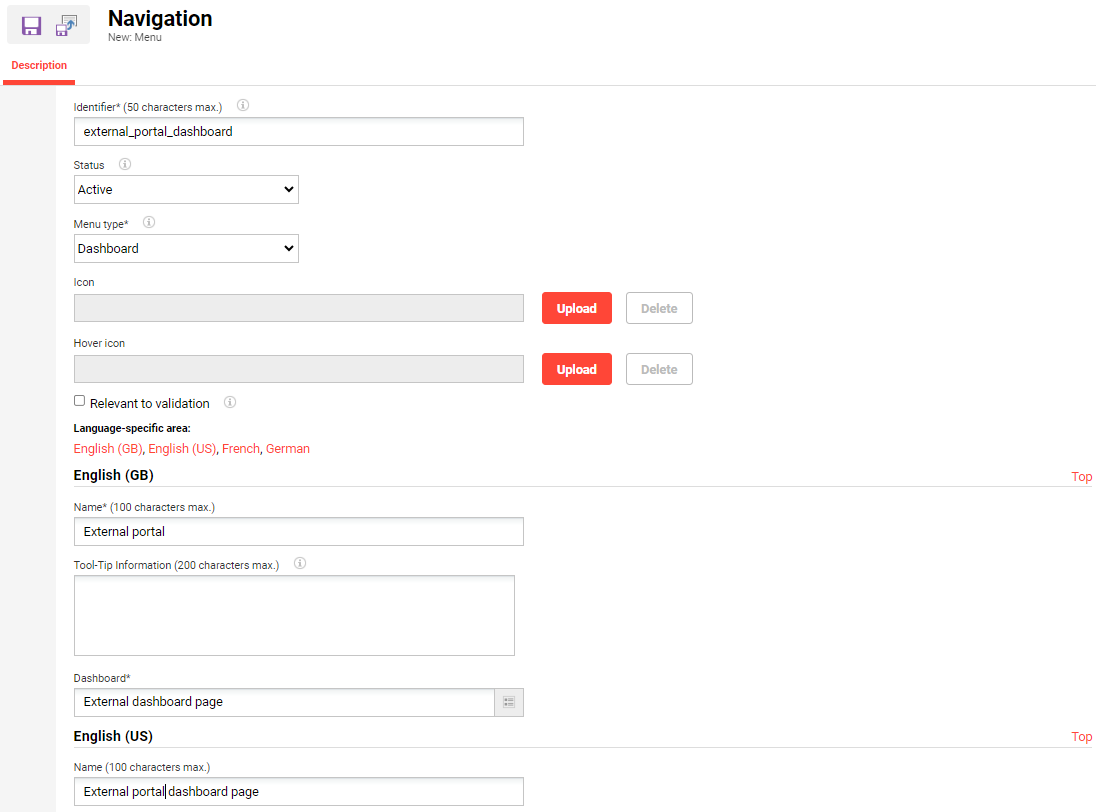
Next highlight the new portal category and create a ‘Menu’ in the hierarchy below. Configure by entering a unique value in the Identifier* field, in the Menu type* field select Dashboard, in the Dashboard* field select the dashboard page created earlier, and then enter a value in the Name field. Once saved, grant full clearance to the new client administrator group.
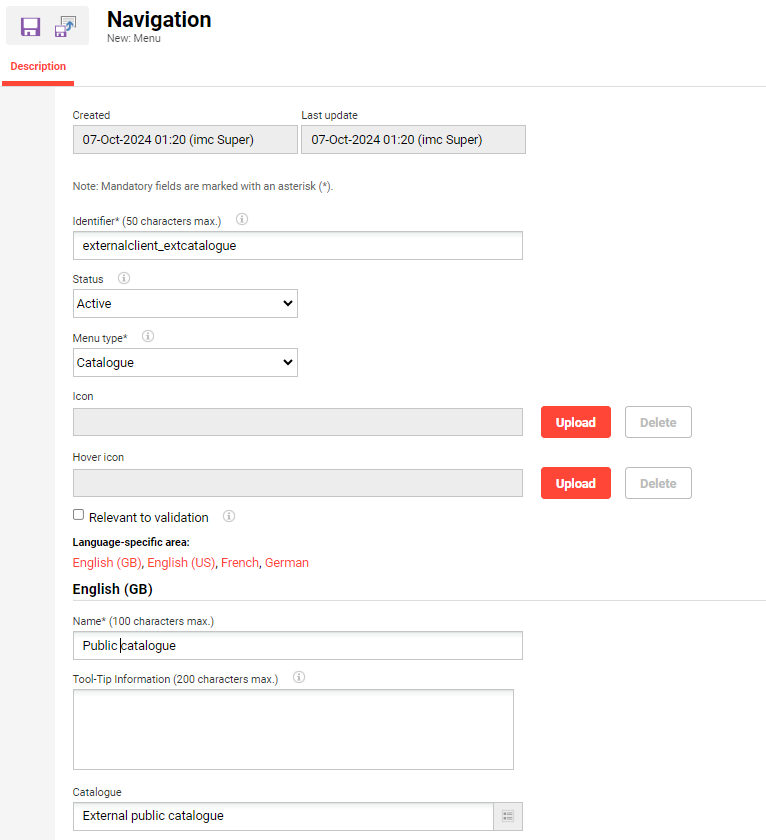
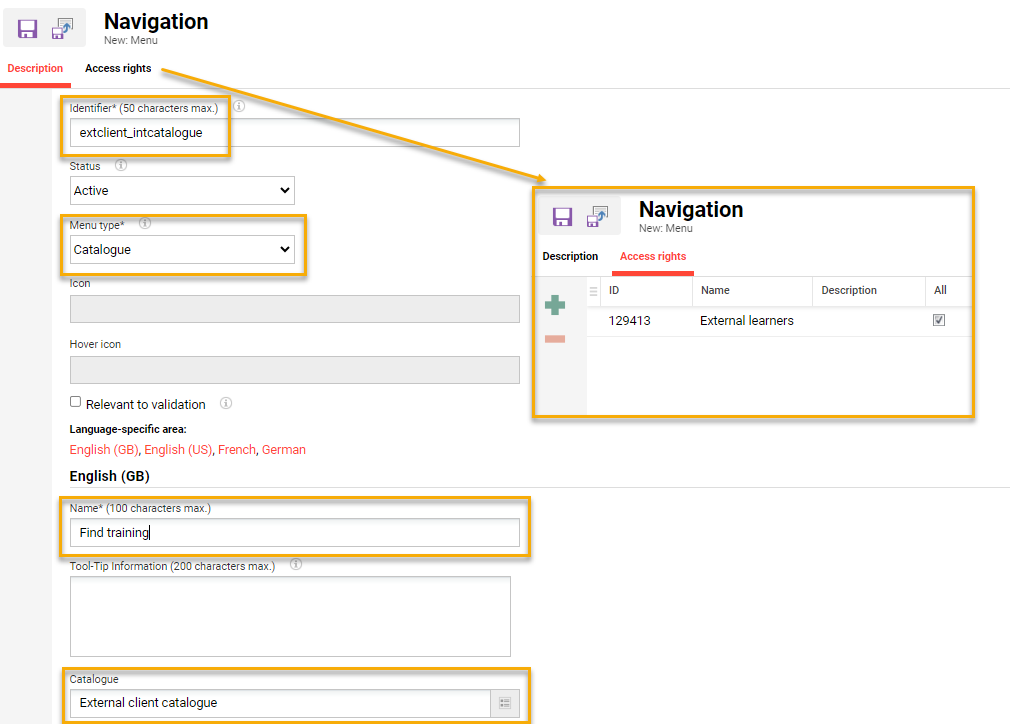
If an external catalogue is required for the new client, then another menu will need to be created. To do so, highlight the new portal category and create a ‘Menu’ in the hierarchy below. Configure by entering a unique value in the Identifier* field, in the Menu type* field select Catalogue, in the Catalogue* field select the ‘main’ external public catalogue page created earlier, and then enter a value in the Name field. Once saved, grant full clearance to the new client administrator group. With a portal catalogue the client that is selected in the category must have clearance on the catalogue to display results.
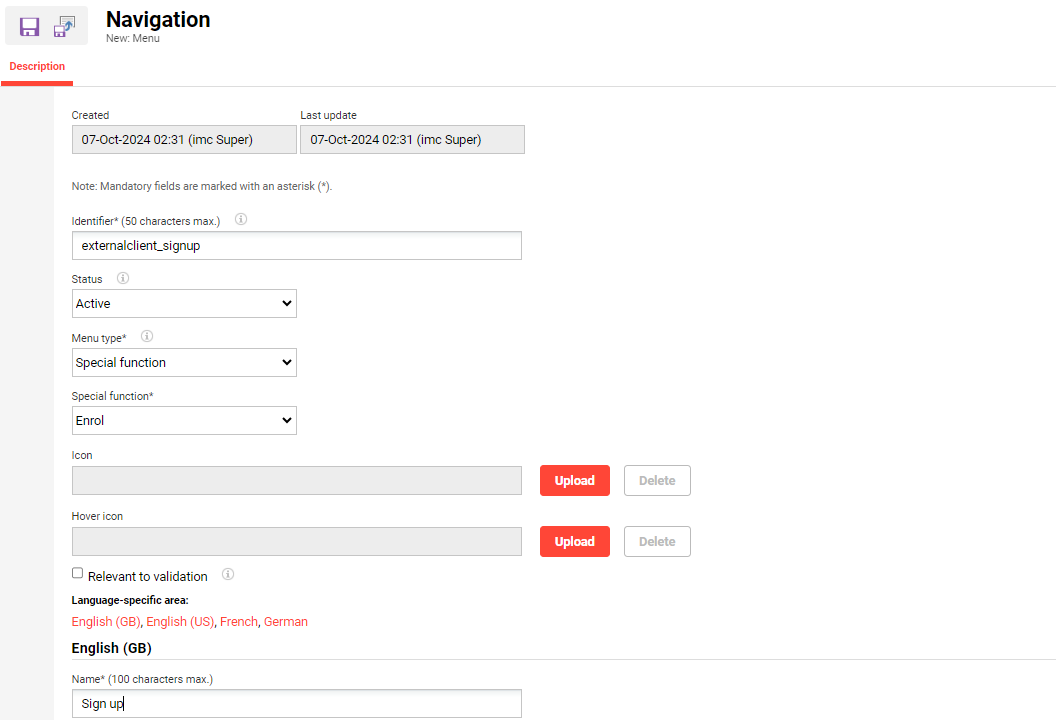
With the portal navigation there are additional navigation possibilities to create own menus for Login, Sign Up and also a Footer. The creation of own navigation points for Login and Enrol (Account sign-up) is normally configured if not wanting to use the ‘Login’ panel for the dashboard. If so, these can be configured by creating a menu with the Menu type* of Special function where there will be options for ‘Enrol’ and ‘Login’.
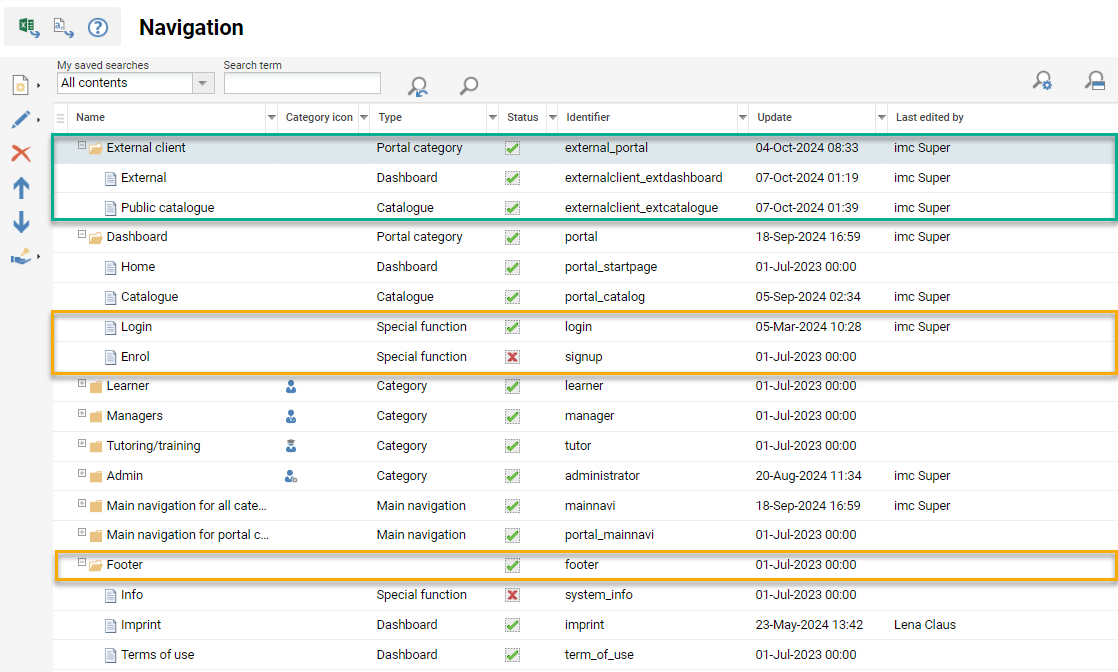
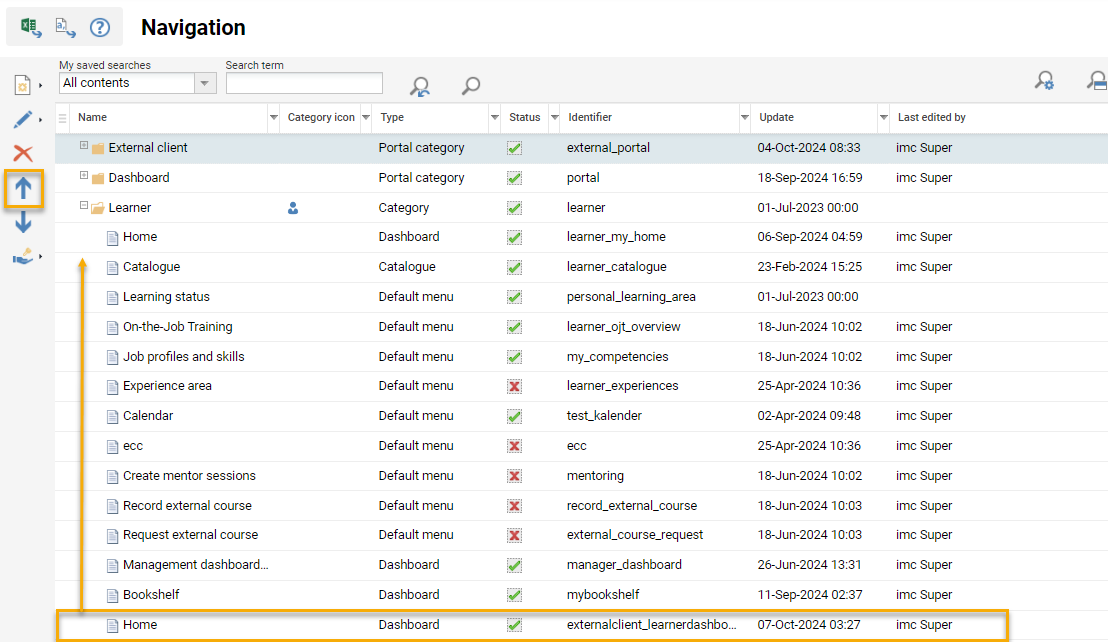
Once the portal navigation configuration is complete it could look something like the image below. The orange highlights are merely indicating the possible menus to configure, but are not configured the new client used in the example.
Internal Dashboard
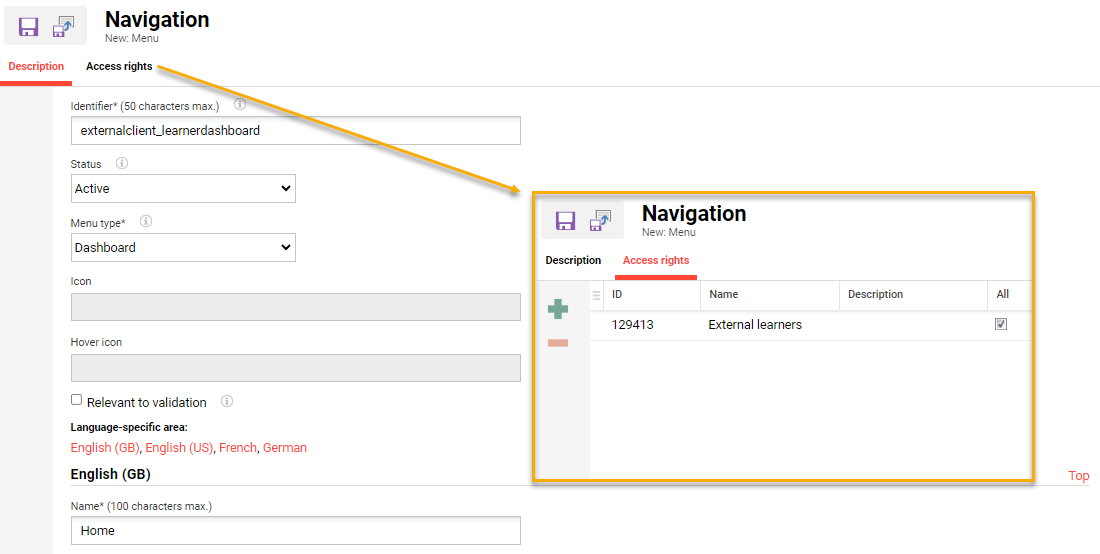
The internal learner dashboard is commonly configured client specific to provide the new client administrators flexibility in choice for included panels and layouts. Normally the learner dashboard is created in the standard Learner category to avoid the need to create an entire new category with all standard learner functions. To create the new dashboard navigation entry highlight the Learner category, click Create and select the Menu option. Configure by entering a unique value in the Identifier* field, in the Menu type* field select Dashboard, in the Dashboard* field select the internal dashboard created earlier, and then enter a value in the Name field. With internal dashboard menus, well any internal menu, access rights must be provided to groups requiring access to the menu.
Once saved, move the new dashboard menu to the desired order as this arrangement matches how the learners will view the menus. Also grant full clearance to the new client administrator group so they can edit the menu in the future.
If other internal dashboards are required repeat the above configuration steps in the required category locations. For example, there might be the need for a new supervisor dashboard, administrator reporting dashboard, or general information pages.
Catalogue
The internal catalogue navigation is commonly configured client specific to provide the new client administrators flexibility in wording. As with the learner dashboard, the learner catalogue for the new client is normally created in the standard Learner category. To create the new catalogue navigation entry highlight the Learner category, click Create and select the Menu option. Configure by entering a unique value in the Identifier* field, in the Menu type* field select Catalogue, in the Catalogue* field select the internal main catalogue created earlier, and then enter a value in the Name field. In the Access rights tab add the new client learner group and save.
Once saved, move the new catalogue menu to the desired order as this arrangement matches how the learners will view the menus. Also grant full clearance to the new client administrator group so they can edit the catalogue menu in the future.
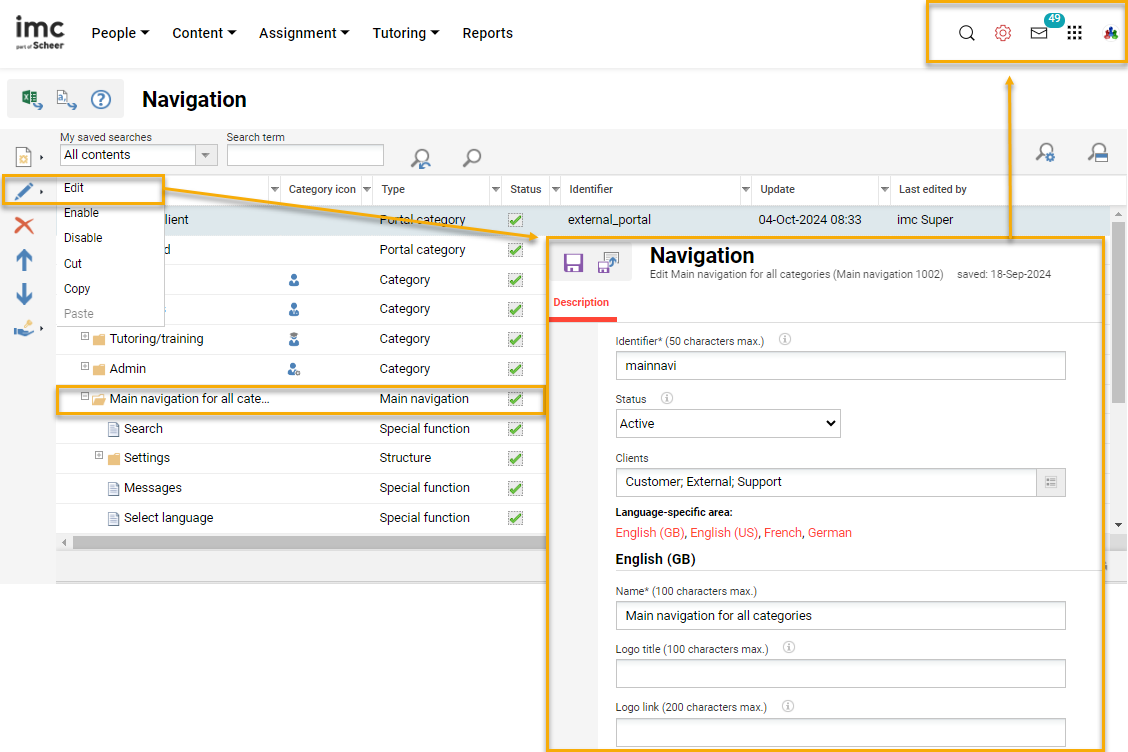
Main (add client)
An important navigation configuration step is editing the Main navigation for all categories entry and adding the new client to the list in the Clients field. This is required to enable the upper-right-hand-side navigation icons including Search, Settings, Messages and Profile.
Multi-Client ‘Advanced’ Configurations
Once the base setup is complete, there are many advanced configurations that are possible to deliver a detailed multi-client solution.
Imports and Interfaces
There are various imports and interfaces that are available that can be configured client specific. Many of these may require connector licences and some setup by Scheer IMC Technical Consultants.
User Import Planning
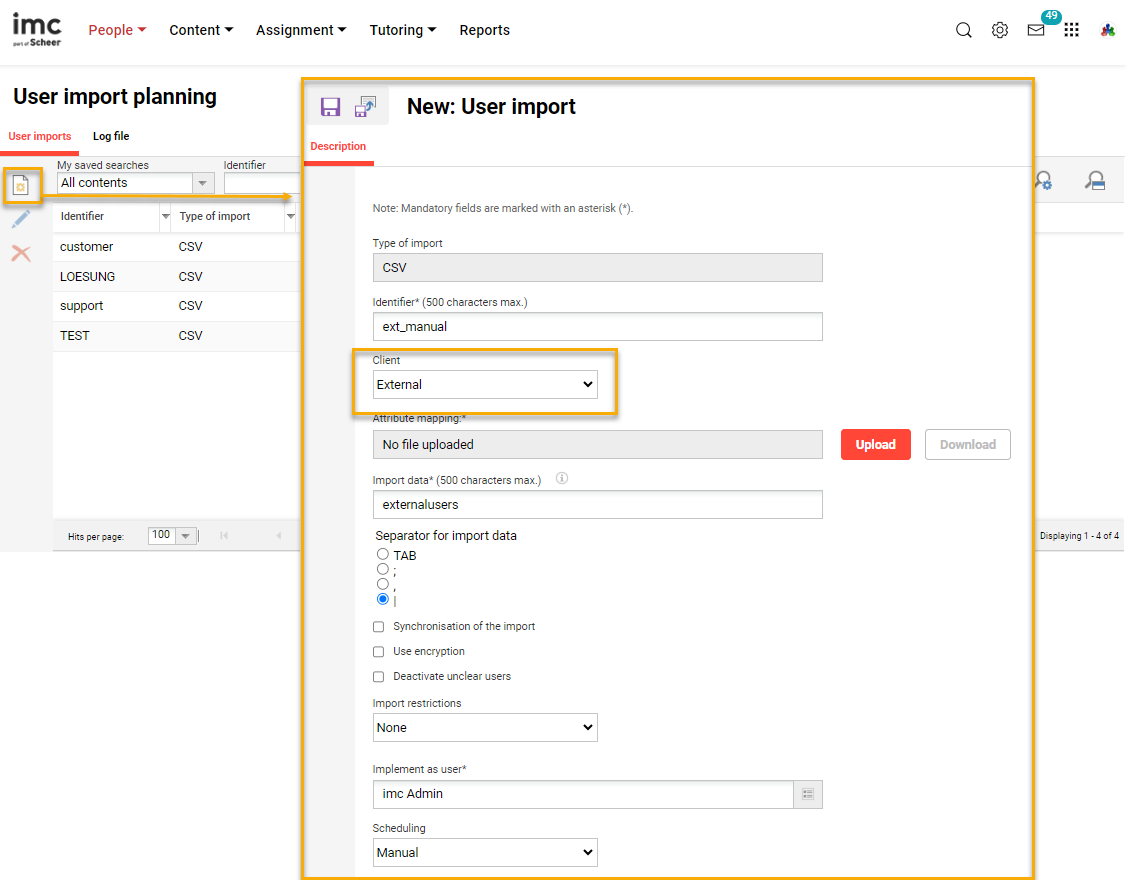
The User import planning function allows configuration of client specific .csv file import jobs to create and/or update user records. This function is intended for use by Scheer IMC Consultants, but many clients that are familiar with batch file interface processes successfully utilise the function. This function allows the creation of new import jobs, editing or deleting existing jobs, and accessing user import log files. Creating a new user import job is quite simple if the required personal attributes are already configured. To commence creating an import, click the Create icon and a new browser tab will open. The configuration of user import jobs requires completions of nine fields including an .xml mapping file upload.
Each field and setting in the Description tab is described below:
-
Identifier: This is the unique name if the import job, but not the name of the .csv file.
-
Client: A Client must be set which will become the imported users 'Master client' unless business rules are written otherwise. In a multi-client system the user import will also only be seen by users within the client who are performing a manual user import in the Users function.
-
Attribute mapping: This upload field requires the creation of an .xml that basically maps .csv file columns names to Personal attribute database names. Discussed in detail below.
-
Import data: This is the name of the .csv file to be used if the user import job will be scheduled as either 'Daily', 'Weekly' or 'Monthly'. If the scheduling is 'Manual' then the file name is not enforced in the manual import process.
-
Separator for import data: Here the column separator/delimiter can be defined as either a TAB, semi-colon, comma or pipe and the file must match when importing. A Pipe is generally recommended if the source system is able to generate a .csv file with this separator.
-
Checkboxes:
-
Synchronisation of the import: When checked this setting will automatically deactivate any previously imported user that is no longer in the file on subsequent imports. Synchronisation is primarily used in cases where a source system is unable to send a termination status in an import as only 'Active' records can be provided. Many clients use this setting, but it must be used with caution as poorly generated partial files can deactivate unintended users if they are not in the file.
-
Use encryption: Use encryption: For added security user import files can be protected with PGP encryption. If enabled an encrypted file must be delivered that matches encryption settings defined in the Configuration > Key management function.
-
Deactivate unclear users: Defines that all users that are mentioned twice in the .csv file will be deactivated. This is only true for user that have been created with the same import (verifiable via user attribute import id).
-
-
Import restrictions: Import jobs can be restricted to only 'Create' users or 'Update' users. The default value of 'None' means there is no restriction active so the import job can both create new user records and update existing.
-
Implement as user: Allows selecting a user in the LMS on who's behalf the import will process and import log files will be sent.
-
Scheduling: Single selection setting that determines how and when the import job will process.
-
Inactive: The import job will not be available for both Manual and Automatic jobs.
-
Manual: Can be selected as an available import when importing in the GUI via the Users menu.
-
Daily: The import job will process daily at the time set in the CRON and the .csv file will require being loaded to an SFTP prior.
-
Weekly: The import job will process weekly at the time set in the CRON and the .csv file will require being loaded to an SFTP prior.
-
Monthly: The import job will process monthly at the time set in the CRON and the .csv file will require being loaded to an SFTP prior.
-
How to create an .xml import mapping file?
The .xml mapping file is used to define how source columns of the .csv file map to target attributes in the LMS. At very least the user import file must include the LMS mandatory Personal attributes as shown below, but there the amount of mapped columns to Personal attributes is normally much higher. To create a new user the follow are the standard mandatory attributes in the system to be included:
-
LOGIN (Can use generator)
-
FIRSTNAME
-
LASTNAME
-
EMAIL
-
EXT_ID_CSV (mandatory unique identifier for .csv imports)
There are many tools available to create .xml files including the freely available Notepad++. The format of a basic .xml mapping file covering the above mandatory attributes would look like below:
<CSV>
<attributeMapping>
<mappingsourceField="Username" clixField="LOGIN"/>
<mapping sourceField="Given name" clixField="FIRSTNAME"/>
<mapping sourceField="Surname" clixField="LASTNAME"/>
<mapping sourceField="E-mail" clixField="EMAIL"/>
<mapping sourceField="ID" clixField="EXT_ID_CSV"/>
</attributeMapping>
</CSV>
Advanced mapping settings
-
The .xml mapping can support some advanced such as:
-
ignoreUnmappedFields - Ignores any columns in the .csv file that are not mapped.
-
ignoreEmptyField - Configured per mapping line where 'false' can overwrite a populated value with a blank and 'true' will not overwrite a populated value with a blank.
-
hashident - Relates to a hash table identifier which is a conversion table in the registration business rules (described below). Commonly used for importing against selection lists to use they instead of imc ID or with date field format conversions.
An example of a more complex table is below:
<attributeMapping ignoreUnmappedFields="true">
<mappingsourceField="Username" clixField="LOGIN"/>
<mapping sourceField="Given name" clixField="FIRSTNAME"/>
<mapping sourceField="Surname" clixField="LASTNAME"/>
<mapping sourceField="E-mail" clixField="EMAIL"/>
<mapping sourceField="ID" clixField="EXT_ID_CSV"/>
<mapping sourceField="Access requirements" clixField="ACCESS_REQ" ignoreEmptyField="false"/>
<mapping sourceField="Position" clixField="POSITION" hashident="POSITIONHASHTABLE"/>
</attributeMapping>
How is the SFTP setup?
Where import jobs are scheduled to automatically process daily, weekly or monthly an Scheer IMC Consultant will be required to organise access to an Scheer IMC supplied SFTP server. The customer is then responsible to load the agreed .csv file name by the agreed time and a transfer job will copy the file from the SFTP server to a specified location on the LMS content server (e.g. \data\person\personimport\src\external). The Scheer IMC Hosting team will provide unique credentials for customers to access their SFTP account and access can be restricted by IP whitelisting if required.
What is a Cron job and how is it configured?
A cron job is an automatic scheduled job that can be configured to run at desired times and there are many cron jobs available in the LMS including 'UserImport'. The crons are normally configuraed by Scheer IMC Consultants, but customers can also configure via the Scheduled jobs function. With cron configuration the sequence timing of jobs is important to ensure data is up-to-date as possible; e.g. the UserImport cron must run after the SFTP delivers the file and is recommended before to run before TargetGroupPersonAssignment and ParticipantAutomaticRegistration jobs.
Can .csv files be encrypted?
For .csv user import files Scheer IMC supports the use of PGP encryption where customers can load encrypted files to the SFTP server for extra security. The customer is responsible for the Private Key and must share a Public Key with Scheer IMC that allows files to decrypted at the time of import. These jobs can be configured by Scheer IMC Consultants and can be client specific so that not every user import job is effected.
SAML / OIDC
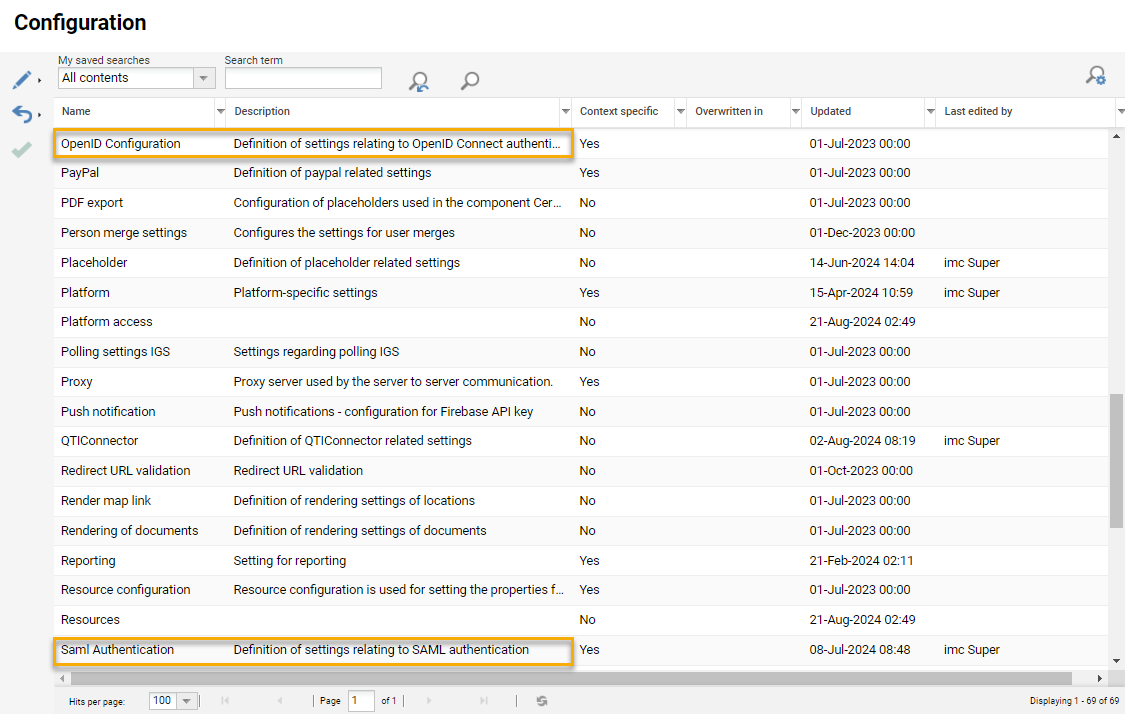
The imc Learning Suite supports both SAML2 and OIDC with client-specific authentication and provisioning. This means that each client in a multi-client setup can have their own interfaces connecting with different identity providers. These interfaces require a connector licence and are then configured in the Configuration > OpenID Configuration or Saml Authentication menu.
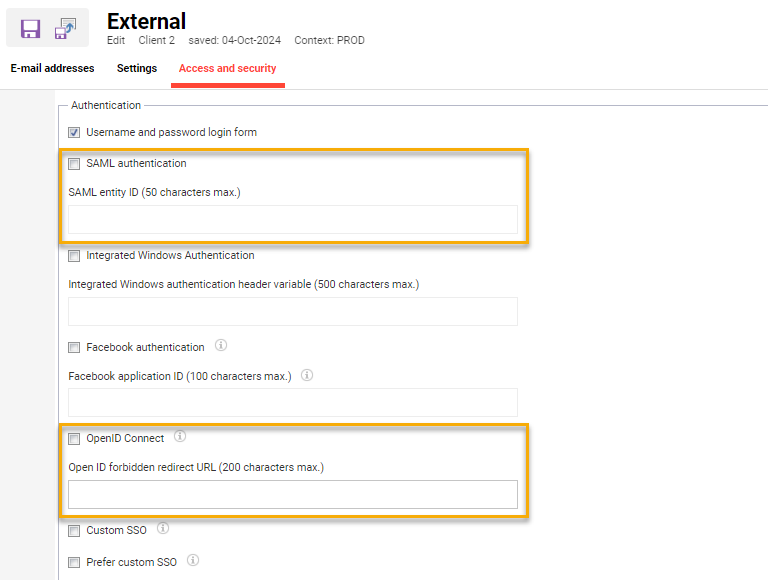
Further SAML2 and OIDC configuration fields are found in the Clients function in the Access and security tab. The checkbox will need to ticked to activate the respective interface on the portal for the client and for SAML2 the entity ID will need to be entered.
The imc Learning Suite additionally supports other forms of single-sign-on including Windows SSO, LDAP, and token-based SSO; however, these are not client specific and likewise with SCIM API for user provisioning. Therefore, the use of these integration methods would only be possible if no other client is using the integration. For these methods the global business rules in Configuration > Import are also used instead of those uploaded in the Clients function.
BU Group Import
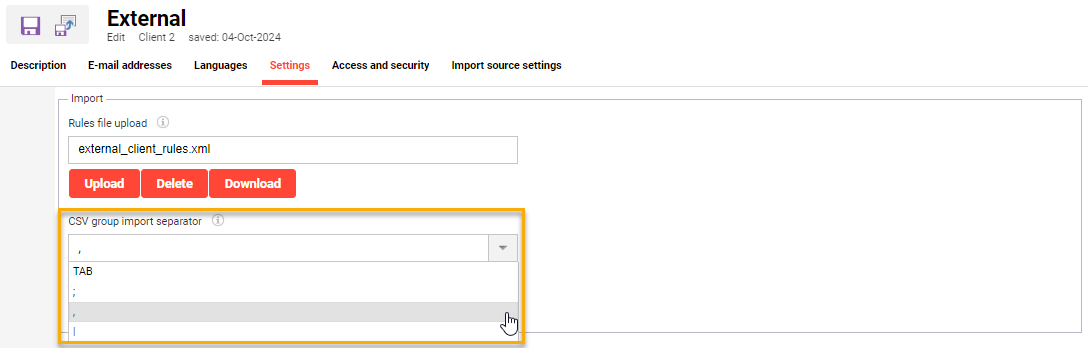
The import of business unit group structures is common for multi-client systems that separate organisations or external users belonging to physical locations requiring supervisors (e.g. clubs and regions). There are two methods of import supported which is a basic .csv for creating/updating structures and a more advanced .xml that also supports user assignment. For the .csv import there is a setting in the Clients function in the Settings tab called CSV group import separator.
For the .xml import option there is no client specific configuration, but these imports can be scheduled for each client to process uploaded files automatically. This would require a job to be configured in the Configuration > Import’ tab ‘XML group import and an SFTP job setup by the Scheer IMC Hosting team.
Provider
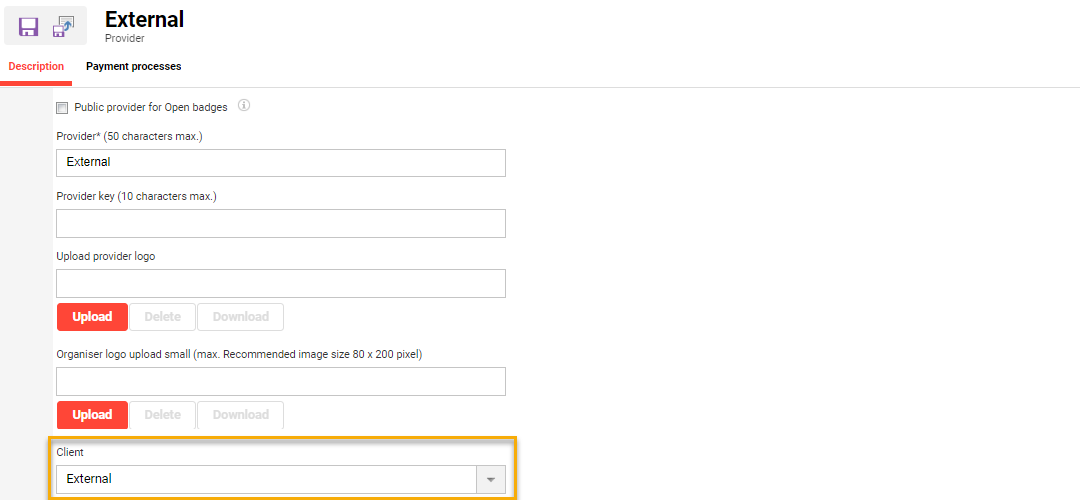
A simple configuration that has many benefits with notifications in a multi-client setup is creating client specific training ‘Providers’ and linking to the client. This allows course notifications and enrolment messages linked to providers to automatically use the ‘Sender’ email address and ‘Alias’ configured in the client.
User Lists
User lists are used to control the personal attributes that are available as columns or filters in many functions and all on-screen reports that contain user records. Client specific configuration ensures that only desired personal attributes are available to improve the user experience; For example, configuration of the User management and Staff pool can be important. To configure client-specific simply change the client context from ‘Global’ to the required client.
The final step when configuring client specific user lists is assigning Clearances to ensure the new client administrator groups have ‘Execute’ clearance to all ‘Global’ entries. This will allow client specific administrators to view all user lists, but they will only be able to edit user lists in their own client context which ensures the ‘Global’ lists will not change.
Enrolment Message Texts and Triggers
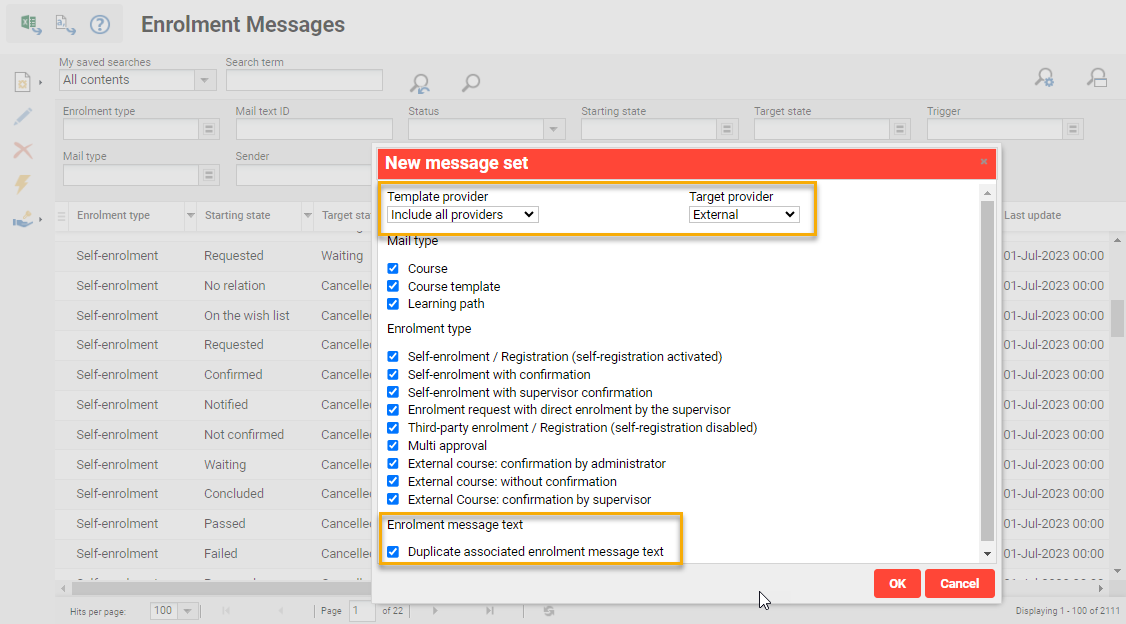
Where branding or different wording is required on enrolment messages for courses and learning paths, the enrolment message texts can be created or duplicated with HTML updated for each client. Then the entire set of enrolment message triggers can be duplicated for a specific provider. This is most efficiently performed within the Enrolment messages function where an entire set enrolment message texts and triggers can be duplicated for a provider using the ’Create new message set automatically’.
Notifications
Notifications can be configured individually to be either Client or Provider specific. This configuration is performed by duplicating standard notifications and making required restrictions to filters or settings in the Notification and Recipient(s) tab. Unlike enrolment messages though, there is no mass duplication function and clearances are not considered.
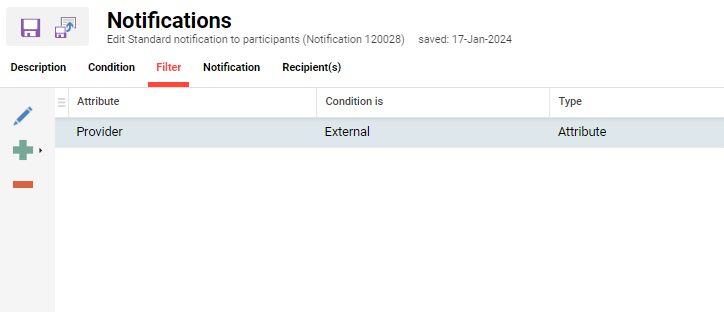
The notifications in the Course folder can be filtered by ‘Provider’ to restrict sending only for courses that are delivered by the selected providers.
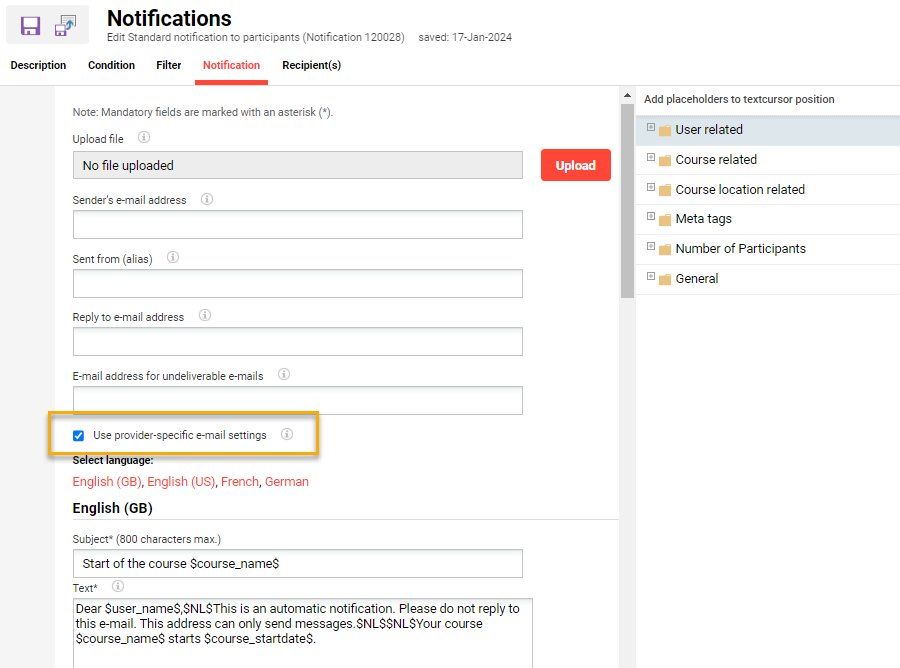
In the Notification tab, ticking the checkbox Use provider-specific email settings will automatic send the notification from the email sender address and alias of the client linked to the course provider; if the provider is not linked then the sender details can be entered manually or the global default sender details will be used.
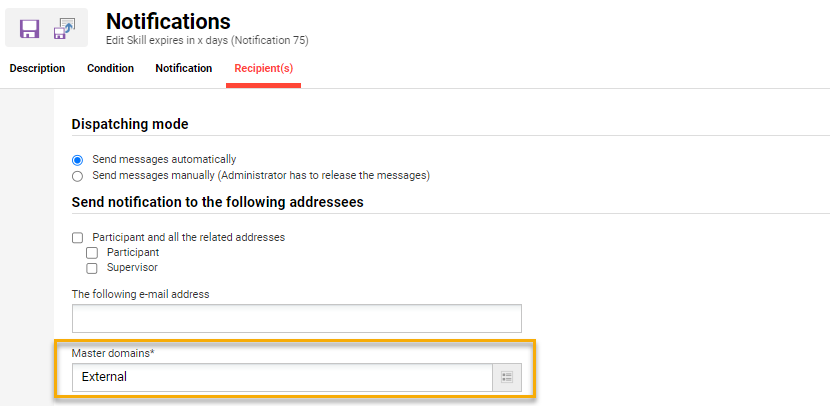
For notifications not related to courses, these can be restricted to users by their master-client in the Recipient(s) tab by selecting the client in the Master domains* field.
Email ‘SFTP’ Whitelisting
Where an imc mail server ‘SMTP’ is used to relay email messages on behalf of the client’s own email domain, it must be ensured that whitelisting of the imc mail server occurs to prevent emails being treated as spam. This can occur via whitelisting the imc mail domain or application server IP address. The customer must configure the whitelisting on their end and request required details for the whitelisting from the Scheer IMC Consulting or Support team.
Further configurations are also possible including the possibility to use customer mail servers; such advanced scenarios are best discussed between respective technical teams.
System Texts (Wording)
The system wording is another area that can be configured client-specific. Wording is configurable via the System texts function where there are over 23,000 system text bundles that can be edited. Changes can be made per client by changing the client context selection field from ‘Global’ to the desired client.
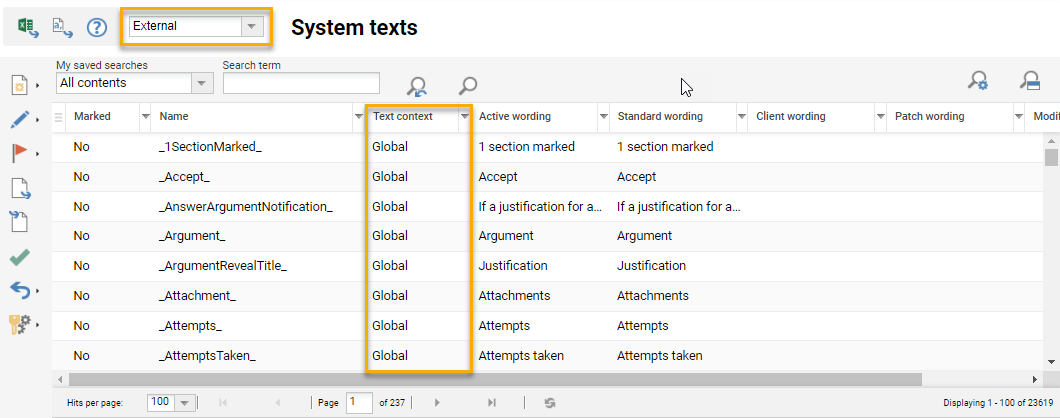
Once a bundle is edited, saved, and activated as client specific the Text context column will update to display the client name rather than ‘Global’.
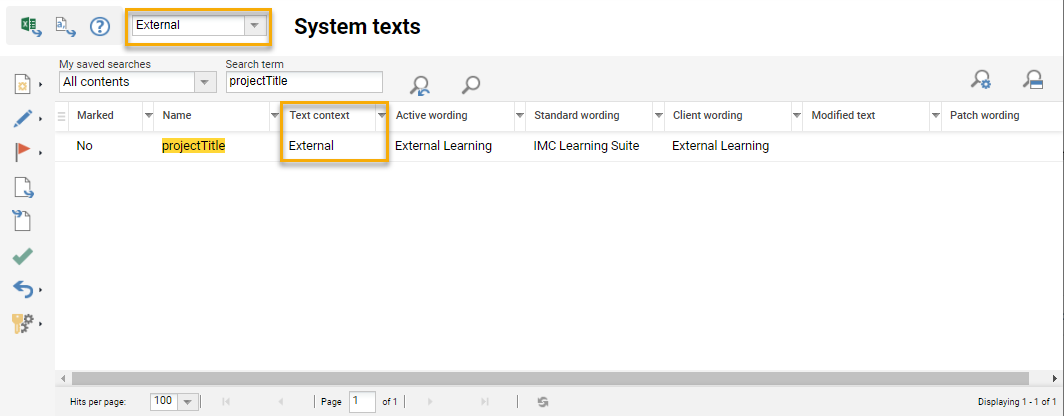
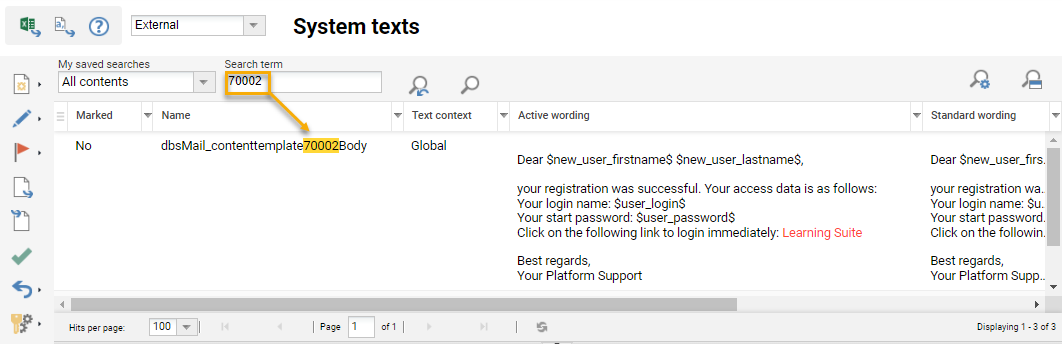
With over 23,000 system text bundles configuration of wording can be a timely task, so a typical multi-client configuration would initially update limited system texts such as projectTitle (browser tab name) and account registration emails (e.g. 70002, 70003) where names of the system can vary between clients.
For a client administrator group to be allowed to edit own system texts, the group will require clearances on the standard system texts bundles. This can be done bulk granting of clearances to up to 500 ‘Global’ system text bundles at a time. Client administrators only in the one client will only be able to edit system text bundles in their own client context.
Reporting
Reporting is another area where some configuration changes would need to occur as users require clearance to view reports via Reports (Learning Analytics) and reporting dashboard. This means clearance will need to granted to new user groups requiring access to reports via the Settings > Report > Reports menu. This is most efficiently done by bulk selecting all reports and then assigning clearances; just be aware if there are custom reports.
Testing
With any logical multi-client separation, testing is a very important step to ensure that all objects have been properly configured in terms of assignment and access rights. Below is a list of some core tests that would need to be performed for a base configuration:
-
Is the client portal page accessible on the configured URL or parameter?
-
If an own domain is in use, is the SSL certificate correctly applied?
-
Is the correct dashboard and design displayed?
-
Is the system name (projectTitle) updated in the browser tab?
-
Are the desired login options enabled? E.g. Local login and/or SSO
-
If ‘Register’ is enabled, does account self-registration create the new user in the correct client and learner group?
-
Are account creation notifications sent?
If so, are the account creation notifications sent from the correct sender? -
Are newly created users via backend assigned to the correct client and learner group?
-
Does the new administrator group have clearance on the new users?
-
Logging in with a learner account of the new client, does the:
-
Dashboard load correctly?
-
Catalogue display?
-
Navigation look correct?
-
Profile personal attributes look correct?
-
-
Logging is with an administrator account of the new client, does the:
-
Role change icon appear?
-
Navigation options available look correct?
-
Users menu show users assigned related to the new client?
-
Clearance enable editing the new users.
-
Organisation structure and groups menu display the new groups?
-
Groups allow the administrator to edit and assign users?
-
Course templates menu show Course types when ‘Create’?
-
Media menu show Media types when clicking ‘Create’?
-
Newly created objects automatically grant clearance to the admin group?
-
Content functions not show unintended content of other clients?
-
Reports menu in the ‘Admin’ category show reports?
-
Admin > Assignments > Catalogue menu show the correct catalogues?
-
Catalogue allow the administrator to assignment content and clearances?
-
Dashboard pages menu show the correct dashboards?
-
Dashboard pages menu allow the client dashboards to be edited?
-
The level of testing performed is very important and can take as long (if not longer) than the configuration itself.
Summary
It’s now hopefully clear on what a logical multi-client separation is, when a multi-client configuration is actually needed, what configurations are required to perform a basic multi-client setup, and what the possibilities are for a more advanced setup. The configuration possibilities listed above are purely those where there is direct multi-client capability in the function or a configuration requirement. There are many further functional areas that can be further configured by the client administrators that have deliberately not been discussed in this document as they are considered general configurations. Whilst a multi-client setup is technically possible for customers to configure, it is highly recommended to work with the Scheer IMC Consulting team in such setups given the complexity.