Deep Dive: User lists overview and configuration
What are User Lists?
The User lists function controls the display of personal attributes in most functions and on-screen reports where user details are displayed. In the imc Learning Suite there are approximately 95 standard User lists that are all configurable to determine which Personal attributes will be displayed by default or optionally available as columns and filters for each individual User list. These configurable user lists are great for personalising functions and on-screen reports with required and relevant user information.
For a System Administrator, the configuration of User lists will be one of the most important tasks. Configuration helps ensure desired columns and filters are available for other administrators, trainers and supervisors to select. This task is important for System Administrators as the default configuration of all User lists do not include any custom Personal attributes created during or after an implementation project, but custom Personal attributes can be added.
This article will explain how each User list can be edited, including how to configure client specific lists, and explain some of the key User lists recommended to configure.
Configuration Steps
The are two types of User lists which are standard System lists and Custom lists; the latter can be created to link to User Panels. Given the functional nature of User lists it’s not possible to create new System list User lists related to functions, but standard System lists can be edited to be client specific if the Activate multi-client context setting is enabled. This means the same user list can be configured differently for separate clients; e.g. separate personal attribute displays for Employee and External user clients/tenants.
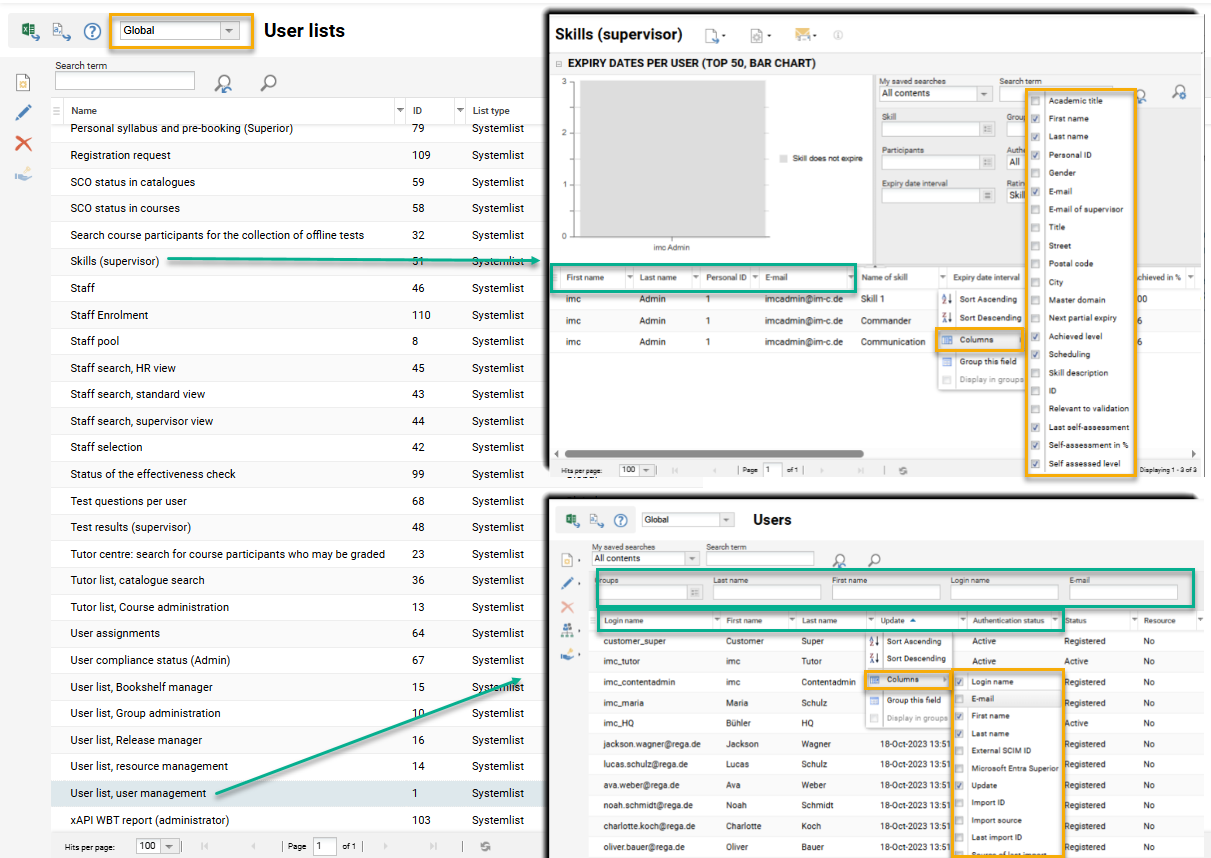
System Administrators can configure the existing User lists in the User lists function accessed via the Settings category User data management folder. To update the configuration of a User list simply requires highlighting the desired User list and clicking the Edit icon.
The naming of the User lists related to on-screen reports are the same making them easy to identify. However, with User lists related to functions and user selection pop-ups within functions, the naming is similar, but not identical which can cause confusion. Unfortunately there is no easy way to exactly identify which User list relates to which function other than trial and error. What can be done if needed is re-naming the User lists to something more meaningful.
Updating User List Columns
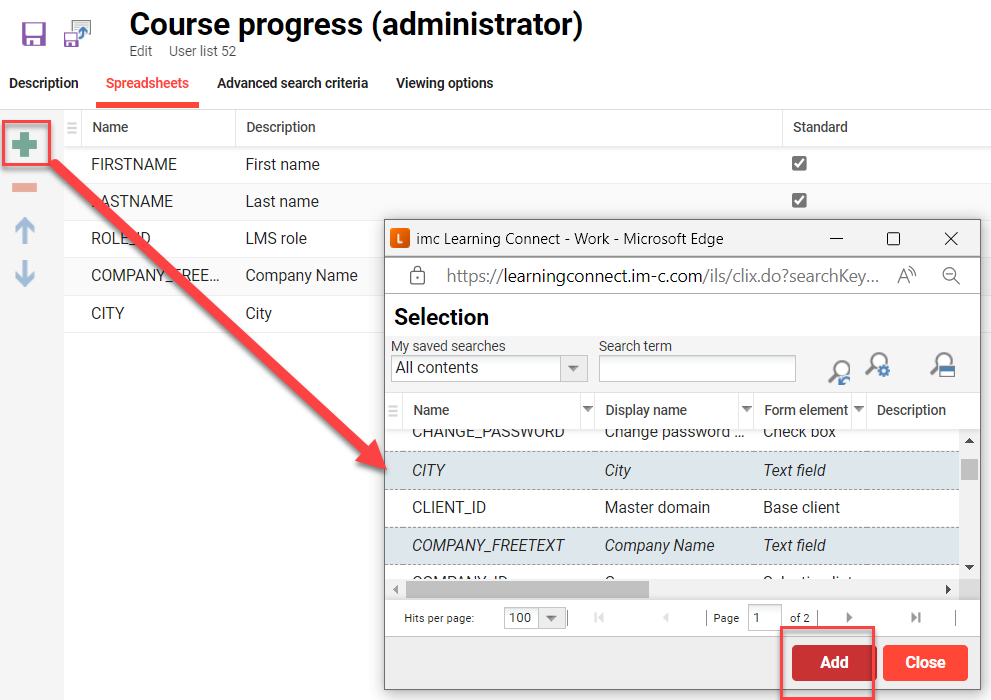
When editing a User List the Spreadsheets tab is where the columns are configured. Use the Add icon (+) to launch a pop-up window to select further Personal attributes to add as result columns. In the pop-up search for the desired Personal attributes, then highlight, and click the Add button to assign to the list; note holding the Ctrl key on the keyboard will allow multi-select. When the desired Personal attributes are assigned they will be displayed in italics and click the Close button to close the pop-up.
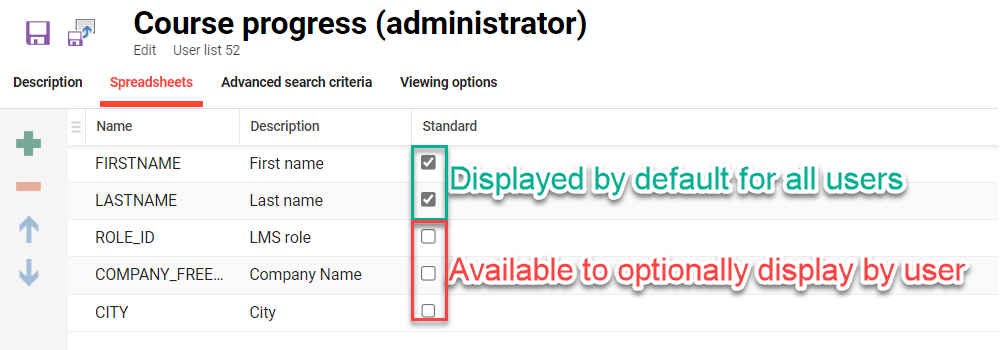
The newly added Personal attributes will now be visible and the Viewing options can be set. A ticked checkbox in the Standard column indicates that the Personal attribute will be displayed as a column by default for all users running the Default search for this User list; whereas an unticked checkbox means the Personal attribute will be available to the users to optionally add via the drop down arrow on any of the columns. Use the Up and Down arrow icons or drag & drop to adjust the ordering of the columns. Click Save when done.
Updating User List Filters
When editing a User list, the Advanced search criteria tab is where search filters are configured. Use the Add icon (+) to launch a pop-up window to select further Personal attributes to add as filters. In the pop-up search for desired Personal attributes, then highlight, and click the Add button to assign to the list; note holding the Ctrl key on the keyboard will allow multi-select. When the desired Personal attributes are assigned they will be displayed in italics and click the Close button to close the pop-up.

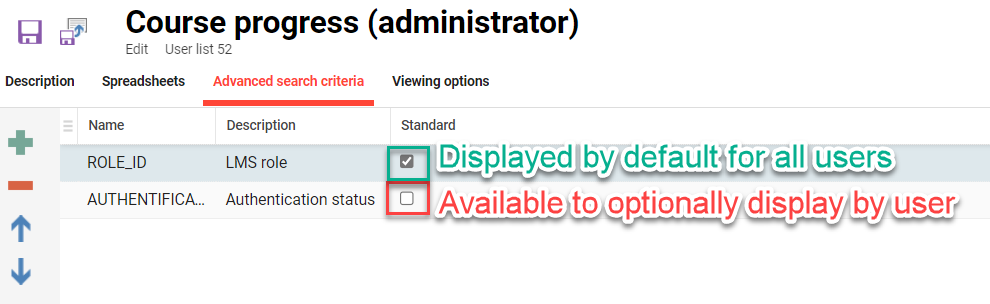
The newly added Personal attributes will now be visible and the Viewing options can be set. A ticked checkbox in the Standard column indicates that the Personal attribute will be displayed as a filter by default for all users running the Default extended search for this User list; whereas an unticked checkbox means the Personal attribute will be available to the users to optionally add via the extended search Add search criteria option. Use the Up and Down arrow icons or drag & drop to adjust the ordering of the filters. Click Save when done.
Any number of columns can be added and ticked to display by default, but there is a limit of filters that can be displayed by default. This is especially the case for on-screen reports where only enable eight standard filters can be enabled which includes standard filters and meta tag list filters. Therefore, it is best to configure non-critical Personal attributes as optional filters.
Client-specific User Lists
A powerful feature of the imc Learning Suite is the ability to update all Profiles and User Lists to be Client specific; thus meaning the display of each User List can change based on a User's master Client. This does require the LMS to have the Activate multi-client context setting activated in the Configuration function Clients menu. When activated the Client context select field will display and can be changed from Global to a specific client.
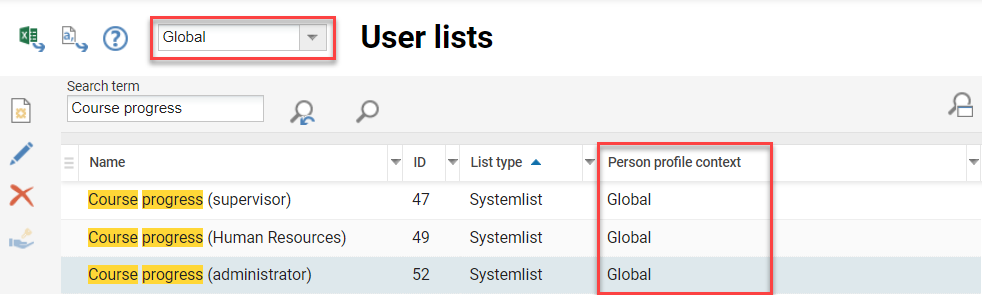
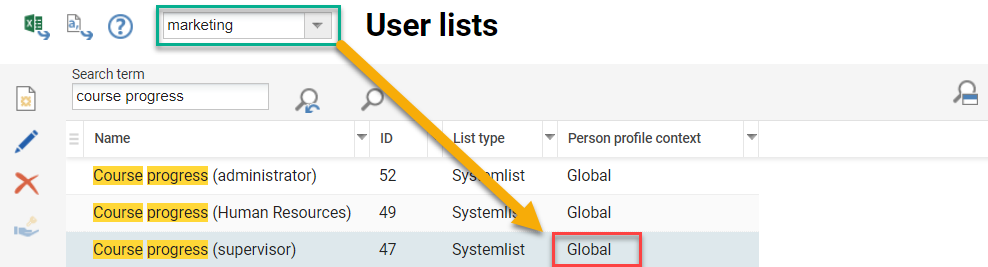
To configure a client specific User List change the client context to the desired client and locate the desired User List. In the example below the selected Client is marketing and in the Person profile context column it can be seen that this User List is currently using the Global context which is the default. To change this simply highlight the desired User List, click the Edit icon, make the required changes to the Spreadsheets and Advanced search criteria tabs and click Save.
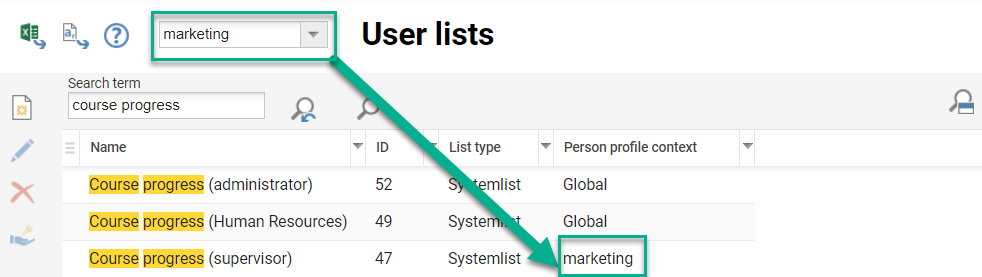
When returned to the User lists function the Person profile context column will be updated to match the client context that was selected when editing the User List. In this example, any changes made to the Global User List Course progress (supervisor) would no longer effect the marketing User List Course progress (supervisor) and any Supervisor with the master-client marketing would see the marketing version of the report.
Hints:
-
To configure multi-client specific User lists requires the Activate multi-client context setting to be activated and a system restart. This is best requested by Scheer IMC as a restart is required.
-
There are no Clearances on clients and the ability to see a client in the selection requires either Super Administrator privileges or the user to be assigned to the client/s. The System Administrator group can be edited to give Super user group function.
Key User Lists to Update
The following are some important functional User lists that are commonly updated:
-
User list, user management: Relates to the Users function to view, create and edit all user records.
-
Staff pool: Relates to the Staff pool function for administrators to view user training history, interact with competency records and assign on-the-job training with mentors.
-
Staff: Allows adding Advanced search criteria in the My staff function. No additional spreadsheet date will display though.
-
List of participants: Relates to the learner view of the course room where the Participants panel is enabled. The attributes assigned as ‘standard’ are visible when the learner clicks ‘Display all’.
-
List of course participants, course administration: relates to the Courses > Participant administration, Course templates > Participant administration and Learning paths > Participant administration functions.
-
User list, Group administration: Relates to the Organisational structure and groups function when adding users in the pop-up.
The following are some key on-screen report User lists that are commonly updated:
-
Course progress (Administrator): Report that shows the current participant enrolment statuses for courses with results based on clearance.
-
Course progress (supervisor): Report that shows the current participant enrolment statuses for courses with results based on supervisor to staff relationship.
-
Course enrolment history: Report that shows all participant enrolment status changes for courses with results based on clearance.
-
Learning path overview (administrator): Report that shows the current enrolment statuses for learning paths with results based on clearance.
-
Learning path courses (administrator): Report that shows the current participant enrolment statuses for all courses within learning paths with results based on clearance.
-
Audit report: Report that shows the participant completion of all course components with results based on clearance.
-
Due date inspection (supervisor): Report for identifying participants with non-completed compliance courses nearing or past due dates with results based on supervisor to staff relationship.
-
Skills (supervisor): Report for identifying skills held by staff and those with encroaching skill expiry dates.
In some user searches, further properties that are not managed via personal identifiers, such as the online status or the search criterion Skills or Course are available. These cannot be shown or hidden via the User lists function as they are not Personal attributes, but Course or Media related items might be configurable in the Meta tag lists function.