Deep Dive: How to configure External Courses and Workflows
What are External Courses?
The External Courses function allows learners to Record external training activities against their own learning history. These activities can be in many forms and generally represent training not offered within the imc Learning Suite; For example, an externally run first aid course, project management qualification, self-study activity, or tertiary qualifications. The External Courses function can also be used to Request external training activities and record activities for accredited certification point/hour tracking. In a default configuration, external courses are only visible in the learning history of users; this means external courses would not be shown in the Administrator view Courses function or course reports.
External Course Use Cases
There are four main use cases or scenarios intended for external courses:
-
Direct recording of completed external courses and training activities
-
Administrator/supervisor approval request to record completed external training with evidence
-
Requesting to attend external courses that are yet to occur
-
Accredited certification activity point/hour recording
Configuration
In an out-of-the-box system, the External Courses function is not activated and requires some configuration to setup. The following sub-sections will explain all steps:
External Course Display
The systemwide display of External Courses is configurable in the Configuration function Course menu in the Show external courses setting. Activating this setting will display external courses in the administrator view Courses function. Activation will enable administrators to view all external courses recorded by learners and make changes.
External Course Type
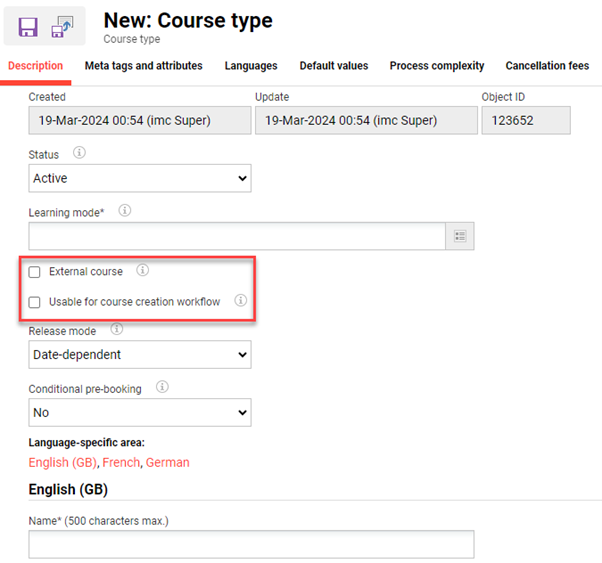
The first configuration step is the creation of new external course types in the Course types function menu. Create new course types the External course checkbox and Usable for course creation workflow checkbox must be ticked; note the External course checkbox must be ticked before saving. If both Date-dependent and Duration of use release modes are required, then two external course types will need to be created.
It's recommended to keep the number of meta tags available for learner population to a minimum to avoid any unnecessary confusion. This is performed in the Meta tags and attributes tab in the Editable for course column by only setting the Editable display option for required meta tags; all other meta tags can have values defaulted and be set to Do not display.
With external course types the Name and Description meta tags are most important, along with Start date and End date for date-dependent course types. Other important meta tags are Enrolment type if approvals are required, and Course may be concluded by to determine how the course is to be set as concluded. It’s might be required to further create some new meta tags in the Meta tags function to better enable learners to describe the external trainings; for example, new External Provider and External Location meta tags are commonly created as the standard Provider and Location meta tags relate to internal objects.
Once the meta tags display settings are complete, move to the Description tab to set the meta tag default values. This is especially important for settings that will not be visible to the learner when creating the external courses; e.g. setting the ‘Enrolment type’ with manager or administrator approvals and ‘Course conclusion by’ learner or administrator. Also ensure the Planning status meta tag is set to Released.
The Process complexity tab is the final area of the course type to configure. This determines the steps available for population when the learner is creating external courses. Typical options enabled would be ‘Modifiable template attributes’ and ‘Meta tag’ to enable administrators changing settings at the course template level; also ‘Components’ can be enabled if allowing the learner to upload media, then ‘Skill management’ and ‘Certifications’ are important if the learners are permitted to record external activities that award required Skills or track Certification points/hours.
External Course Templates
The next step is to create course templates from the new external course types flagged for ‘External course’ use. These external course templates will be used by learners to create their external courses. When creating the course templates consider all the training activity formats that will required for a learner to select from; e.g. Seminar, Conference attendance, External qualification, Mentoring session, Self-study, Certification, or Online course etc. These training formats or types will determine the meta tag fields and settings that will be required for the learner to populate.
Adjust the meta tags in the Meta tags and attributes tab as required. Then adjust the meta tag default values as required in the Description tab. When approvals are required for external courses the Enrolment type meta tag will need a self-enrolment workflow with the desired approver (Supervisor or Administrator). Also ensure the Planning status meta tag value is ‘Released’ and on saving use the Save & Publish icon.
If using the Skills or Certification functions to enable learners to add skill achievements or record points/hours against accredited certifications, then specific course templates can be created with the relevant skills or certification pre-assigned.
Finally, as general users will be using these external course templates, ensure ‘Execute’ Clearance is provided to the learner groups or client requiring access.
External Course Creation Workflows
The Easy Course Creation function menus use pre-defined Course creation workflows to determine what steps will be possible when creating courses. These workflows are defined in the ‘Course creation workflow’ function found in the Settings category Content menu.
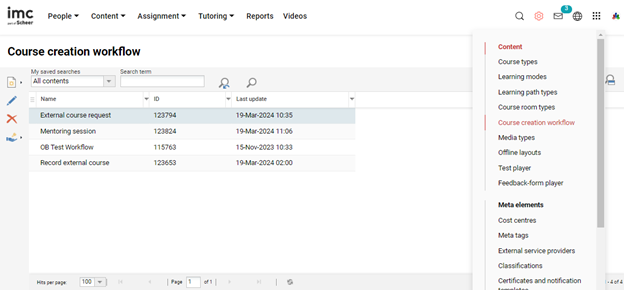
If the Course creation workflow function is not available in the navigation, it might be set Inactive, require access rights to be granted, or is yet to be created. The latter can be configured in the Navigation function by creating a new Default menu (Navigation > Create > Menu), choosing Course creation workflow as the Default menu type and setting the identifier as course_creation_workflow.
When creating a new course creation workflow, the first step in the ‘Description’ tab is deciding the Workflow use setting; for external courses this is either Record external course by the participant or External course request by the participant’. Select the desired ‘Workflow use’ option, then enter values in the ‘Name’ and ‘Subtitle’ fields. The text defined as subtitle for the workflow will be the text displayed as a workflow name in the front end. For each step, the name and the description will be displayed to the user while navigating through the steps in the workflow.
Next is the ‘Entry point’ tab whereby default the ‘Select template’ and ‘Manage courses’ steps are active with further Edit options.
Highlight the ‘Select template’ option and click the ‘Edit’ icon. The step can be renamed in the ‘Description’ tab and options defined in the ‘Settings’ tab.
-
Course Templates: Allows limiting the workflow to automatically select a specific course template. If a course template is selected the following options are irrelevant.
-
Display mode: Determines if course templates are shown in list or tiled (map) view.
-
Permit search: Shows a search box to search for course templates by name and description. This option makes more sense for Easy Course Creation rather than external course workflows.
-
Number of search results: Limits the number of search results and if there are further non-displayed results a Show more button will be presented.
Once options are set, click the ‘Save & back’ icon to return to the ‘Entry point’ screen. The remaining ‘Manage courses’ option is not relevant to external courses and can be ignored.
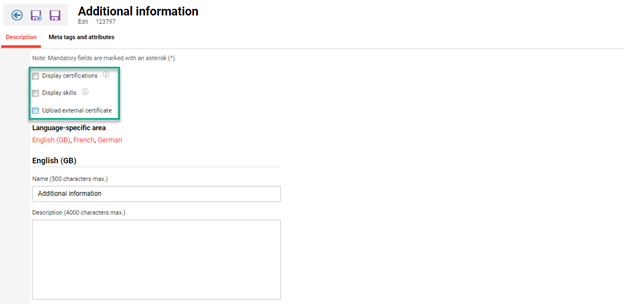
Finally, the ‘Workflow steps’ are to be defined. These control the tabs shown during the creation process. For external course workflows, the ‘Additional information’ value is the only important option to edit and the others can be ignored, unless it's desired to allow learners to upload content.
In the ‘Description’ tab are three important checkboxes that are relevant to some external course recording scenarios. These are ‘Display certifications’ to enable accredited certification points/hours to be earned via external training activities, ‘Display skills’ where external training can deliver a skill managed in the LMS (e.g. First aid, Project Management), and ‘Upload external certificate’ to serve as evidence of completion. The ‘Meta tags and attributes’ tab enables adding additional meta tags for the user to populate that may not be available in the external course templates.
Once finished click ‘Save and back’ icon and then ‘Save and close’ icon to finalise the workflow.
Like with external course templates, clearances will need to be provided on the workflows for the learner groups requiring access to record or request external courses.
If additional external workflows are required duplicating an existing workflow can save time.
External Course Navigation Points
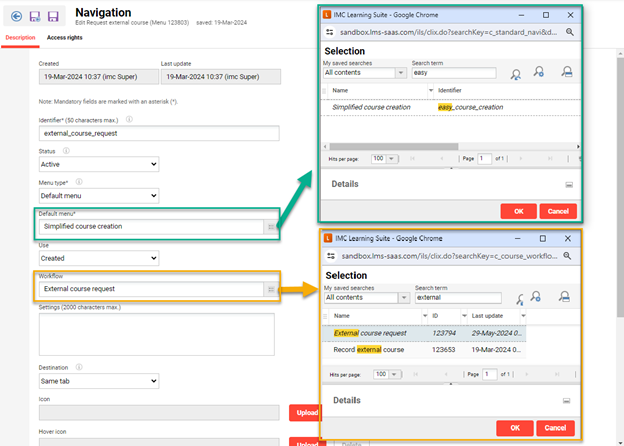
The next step to configure is navigation points for the learners to Record and/or Request external trainings. To configure, either type ‘Navigation’ in the search or in the Settings category expand the System Platform management menu and open Navigation. The new navigation points would normally be in the Learner category. To start the creation process, click the ‘Learner’ category to highlight, then click the ‘Create’ icon and select the ‘Menu’ option.
When creating a new menu complete the following steps:
-
Populate the ‘Identifier’ field which will require a unique text value to be entered without spaces; it's recommended to name similar to the workflow.
-
The ‘Status’ field will need to be set Active for the menu to be usable.
-
The ‘Menu type’ field will need to be set as ‘Default menu’ as Easy Course Creation is a standard function that is selectable via the ‘Default menu’ selection field.
-
Click the ‘Default menu’ selection field to launch a popup window that contains all standard functions. Search for ‘Easy’ or ‘Simplified’, then select ‘Simplified course creation’ and click the ‘OK’ button.
-
The ‘Use’ option for external courses will be ‘Created’.
-
Next choose the ‘Workflow’ to be used for the new navigation point.
-
Decide if the ‘Destination’ will be ‘Same tab’ or ‘New tab’.
-
Enter a ‘Name’ for the new navigation point in each system language.
-
In the ‘Access rights’ tab click the Add icon to select groups that will require access.
Once population is complete click the ‘Save and back’ icon. The new navigation point will now be ready, but to view requires logging out and logging back in.
-
In a default configuration this would require a System administrator or Super administrator role to perform navigation configurations.
-
If multiple external workflows are required for different workflows repeat the above process to create multiple navigation points.
-
If creating multiple navigation points it can be neater to structure these by first creating a Structure instead of a Menu.
External Booking Request Panel
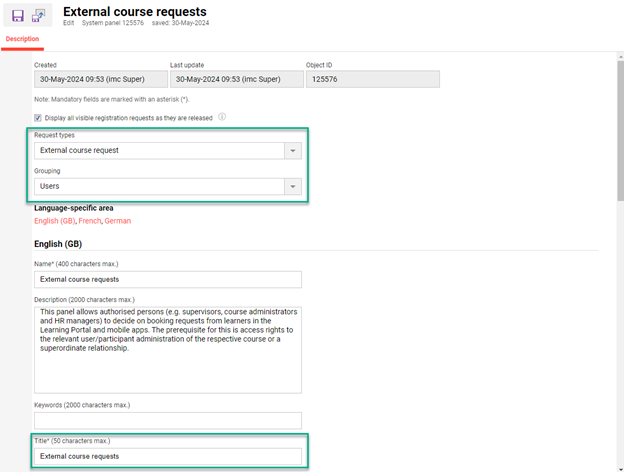
Where external course Record and Request workflows require Supervisor or Administrator approval, it will be needed to create a new Booking request panel. This is done in the Panels function by duplicating the standard Booking request panel with ID 173.
Change the Request type setting to External course request, change the Grouping to Users, name the panel and title as required then click the Save and close icon.
The final step is assigning the new external course approval panel to an existing or new internal dashboard page; normally a Supervisor dashboard or Administrator dashboard.
External Course Administration
Learners Requests and Recording
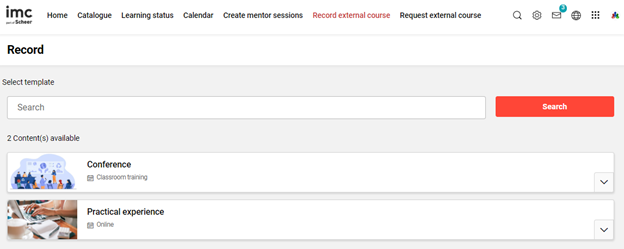
Learners can record or request external courses via respective menus. The workflow linked to the navigation point will determine if population begins immediately in a pre-selected external course template, or if the learner will need to manually select an external course template for which they have clearance.
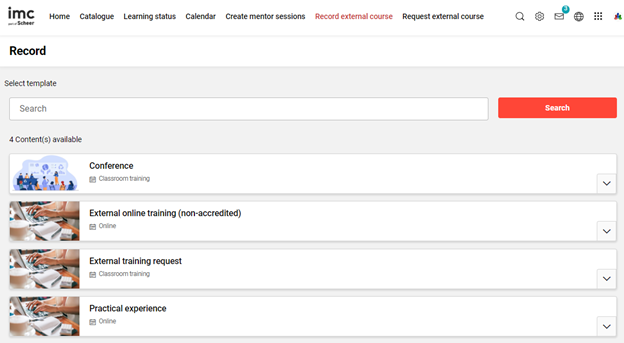
A course template is selected simply by clicking anywhere on the list or tile object except the down arrow which expands. This will immediately load the ‘Course details’ step where the learner will populate details of the training activity they are recording or requesting. Like regular courses, the available meta tags and pre-defined values displayed when creating external courses are determined in the selected course template, but some additional meta tags can also be defined in the course creation workflow. Once meta tags are populated clicking the ‘Save and close’ button will save the external course and move to the next step of the process.
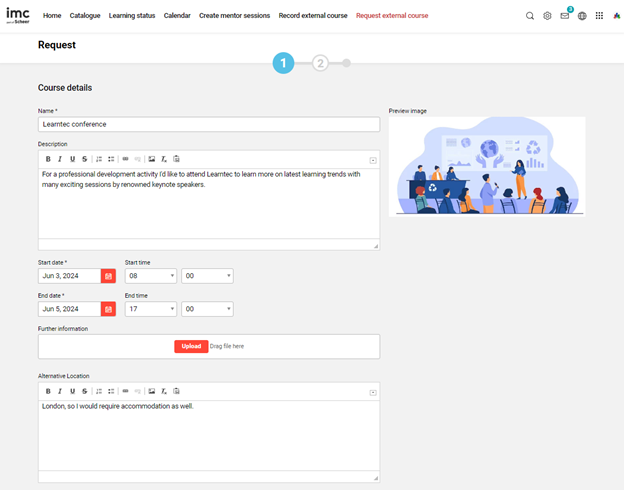
The next step of the process is largely determined by the course creation workflow linked to the navigation point, but also by the course type ‘process complexity’ settings from which the selected course template was derived. Normally for external courses the next step in the process would be ‘Additional information’ which can allow populating additional meta tags if added to the workflow.
Further possible steps in the process could include adding an internal Certification plus achieved hours/points the training relates to, adding an internal skill that the training awards, and adding externally awarded certificates as evidence. Once all available steps have been completed the final step displays the course overview which is a summary of entered information.
If the selected course template defined an approval process in the ‘Enrolment type’ meta tag the external course would not immediately be assigned to the learner’s ‘Completed’ courses in the ‘Learning status’ function, but actually have a ‘Pending’ status until approved or rejected by the supervisor or administrator.
Supervisor and Administrator Approvals
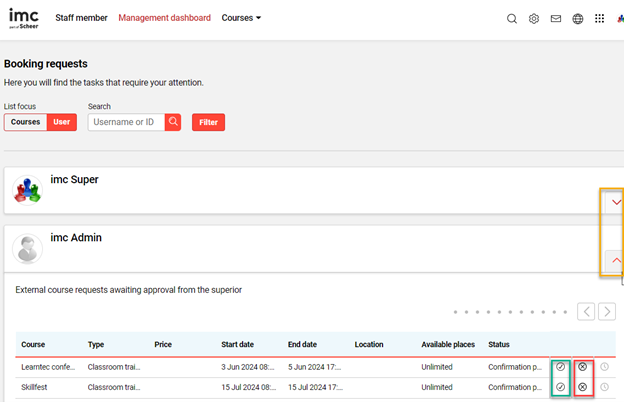
External course requests and recorded external courses that require approval must be viewed via a Booking request panel that is configured to display external courses. For supervisors this is like contained within the Manager dashboard and for administrators this would likely be an own approval dashboard in the Admin category. For external course approval panels, the pending approvals would normally be sorted by User which makes more sense than by course given external courses are one to one ratio. The drop-down arrow on a user when clicked will expand to show pending approvals for the user. Approvals are performed by clicking the tick symbol and rejections by clicking the cross symbol.
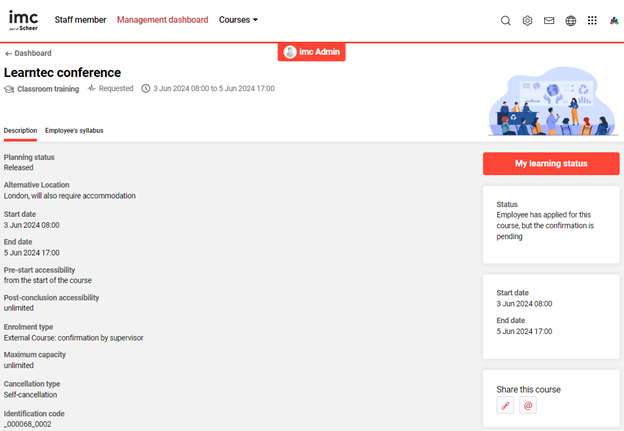
Clicking anywhere else on the request record will open the course details to provide a full description, along with any uploaded content such as additional information or certificates that complement the request. Once details are viewed either clicking ‘ß Dashboard’ or the browser ‘Back’ button to return to the previous screen where the Approval/Rejection can be processed.
Summary
It will now be clear what External Courses are, along with intended use cases, the required configuration steps, and administration process. This is a versatile function used my many customers. If more information or support is required please lodge a ticket with the Scheer IMC Service Desk.