Deep Dive: On-the-job Training Overview, Creation, Administration and Configuration
Introduction
On-the-job Training is an add-on module that compliments standard training workflows in the Learning Suite. The intention of On-the-job Training is to put training theory into practice by applying training knowledge to real work situations. This article aims to provide a thorough overview of the On-the-job Training module with example use cases, configuration steps, and administration workflows.
What are On-the-job Trainings?
On-the-job Trainings (OJTs) are essentially sets of tasks for Learners to complete. Tasks are created individually and then assigned to an On-the-job Training Template. These templates can then either be directly assigned to a user by their Supervisor or added as a component of a Course. They are intended to support development activities that take place directly in the workplace and consists of various tasks for the learner needs to complete. The tasks can be:
-
completed in written form or by uploading files including video,
-
graded as either Complete or Passed/Failed by the Assessor/Mentor,
-
optionally scored with a percentage achievement,
-
limited to a number of attempts, and
-
completed collaboratively in a group.
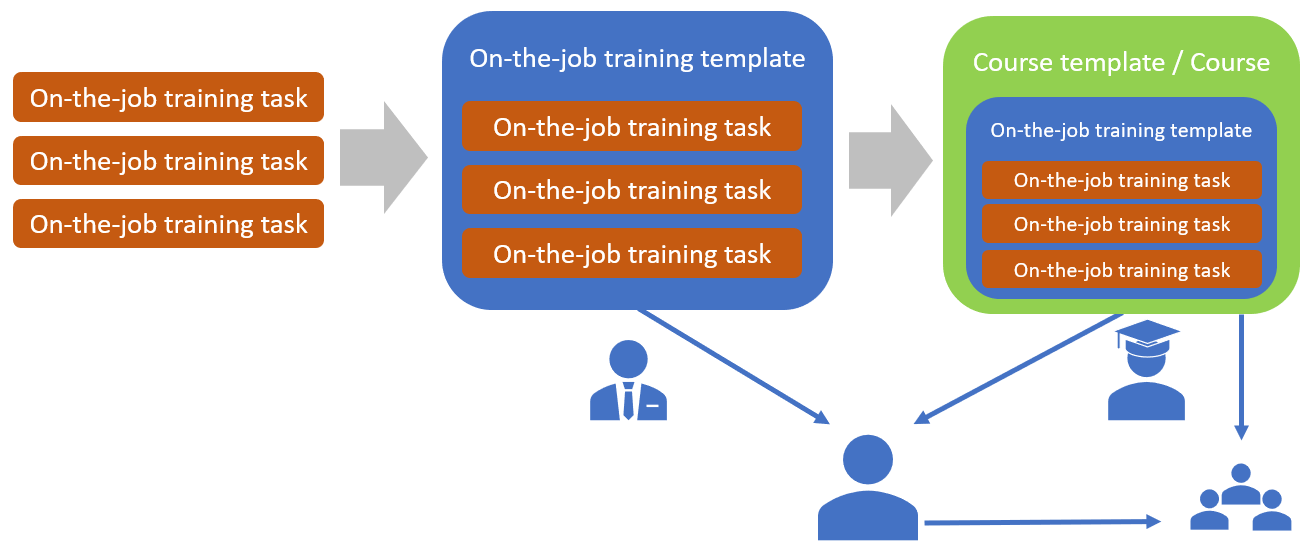
When On-the-job Trainings are directly assigned to the Learner by their Supervisor, either the Supervisor themselves or a selected Mentor will be responsible for assessing completion. Where On-the-job Trainings are assigned to Courses there must be at least one Tutor added to the Course with ‘On-the-job training’ assessor rights.
On-the-job Training Use Cases
The On-the-job Training module is quite flexible and is used by customers for many scenarios including:
-
Completing practical assessments of attained theory in the workplace
-
Issuing basic sets of tasks such as onboarding requirements
-
Supporting development activities in the workplace between a trainee and mentor
-
Performance management by setting development goals and tasks.
-
Capturing information from course participants
-
Fostering collaborative work with group assignments within courses
-
Completion of uploaded exercises or assignments within the classroom
Accessing On-the-job Training
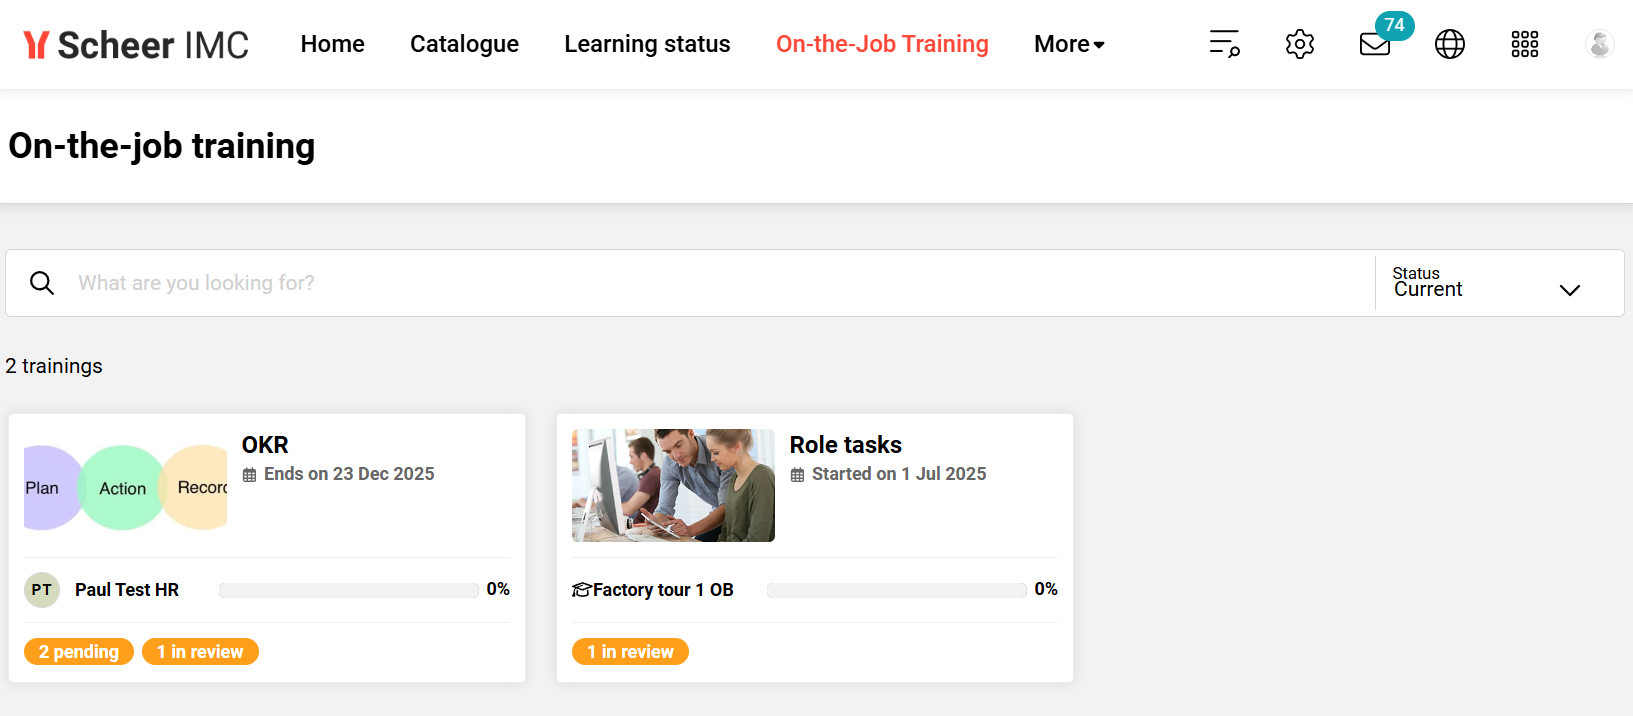
Learners have an On-the-job training menu to access both forms of On-the-job Training assignments. On-the-job trainings assigned to a Course can additionally be accessed within the Course syllabus. A drop-down menu in the search bar allows you to filter the on-the-job trainings according to their status. Current refers to trainings that have not yet been completed, Pending refers to trainings that still need to be assessed, and Completed refers to trainings that have been successfully processed. To open an On-the-job Training simply click on the tile which will open the selected On-the-job Training in an extended view.
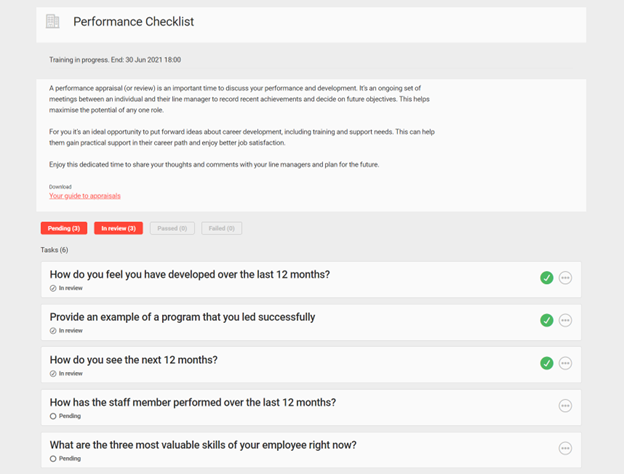
When opened the current status along wish a due date (if there is one) is displayed at the top, followed by a description of the on-the-job training requirements, then buttons to filter the linked On-the-job Training Tasks (Pending, In review, Passed, Failed) and at the bottom a list of all the linked/filtered tasks. Identifying how the On-the-job Training was assigned is simple as there is a Mentor listed for directly assigned or a Course name displayed. With the On-the-job Training Tasks a green tick identifies the Tasks that are already completed and each Task can be expanded by clicking the circle icon with the three dots.
Once expanded each On-the-job Training Task will provide a further explanation of what is needed to complete the Task. Depending on the Task there might be a document to download, evidence to upload via Add attachments button and/or comments via Feedback to complete the tasks. When the requirements have been completed the Mark done button either completes the task or submits for review by the Mentor/Assessor. For Tasks In review requiring assessment it’s possible for the Mentor or Assessor to provide further feedback and change the status back to Pending if they feel more work is needed to complete the task requirements. Tasks may also have limited submissions.

Once all Tasks have been satisfactorily completed the On-the-job Training can be set either manually or automatically to a Concluded status. Tasks may also be marked by the Mentor/Assessor as Passed or Failed and percentage graded.
If using a mobile device or tablet the use of the camera is possible when performing an Upload. This is great for uploading live videos as evidence.
Creating On-the-job Trainings
On-the-Job Training can easily be created by Administrators in a simple two step process where the first step is to create the 'On-the-job training tasks' and the second step is to create the 'On-the-job training template' with tasks then assigned. The tasks can be created multi-lingual with various options relating to completion requirements and satisfaction workflows.
On-the-job Training Task Creation
On-the-job training tasks are created in the Admin role by opening the Content menu and selecting the On-the-job training tasks function. To commence creating a task click the Create button and select New. When creating a task there are many fields to populate with mandatory fields being marked with an Asterix '*' symbol. All fields and their purpose are explained below in a numbered list:
-
Name*: This is the name of the task and will be displayed to the learner and searchable by administrators when assigning to training templates. The name should be meaningful.
-
Description*: This is important to describe to the learner what is required or instructions to complete the task and will display when the task is opened.
-
Keywords: Are not so important as they are only used to enhance searching for tasks by Administrators; e.g. when an Administrators searches for a task within an On-the-job training template keywords are considered in the search results.
-
Comment: Are used to enhance administration of OJT-objects as they are indexed by the free text search and function as additional category in the extended search. The comment is not shown to the learner.
-
Duration: Used to indicate how long the task completion should take to complete. This field is not functional and serves only for descriptive purposes.
-
Upload file: Allows a file to be uploaded for the learner to download. These files could include assignments for the learner to complete offline and re-upload once completed or simply supporting information to complete the task such as a video. The Title is the displayed name the learner will see when accessing the file. To upload a file click the Upload button, then in the pop-up click Choose file to search on your local file explorer, locate the desired file then click Open and finish by clicking Upload.
Note: The list of available file extensions is controlled by a whitelist that can be configured by System Administrators to allow more in the Configuration function File formats option. -
Number of attempts: Here an integer value can be entered to restrict the number of times a learner can submit/mark a task as completed. By default the number is '0' which actually is an unlimited number of attempts. This setting is ideal for workflows where the learner is allowed to submit draft completions to be reviewed by mentors or assessors with their feedback provided in order for the learner to improve subsequent submissions, but ensuring the number of attempts is controlled. This setting also activates a submission where each submission along with dates is tracked and can be viewed.
-
Checkboxes:
-
Staff member can mark tasks as done: When ticked the learner will be able to mark the task status as Complete using the tick icon. If not ticked or if the task is subject to Passed/Failed grading then the Mentor or Assessor is responsible for ensuring tasks are completed.
-
Require date and time at task completion: If the 'Staff member can mark tasks as done' is ticked then this setting also being ticked will require the learner to manually enter a date/time when the task was completed rather than using the date/time at processing.
-
Task can be evaluated as passed or failed: When ticked the Mentor or Assessor will need to mark completed tasks as Passed if satisfactory or Failed if not up to required standard.
-
Allow the input of results in percentages: When ticked the Mentor or Assessor can further grade Passed or Failed tasks with percentages.
-
Evaluation criteria: Enter text here to describe to the Mentor or Assessor how satisfactory task completion is to be evaluated when marking. The text entered is not seen by the learner.
-
Feedback: Here the checkboxes when ticked allow the learners and mentors/assessors to provide each other feedback on the task; if not unticked this will not be possible. The Draft solution is where a written template can be entered to pre-populate the feedback for the learner to make online submissions.
-
Attachments: Here the checkboxes when ticked allow the learners and mentors/assessors to upload attachments to the task to compliment the submission or feedback. When using mobile devices or tablets the uploads can include live recorded videos which can be ideal for observation scenarios.
Once the task has been populated click Save or Save & Close and the task will be created.
Hints:
-
On-the-job training tasks are not versioned so any future changes will be updated live throughout the system.
-
If the created task is to be made available to other administrator groups to use in their own On-the-job training ensure Clearances are set accordingly.
Creating On-the-job Training Templates
On-the-job training templates are basically like a folder where existing tasks are added to compile a checklist. Therefore, it's recommended to first create the tasks before the template, but the two can be done in parallel if required. In the Admin role open the Content menu and select the On-the-job training template function. To commence creating a template click the Create icon and then select New. A new browser tab will open with four sub-tabs. The first Description tab as many fields to populate with mandatory fields being marked with an Asterix '*' symbol. All fields and their purpose are explained below in a numbered list:
-
Name: Visible to the staff/learner, mentor and assessor
-
Description: Used to overall described the included tasks and completion process
-
Keywords: Used to aid administrator searches
-
Comment: Can be freely defined and represent detailed annotations of the respective on-the-job object. They enhance administration of OJT-objects as they are indexed by the free text search and function as additional category in the extended search. The comment is not shown to the learner.
-
Task checkboxes: Focus on tasks hides the template details tab and the description pop-up to allow to focus on the tasks. Enable task expanding on load automatically expands the tasks load and always remain expanded.
-
Image: Used to display a related image where the On-the-job training is accessed for staff, mentors and assessors
-
Processing checkboxes: Completion by progress if ticked will automatically conclude the On-the-job training once the staff member is marked as Complete or Passed on all tasks contained within the template. Allow rating enables the staff member to rate their experience out of 5 starts.
-
Staff file upload: A file with additional information for the overall on-the-job training can be uploaded here. The file will be made available to staff members and mentors within the training for download. Supervisors and HR managers can download the file via the training overview. Files types able to be uploaded are controlled by a whitelist in the 'Configuration > File formats' function.
-
Mentor file upload: A file with additional information for the overall on-the-job training can be uploaded here. The file will be made available to staff members and mentors within the training for download. Supervisors and HR managers can download the file via the training overview. Files types able to be uploaded are controlled by a whitelist in the 'Configuration > File formats' function.
-
Number of attempts: The number of attempts a learner has to submit the task. The default of 0 equals to unlimited attempts.
-
Permissions: Determines which functionalities staff member will have access within the training. The tasks themselves have the same settings, but these options can override those set in the tasks.
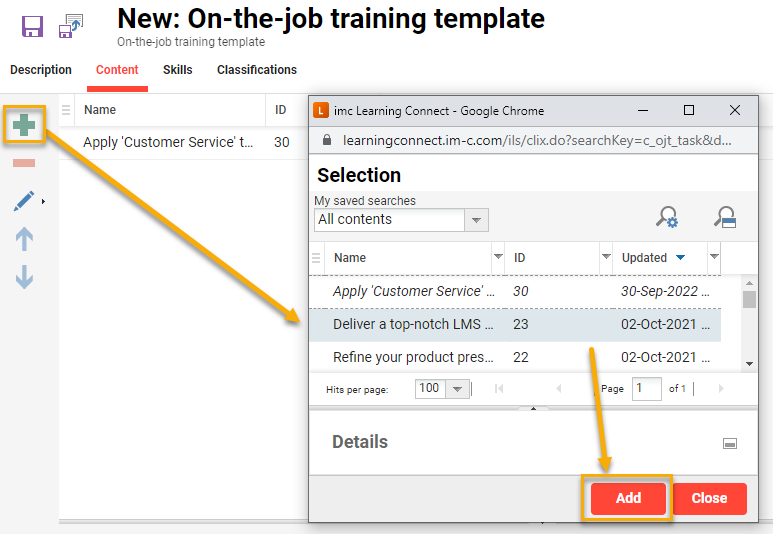
The Content tab is where the tasks are added to the template. To add tasks click the Add icon to launch a pop-up window that will display tasks based on Clearance. Search for the desired tasks, highlight and click the Add button. When a task is added it will display in italics and be visible on the sub-layer. When required tasks have been added click the Close button and then order the tasks as required.
The Skills tab enables adding a Skills that can be awarded to the staff member on successful completion of the On-the-job training. It’s possible to add multiple skills, set specific achievements levels and expiry dates if needed. The Classifications tab enables adding Classifications to the On-the-job training template to enhance admin searches. Classifying content is useful as classifications can often be used for reports and notification filtering throughout the system.
Once the template population is complete click either the Save or Save & Close button.
Hints:
-
Unlike other learning objects On-the-job training templates are not versioned and any changes in assigned templates will be updated live throughout the system.
-
If the created template is to be made available to other administrator groups to use in their own On-the-job training ensure Clearances are set accordingly.
-
The 'Focus on tasks' option presents well when there are few tasks or tasks themselves are not too detailed and act more like a checklist.
-
Completion of On-the-job training tasks can attribute to Skills and Certifications.
On-the-job Training Assignment
As mentioned earlier On-the-job Training can be assigned to a Learner either directly or via a Course. This section will explain both workflows.
Direct Assignment by Supervisor
Directly assigned On-the-job Trainings by Supervisors to Staff are especially ideal for digitally recording, agreeing and tracking basic performance plans or development goals as tasks can be tailored per staff member. Supervisors are able to directly assign their staff On-the-job Trainings via the My Staff menu. On-the-job Trainings can either be assigned to a single staff member or bulk to multiple staff.
-
Assigning to a single staff member is possible via clicking the button with the three vertically arranged dots and selecting the Assign on-the-job training option.
-
Assigning to multiple staff is done by ticking the left-hand-side checkboxes of desired staff and then clicking the Assign on-the-job training button at the bottom of the page.
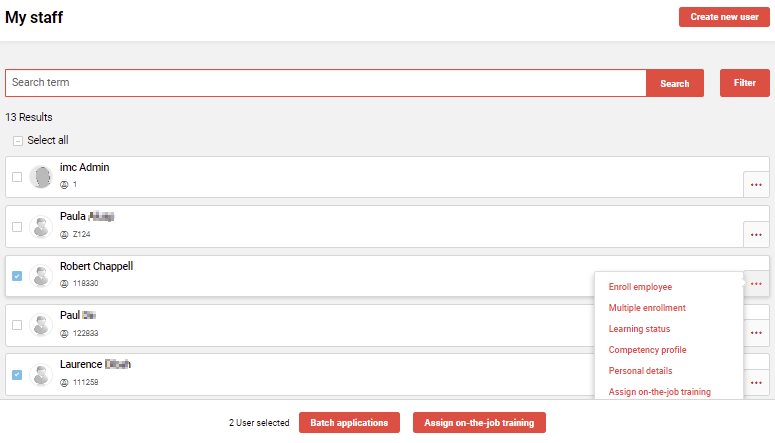
The next step will be to select an On-the-job training Template that will contain at least one pre-defined task. Simply click the desired template to proceed. In this example the 2022 OKR On-the-job Training will be assigned to Robert Chappell.

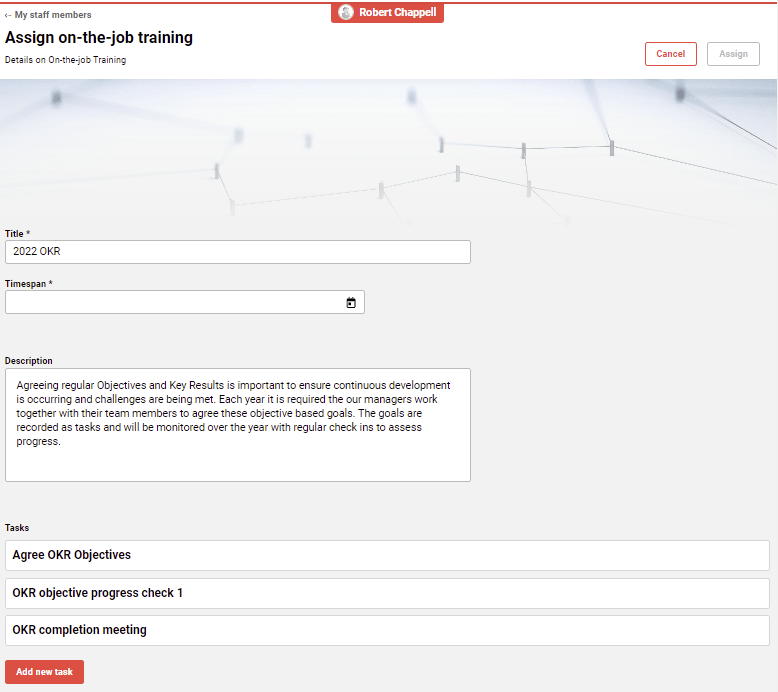
The On-the-Job Training template will be loaded with a pre-defined Title and Description that can be altered, but the pre-defined tasks can not be altered or removed. A timespan for when the On-the-Job Training is to be completed must be populated. The Add new task button allows the Supervisor to create own tasks for their staff member to complete.
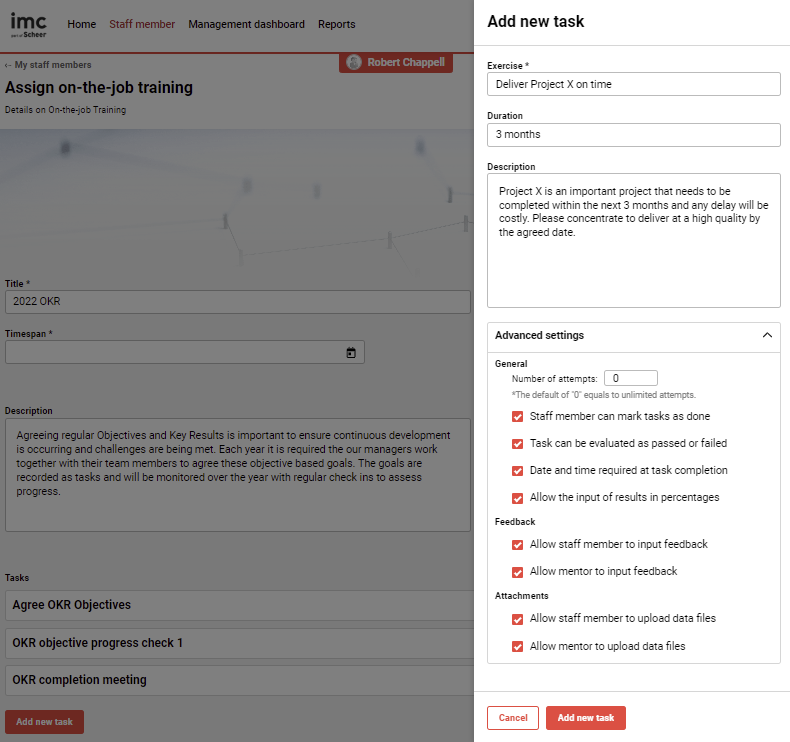
When adding a new task name the task, set a duration, and describe what is required. The Advanced settings controls workflows on how the staff member and Supervisor will interact with task. Once the new task is completed click the Add new task button to save.
The Advanced settings are explained below:
-
Number of attempts - specifies how many times the learner can mark a task as completed (0 is unlimited)
-
Staff can mark tasks as done - otherwise Supervisor has to mark as done
-
Tasks can be evaluated as passed or failed - if not active only completion matters
-
Date and time required on completion - Enter a completion date when closing tasks.
-
Allow input of results in percentages - When detailed completion rating is needed.
-
Allow staff to input feedback - Enables staff to make comments to Supervisor.
-
Allow mentor to input feedback - Enables Supervisor to comment to staff.
-
Allow staff to upload data files - Enables staff to upload supporting information in the task.
-
Allow mentor to upload data files - Enables Supervisor to upload supporting information in the task.
Newly added tasks will be visible and if required can be further edited or deleted. Once all details including the Timespan are set the final assignment step is to click the Assign button in the upper right hand corner. After assignment the Supervisor will taken to the detailed view of the staff member's On-the-job Training where updating or assessing of progress can already commence.
Mentoring On-the-job Trainings
The ongoing monitoring of On-the-job Training task completions by a Supervisor is done in the Mentored training function. Here where all open tasks of staff members are displayed together.
On-the-job training Tasks is a licensed add-on function. If you do not see the Assign on-the-job training buttons check with your system administrators whether the function has been purchased or if the Supervisor group has been given Clearance to access the direct assignment feature.
Direct Assignment by an Administrator
Directly assigned On-the-job Trainings by Administrators is possible via the Staff pool function where due dates and mentors responsible for ensuring completion can be set. This workflow is commonly used by people management teams such as Human Resources to set onboarding tasks or performance plans.
The Staff pool function is specific for Admin users and returns user records based on having Clearance to users; whereas My Staff function returns user records based on supervisor to staff relationships. On-the-job Trainings can either be assigned to a single users or bulk. Assigning to a single staff member is possible via highlighting the desired user, clicking the On-the-job training icon and selecting the New on-the-job training option. Assigning to bulk users can be done via a Select all approach after desired filtering, or via a multi-select approach using the ctrl key and clicking each desired user.
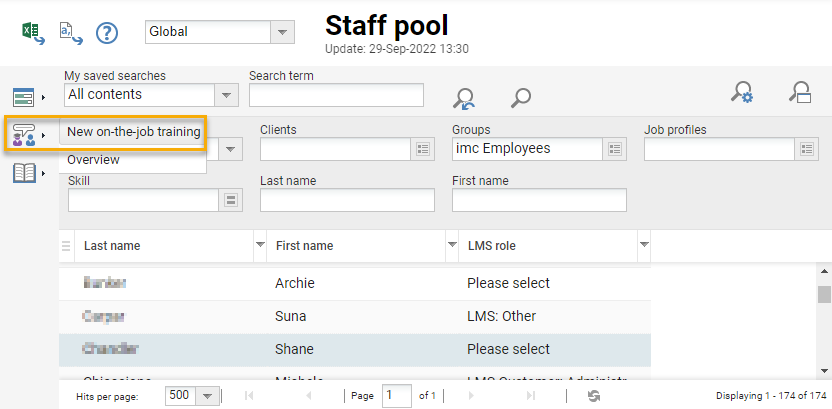
A new tab will open with a three step wizard:
-
Template tab: Click the selection button to launch a pop-up where the desired template can be selected and then click the OK button and then the Continue button (in the upper right corner) to proceed to the next step.
-
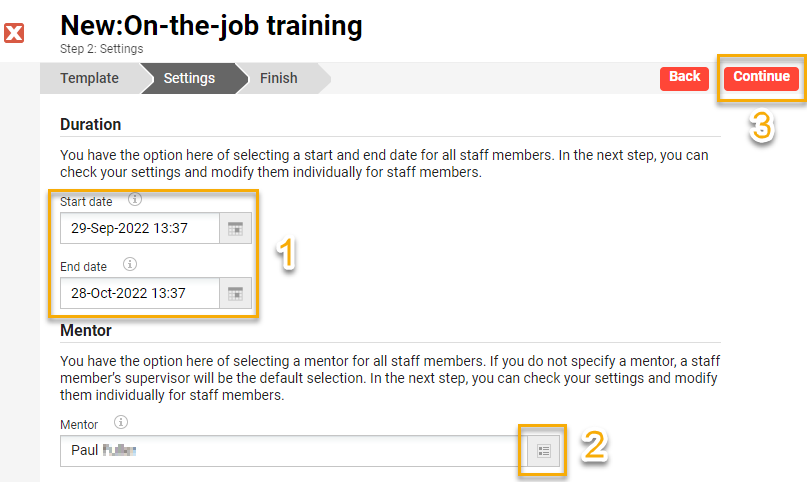
Settings tab: Where specific completion requirements are defined.
-
Start date is from when the tasks can be started.
-
End date is by when the tasks must be completed.
-
Mentor is who will be responsible for assessing the task completion.
Note: The list of available mentors is derived from users in groups that have the role function of Mentor selected.
-
-
Finish tab: Presents a confirmation screen of who will be assigned the On-the-job Training with details or dates and mentors. The dates and selected mentor details can still be changed here if required; this includes changing for individual users in the case of bulk assignment. Once satisfied click the Create training button to finish the assignment.
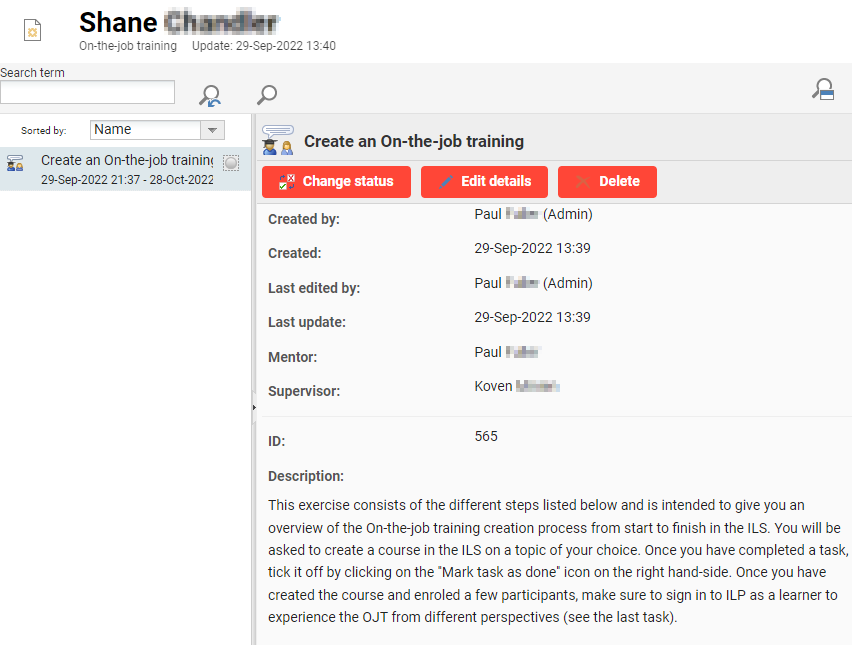
To ensure the On-the-Job Training has been assigned correctly, in the Staff pool function highlight the user, click the On-the-job training icon and select the Overview option. The Overview displays a new tab with a list of all the on-the-job trainings assigned to the highlighted user. The administrator has the ability to update the status, edit the details or delete the assignment completely.
Assignment as Course Component
On-the-job Trainings can be assigned to Courses or Course templates as a component for the participants to complete. The assignment can be used for many purposes including assessments, offline exercises or projects, evidence collection, workplace observations, and general task lists.
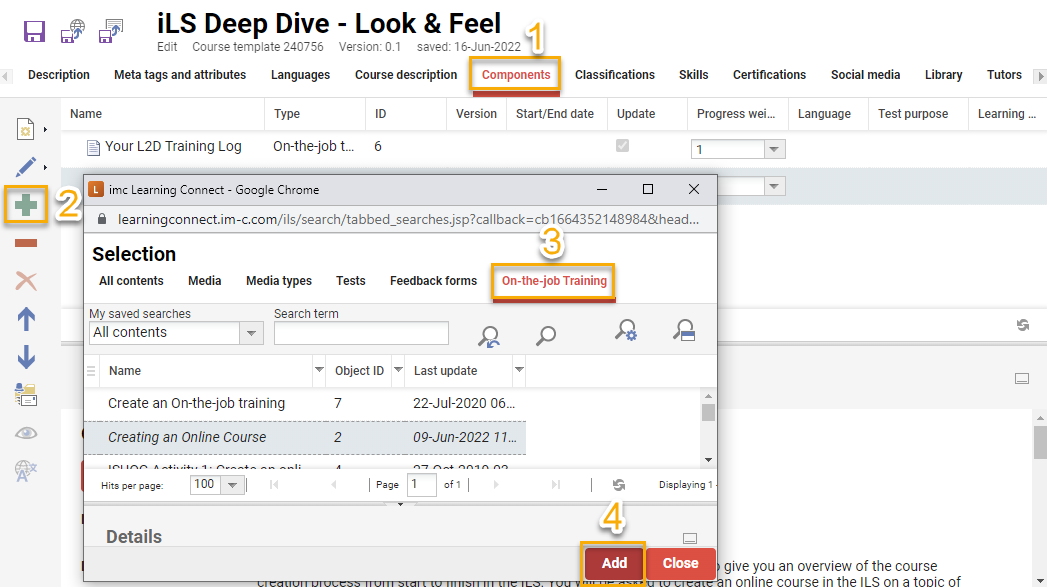
To assign to a Course or Course templates is done as follows:
-
Click on the Components tab.
-
Click the Add icon and select the Add Component option.
-
In the pop-up select the On-the-job Training tab, and
-
Search for the desired On-the-job training template then click the Add button.
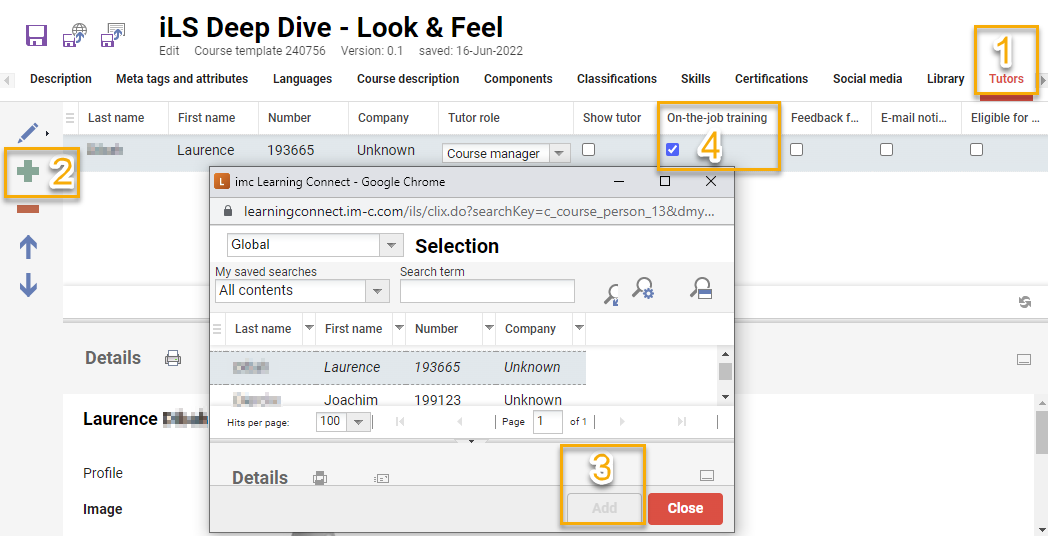
When an On-the-job training template has been added to a Course it will be required to add a Tutor with On-the-job training permission. To assign a Tutor for On-the-job trainings follow these steps:
-
Go to the Tutor tab.
-
Click the Add icon to launch the Tutor selection pop-up.
-
Search for the desired tutors to Add then Close the pop-up.
-
Tick the On-the-job training checkbox for the tutor to give permissions.
Note: Ticking is required to Save the course when an On-the-job training has been assigned. Only tutors with the On-the-job training checkbox ticked will be able to view/assess the tasks in the Course instruction or Mentored training functions.
Collaborative Group Work
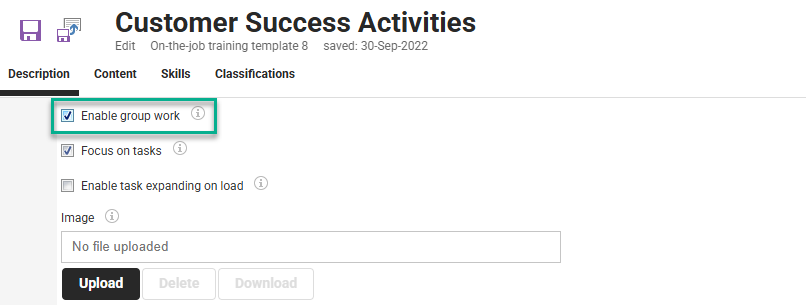
A great benefit of On-the-job Training in Courses is promoting collaborative group work where students work in groups to complete the tasks. This is possible for On-the-job training templates where the Enable group work checkbox is ticked.
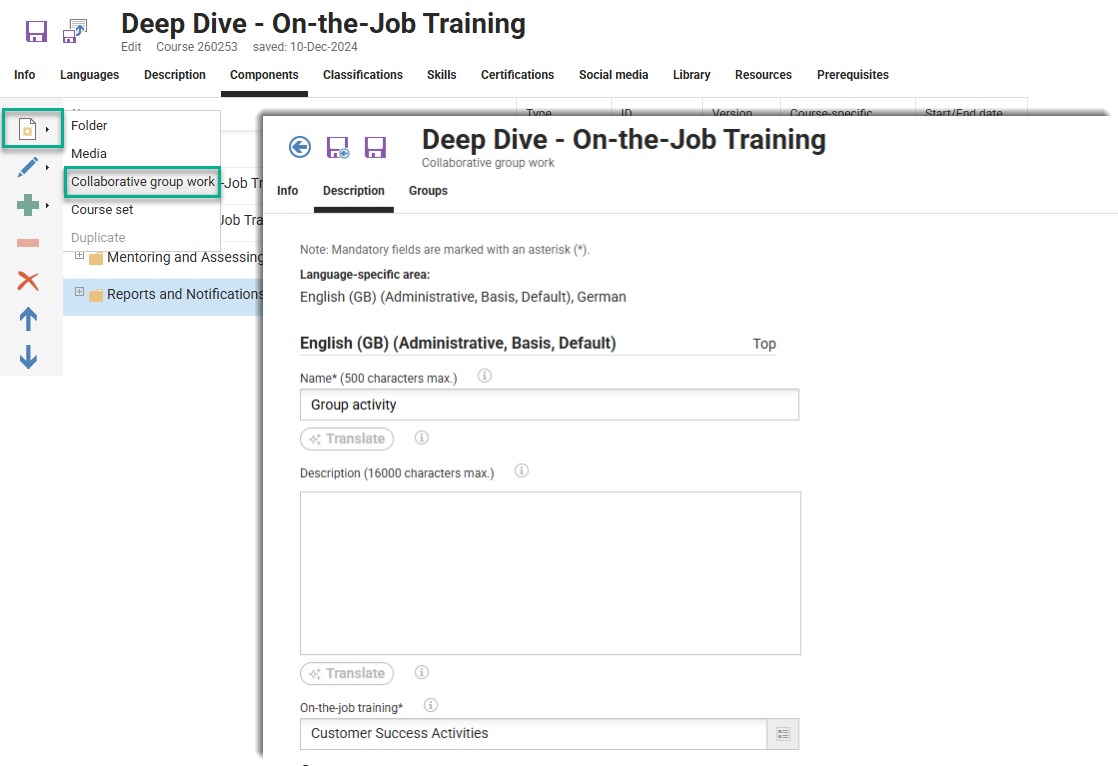
When ticked the Administrator, or Tutor with Syllabus authorisation, will be able to create a Collaborative group work folder in the Components tab. This will launch a new screen with three tabs. In the Description tab give the activity a Name and select the On-the-job training template.
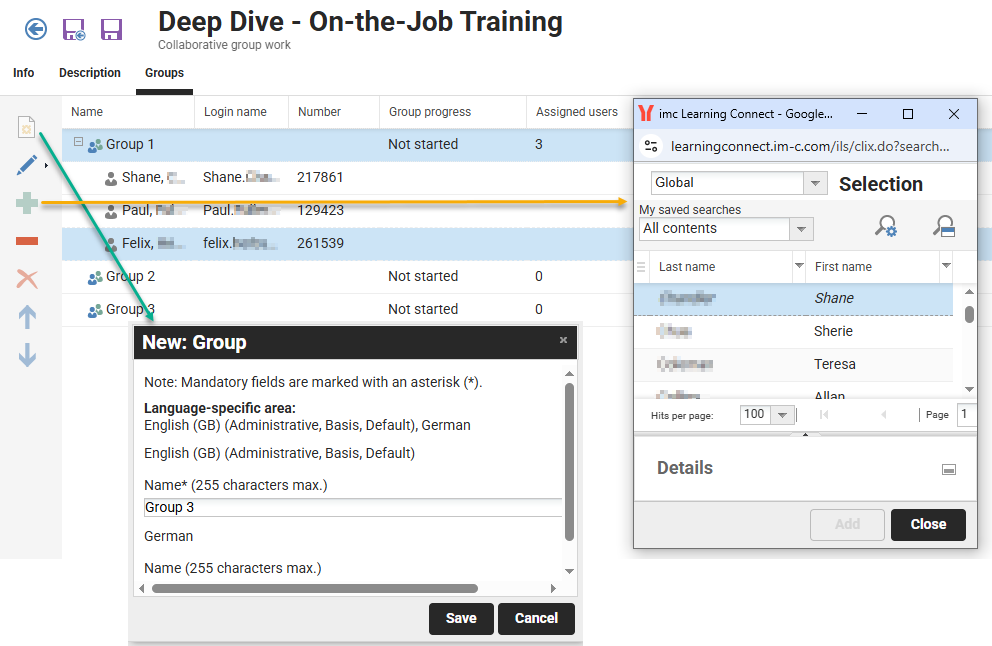
The Groups tab is where student working groups are created and course participants are assigned.
An integrated messaging feature allows participants and tutors to communicate within the assignment. Once the group submits the completed tasks, the Tutor performs a single grading for all participants in the group. The handling of attachments, providing feedback, and delivery of notifications are all designed specifically for group communication.
Assessing On-the-job Training
There are two areas for assessing On-the-job training. There is a central function available to both Mentors and Tutor assessors, then there is a Tutor specific function. Each will be explained below.
Supervisor and Tutor Assessment via Mentored Training
The Mentored training function enables Mentors or Assessors (Tutors) to view and assess all On-the-job Trainings they are responsible for. On-the-job trainings are displayed in tiles that contain important information such as user names and progress in an easy to interpret format. The standard Search field returns results based on the On-the-job training title and the user names.
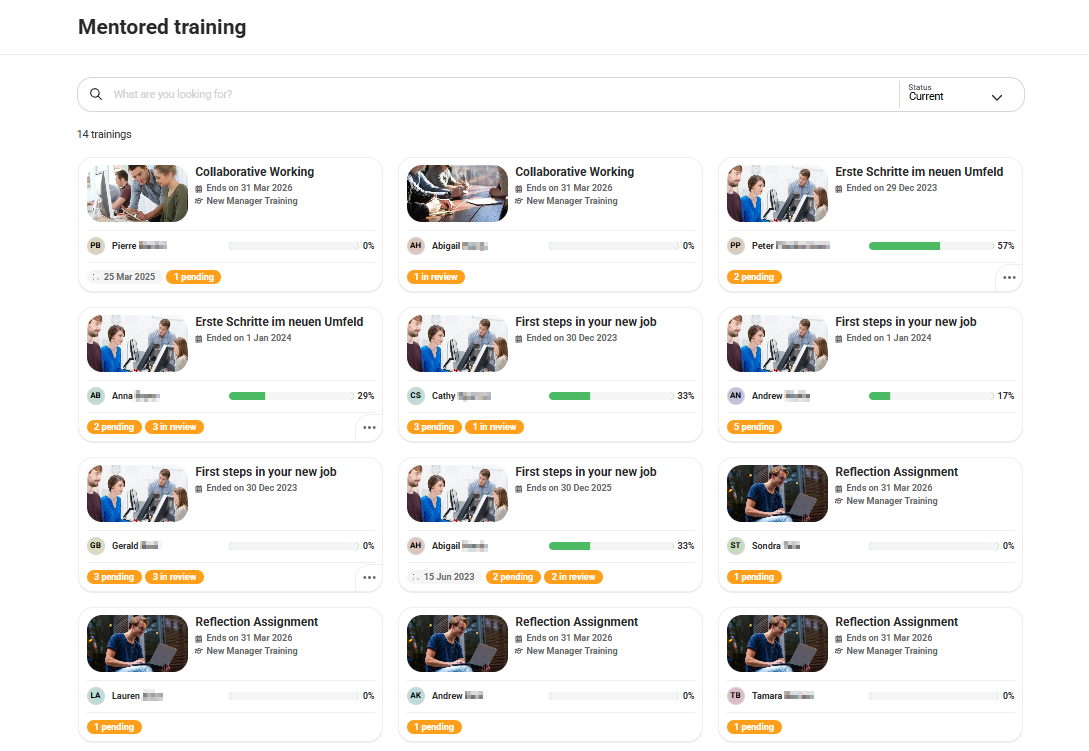
Based on client configuration, it's additionally possible to activate an advanced filter and sort mode which allows easily locating On-the-job Training modules where staff or students have already provided input that must be reviewed. When the configuration is enabled the assessors will have access to three additional filters including:
-
Course: Allows Tutors to identify all the On-the-job Trainings issued by course participation.
-
Unreviewed learner activity: Displays On-the-job Trainings containing Tasks where learners have provided feedback or an attachment that is yet to be reviewed by the assessor.
-
Sorted by: Enables ordering tasks based on the oldest or most recent input by learners.
Commencing assessment of On-the-job training requires clicking anywhere on the tile to open the detailed view. The description along with each individual task will be divided across five status based tabs which are:
-
Pending: The task is yet to be started or submitted for assessment.
-
To review: The task has been started, marked as completed by the learner and awaits assessment.
-
Done: The task has been marked as 'Done' indicating satisfactory completion has occurred. Depending on settings this could be by the learner or mentor/assessor.
-
Passed: The task has been completed and deemed successful by the mentor or assessor.
-
Failed: The task has been completed and deemed unsatisfactory by the mentor or assessor.
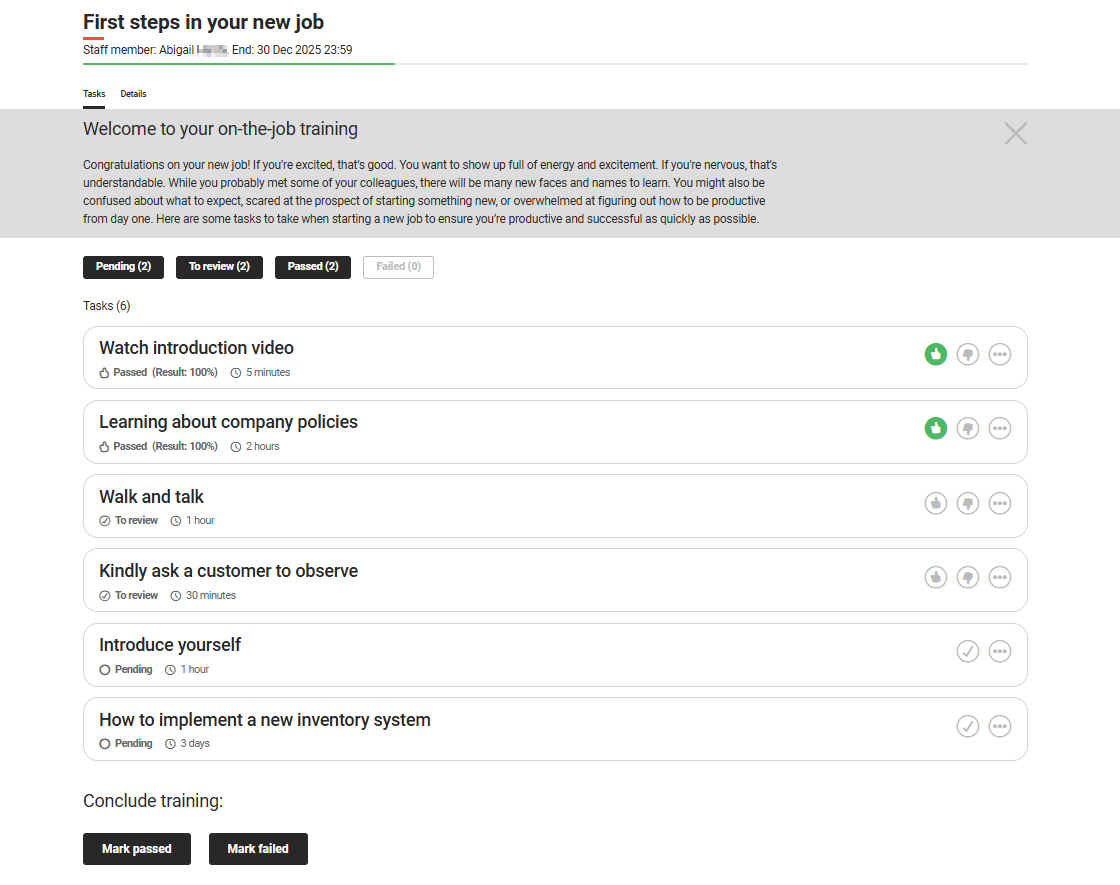
All tasks will be displayed in a minimised view and the status can be seen on the lower left hand side. Each task can be expanded by clicking the circle icon with the three dots where full details of the task requirement will be seen. Tasks that display a circle with tick icon can be marked as Done and those with a Thumbs up/down icon are to be marked Passed or Failed.
Hints:
-
In order to be set as mentor for a directly assigned On-the-job Training, the user must be assigned to a group with the Mentor function enabled.
-
Any group with the Mentor function enabled will require navigation Access Rights to the Mentored training function to mark tasks.
-
Assessing On-the-job Trainings contained in a course can also be done in the Tutoring > Course instruction function (see below).
-
For marking On-the-job Training in a course where the participant is not expected to open the task or submit anything, the participant will require an In progress (started) enrolment status in order to mark.
Tutor Assessment via Course Instruction
Tutors marked as On-the-job Training 'Assessors' are able to perform assessments in the Tutoring/training category Course overview menu Course instruction function. To commence assessment open the Course instruction function for the desired course and click the Syllabus tab to show the list of course components. Here a Type column clearly identifies which components are On-the-job training objects and the Processing rate column indicates how many participants have completed the tasks. To commence assessment highlight the desired On-the-job Training Template and click the Progress per user icon.
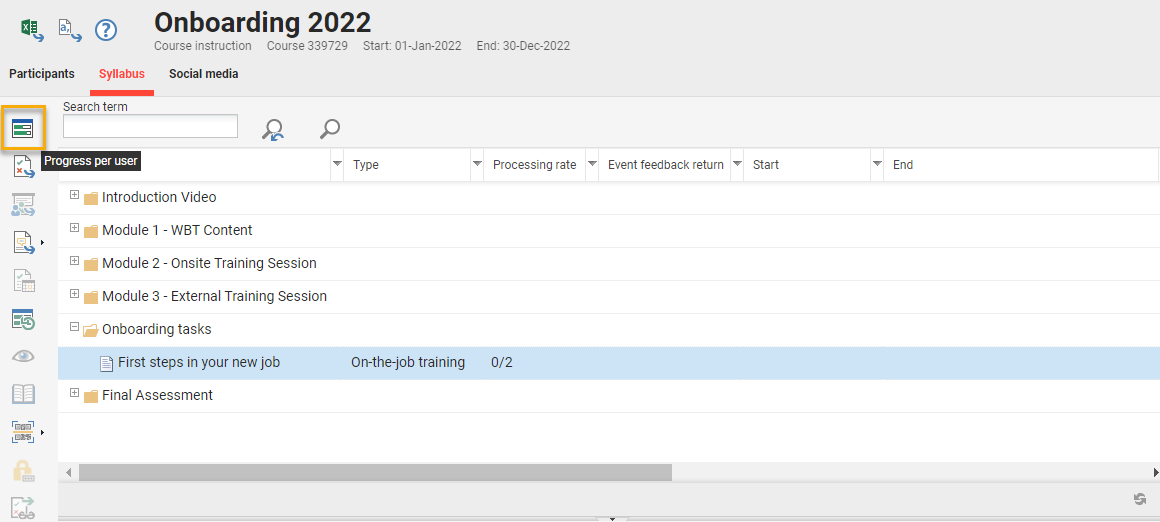
The screen will reload with a list of course participants that have accessed the course and can be assessed for the On-the-job Training. Highlight the participant to be assessed and click the Supervise on-the-job training icon. One important detail is that only participants that have an In progress (Started) enrolment status can be assessed; so to assess participants that still have an Enrolled status will require performing an enrolment status update.

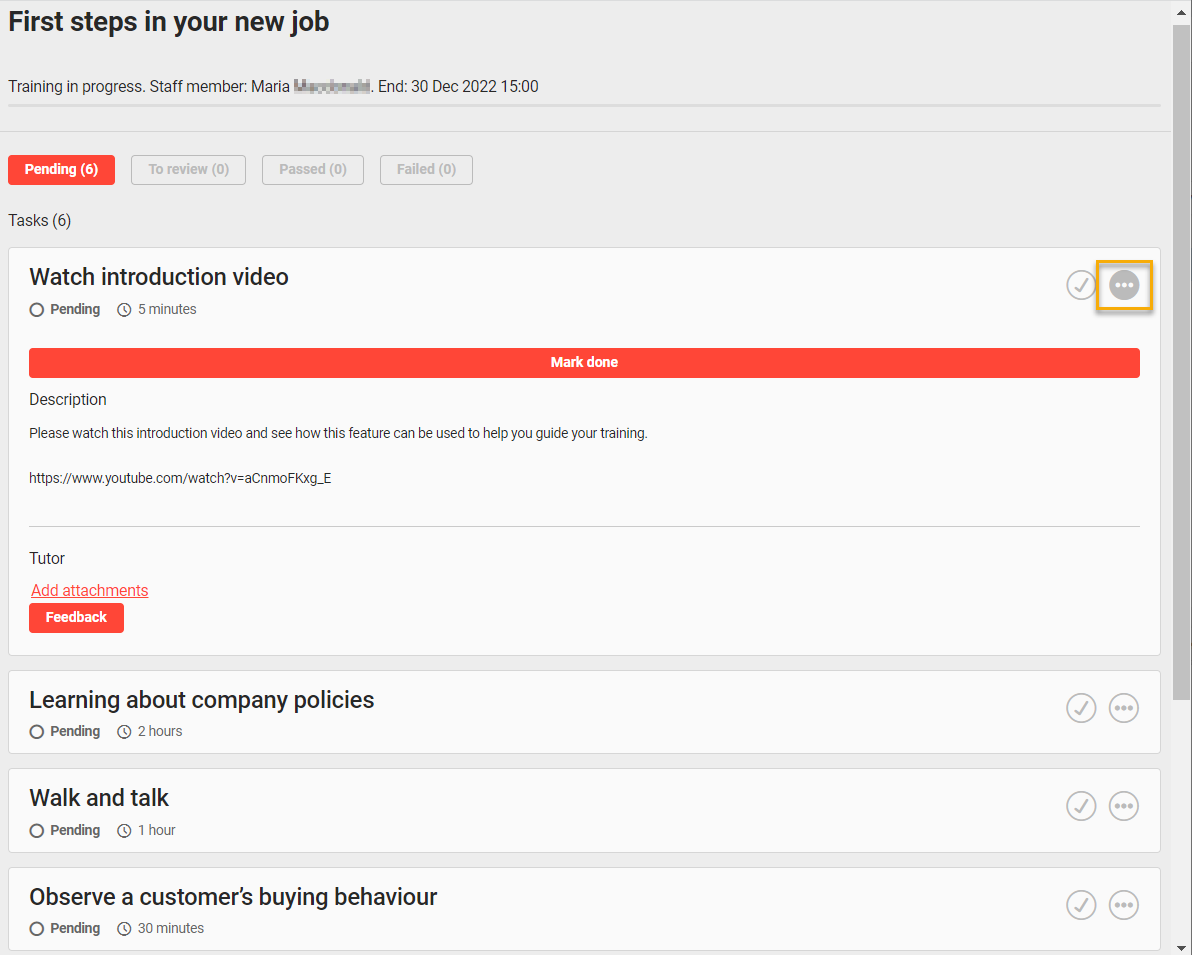
The On-the-job training will open with the list of tasks and the participant’s statuses. Depending on settings the tasks can be in a collapsed state or automatically expanded. The Mark done button commences the grading process and is all that is needed for tasks that are not Passed/Failed graded. Furthermore, the Feedback and Add attachments buttons enable the Assessor to enter comments or upload files that will be visible to the participant. If the participant has made comments or added attachments these will also be visible.
Once a task with no further grading requirements is marked as Done, the progress bar will update and the Thumbs up icon will display in green. Where a task is subject to grading when Mark done is clicked further buttons will be shown which are Mark passed, Mark failed and Reopen task; if a percentage is to be awarded this can be once Mark passed or Mark failed is clicked.
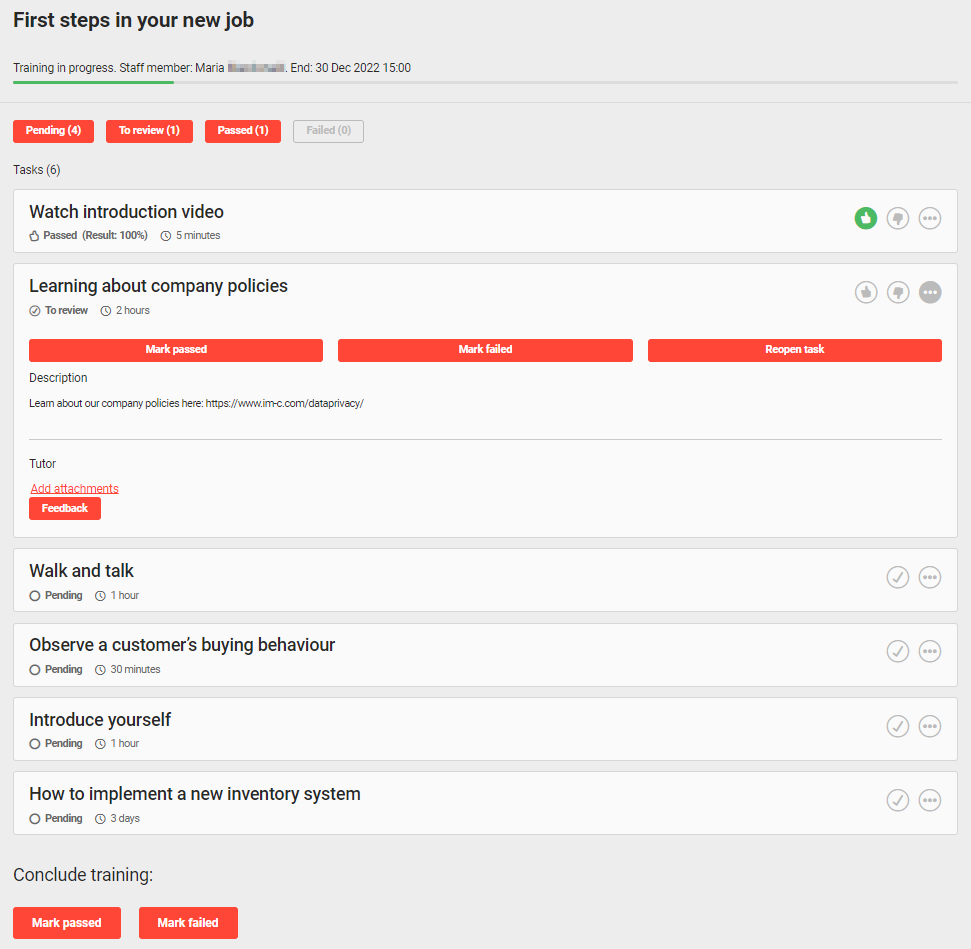
The completion of a On-the-job training can either be performed manually by the Assessor or automatically if the Completion by progress checkbox is checked in the Description tab of the On-the-job training template.
On-the-job Training Reporting
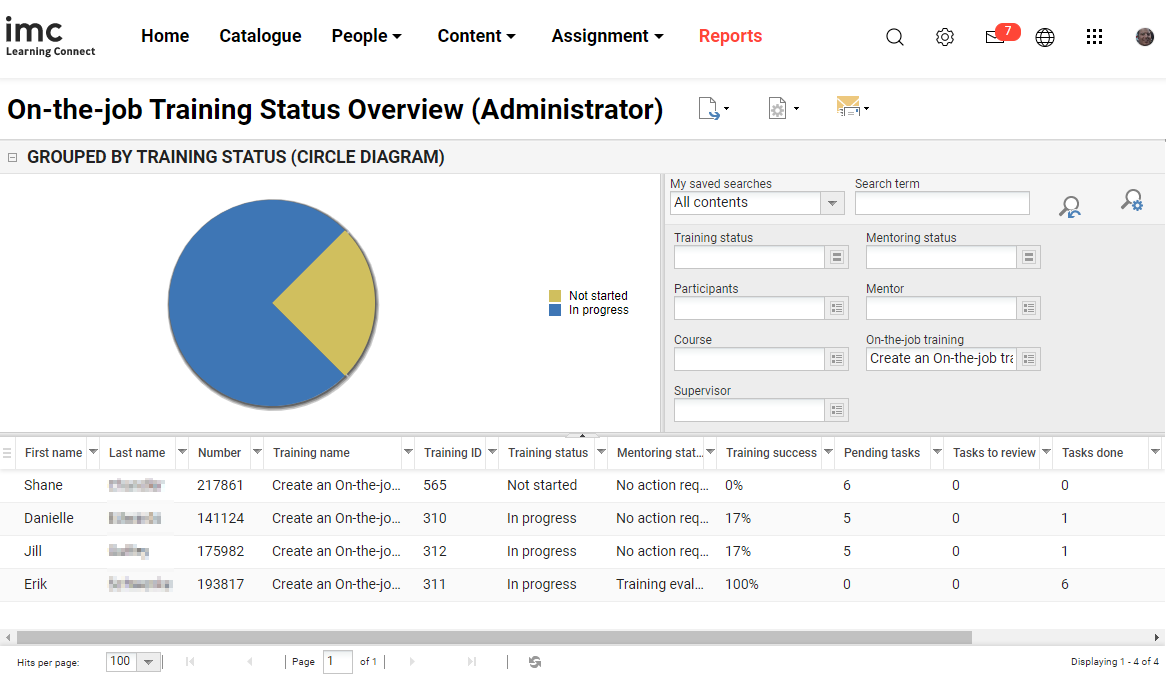
In addition to the functional views there are reports available for Administrators and Supervisors to analyse On-the-job Training progress. There are two main On-the-job training reports available which are On-the-job Training Status Overview and On-the-job Training-Status Details, but there are slightly different versions for Administrators, Tutors and Supervisors to consider the different distribution options.
-
On-the-job Training-Status Overview: Provides a single row for each learner for the entire On-the-job Training Template.
-
On-the-job Training-Status Details: Provides multiple rows for each learner to consider detailed status of each task contained within an assigned On-the-job Training template
Configuration Setup
In order to use the On-the-job training functions described above some additional configuration will be required as described below:
Licence
As On-the-job Training is a licenced Add-on module the use of the functionality will require a licence update. Please discuss pricing with your Scheer IMC account manager. Upon ordering the imc Support team will arrange the licence and system update. The licence unlocks the function so remaining configuration can be completed.
Navigation Creation
Once a licence update has occurred the navigation will need configuration. New navigation menus will need to be configured for the Learners, Supervisors, Moderators (if needed), Tutors and Administrators.
-
Learners: Default menu = On-the-Job Training
(Identifier: learner_ojt_overview) -
Supervisors: Default menu = Mentored training modules
(Identifier: manager_ojt_mentor_trainings) -
Administrators: Default menus = On-the-job training template and On-the-job training task (Identifiers: content_ojt_template_manager and content_ojt_task_manager)
Notification Activation
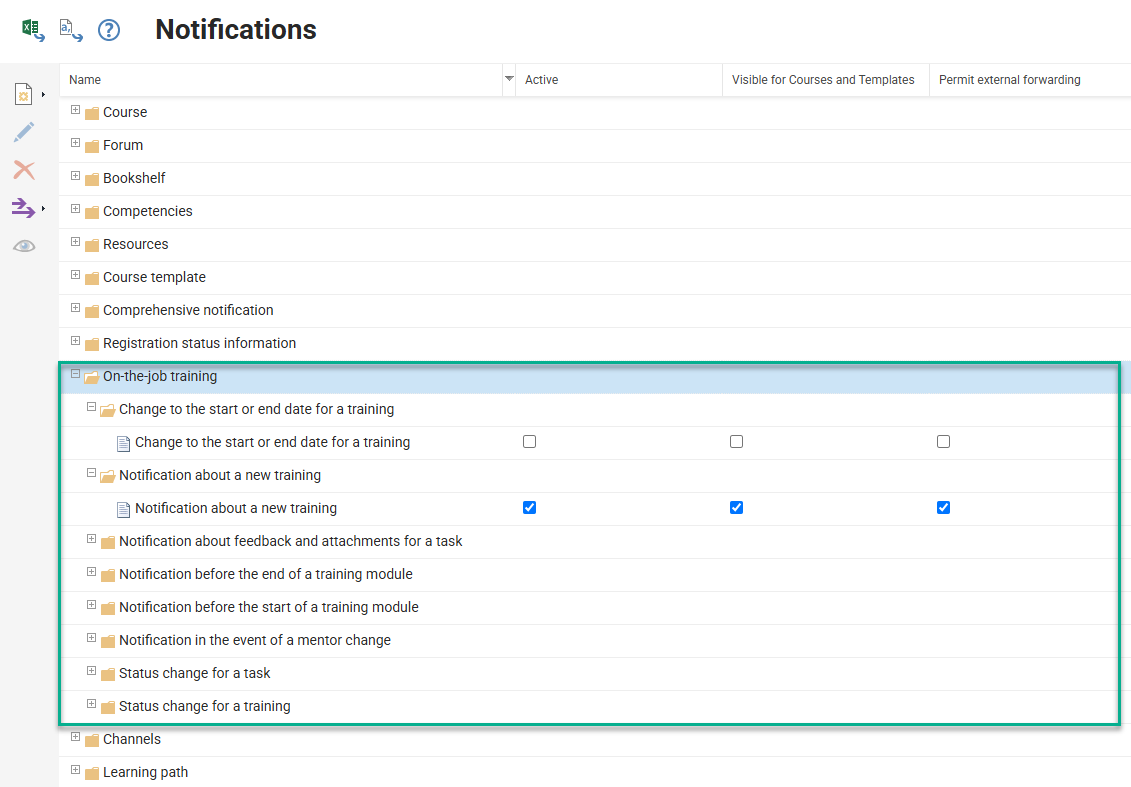
The use of notifications ensures Learners, Mentors and Assessors are aware when there has been new On-the-job Training assignments or key updates to existing assignments. System administrators are able to activate and further configure On-the-job Training emails in the Notifications function. Here there are two different On-the-job Training folders that contain various notifications.
Firstly, the Course folder contains a On-the-job Training sub-folder to manage those related to course assignment. These notifications when made 'Active' can actually be further configured in the Courses or Course templates functions as well.
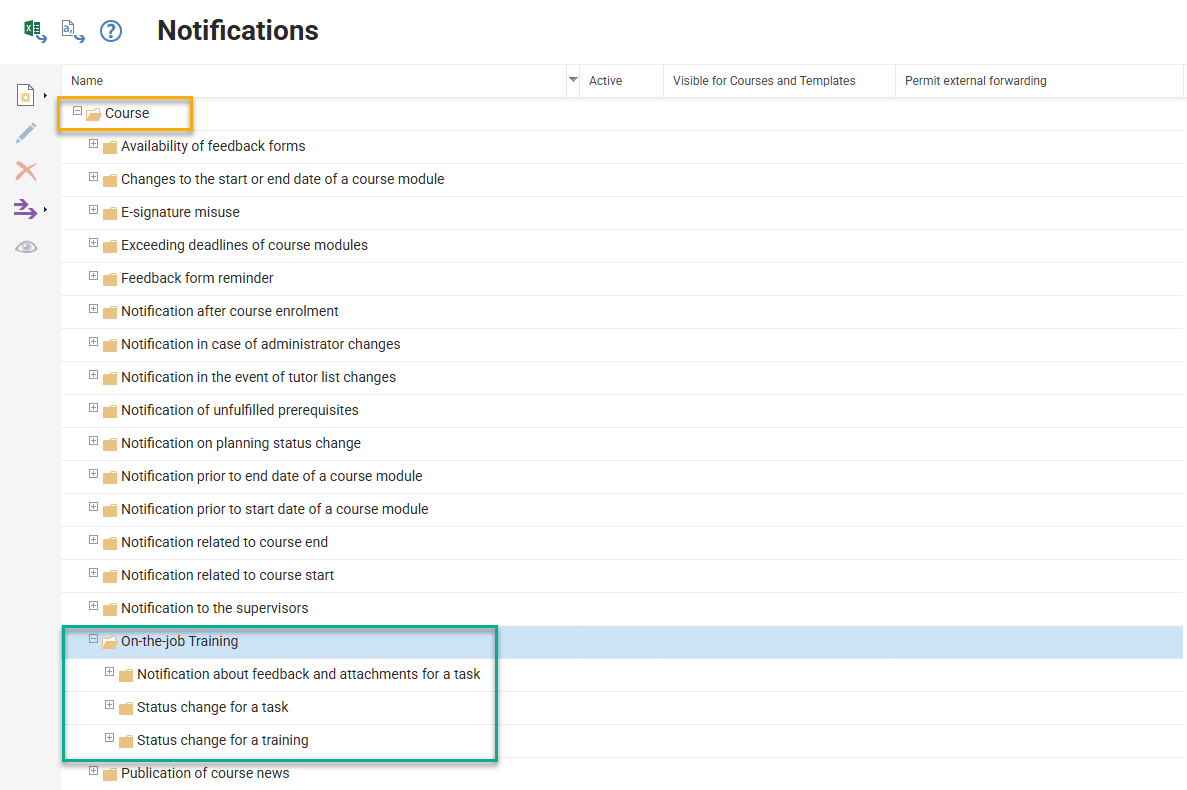
There is additionally the On-the-job training folder for directly assigned On-the-job Trainings. Expanding the folders will reveal notifications contained within and three checkboxes determine activation and distribution for each; where the Active and Permit external forwarding checkboxes are to be ticked to send emails to external mailboxes outside of the LMS.
Existing notifications can be Edited or Duplicated to change the message content and settings. The notification tabs are described below:
-
Description: Only contains the name of the notification which is not visible to the recipient.
-
Condition: Contains the notification trigger settings and the options will vary per notification, but will always be restrictive fields such as checkboxes or integers.
-
Notification: Where the email message is configured in terms of the subject, body and various settings. In the body 'Text*' area plain text is used by default and variable values can be inserted from the placeholder folder on the right hand side; these variable values pull desired details from fields on the Learner's profile, the On-the-job training or the Course to ensure the messages are flexible and meaningful.
-
Recipient(s): Where it's determined who the notification will be sent to and how the dispatching will occur. The Send notifications to the following addressees checkboxes can be multi-select, but if using variable placeholders the message content can be confusing. The Master domains* field is used in multi-client implementations to limit the recipients based on their master client; e.g. the users' main client to which they are assigned and which their profile is linked.
When notification changes are made simply click the Save & Back button.
Notifications can be triggered when On-the-job Trainings are assigned, tasks have been updated, or feedback comments entered. If no notifications are received check the Notifications function if the On-the-job training folders contain Active notifications.
Report Assignment and Clearances
In a default Learning Suite configuration not all On-the-job training reports are assigned to the Admin category Reports menu. Therefore, configuration of the Report categories function might be required to assign reports to an existing category or create an entire new category. To assign to an existing category simply highlight the desired category and click the Edit icon. In the report category go to the Reports tab and click the Add icon to select additional reports; all have the text On-the-job in the name which can be efficiently searched. Once reports are added close the pop-up and click the Save & Close button.
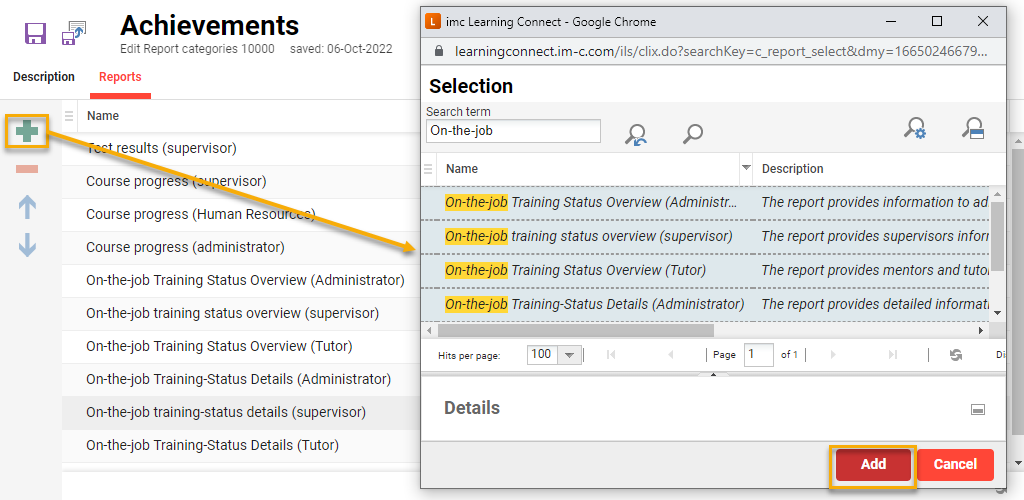
In addition to adding On-the-job Training reports to a report category, it must also be ensured that user groups have Execute Clearance on the reports they need to access; e.g. the Supervisor group would require Execute clearance to the (Supervisor) report version. To do this, highlight the desired report, click the Clearance icon, select Edit clearances option and in the pop-up select the required users or groups as well as specific authorisation levels.
OJT Report Functions
In addition to the On-screen reports are two functional reports that can be added via the Navigation function. These are the Task status report and the Mentoring status report.
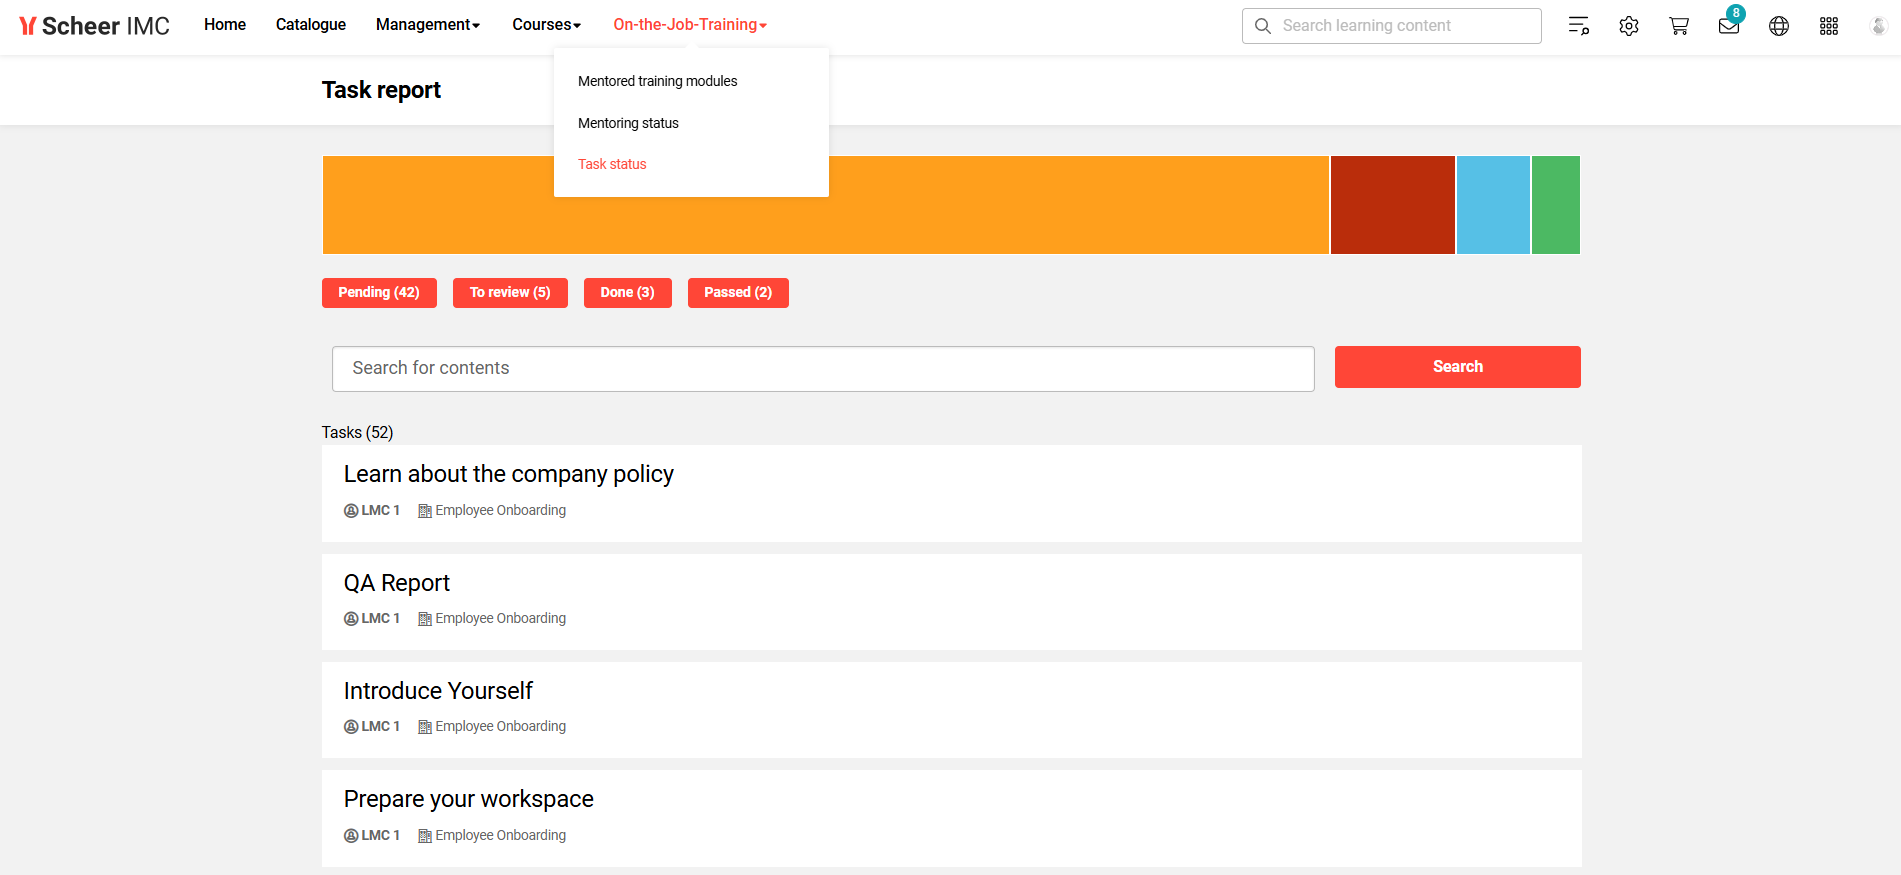
Enabling these reports requires creating new menus in the desired navigation category, then selecting the default menu values of Task status or Mentoringstatus. In the Access rights tab add the desired groups and click Save.
Summary
As can be seen there are many use cases for the On-the-job Training module and it really does compliment the out-of-the-box training modules. For more information including pricing, to discuss your scenario, or to arrange demonstration please contact your Scheer IMC account manager.
\uD83D\uDCCB Related Articles
