Deep Dive: Catalogue overview, configuration and administration
Catalogue Overview
Catalogues are a very important, and highly configurable, function in the Learning Suite. The use of catalogues enables targeted promotion of training opportunities and content to selected users. One key benefit is providing users with the ability to self-manage their own training journey.
Administrators can create catalogues in structures, assign training content or offerings, and define access permissions for each catalogue. Users can browse the catalogues they have clearance for, immediately access content, and enrol or request available courses/learning paths.
This article will provide a complete overview of catalogue configuration and administration steps.
Catalogue Configuration
The Learning Suite enables any number of catalogues to be created and catalogue navigation points to be configured. This section will provide the steps to configure new catalogues.
Catalogue Creation
Any number of catalogues can be created in the Learning Suite. To create catalogues, go to the Admin category and select the Catalogues function from the Assignment drop-down menu. Either Main catalogues or Sub catalogues can be created. The differences are explained in the next sections.
The creation of all catalogues present a Description tab with the following fields to be populated:
-
Name: Name of the catalogue visible to the learner
-
Description: Describes the catalogues for admin purposes and not visible to the learner
-
Image: Images from sub-catalogues are displayed to learners below the search bar
Main-catalogues
When no existing catalogue is highlighted, clicking the Create icon will create a new ‘Main’ catalogue. Only main catalogues can be assigned directly to the menus of the Navigation function. The prerequisite for this is that the value of the Menu type* field is set to Catalogue. The ‘Main’ catalogues contain an Options tab with settings that control assignable object types and appearance options; the selected settings will be inherited by Sub-catalogues created in the hierarchy of the Main catalogue.
-
Displayed object types: The checkboxes control which object types can be assigned to both the main catalogue and any sub-catalogues. These settings are often used to create separate media and course catalogues.
-
Learning path templates
-
Learning paths
-
Course templates
-
Courses
-
Media
-
-
Appearance:
-
Allow catalogue contents in main catalogue folder:
If unticked, the main catalogue is purely for structural purposes and would require sub-catalogues to assign content to. -
Do not show catalogue in front end:
Normally unticked so the catalogue can be seen in the learner view. Could be ticked to prevent a catalogue structure from showing until it is complete with content assigned. -
Use for the booking of staff members by the supervisor:
When ticked, the catalogue can be directly searched by supervisors in the My Staff function when clicking the Enrol employee option for a staff member. If unticked, the supervisor could still enrol their staff to training directly within the catalogue using the Enrol staff members button. -
Position of newly added contents in the catalogue content list:
When the option Top of the list is chosen, newly added content to the catalogue is added to top of the content list. When the option Bottom of the list is chosen, newly added content to the catalogue is added to bottom of the content list. By default, Bottom of the list is chosen.
-
The benefit is flexibility to adjust the positioning, better visibility, prioritization and more efficient administration of the catalogue content.
Multiple Main catalogues are often created for internal/external promotion, separating content types, and for different clients (Multi-tenant).
Sub-catalogues
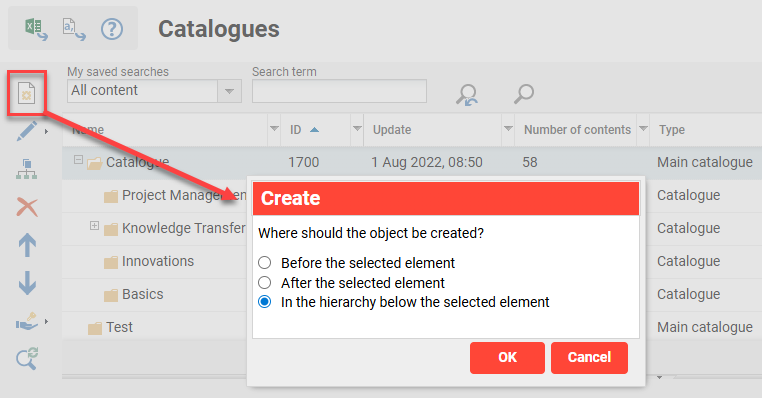
If an existing catalogue is highlighted, clicking the Create icon will present three options to determine where the new catalogue is to be located:
-
Before the selected element: Creates at the same level and places before the highlighted catalogue
-
If a ‘Main’ catalogue is highlighted, then another ‘Main’ catalogue will be created before.
-
If a ‘Sub’ catalogue is highlighted, then another ‘Sub’ catalogue will be created at the same level.
-
-
After the selected element: Creates at the same level and places after the highlighted catalogue
-
If a ‘Main’ catalogue is highlighted, then another ‘Main’ catalogue will be created after.
-
If a ‘Sub’ catalogue is highlighted, then another ‘Sub’ catalogue will be created at the same level.
-
-
In the hierarchy below the selected element: Creates in a sub-level of the highlighted catalogue
-
If a ‘Main’ catalogue is highlighted, then a ‘Sub’ catalogue will be created at the first level.
-
If a ‘Sub’ catalogue is highlighted then another ‘Sub’ catalogue will be created a level deeper.
There is a configurable limit to the number of levels that can be created.
-
Sub catalogues display below their parent Main catalogue and will inherit their settings except Clearances.
Catalogue Clearances
Users must have Execute Clearance to view catalogues. The Clearances can be granted to individual Users, Groups or Clients. Common Clearance configuration includes:
-
Clearance for Main catalogues is granted to Clients.
-
Clearance for Sub-catalogues is granted to Groups.
-
Clearances granted to individual users is to enable administration for specific catalogues.
In terms of access to content assigned to the catalogues, there are two configuration possibilities:
-
Clearance to the catalogue automatically provides access to the assigned content (Default).
-
Access to content in the catalogue additionally requires Clearance to the content.
This is configurated in the Clients function Catalogue settings menu by ticking the Take into account the clearances for the display of catalogue content checkbox in the Catalogue search tab.
One important note on clearances for catalogue structures is that users will require clearance on each level. For example, if a user only has clearance to a sub-catalogue and not the parent catalogue, then he will not see the sub-catalogue.
Navigation Configuration
In a default configuration, there is only one Catalogue menu configured for learners. Many customers configure further catalogue menus for a Portal (pre-login) catalogue, content type specific catalogues, role-specific catalogues, or client-specific catalogues.
Internal Catalogues
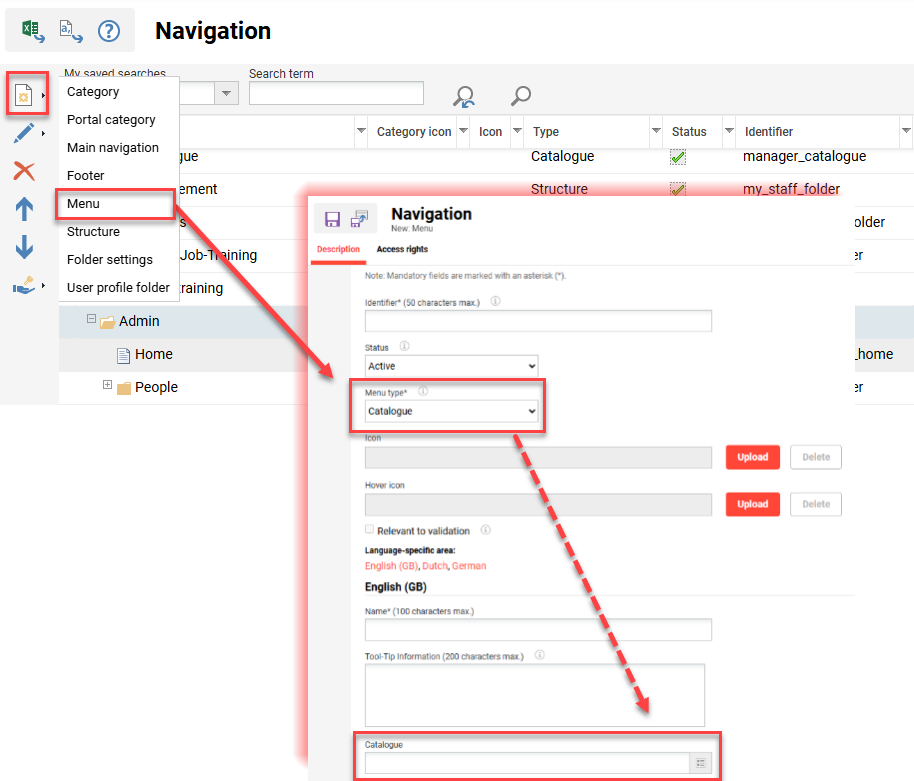
If a new navigation menu is required for a new catalogue, this can be configured in the Navigation function by the following steps:
-
Select a folder with the Type Category (depending on your requirements) and create a Menu using the Create icon.
-
In the Menu type* field, select the Catalogue option.
-
Use the Catalogue field to select the main catalogue(s) to be linked to the new menu.
-
Name the menu for each activated language.
-
In the Access rights tab select the Groups that require access to the menu.
Note: Access rights only provide access to the menu and not Clearance to the linked catalogues.
Portal Catalogues
Portal catalogues enable the promotion of training content and courses prior to user Login or Sign up. These catalogues are commonly configured in extended enterprise scenarios where training is offered to the general public. If required, a portal catalogue can be configured in the Navigation function by the following steps:
-
Highlight the ‘Portal category’ type menu.
-
Click the Create icon and select the Menu option.
This presents a pop-up advising a new object will be created in the hierarchy below the selected element. Click the button OK. -
In the Identifier* field populate a unique name for the new menu.
-
In the Menu type* field select the Catalogue option.
This will insert a new Catalogue field. -
In the Name* field(s) enter a name (for each activated language).
-
In the Catalogue field select the catalogue to be linked for each activated language.
The selected catalogue will require that the Client linked in the Portal category folder has Clearance. -
Once done, click the Save and close button.
In the Portal catalogues, prior to login the user will be able to directly view some Media objects (Files, multimedia) where Clearance is given to the Client. For Courses, Learning Paths and Web Based Trainings (SCORM, xAPI), the user will be able to preview the objects; any interaction such as Enrolment will require Login.
General Settings
In the Configuration function Catalog menu there are some system-wide catalogue settings.
-
Maximum nesting depth: Default is 10
Restricts how many levels deep a sub-catalogue structure can be. -
Number of days for new: Default is 14
Determines for how many days a component is displayed in the catalogue as new (relates to the New content filter). -
Use visibility for the type: Default is not ticked
Relates to the Solr Index update job. -
Display of courses from templates based on clearances: Default is not ticked
Enables the ability to only show courses of the list course template based on Clearance; e.g. providing Clearances to location based groups close to the course location. -
Real-time update of the number of free places in the catalogue index: Default is not ticked
When enabled, enrolments or cancellations to courses and learning paths with a Maximum capacity trigger the Solr Index to immediately process. This setting helps ensure the value in the Available Places field is more accurately reflected.
Client-specific Settings
There are many further settings for catalogues that are configured Client-specific. The applied settings will display for users where the Master domain Personal attribute on their profile has a match. These settings are configured in the Clients function. To do this, select the relevant client, click on the Settings icon and select the Catalogue settings option. This will open a new browser tab with three sub-tabs described below:
Catalogue Search
Here there are many settings that control search behaviour within catalogues. Most of them are explained with the i icon. Commonly adjusted settings include:
-
Search via pattern in search term
Enables results based off part matches to any word. -
Show indirectly assigned courses in the catalogue
When enabled directly displays Courses where only the Course template is assigned to the catalogue. This essentially saves clicks and can be useful where the Locations filter is used. -
Display syllabus button when opening course from catalogue
Enables users to preview the Syllabus of Courses prior to performing an enrolment. -
Minimum length of search term
Relates to the character limit that determines when the predictive search activates. A higher number can return more accurate results, but take longer to return potential matches. -
Sorting
Determines the default sorting of search results. Options include name (title), category position (catalogue position), last update and start date. -
Enable manual sorting in the catalogue
Enables the users to manual select their desired sort preferences.
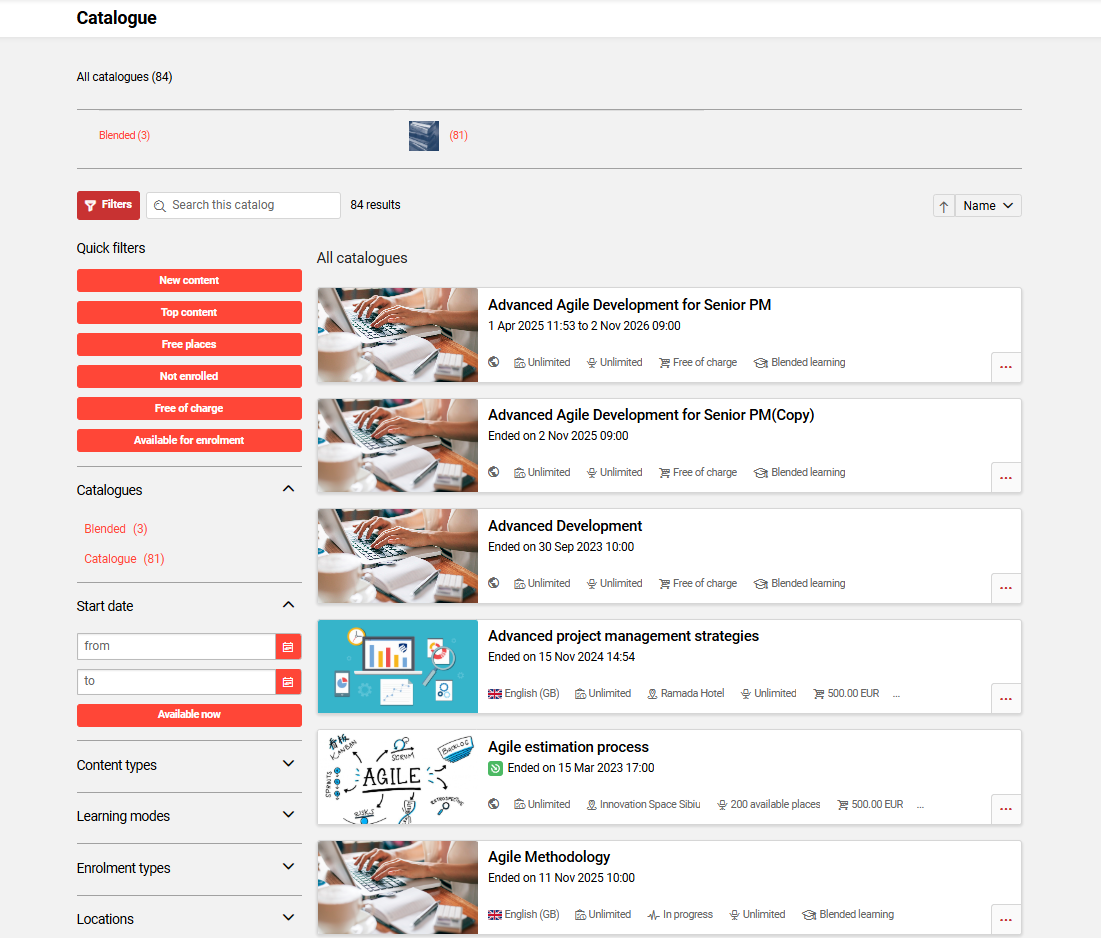
Filter
The Filter tab contains two folders that contain all possible filters that can be enabled in the catalogue view. Then there are four columns of checkboxes that determine if filters will be enabled.
-
Quick filters
These filters are displayed prominently in the top left corner of the catalogue. The filters are enabled by ticking the corresponding checkbox in the Show hierarchy facets column. These options relate to assignment and availability.-
New content
Displays only content assigned to the catalogue within the day range configured in the Configuration function Catalog menu Number of days for new setting value. This is commonly enabled. -
Top content
Displays only content that has the Top ten contents items checkbox ticked when assigned to catalogues. This is commonly enabled. -
Free places available
Shows Courses or Learning Paths that have a value set in the Maximum capacity field (meta tag ID 10009) and places are still available. -
Not enrolled
Displays all Course and Learning Path results for which the user has a No relation enrolment status. -
Free of charge
Displays all Course and Learning Path results where the Price field (meta tag ID 10033) is empty or contains a 0 value. This is mainly enabled for extended enterprise systems where much training would be sold to external users. -
Available for enrolment
Restricts results to Courses and Learning paths that can be immediately enrolled to. For example, not displaying training that has a ‘Locked’ planning status or no ‘Self-enrolment’ enrolment type enabled.
-
-
Sidebar
These filters mostly restrict results based on information linked to the assigned learning content. The filters even if enabled will dynamically display only if there are results meeting the filter criteria. Most commonly enabled filters include Catalogues, Locations, Classifications, Languages and Skills. -
Show hierarchy facets
When ticked will display the filter. -
Show indirectly assigned courses
When ticked will show individual Courses in results when only the Course templates is actually assigned. -
Hide course templates
When ticked the assigned Course templates can be hidden. This would often be ticked when the above setting is ticked to avoid duplication. -
Collapse filter: When ticked the Filters that contain structures would only display the top level. This is ideally ticked for Catalogues, Locations, Classifications and Skills which can have deep structures.
Classifications Settings
This tab enables specific Classification structures and select Sub-classifications to be selected.
Catalogue Administration
Once catalogues are configured, they will require regular administration. Catalogue administration tasks include content assignment, cleaning up content, and defining clearances.
Content Assignment
The Admin category (role) Assignment menu Catalogue function is the standard path for performing catalogue assignments. Assignment is possible by highlighting the desired catalogue and clicking the Catalogue assignment icon. This will open a new tab that contains eight icons:
-
Edit: Allows Cut/Paste option to move assigned content. Drag and drop is also possible.
-
Add: Launches a pop-up window to select content. The available content to Add is displayed based on Clearance and the content types enabled in the main catalogue.
-
Remove: Highlighted content will be removed from the catalogue.
-
Update: This is a manual option that simply either ticks or unticks the Update checkbox for the highlighted File or Course template objects. These are versioned objects and when the Update checkbox is ticked the assigned object will automatically update if a new version is published. This ensures content remains up to date with changes.
-
Transfer: Highlighted objects can be moved to a different catalogue selected in a pop-up window. The displayed catalogues in the pop-up are based on Clearances (Execute and Release).
-
Move up: Moves the highlighted content up.
-
Move down: Moves the highlighted content down.
-
Preview: Preview the single highlighted object.
The icons for the order of the content (1, 6, 7) are only relevant if, in the Clients function via the Catalog settings option, the value of the Sorting field in the Catalogue search tab has been set to categoryPosition asc or categoryPosition desc. Otherwise, the sorting would only impact administrators who access the Catalogues function to assign content.
Once desired content is assigned remember to click the Save or Save and back button.
Top Ten Content Items
When assigning content, the Top ten content items checkbox is used to identify objects that are to be promoted as a priority. There is actually no limit of ten either and any number of objects in all catalogues can be ticked. The promotion of content to learners is possible via the Top content quick filter in the catalogue and via Catalogue (ID 171) or Top contents (ID 114) panels on dashboards.
Update
When assigning content, you can ensure that versioned objects remain up to date by selecting the Update checkbox.
The Update checkbox in the Content assignment tab is important as it helps ensure versioned objects remain up to date. This is especially advantageous for media elements that are subject to regular updates. When assigned objects are not ticked to update there is risk of the content becoming outdated.
Course Template Assignment
Where there is many instructor-led date-dependent courses to be advertised in catalogues, it is recommended to assign the Course templates rather than the individual courses. The benefits of this include:
-
A cleaner catalogue with less duplicated content
-
More efficient assignment as new courses are automatically assigned
Requires course to have Viewable via template (ID 10136) meta tag ticked -
Already delivered courses will automatically be removed
Based on value defined in the Display in catalogue until field (meta tag ID 10067)
Update Search Index (SOLR)
Changes made to the catalogues and structures are not immediately displayed to learners in the front end. This is because there is a SOLR update processing job that needs to run. There are two options for this including an automated scheduled job and an immediate manual trigger.
The manual trigger is available in the admin Catalogues function and is ideal if needing to check changes straight away. Highlight the main catalogue where changes were made and click the Update search index icon to regenerate the catalogue. The regeneration of the catalogues would normally take between 30 to 90 seconds to complete and a confirmation message will appear on screen once complete in the upper right-hand corner.
The automated option uses a cron job that is configured in the Scheduled Jobs function. The cron job is called SolrIndexFullBuildJob and can be configured to run at defined intervals; e.g. every 180 minutes.
Catalogue Panels
There are three panels that can be assigned to learner dashboards to promote catalogues. Each of the panels is described below:
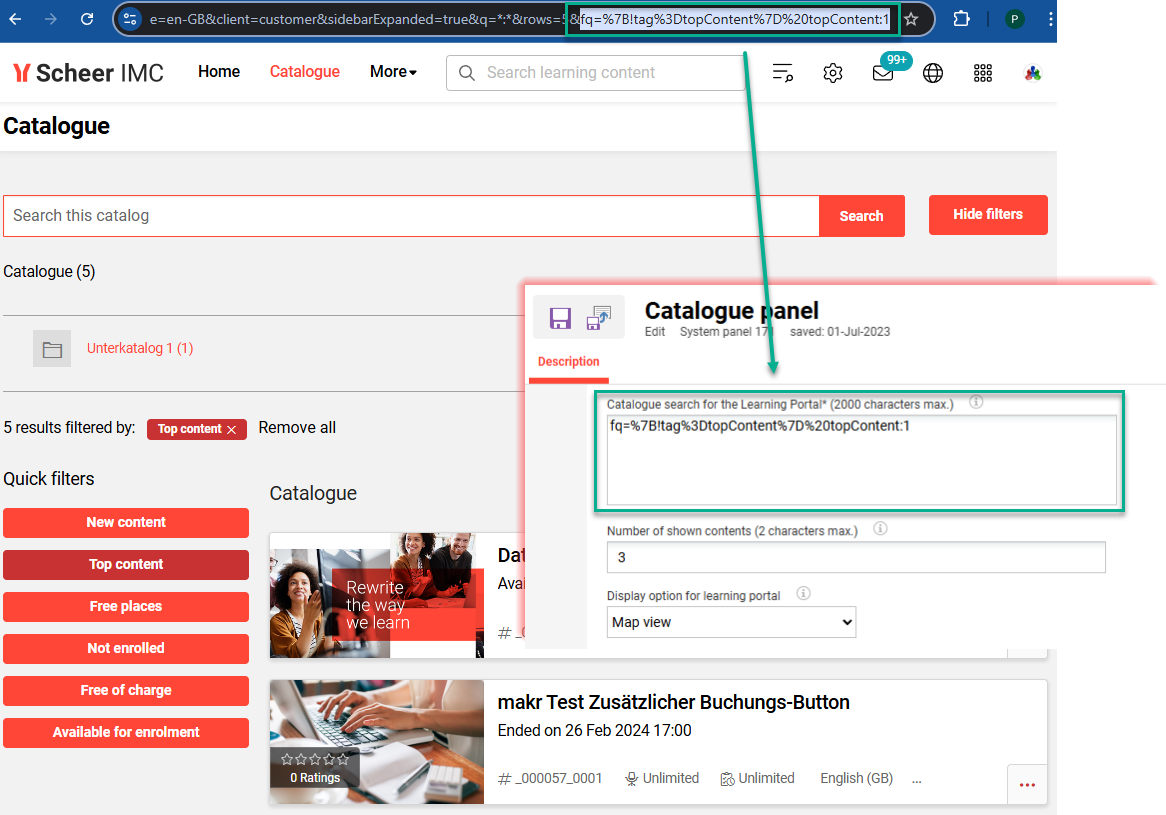
Catalogue Panel (ID 171)
The Catalogue panel returns catalogue contents based on a specific search query whilst considering the user clearances. The Catalogue search for the Learning Portal* field is where the query string is entered and this acts like a filter. This query string can be attained by conducting a catalogue search with desired filter criteria and copying part of the URL from “fq=”. The default value in the Vanilla configuration returns Top Contents with the query “fq={!tag=topContent} topContent:1”. Essentially the search query can consider any filter and text criteria to return specific results. This panel can also be duplicated where multiple panels with different queries are required.
Top contents (ID 114)
This panel is used to promote content that is assigned to catalogues with the Top ten content items checkbox ticked. The settings in the panel allows for the number of displayed contents and layout to be defined. Unlike the Catalogue panel (above) there is no further filtering possibilities to restrict to specific content. This means the returned top contents will be randomised based on all the flagged Top ten content items from all catalogues in which the user has clearance.
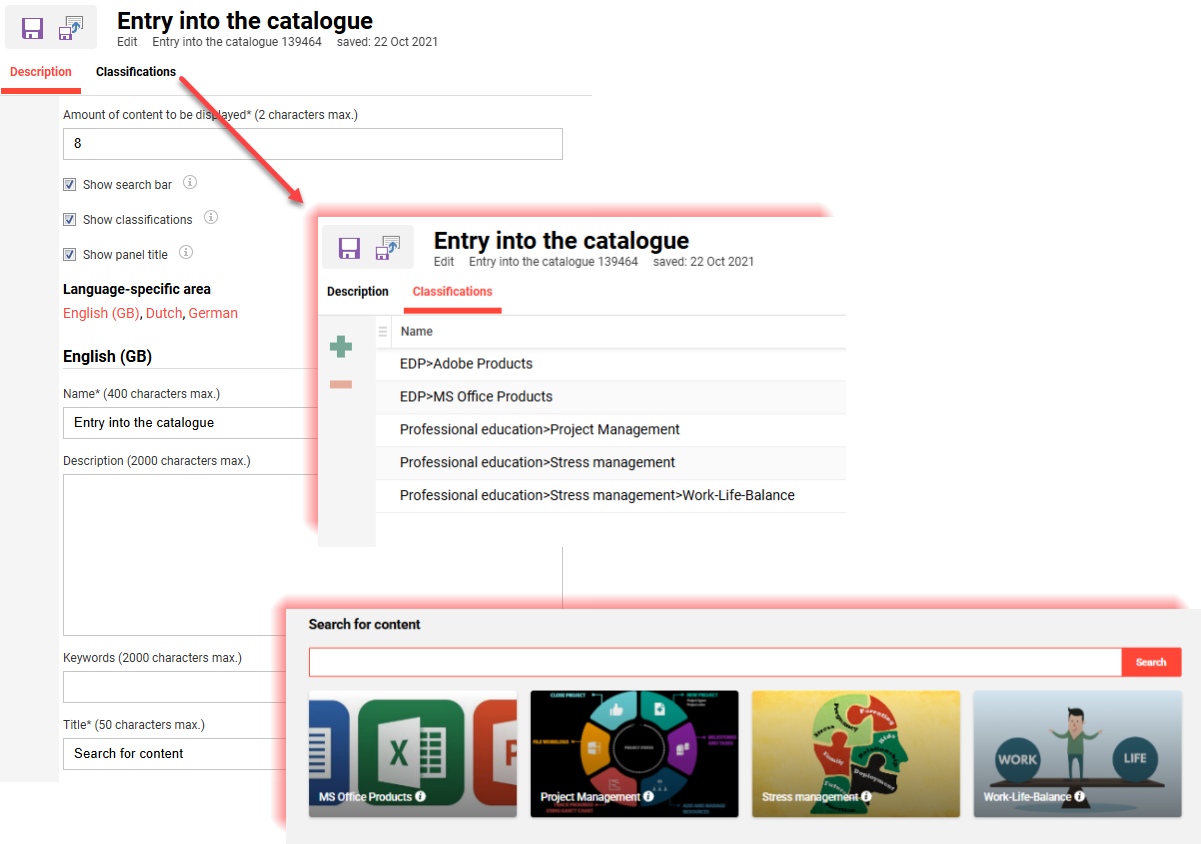
Entry into the Catalogue
This is a panel type that can be created in the Panels function using the Create icon. The key difference to the Catalogue panel (ID 171) is that it can include a catalogue Search bar and display Classification-based search tiles.
This is a panel type that can be created in the Panels function. The key difference to the Catalogue panel (ID 171) is that it can include a catalogue Search bar and display Classification-based search tiles. These options provide a nice visual display and are ideal for customers that utilise Classifications. A tile will be displayed for each assigned Classification with the image and/or text label.
Catalogue Reporting
There are four standard reports that return data related to catalogue activity. In the Report categories function these can be assigned to a category to be visible in the Admin role Reports function. The reports and their descriptions are listed below:
-
Catalogue assignments (ID 155)
Displays when training content such as courses or media was assigned to or updated within catalogues. This report can be useful for systems with complex catalogue structures to identify all catalogues where specific objects are assigned. -
Media requests in catalogues (per user) (ID 22518)
This report determines current media requests in catalogues per user. In addition to AICC WBTs and individual AUs, it includes all media assigned to a given catalogue. With the help of object IDs (see media administration), results may be filtered by medium. With the help of login names, results may be filtered by user. Results are displayed in a spreadsheet, showing media requests per user and per catalogue. -
SCO status in catalogues (ID 133)
Returns result statuses and details of participants who have accessed WBT SCORM modules directly via the catalogues. -
AU status in catalogues (ID 135)
A list showing all accesses or completions of 'WBT (AICC)' media type components by participants directly via catalogues, e.g., the media item is directly assigned to the catalogue rather than in a course.
Meta Tag Settings
For date-dependent Courses and Learning paths, the following meta tags that relate to catalogues are recommended to be utilised:
-
Viewable via template (ID 10136)
Enables courses to be advertised in catalogues automatically when the Course template from which they are derived is assigned. This keeps the catalogue cleaner and saves administration effort. Only available for Course templates. -
Catalogue advertisement from (ID 11675)
Enables defining a date from when the course or learning path will be displayed in the catalogue. This allows administrators to pre-assign content prior to a desired release date. If not populated or present, the assigned object will immediately be displayed in the catalogue. -
Display in Catalogue until (ID 10067)
Enables defining a date when the course or learning path will be removed from the catalogue. It’s recommended at the Course type level to define a default value in this meta tag based on x days before or after the Start date; e.g. 1 day before or 0 days after. Defining a default will help ensure the catalogue does not display already delivered courses or learning paths.
The presence of these meta tags displaying in Courses or Learning paths is defined at Type/Template level in the Meta tags and attributes tab.
📋 Related Articles