About Single Sign-On (SSO)
Single Sign-On (SSO) allows users to authenticate once and seamlessly access multiple applications and services without the need for repeated logins. SSO integration can be accomplished through various protocols, with SAML2 (Security Assertion Markup Language 2.0) and OIDC (OpenID Connect) being the most widely used. These protocols facilitate secure and standardized authentication between OpenID Provider (OP) and a Relying Party (RP).
Integrating SSO via SAML2 or OIDC necessitates careful coordination between the OP and RP. Both protocols provide strong security and flexibility, though they differ in their implementation. SAML2 relies on XML-based messages, while OIDC is based on the modern OAuth2 framework and uses JSON Web Tokens (JWT). The choice of protocol is influenced by specific use case requirements and the existing infrastructure of the system.
Introduction
This document outlines the Single Sign-On (SSO) authentication method via OpenID Connect (OIDC) for the imc Learning Suite and provides an overview of the configuration steps involved.
OIDC has been implemented as the Single Sign-On solution for the imc Learning Suite. The Learning Management System (LMS) application features an initiation page (request page) that triggers the OIDC authentication process using pre-configured parameters.
The general workflow for the implementation includes the following steps:
-
Button / Link or Entry point to ILS
-
SSO initiation page
-
Redirect to Authorization Server (OP) / remote user login
-
Authorization Server sends the logged in user back to the ILS - SSO response page
-
Authentication
For the case where a user could not be found in the LMS database, Account Provisioning can be configured to seamlessly create an LMS user for the authenticated person. Along with this Account Provisioning feature, personal data within the LMS database can further become synchronized upon each user login when desired.
About OpenID Connect (OIDC)
OpenID Connect builds upon the OAuth 2.0 framework by adding an identity layer, enabling the provision of user information and the establishment of login sessions. While OAuth 2.0 is designed for delegating access to third-party applications without exposing user identity, OpenID Connect allows for both user authentication and authorization in a single flow, providing an ID token and an access token for access to protected resources.
OIDC Flow
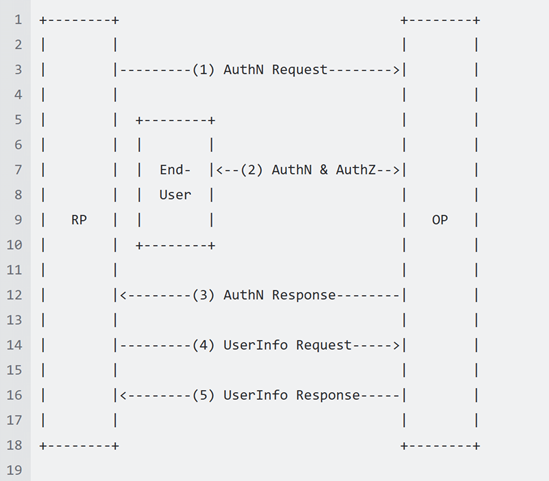
The OpenID Connect protocol follows a structured sequence of events, as outlined below:
-
The Client (Relying Party or RP) initiates a request to the OpenID Provider (OP).
-
The OP authenticates the End-User and obtains authorization.
-
The OP issues an ID Token and, in most cases, an Access Token.
-
The RP can then use the Access Token to make a request to the UserInfo Endpoint.
-
The UserInfo Endpoint returns relevant claims regarding the authenticated End-User.
This sequence is illustrated in the diagram below:
Claims
In OpenID Connect, claims are name/value pairs containing pieces of information about an authenticated user that are included in ID token. These claims contain details about the user, such as:
|
Member |
Description |
|
sub |
Subject - Identifier for the End-User at the Issuer. |
|
preferred_username |
Shorthand name by which the End-User wishes to be referred to at the Relying Party (RP) |
|
profile |
URL of the End-User's profile page. The contents of this Web page SHOULD be about the End-User. |
|
|
End-User's preferred e-mail address. |
Response Type
In OIDC configuration, the response type specifies the type of response the client expects from the authorization server after the authentication process. It defines the tokens or authorization codes that the client will receive as part of the response. Common response types include:
|
Response Type |
Description |
|
code |
This requests an authorization code, which the client exchanges for an access token and ID token in the token request. |
|
id_token |
This requests only the ID token, which contains information about the authenticated user. |
|
code id_token & code token |
A combination of these types, typically used to facilitate hybrid flows for greater flexibility and security. |
The chosen response type depends on the specific flow being used and the client’s security requirements.
Scope
Scope defines the permissions or resources the client is requesting from the authorization server. The scope parameter is included in the authentication request and can include standard values such as:
|
SCOPE |
Description |
|
openid |
A mandatory scope for all OIDC requests, indicating that the client is requesting authentication. |
|
profile |
Requests access to the End-User’s basic profile information (e.g., name, profile picture). |
|
|
Requests access to the End-User’s email address. |
Response Mode
Response mode defines how the authorization server will return the authentication response to the client. It specifies the method by which the response parameters (such as tokens or authorization codes) are transmitted. Common response modes include:
|
SCOPE |
Description |
|
query |
The response is returned as query parameters in the URL. |
|
form_post |
The response is sent as form data in an HTTP POST request, typically used for more secure handling of sensitive data. |
The choice of response mode depends on the client's requirements and the security considerations of the communication method.
Discovery URL
The Discovery URL is a standardized endpoint that allows clients to dynamically retrieve configuration information about the OpenID Provider (OP). The Discovery URL follows a well-defined format, often ending with "/.well-known/openid-configuration". This URL typically provides critical metadata values that enable clients to interact with the OpenID Provider (OP). These values include:
|
Metadata values |
Description |
|
issuer endpoint |
This is the URL that uniquely identifies the OpenID Provider. It is used by clients to confirm that the tokens are issued by a trusted provider. |
|
authorization endpoint |
The URL where the client directs the End-User to authenticate and grant authorization to access protected resources. |
|
token endpoint |
The URL used by the client to exchange an authorization code for an access token and ID token, or to refresh tokens. |
|
userinfo endpoint |
The URL where the client can retrieve claims about the authenticated End-User, typically after receiving an access token. |
|
jwks uri |
The URL where the OpenID Provider’s public keys are stored. These keys are used by the client to verify the integrity and authenticity of the ID tokens received from the provider. |
Client Application
To establish a secure connection between the OpenID Provider (OP) and the Relying Party (RP), the OP provides the necessary credentials to the RP for secure communication. The following are the configuration properties for the client application:
|
Property |
Value |
Description |
|
Client ID |
XXXX-XXXXX-XXXXX-XXXXX |
A unique identifier for the RP within the OP. |
|
Client secret |
XXXX-XXXXX-XXXXX-XXXXX |
A secret key used by the RP to authenticate with the OP. |
|
Redirect URL |
https://{{base_url}}/idm/oidc/login https://{{base_url}}/idm/logoff |
The URL to which the OP sends the ID token and authentication results. |
The RP must share the Redirect URL with the OP, which allows the OP to send the ID token and the authentication result to that URL.
User Provisioning
User provisioning in OIDC refers to the process of creating or updating user accounts within the LMS based on the authenticated user's identity information.
Once a user successfully authenticates via OIDC, the system checks for an existing account. If no account is found, a new user account is created using the user's unique identifier, typically provided by the OP.
If an account already exists, the system updates the account with any new or changed information. This automatic provisioning ensures that users are granted the appropriate access and permissions based on their authentication status.
User Profile Attributes
Multiple user attributes from OIDC can be mapped to all user profiles that are provisioned. The following are the most commonly used attributes:
|
From OP |
LMS attribute id |
Description |
|
Login |
LOGIN |
The unique username or identifier that the user will use to log in to the system. It is typically provided by the Identity Provider (IdP) and must be unique across the system. |
|
first_name |
FIRSTNAME |
First name of the user |
|
last_name |
LASTNAME |
Last name of the user |
|
user_email |
|
The email address associated with the user's account |
|
Membership Status |
MEMBERSHIP_STATUS |
Indicates the user's active membership status within the system or organization. |
Effects on Other Components
No effects on other components are foreseen. However, care should be taken regarding data quality of the users being provisioned. If the user provisioning is not the only way users will be provisioned in the LMS (e.g. if users will be created manually or via CSV file), consider and use a unique ID which is truly unique across all sources. This is to avoid user duplication in the LMS.
Configuration of OIDC in imc Learning Suite
Follow the steps mentioned below to setup OIDC authentication in your LMS:
-
Login to your LMS (imc Learning Suite).
-
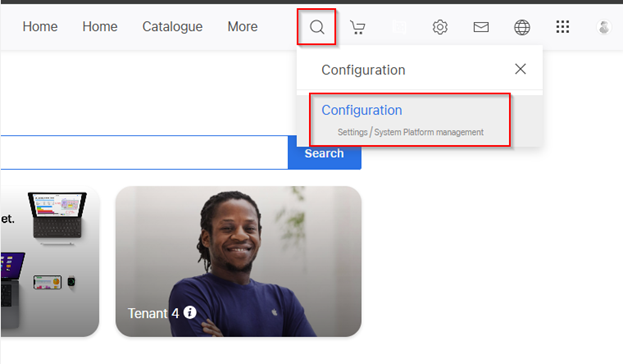
Search and navigate to the “Configuration” manager.
-
In the “Search term” option, enter “OpenID”.

-
Select the “🖊️” (Edit) option and, from its drop-down menu, choose the environment for which you want to configure OIDC.
-
On the “OpenID Configuration” page, set up the configurations as shown in the screenshot below.
Note: In the “OIDC Default Fallback Attribute” section, select a unique attribute (e.g., Email, LOGIN) from the drop-down menu.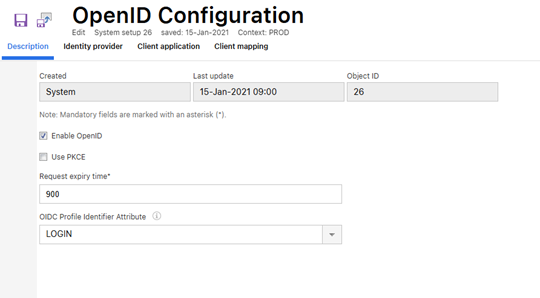
-
Navigate to the “Identity Provider” tab on this same “OpenID Configuration” page.
-
Click “📄” option in the sidebar to create a new instance.
-
Configure the Identity Provider settings as per the details provided in previous sections of this document (“Discovery URL”). For reference, screenshot is shown below.
Note: Ensure that the “Provider ID” is a unique identifier, which must also be referenced in the “Client Application” section.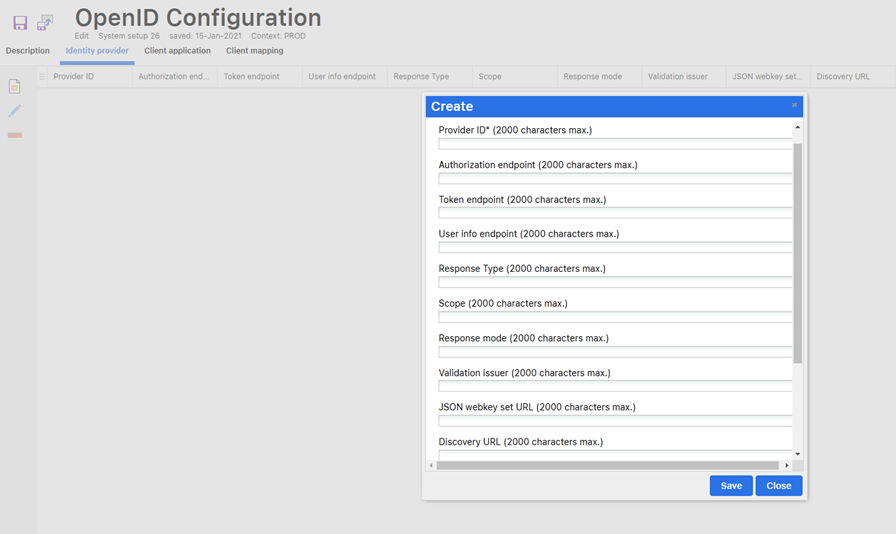
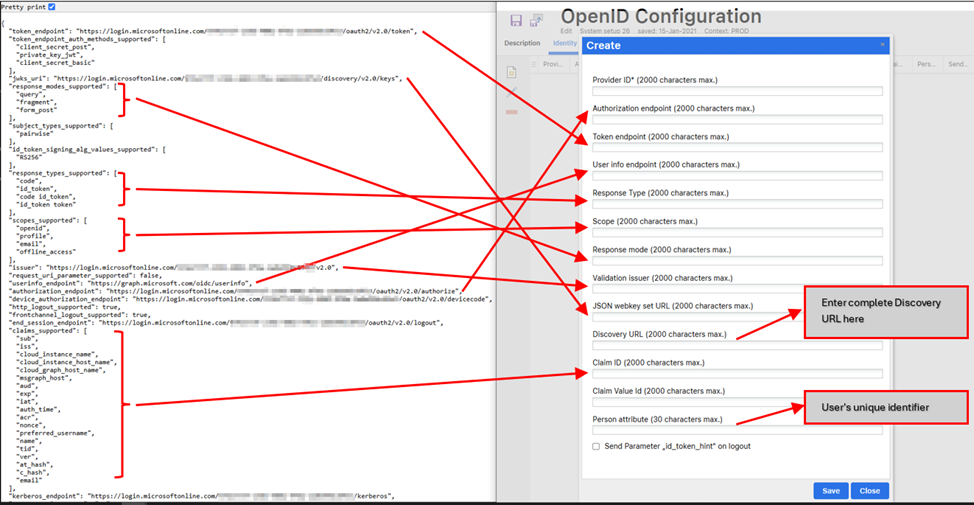
For further reference, the image below illustrates how different elements from the Discovery URL JSON Response map in the OpenID Configuration page.
-
Navigate to the “Client Application” tab on this same “OpenID Configuration” page.
-
Click “📄” option in the sidebar to create a new instance.
-
Configure the Client Application settings as per the details provided in previous sections of this document (“Client Application”). For reference, screenshot is shown below.
Note: Ensure that the “Provider ID” is a unique identifier, which must also be referenced in the “Identity Provider” section.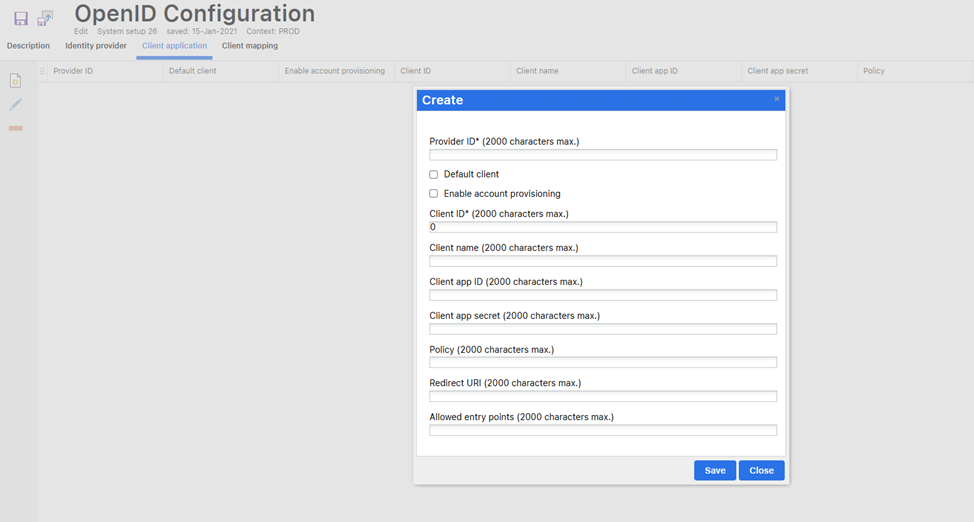
-
Now, navigate to the next tab “Client Mapping” section and create a new instance by clicking the “📄” option in the sidebar.
-
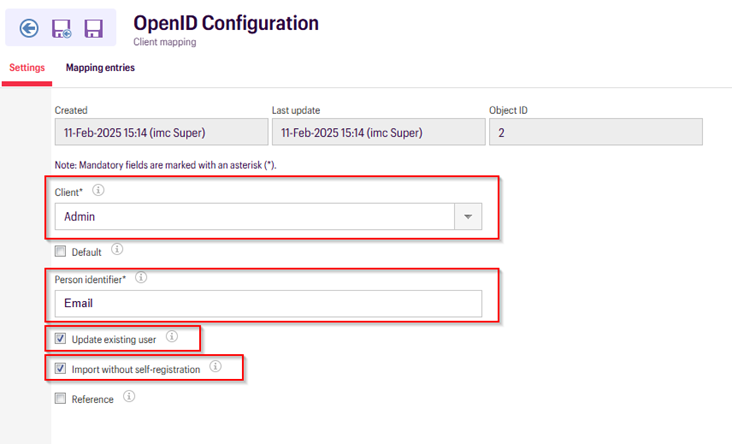
Select the Client for which the OIDC is being configured from the given drop-down menu.
-
Mention the Person Identifier (such as Email) which is the unique attribute for the Client Mapping.
-
Check mark the “Update existing user” and “import without self-registration” only if you want to enable User Provisioning alongside the Single Sign-On.
-
Now navigate to the “Mapping Entries” tab on this page and create new instances of all the User Attributes you want to map by clicking the “📄” option in the sidebar. See the screenshot below for reference.
Note: The “Source Field” refers to the attribute received from the OpenID Provider (OP), while the “Target Field” is the corresponding field in the LMS (imc Learning Suite) where this data is stored.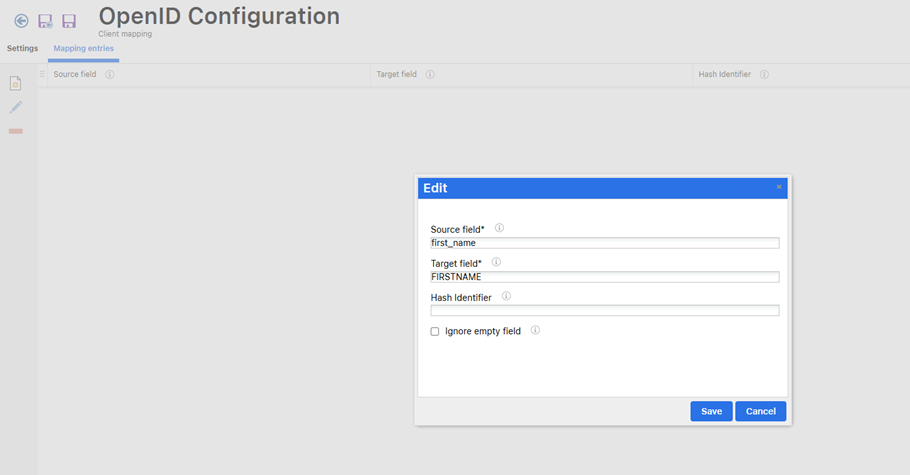
-
Save and close the “OpenID Configuration” page.
-
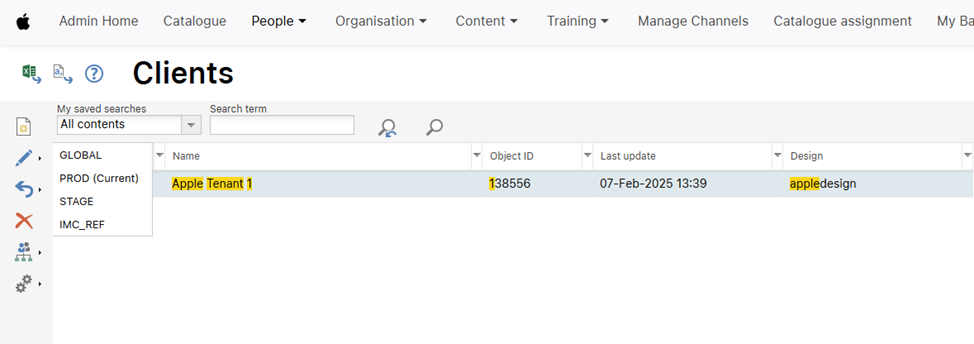
Then, search and navigate to the “Clients” page.
-
Select the client that you are configuring the OIDC authentication for and select the “🖊️” (Edit) option and, from its drop-down menu, choose the environment for which you have configured OIDC.
-
Now, navigate to the “Access and Security” tab.
-
Check mark “OpenID Connect” option to enable OIDC authentication.

By completing these steps, OIDC authentication will be successfully integrated into imc Learning Suite, ensuring a secure and seamless login experience for users.
If setting up multiple OpenID Providers (OPs) for different clients, define separate OIDC settings for each client.