How to track course participant attendance using QR codes
The QR code attendance tracking workflow is intended for courses where participants are required to attend a physical training location. On arrival, participants use their phone cameras to scan a QR code displayed on a course poster. This prompts the participant to log in to the LMS, which automatically checks them in. Upon leaving, participants scan the QR code again to check out.
This workflow is ideal for training sessions with large attendance where it would not be efficient for a tutor/facilitator to manually track all attendees. The workflow requires a specific course setup, which is explained in this article.

Course and Event Configuration
The QR attendance tracking requires you to create a course with an Event media type created in or added to the Components tab. These events are created manually and have dates and times that match those of the course.
Event Media Type Configuration
In the Media types function, you need to edit the Event media type to check if three Attendance tracking related meta tags are added. The meta tags to add are:
-
Start of tracking before event in hours (ID 11807)
-
End of tracking after event in hours (ID 11808)
-
Record Attendance Tracking for Weekends (ID 11936)
If the meta tags are not present, add them and click the Save button.
For systems where events are used for purposes other than Attendance Tracking, it can make sense to create a new Event media type specific for Attendance Tracking. This way the required meta tags for Attendance Tracking do not display for regular events.
Event Creation
To generate a QR Code for tracking attendance, first create an event media object. You can do this directly in the Courses function or via the Media function.
Event Creation in Course
The simplest method is to create the event directly in the Components tab of the course. You can do this by clicking the Create icon, selecting the Media option, and in the pop-up choosing the Event media type. For the attendance event, match the Start date/time and End date/time to the course dates/times; this is why direct creation in the course is the simplest approach.
With Attendance Events, you can save these as Course-specific. This means the event will not be visible in the Media function and will not be versioned. Any updates after saving must be made directly in the course by highlighting the event in the Components tab and clicking the Edit icon.
Where a course spans multiple sessions or days, you can create multiple events. Each event can then have a separate QR code to track attendance.
In a Course Template, an Event media type can be added to the Components tab to serve as a reminder when creating each course session that an Event with specific start/end date/time is needed for attendance tracking.
Event Creation in Media
You can also create events for Attendance tracking in the Media function. This approach creates versioned objects that can be added to a course. You can do this by clicking the Create icon, selecting the Media option, and in the pop-up choosing the Event media type. For the attendance event, match the Start date/time and End date/time to the course dates/times; this means the course is normally created first.
Event Updating
Once an event is created, it may require updating to adjust descriptions or meta tag settings. How you do this depends on whether the event was created ‘Course-specific’ or ‘As systemwide media’.
-
If an Event was created Course-specific, you will need to edit the event directly in the course Components tab.
-
If an Event was created ‘As systemwide media’, you will need to edit the event in the Media function. This will then require publishing and a new version will be created. Whether the new version is reflected in the course automatically depends on the Automatic update settings for the course and whether there are already enrolled users.
It's recommended to have suitable default values in the media type meta tags: Start of tracking before event in hours and End of tracking after event in hours.
Printing the QR Code
Once the Event is added and the Course is saved, the QR code can be immediately printed by select Administrators and Tutors:
-
Administrators will require Edit Clearance to the Course.
-
Tutors require a role with access to the Syllabus tab.
The QR code poster can be printed as per instructions below:
Components Tab
When administrators are creating or editing a course that has an Event, in the Components tab is a Generate QR code icon. Highlight the Event for attendance, click the Generate QR code icon and select Generate QR code for event attendance tracking option. This will generate a PDF file that can be printed for display in the Classroom.
Syllabus Tab
Your course Tutors and Administrators can generate QR code posters via their respective Course instruction functions.
-
Tutor: Course overview function -> Course instruction icon
-
Administrator: Courses function -> Tutoring icon -> Course instruction option
In the Syllabus tab there is a Generate QR code icon. Highlight the Event for attendance, click the Generate QR code icon and select the Generate QR code for event attendance tracking option. This will generate a PDF file that can be printed for display in the classroom.
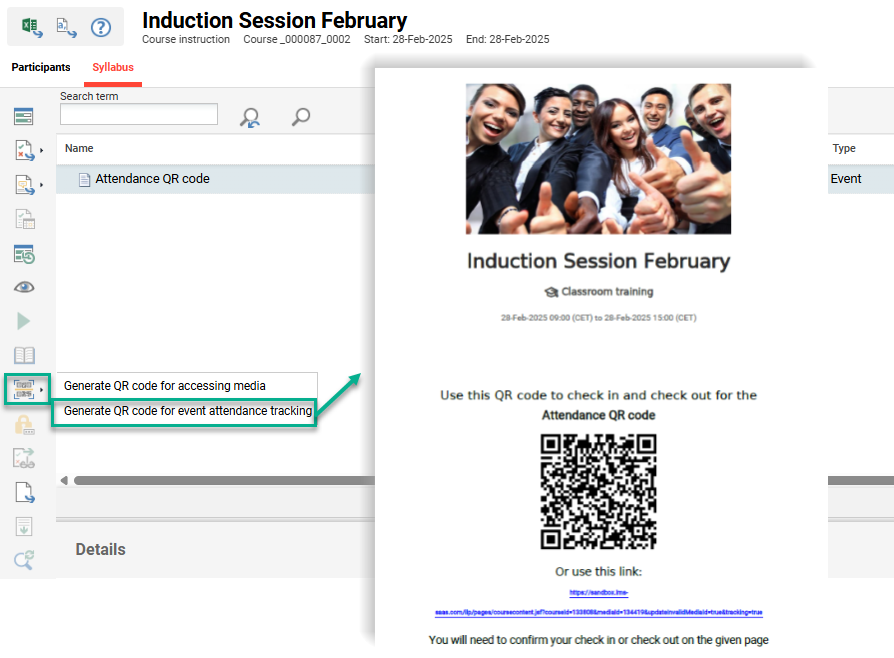
Only Tutors assigned to the course that have a role that can access the Syllabus tab will be able to print the QR code poster.
Monitoring Attendance
Once the participants scan the QR code and successfully log in to the LMS, their attendance will be automatically updated if they are enrolled on the course. You can track the event attendance as an Administrator and/or Tutor using the respective Course instruction function for the course. Here, the simplest view is the Attendance tracking option where there is a nice mobile-friendly display. A detailed view is available via the Course instruction option in the Syllabus tab, where exact date and time stamps are also recorded.