
“Easy media upload” is a functionality for creating learning content simply by dragging and dropping.
Benefits
With the easy media upload, content can be created very simply. It is now also possible for people who do not have access to the administrative LMS to create content and therefore no longer have to ask administrators to upload content. There is also no need to worry about configuring the fields; content can simply be dragged and dropped into the field or a link can be entered, after which content creation can begin.
Use Cases / Scenarios
Enable Subject Matter Experts to Easily Contribute to Channels
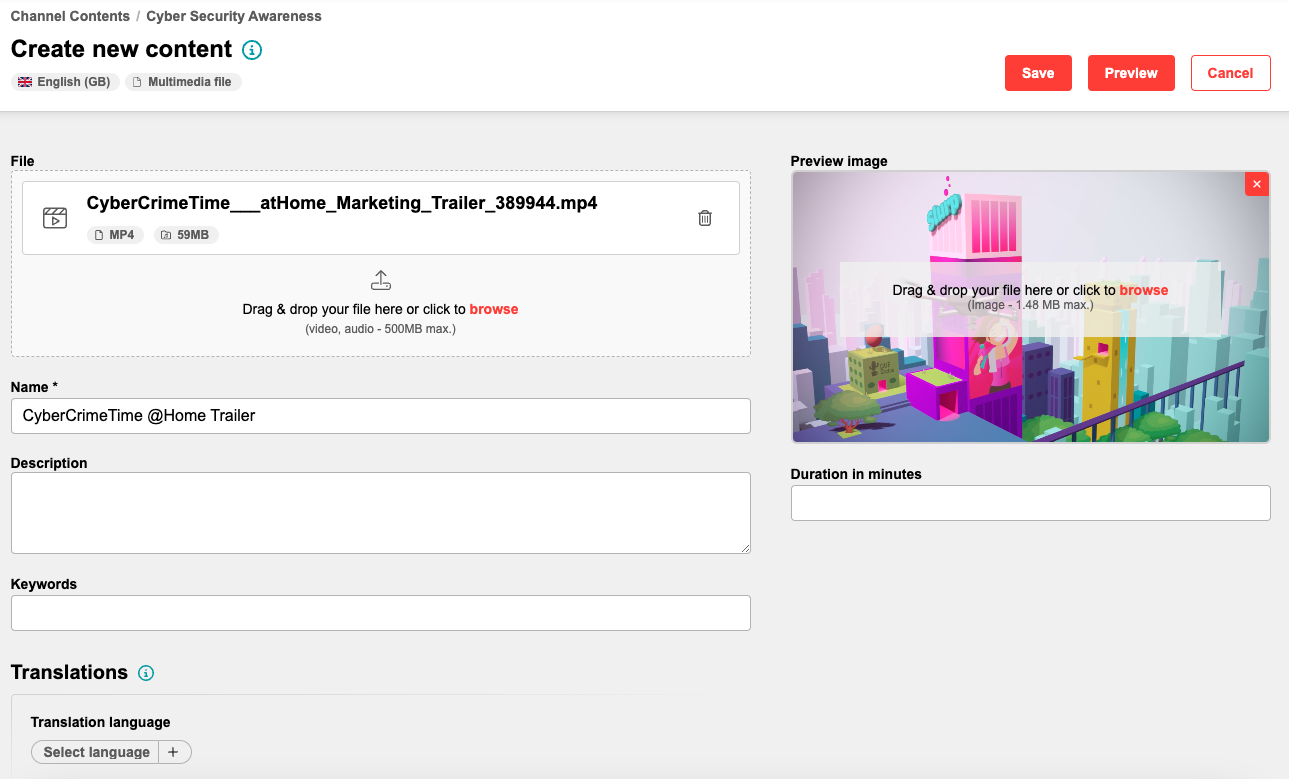
The "Easy media upload" function requires no administrative access. Content creators can view only the channels they have permission to edit, allowing a channel for content creation to be selected and the process to be started immediately. Various content types are available, including files, links, multimedia, and third-party content. For instance, with a simple drag-and-drop action, subject matter experts can upload PDFs by dragging them into the designated field, which opens a new page where only metadata such as name, description, or translations need to be completed. If possible, the system generates a preview image automatically.
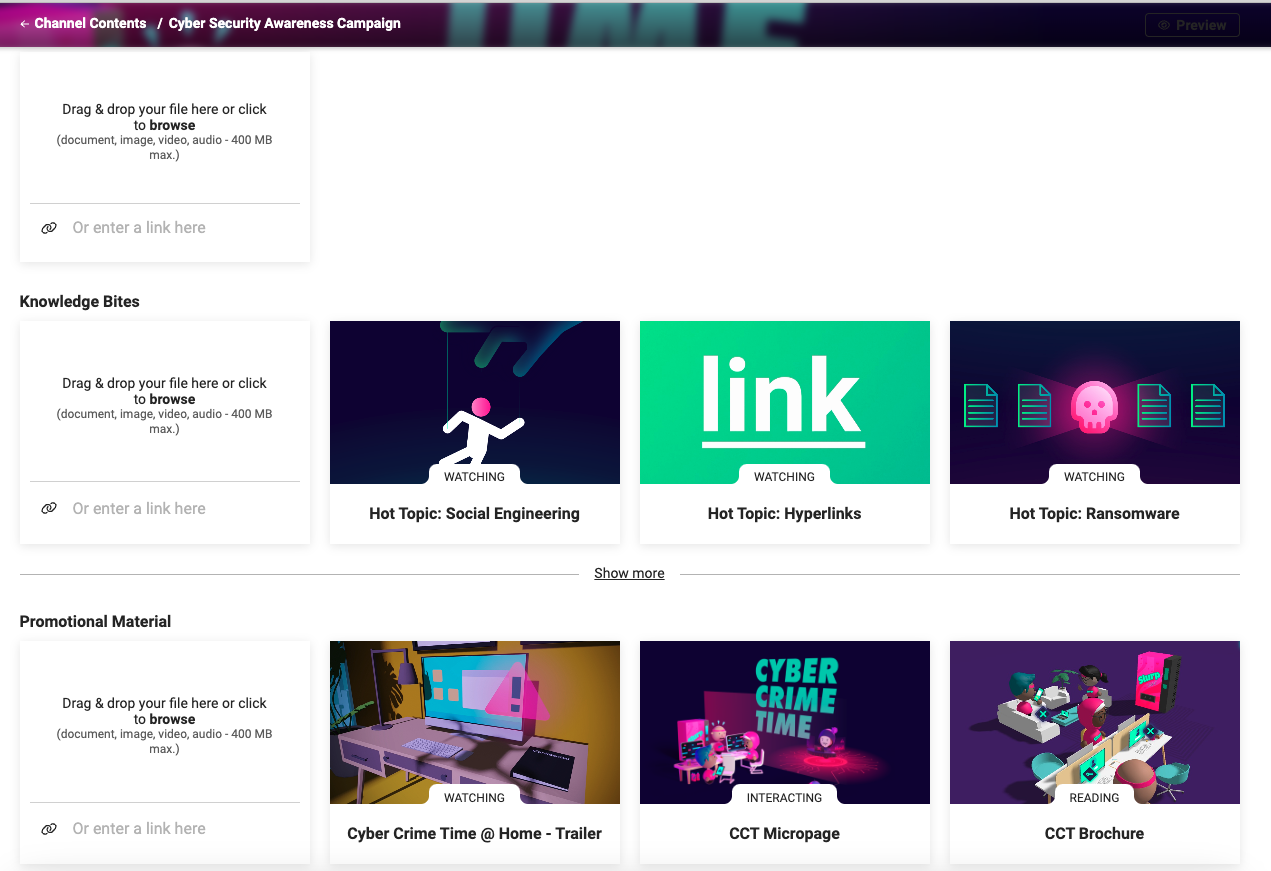
Content creators can also preview how their content will appear to learners, ensuring it displays as intended. Once saved, the content is immediately available, and Channel subscribers are notified of the new addition. Existing content can also be edited using this feature, making updates and adjustments seamless. For learners, new or updated content is marked with a flag, making it easy to identify recent changes.
In Easy Course Creation: In easy course creation, it was previously only possible to add content that had already been created in the ILS media manager. Content could not be created directly there. This is now possible with easy media upload: both course administrators who create courses and tutors who maintain their course content can easily create content for the course themselves.
Steps to Configure Channels “Easy Media Upload”
-
Content creators need to have access to the navigation entry “Channel contents” to be able to create and save media.
-
Clearances for “Channel contents” should be checked; content creators need to have at least the “Edit” right for the channels on which they are working.
-
“Easy media upload” should be configured in client administration to enable the functionality per client and define the desired media types to be used.
-
Clearances for media types should be checked: Content creators need at least “View” rights for the media type specified in the client manager for the upload.
-
The file formats to be used for the easy media upload should be checked or adapted to ensure that the correct ones are configured.
-
The upload size of files should be checked or adapted if the upload size of files is to be limited to a certain size or left unrestricted.
-
The platform URL should be configured because it is needed to construct proper URLs.
Steps to Configure Easy Course Creation “Easy Media Upload”
-
Easy course creation for managers should be configured to create a course with components.
-
“create content” should be configured in the course creation workflow to enable the “create content” button in the content step of the easy course creation.
-
“Easy media upload” should be configured in client administration to enable the functionality per client and define the desired media types to be used.
-
Clearances for media types should be checked: Content creators need at least “View” rights for the media type specified in the client manager for the upload.
-
The file formats to be used for easy media upload should be checked or adapted to ensure that the correct ones are configured.
-
The upload size of files should be checked or adapted if the upload size of files is to be limited to a certain size or left unrestricted.
-
The platform URL should be configured because it is needed to construct proper URLs.
Functions for Easy Media Upload
Create new Content with Easy Media Upload
The creation of content with easy media upload is highly intuitive. Three media types are always available as a basis: File, multimedia, and link. Additionally, optional media types can be configured, which may vary slightly between “Channels” and “Easy course creation”.
Channels
Select Channel
Before starting to create content, a channel must first be selected for which the content will be created. The view is generally similar to that of "Explore channels," but only channels for which editing rights are granted are displayed here.
Preview
This preview focuses on the overall appearance of the channel. It allows both an overview of the channel as a whole and the examination of specific parts to assess how they are displayed to channel subscribers.
Select Section
Within the channel, a selection must be made regarding where the content should be placed. If the channel has no sections, the area is clearly defined. If one or more sections have been created, either one of the sections must be selected or the general area above the sections.
Select Media Type
Depending on the configured media types, a larger or smaller selection is now available. Files or multimedia files can either be dragged and dropped into the designated field, or the field can be clicked to browse the computer. For creating media based on a link, a field where any URL can be entered is located below the drag-and-drop field. As an optional media type (if licensed), third-party content can also be integrated; Pluralsight, Udemy, and Academia are possible options.
Creation Step
Once the content type has been selected, the process moves to the next step, where the required metadata, such as name and description, can be added. The fields displayed here depend on the template configured for the client. Additionally, further languages can be added; the options available are also determined by the configuration within the client.
Before saving the content, a preview can be used to see how the content will be displayed to subscribers.
Rating
If a channel with activated ratings is selected, the content creator can view the ratings from learners on each content card in the overview, allowing them to assess the quality of the content.
Easy Course Creation
Create Content
First, a course must be created or edited that has content creation enabled. In the content step, it is possible to add existing content, and there is also a button to create entirely new content. This button must be used to proceed to the content creation process.
Select Media Type
Depending on the configured media types, a larger or smaller selection is now available. Files or multimedia files can either be dragged and dropped into the designated field, or the field can be clicked to browse the computer. For creating media based on a link, a field where any URL can be entered is located beneath the drag-and-drop field. As optional media types, events and articles can be created; the fields to start the process are also positioned beneath the drag-and-drop field.
Creation Step
Once the content type has been selected, the process moves to the next step, where the required metadata, such as name and description, can be added. The fields displayed here depend on the template configured for the client. Additionally, further languages can be added; the options available are also determined by the configuration within the client.
Before saving the content, a preview can be used to see how the content will be displayed to subscribers.
Preview Content with Easy Media Upload
If the preview was missed during content creation or if something needs to be reviewed later, it is still possible to start the preview from the content card. This option becomes visible when hovering over the card. Unlike the earlier preview, this preview displays only the content itself, not the entire channel.
Edit Content with Easy Media Upload
Editing the content is also possible afterward. All metadata of the content can be revised, languages can be added or removed, and even the file or link can be replaced. The only requirement is that the necessary editing rights for the content are in place.
Delete
MS Teams meetings in Easy Course Creation
General behavior
When MS Teams meetings are created via Easy Media Upload, the following general behavior applies:
-
If configured in the workflow, participants assigned to a course are automatically added to the corresponding MS Teams meeting.
-
The meeting URL is displayed in the course overview at the end of the creation process and can be copied for further use.
-
Only date-dependent courses are reflected when using MS Teams meetings.
Limitations and restrictions
MS Teams meetings created via Easy Media Upload are subject to the following limitations:
-
Delegated permissions are not supported. Only application permissions can be used.
-
Tutors or trainers cannot be assigned automatically as presenters of an MS Teams meeting.
-
Classifications are not supported for MS Teams meetings.
-
Attendance time cannot be reviewed within the ECC context. Attendance information is only available in the administrative area of the system.
-
The organizer of an MS Teams meeting cannot be changed after the meeting has been created and saved. If the organizer or presenter is unable to attend, a new meeting must be created.
Best practice: simplifying meeting creation
To streamline the meeting creation process, it is recommended to predefine recurring or static information directly on the media type level.
For example, external service providers or other metadata that typically do not change between meetings can be configured as fixed metadata on the MS Teams media type. These metadata fields can then be hidden on the Easy Media Upload page.
This approach ensures that content creators only need to focus on meeting-specific details during creation, reducing complexity and minimizing the risk of incorrect configuration.
Out of Scope and Limitations
-
Supported media types for Channels: multimedia, file, link, 3rd party content
-
Supported media types for Easy course creation: multimedia, file, link, activity and event
-
The fields can be pre-filled with data extracted from the uploaded content (if available); currently, only “Name” is possible.
-
Only available for Channels and Easy Course Creation
-
Limited set of supported meta tags
-
Name
-
Description
-
Upload content
-
Keywords
-
Preview image
-
Purpose of the media
-
Duration in minutes
-
Upload multimedia preview image (10962)
-
Custom: Meta tag with entry field (textfield)
-
Start and End date (ecc)
-
Location (ecc)
-
iCal appointment (ECC)
-
Media can be marked as completed (ECC).
-
Time zone
-
Fix time zone for learner
-
MS Teams related settings
-
-
Configuration of where the created content should be stored
-
only available for Easy course creation
-
-
For 3rd party content: edit not possible