
The “User import planning” function is used to configure CSV batch import jobs for user files and to access import log files directly in the GUI. Multiple client-specific import jobs can be configured. They are scheduled or processed manually and can be restricted to creating and/or updating users.
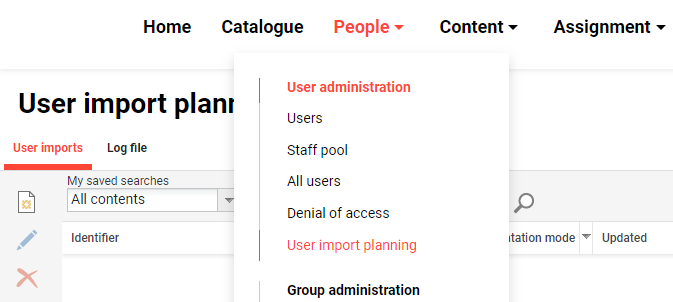
The function is accessed via the “Admin > People > User administration” menu path. It contains two tabs, “User imports” and “Log file”.
The function is intended for use by Scheer IMC consultants. Customers who are familiar with batch file interface processes also use it successfully. It allows creating new import jobs, editing or deleting existing jobs and accessing user import log files. This page explains the options in detail.
Functions of the User Import Planning
Creating a User Import Job
Creating a user import job is quick if the required personal attributes are already configured. To start, click the “Create” icon. A new browser tab opens. Configuring a user import job requires nine fields, including the upload of an XML mapping file.
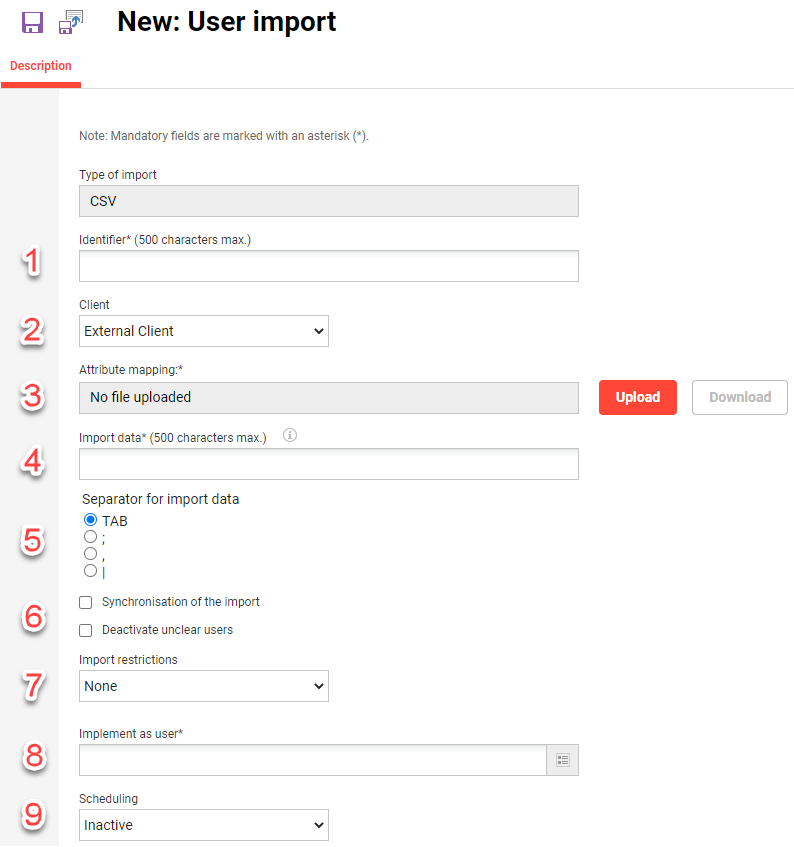
Each field and setting in the “Description” tab is described below:
-
Identifier: The unique name of the import job. It is not the name of the CSV file.
-
Client: A client must be set. It becomes the “Master client” of the imported users, unless business rules specify otherwise. In a multi-client system, the user import is visible only to users within the client that performs a manual user import in the “Users” function.
-
Attribute mapping: This upload field requires an XML file that maps the column names of the CSV file to the names of the personal attributes in the database. Details follow in the section on the XML mapping file.
-
Import data: The name of the CSV file used when the import job is scheduled as “Daily”, “Weekly” or “Monthly”. With the scheduling “Manual”, the file name is not enforced during the manual import.
-
Separator for import data: The column separator (delimiter) is TAB, semicolon, comma or pipe. The file must match when importing. A pipe is recommended if the source system can generate a CSV file with this separator.
-
Checkboxes:
-
Synchronisation of the import: When enabled, each subsequent import automatically deactivates all previously imported users who are no longer in the file. The setting is mainly used when a source system cannot send a termination status because it provides only “Active” records. Many customers use this setting.
-
Use encryption: For added security, user import files can be protected with PGP encryption. When enabled, an encrypted file must be delivered that matches the encryption settings defined in the “Configuration > Key management” function.
-
Deactivate unclear users: All users mentioned twice in the CSV file are deactivated. This applies only to users created with the same import (verifiable via the user attribute “Import ID”).
-
-
Import restrictions: Import jobs can be restricted to creating or updating users. The default value “None” means that no restriction is active. The import job then creates new user records and updates existing ones.
-
Insert only: Unknown IDs create new users, known IDs are ignored.
-
Update only: Unknown IDs are ignored, known IDs update existing users.
-
None: Unknown IDs create new users, known IDs update existing users.
-
-
Implement as user: Selects a user in the imc Learning Suite (LMS) on whose behalf the import is processed and the import log files are sent.
-
Scheduling: A single-selection setting that determines how and when the import job is processed.
-
Inactive: The import job is available neither for manual nor for automatic runs.
-
Manual: The import job can be selected as an available import when importing in the GUI via the “Users” menu.
-
Daily: The import job runs daily at the time set in the cron job. The CSV file must be uploaded to an SFTP server beforehand.
-
Weekly: The import job runs weekly at the time set in the cron job. The CSV file must be uploaded to an SFTP server beforehand.
-
Monthly: The import job runs monthly at the time set in the cron job. The CSV file must be uploaded to an SFTP server beforehand.
-
Synchronisation requires caution. Poorly generated partial files can deactivate users unintentionally because they are missing from the file.
Creating an XML Mapping File
The XML mapping file defines the structure of the CSV file, including how column names map to the names of the personal attributes in the database. At the very least, the user import file must include the mandatory personal attributes of the LMS. In practice, many more columns are mapped to personal attributes. The following standard attributes are mandatory to create a new user:
-
LOGIN(generator can be used) -
FIRSTNAME -
LASTNAME -
EMAIL -
EXT_ID_CSV(mandatory unique identifier for CSV imports)
Many tools are available to create XML files, including the freely available Notepad++. A basic XML mapping file covering the mandatory attributes looks like this:
<CSV>
<attributeMapping>
<mapping sourceField="Username" clixField="LOGIN"/>
<mapping sourceField="Given name" clixField="FIRSTNAME"/>
<mapping sourceField="Surname" clixField="LASTNAME"/>
<mapping sourceField="E-mail" clixField="EMAIL"/>
<mapping sourceField="ID" clixField="EXT_ID_CSV"/>
</attributeMapping>
</CSV>
The <CSV> tag is only needed if the .xml file is uploaded directly during an import in the "Users" function as custom mapping can be uploaded at the time of manual import. If the mapping file is uploaded in the User Import Planning as per this example then the CSV tag is actually automatically generated by the specified settings.
Advanced Mapping Settings
The .xml mapping can support some advanced such as:
-
ignoreUnmappedFields - Ignores any columns in the .csv file that are not mapped.
-
ignoreEmptyField - Configured per mapping line where "false" can overwrite a populated value with a blank and "true" will not overwrite a populated value with a blank.
-
hashident - Relates to a hash table identifier which is a conversion table in the registration business rules (described below). Commonly used for importing against selection lists to use they instead of Scheer IMC ID or with date field format conversions.
An example of a more complex table:
<attributeMapping ignoreUnmappedFields="true">
<mapping sourceField="Username" clixField="LOGIN"/>
<mapping sourceField="Given name" clixField="FIRSTNAME"/>
<mapping sourceField="Surname" clixField="LASTNAME"/>
<mapping sourceField="E-mail" clixField="EMAIL"/>
<mapping sourceField="ID" clixField="EXT_ID_CSV"/>
<mapping sourceField="Access requirements" clixField="ACCESS_REQ" ignoreEmptyField="false"/>
<mapping sourceField="Position" clixField="POSITION" hashident="POSITIONHASHTABLE"/>
</attributeMapping>
SFTP Setup
If import jobs are scheduled to process automatically on a daily, weekly or monthly basis, a Scheer IMC consultant organises access to an SFTP server supplied by Scheer IMC. The customer uploads the agreed CSV file by the agreed time. A transfer job then moves the file from the SFTP server to a specified location on the LMS content server (for example \data\person\personimport\src\staff).
The Scheer IMC Hosting team (ECMT) manages the SFTP server, because for security reasons no direct access to the LMS servers hosted by Scheer IMC is available. The Hosting team provides unique credentials for customers to access their SFTP account. If required, access can be restricted by IP whitelisting.
Cron Jobs and Their Configuration
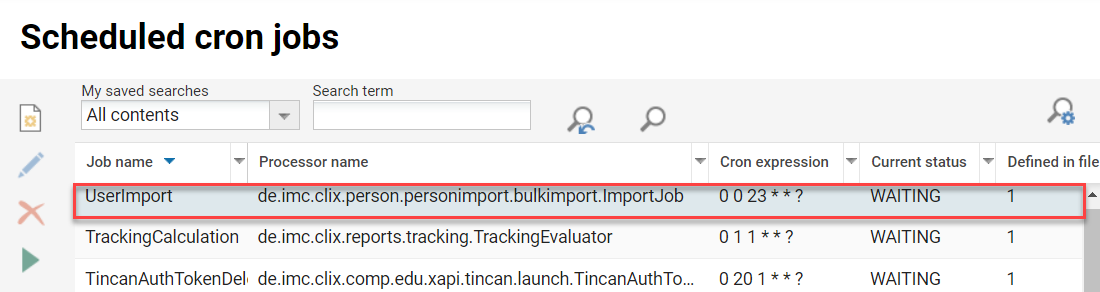
A cron job is an automatic scheduled job that can be configured to run at desired times and there are many cron jobs available in the LMS including "UserImport". The crons were traditionally coded by Scheer IMC consultants and in 2022 there is the possibility to configure directly in the GUI via a new "Cron jobs" function. With cron configuration the sequence timing of jobs is important to ensure data is up to date as possible; e.g. the "UserImport" cron must run after the SFTP delivers the file and is recommended to run before "TargetGroupPersonAssignment" and "ParticipantAutomaticRegistration" jobs. With crons Scheer IMC uses the quartz cron standard and the date/time formats are described here: https://www.freeformatter.com/cron-expression-generator-quartz. In the example below the import would execute daily at 11 pm.
Encryption of CSV Files
For CSV user import files, Scheer IMC supports PGP encryption. Customers can load encrypted files to the SFTP server for extra security. The customer is responsible for the private key and must share a public key with Scheer IMC that allows the files to be decrypted at the time of import. Scheer IMC consultants configure these jobs. They can be client-specific, so that not every user import job is affected.
Registration and Business Rules
When users are created or updated, either locally in the GUI or by import, a series of business rules is triggered. Scheer IMC consultants write these rules in XML code. Based on personal attribute values, the rules perform tasks such as:
-
Assigning users to groups (roles or business units) or clients
-
Assigning job profiles
-
Granting clearance on users to admin groups
-
Populating settings such as language preferences or time zones
-
Determining the authentication status
-
Applying more advanced rules such as conversions
Business rules are typically written by consultants during implementation projects. They can be updated at any time directly in the GUI, either globally for all clients (“Configuration” function) or client-specific (“Client” function).
Accessing and Interpreting User Import Log Files
Log files are normally e-mailed automatically to the user set in “Implement as user” when an import is completed. They can also be accessed directly in the “User import planning” function in the “Log file” tab. A summary is displayed there in date order for each import. It shows important overview information such as the status, the number of records and, above all, the number of incorrect records to address.
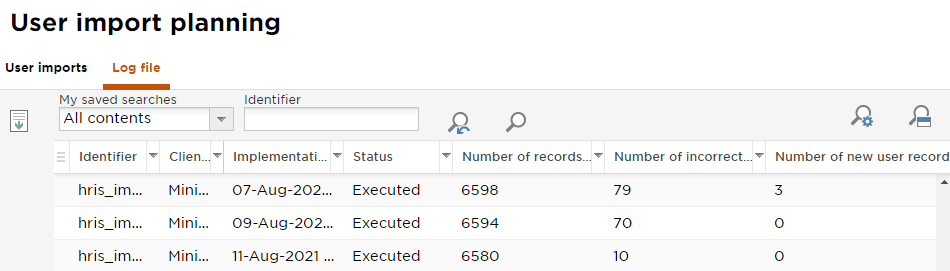
A detailed CSV log file can be downloaded. To do so, highlight the desired import date and click the “Download” button. A ZIP file containing the import log file is downloaded. The CSV file inside the ZIP file again starts with a summary overview. Further down, there is a row with the import status for each user record contained in the user data file.
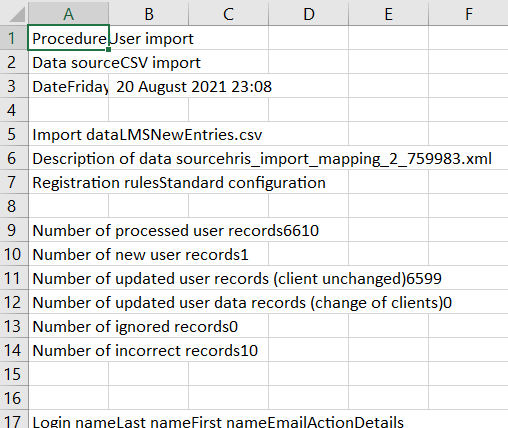
If errors occur, press “Ctrl + F” and search for the word “Error” to locate all records that did not import. Then click the corresponding column in each affected row to view the description of the error, including the error code. The most common errors are related to:
-
Login clashes
-
Missing mandatory attributes such as e-mail
-
Incorrect e-mail formats
-
Incorrect date formats (if there are date attributes)
-
Duplicate entries in the
EXT_ID_CSVcolumn
A sample error message for a duplicate login is: “Error, Unfortunately, the login name you entered is already assigned to another user. Please choose another login name. [ErrorCode:PRS0126]”.
Import Error Troubleshooting Tips
The following checks help to resolve import errors:
-
Check that the required attributes are included in the mapping and in the CSV file.
-
Check the encoding and the
fieldSeparatordefined in themapping.xmlfile and the applied setting in the CSV file. -
Check the column names and attribute names defined in the
mapping.xmlfile, in the CSV file and in the LMS. -
Check the registration rules, the correct spelling of the attribute names and, if given, the hash table references.
Hints & Tips
-
For the configuration of complex imports, including those that require business rules and automatic scheduling, contacting the Scheer IMC Consulting team is recommended.
-
If a scheduled import is not synchronised, a manual import with the same mapping and settings is useful. It is ideal for testing and as a contingency if the scheduled import is missed for any reason.
-
With a comma as separator, the risk of a comma appearing within a value is often high. In this case, the comma can be enclosed in quotation marks to avoid incorrect column processing.
-
If a task can be solved by logic based on attribute data, a registration/business rule may be possible. In such cases, it is recommended to speak with an experienced Scheer IMC consultant by creating a Level 2 Support ticket.