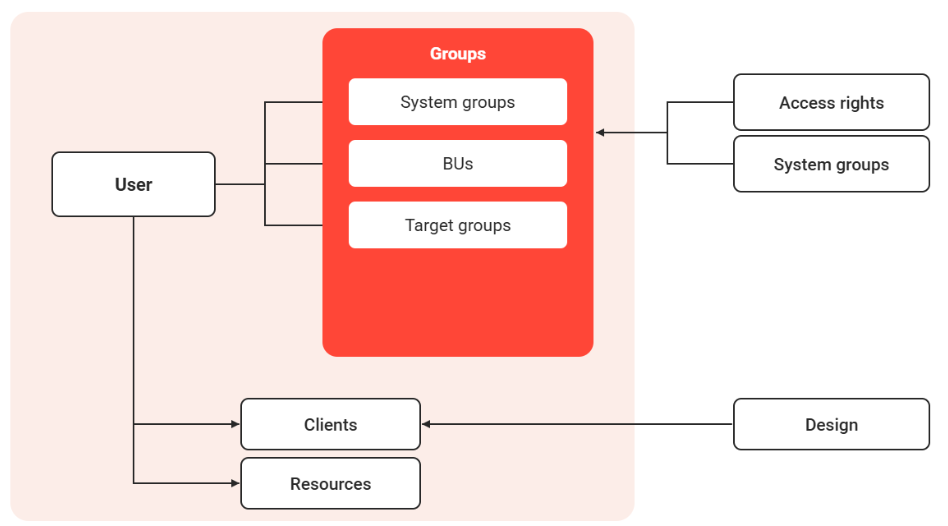
The "Users" function is the central location where Administrators are able to create new user accounts or view and manage user accounts for which they have clearance access rights. The administration of user accounts can be performed manually through the "Users" function or through external data sources; e.g. batch file imports or other interfaces such as SCIM API. Once user accounts are created further management possibilities here include assignment to groups, clients, and resources. In addition for each user, an overview of their client and group affiliations, course participation records, and bookshelf assignments is available.
All functions required for the Administrators to manage user accounts are accessible from here including creation, editing, deletion, assignment, and clearance options. There are eight key functional areas and icons that are covered in detail below:
Client Context
In a multi-client system where the logged-in administrator belongs to more than one client, there will be a client selection box to either restrict users returned in a search or to determine the master client of new manually created users. Various settings can be determined by the selected client including user profile attributes, business rules and system designs. With systems that are not multi-client, this pop-up might not be shown as the master client is known.
Search
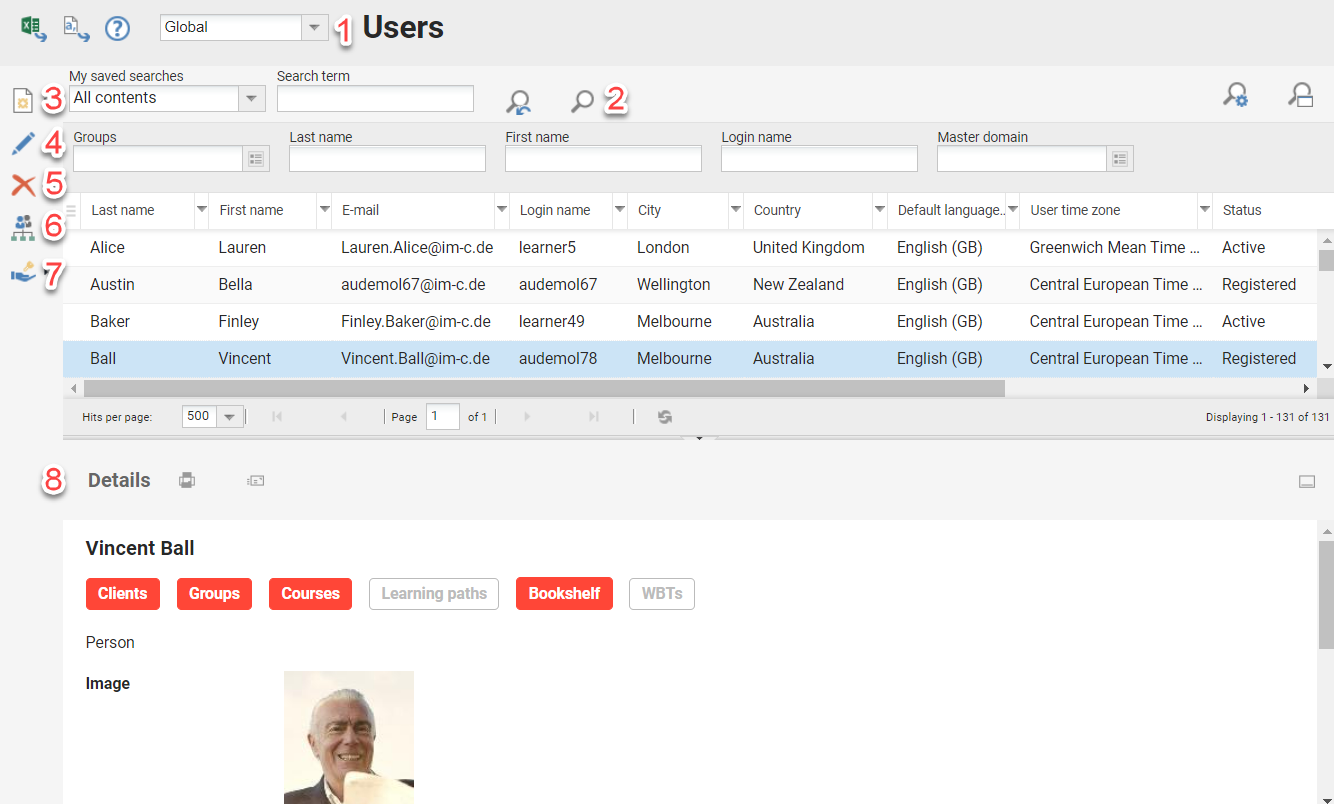
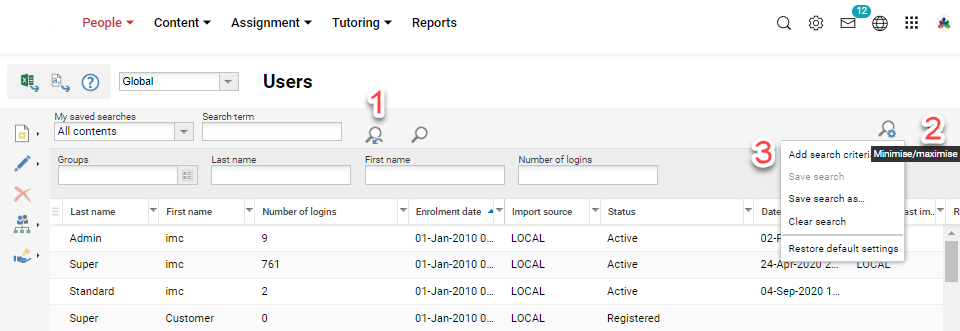
The search options in the "Users" function are very important given a large number of user accounts Scheer imc customers typically have in their systems. The use of configurable extended filters ensures that desired users can be returned on various criteria including values in any personal attribute on the user profile. Conducting a search is recommended before manually creating new users to ensure the user does not already exist as this will help reduce potential duplicates. When searching the "Search term" (1) field will search users by matches with first name, last name, and the LMS Person ID. To enable further search fields click the "Maximise/Minimise" (2) search icon and then the "Manage search settings" icon to "Add search criteria" (3). Extra attributes such as Email, Login, External ID, or custom attributes can be made available here by System Administrators in the "User lists" function to enhance specific searches.
New
Under the "New" icon are two options for manual user creation which are 1) Users and 2) Import.
-
Users: This option requires the Administrator to complete a "backend" user profile by populating details of the new user into attribute fields. In a standard configuration there are three tabs which are "Person", "Administration", and "System" where the first two contain attributes and settings to complete, but "System" generally just has non-editable. The User Profiles though are highly configurable by Scheer imc clients so it is likely there could be more tabs and attributes than in this example. When completing the User Profile the important attributes to complete are the mandatory attributes which can be identified by the asterisk "*". Populate all relevant attributes and when done click "Save". On saving the user will be created if all mandatory attributes have been populated and there is no clash of Login with an existing user; in regards to the latter, it is wise to enter Email as Login to prevent potential duplicates.
-
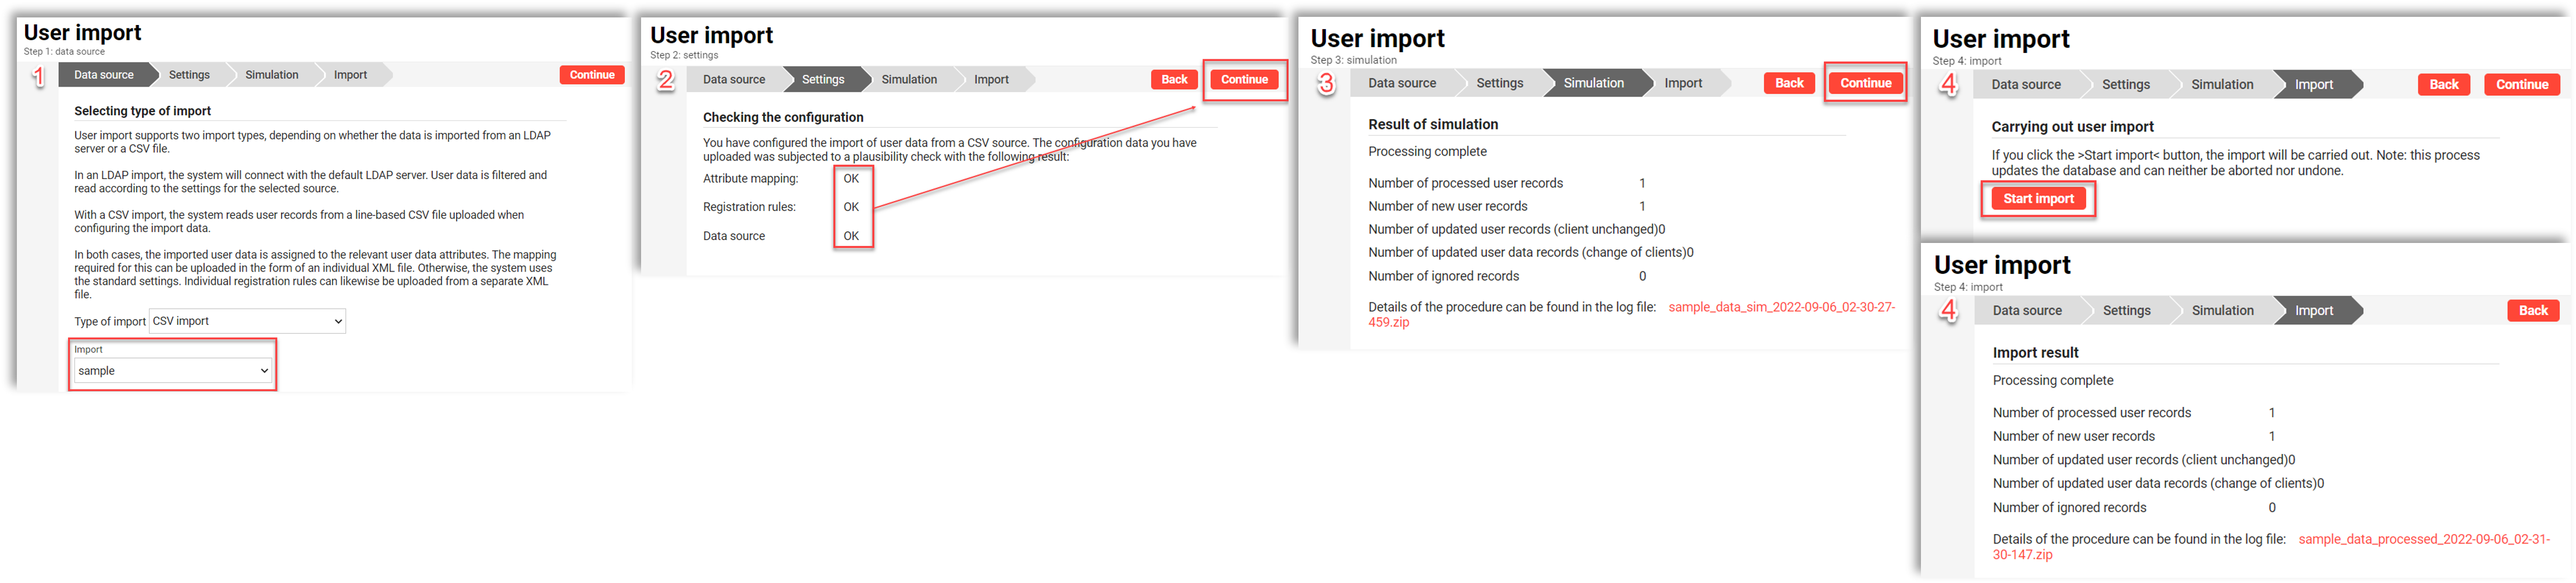
Import: User information can be prepared in .csv or .txt files that match the format of a "Manual" scheduled job configured in the "User Import Planning" function. The delimiter and columns of the file must match the configured job, but the file name can change in a manual import. If the multi-client context is enabled the first step is to select the master client to which all imported users will belong and the configured import job must have also been configured to this the selected client. The import is completed in 4 step wizard where:
-
Step 1 Data Source: Allows a pre-configured job created against the selected client to be selected in the "Import" field, but if there is no pre-configured job available then it"s possible to skip and manually load mapping file as described in the "User Import Planning" function.
-
Step 2 Settings: This is where the user data .csv or .txt file is uploaded and clicking the "Continue" button will check if the file format matches the mapping; If the file matches there will be three OKs, but if not an error message will display explaining what needs to be resolved before continuing.
-
Step 3 Simulation: The simulation is an optional step where the .txt or .csv file can be uploaded to perform a test run prior to the actual import. Click "Start simulation" to commence the test simulated import. When the simulation is complete a summary will be displayed along with a link to download a detailed log that identifies all expected data errors which can be located by finding the word "Error". Once errors are resolved or to bypass the simulation click the "Continue" button.
-
Step 4 Import: To commence the final Import step click the "Start import" button. When the import is complete a summary will be displayed along with a link to download a detailed log that identifies all successful and unsuccessful records; with unsuccessful records find the word "Error" in the log and the reason will be given. The browser tab can be closed to exit the import function or click "Back" to return to step 2 to make file changes.
-
Edit
Under the "Edit" icon are four options which are:
-
Edit: When a user is highlighted this option opens a new tab displaying the "Backend" profile to edit the user account details. This option requires the administrator to have "View" and "Edit" clearance on the highlighted user.
-
Merge: This option is used in the handling of duplicate user accounts where the selected user's training history is to be merged into that of another user selected in a pop-up window. The merge considers all training and competency-related data, but not profile data as the account being retained is assumed to have accurate details. Configuration options determine if a merge is to be aborted on conflict, E.g. where both users have relationships with the same learning object, or whether advanced rules will determine which record is retained based on dates, statuses, and levels. After a merge has been completed a log is available, and the starting user account becomes deregistered and possibly anonymised.
-
Scheduling: The scheduling function serves to limit user access to a specific time interval. After selecting a user and clicking "Edit" / "Schedule" in the toolbar, an appropriate layer appears. Scheduling a user determines when they are deregistered from the platform. The options "No deregistration" and "Manual deregistration" are available.
-
Accept user: This option allows administrators to approve user accounts that either created by Supervisors in the "My staff" or accounts created in external catalogues by external users who are allowed to create accounts. The prior workflow is possible if a checkbox "Enable enrolment by supervisor" in the "Client" function "Settings" tab is checked, and the latter by a checked attribute "PROXY_REGISTRATION" on the creating user"s profile.
Delete
The selected user will be deleted. Depending on configuration settings this could see the user record anonymised where the record exists in an unidentifiable state or completely deleted where it is no longer visible. Deleted records can be either "Archived" where Scheer imc could be retrieved or completely deleted.
DeleteAssign
There are three assignment options which are:
-
Assignment to the client: Adds the selected user into additional clients to their master client. This will not change the user’s master client as this can only be performed by rules. To see clients in the pop-up the administrator must either be a "Super Administrator" or also be assigned to the clients as there is no clearance concept on clients.
-
Assignment to group: Launches a pop-up where the administrator can select groups for which they have clearance to assign the selected user.
-
Assignment to resource: Launches a pop-up where a selection box enables the selected user can be linked to a resource of the category "Individual". It is only possible for a user to be assigned to a single "Individual" resource so if they are already assigned then details of the resource will display. When a user is tied to an individual resource and the mapped attribute values (e.g. First name, Last name, Email) are different the resource meta tag fields will change to match those of the linked user.
Clearance
Clicking the "Edit clearances" option opens a new tab that displays the users, groups, or clients with clearance on the selected user and to what level of authorisation. Clicking the "Add" icon will launch a pop-up that enables the administrator to select further "Users", "Groups" or "Clients" to Add to the clearances. The "Specific authorisations" column allows setting a granular level of access for specific users, groups, or clients; whilst "Owner/Unrestricted rights" provides full clearance. With clearance on users, this is typically completed via business rules.
ClearanceDetails
When a single user is highlighted the "Details" section on the bottom of the screen will display some profile information and some quick launch buttons to view user assignments and to send a direct email. The profile information is configurable in the "Personal information" profile and the quick link buttons can be enabled/disabled in the "User list, user management" user list viewing options tab.
User Manager → Merge User Accounts
Administrators have the possibility, via the Users Manager and with the appropriate clearances, to merge two user accounts into a single one, in cases when the same person has been using two different accounts on the same platform, in order to remove the redundant account and allow that a single account can be used in the future. The system will decides based on predefined rules which value to maintain in case the two user accounts have different user profile values, or different group assignments or media progress. As an exception and only for the course enrollment status, it is possible to define more customized merge rules.
Hints & Tips
-
It might be the user already exists and your account does not have clearance to view, details could be slightly different or there is an error in the creation process; therefore, it is wise to have a System Administrator that can view all users conduct the search and examine user import files for errors. Doing so can help reduce the creation of duplicate user accounts that would later need to be merged.
-
User profiles are configurable per client with different tabs and personal attributes. The profile that is presented when creating a user depends on the selected "Client context" and when editing a user it depends on the user's master client.
-
If users are created via the manual "LOCAL" method and are expected to be later interfaced ideally the unique identifier attribute of the interface to be populated (if known) to avoid duplicate accounts; E.g. making the "EXT_ID_CSV" or "EXT_ID_SCIM" attribute editable and populating with the expected value if known.
-
When creating or editing a user the "Reset" function serves to reset all attribute options to their default values. If this is done accidentally close the tab without saving to prevent changes.
-
Merging of user accounts by default will abort a merge on conflict due to the two users being enrolled on the same training object, but there is a configuration to automatically determine which records to keep and proceed with the merge. This setting can be enabled by the Scheer imc Consulting team and would require lodging a ticket with the Scheer imc Support desk.
-
Where specific clearances are required it is best to engage with the Scheer imc Consulting team to write business rules to help automate the assignment.
Super Users
By default, the system comes with two Super Users only; additional ones can be created, but only by existing Super Users
Built-in access & behavior
-
Super Users are automatically assigned to all clients and all groups by internal LMS logic — even without explicit group or client assignments
-
They have access to all active navigation items and all functions, regardless of whether they or their groups appear in the navigation access list
-
They have access to all objects (including all users), even without specific clearances/access rights
-
Super Users are not visible to Standard Users at all, and Standard Users cannot assign Super Users to groups without the Super User function
Recommendations for usage
-
Usage should be restricted to investigations and checks — not for daily work, since objects created or touched by Super Users may inherit unexpected access rights due to the automatic assignment to all platform groups
-
For daily admin tasks, Standard Users with System Administrator configuration should be used instead (they already have full navigation and object access by default)
-
Both Super Users and Standard Users can use generic or personalised account names
Related Topics
Configuration Manager - UserSearch in ManagersOrganisational Structure and Groups AdministrationMulti-client ContextResource Administration