
Guidelines are provided for configuring the MS Exchange APIs and creating the application in Azure Active Directory. The configuration process is divided into the following sections
-
Creation of new account on Azure portal along with steps to register a new application.
-
Adding permissions to the registered application.
-
Configuration on backend application along with Postman & Swagger document for using APIs.
It is important to acknowledge that certain configurations within the Azure Portal have the potential to create issues or impede specific functionalities of this service. It ithat this document is unable to furnish configuration steps or information for exceptional scenarios of this nature.
Prerequisites / Limitations
imc Learning Suite
-
The feature is tied to a licensed add-on in imc Learning Suite, “Resource Management Licence”.
-
The backend and frontend URLs need to be configured in the configuration properties.
-
Setup is available only for the resource type “Room”.
-
Only the booking process is supported; prebooking and preplanning are not available for external resources.
-
Multiple bookings of the same room in the same time interval are not possible.
-
Downtime and checklist functionalities are not possible for external resources.
-
External resources cannot be added to course templates.
-
In the resource calendar, the availability of external resources can be checked for a maximum of one month.
Benefits
Azure/MS Exchange
-
The service ”External Resource Connector” needs to be included in the delivery package
-
A Teams tenant is required (usually included in an Office 365 subscription / tenant)
-
A technical user / app needs to be created to access the Microsoft Graph API with specific permissions
-
Automated import to imc Learning Suite for available rooms from the active directory is not supported; this needs to be done manually
-
External resources are available only for date-dependent courses, since this is a limitation from MS Exchange when requesting the availability of resources
-
The maximum time interval for checking a room is one month; this is a limitation from MS Exchange.
Functions Overview
-
Rooms can be selected as resources in resource management in imc Learning Suite from MS Exchange.
-
The availability status of rooms is provided by the provider and transferred vice versa.
-
Multiple external providers of the type Resource Account can be created, ensuring in a multi-tenant system that users belonging to different tenants can use different Exchange installations.
Pre-Configuration
Creation of the Technical User / App
System Requirements
Application / Web Server
|
Product |
Version |
|---|---|
|
Tomcat |
9 |
Technology Stack
The following table provides a list of the technologies used to implement MS Exchange.
|
Name |
Version |
|---|---|
|
Java |
17.0 |
|
Spring Boot |
2.7.11 |
|
Gradle |
7.6.1 |
|
Microsoft Graph SDK |
5.30 |
|
Junit |
4.12 |
|
Lombok |
1.18.10 |
|
Azure Identity |
1.2.5 |
Integration Steps
Register a new application on the Azure Portal.
To register a new application using the Azure Portal, perform the following steps:
-
Sign in to the Azure portal using either a work or school account or a personal Microsoft account.
-
If the account gives access to more than one tenant, the account in the top right corner is selected, and the portal session is set to the required Azure AD tenant.
-
In the left-hand navigation pane, the Azure Active Directory service is selected, followed by App registrations > New registration.
-
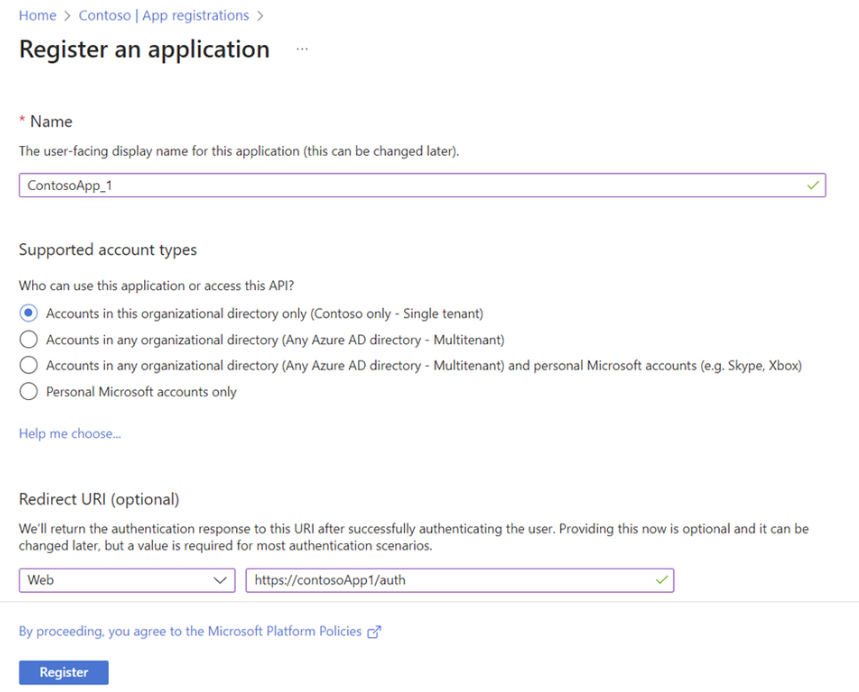
When the Register an application page appears, the application's registration information is entered:
-
Name - A meaningful application name that will be displayed to users of the app is entered.
-
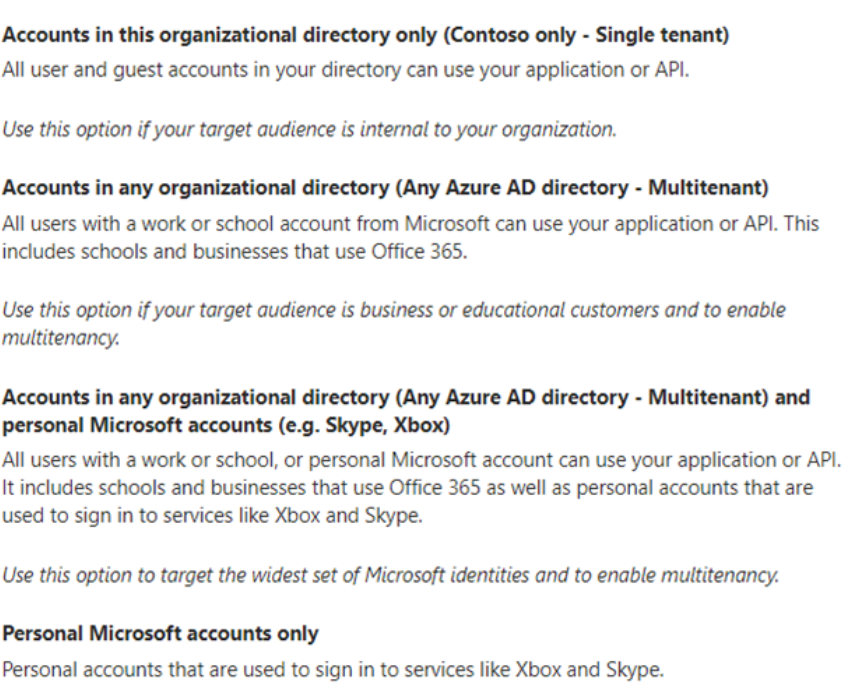
Supported account types - The accounts supported by the application are selected.
-
|
Supported Account types |
Description |
|---|---|
|
Accounts in this organisational directory only |
Select this option when building a line-of-business (LOB) application. This option is not available if the application is not being registered in a directory. This option maps to Azure AD only single tenant. This is the default option unless registering the app outside of a directory. In cases where the app is registered outside of a directory, the default is Azure AD multi-tenant and personal Microsoft accounts. |
|
Accounts in any organisational directory |
Select this option if targeting all business and educational customers is wanted. This option maps to an Azure AD only multi-tenant. If the app is registered as Azure AD only single-tenant, the app can be updated to be Azure AD multi-tenant and back to single-tenant through the Authentication blade. |
|
Accounts in any organisational directory and personal Microsoft accounts |
Select this option to target the widest set of customers. This option maps to Azure AD multi-tenant and personal Microsoft accounts. If the app is registered as Azure AD multi-tenant and personal Microsoft accounts, it cannot be changed this in the UI. Instead, the application manifest editor must be used to change the supported account types. |
Redirect URI (optional) - The type of app being built, Web or Public client (mobile & desktop), is selected, and the redirect URI (or reply to URL) for the application is entered. This option is optional and can be skipped.
When finished, Register is selected.
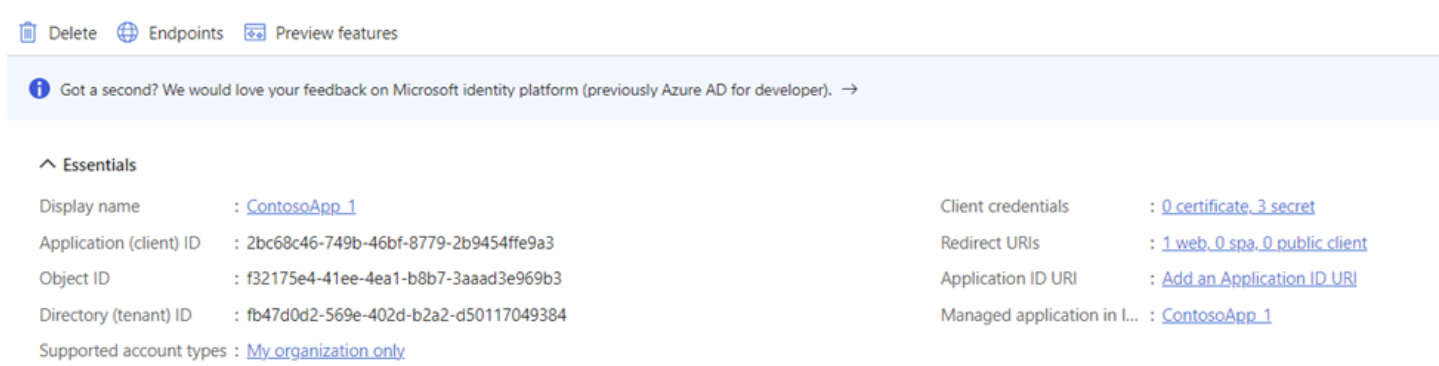
Azure AD assigns a unique application (client) ID to the app, and the application's Overview page is displayed. Additional capabilities can be added to the application by selecting other configuration options, including branding, certificates and secrets, API permissions, and more.
Adding Permissions to Registered Application
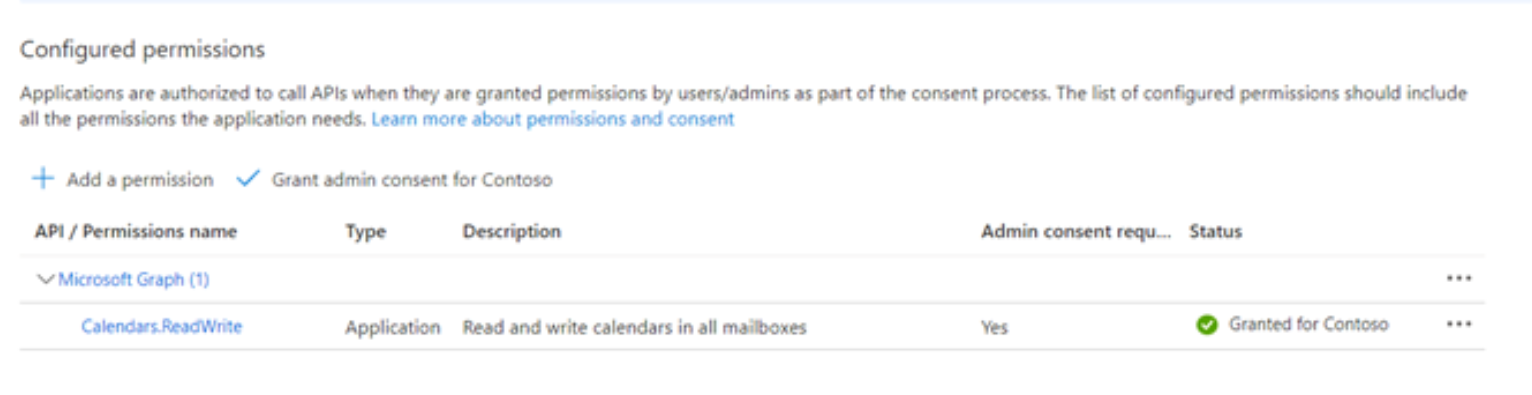
Permissions are essential for enabling specific functionalities within the registered application. These permissions grant the necessary access rights for the registered application to create, fetch, update, and delete calendar events.
The Microsoft Graph API scopes granted here are tenant-wide application-level permissions, not per-user permissions. Review the implications of Grant admin consent carefully before confirming.
To add permissions, perform the following steps:
-
In the left-hand navigation pane, the Azure Active Directory service is selected, followed by App registrations. All registered applications are listed, and the newly registered application is selected. The overview page of the application is then displayed.
-
In the left-hand navigation pane, API Permissions is selected.
-
The Add a permission button is selected, and the permissions below are assigned to the app at Application level with Grant admin consent:
|
Functionality |
Privileges |
Description |
|
Calendars.ReadWrite |
Creates an event to mark the resource as booked |
|
|
Calendars.Read (†) |
Returns a list of an user events. |
|
|
Calendars.ReadWrite |
Unbooks an event from the user's calendar |
|
|
Calendars.ReadWrite |
Updates an existing event in the user's calendar |
Note: Permission is not needed if Calendars.ReadWrite permission has already been granted, as Calendars.Read is contained within the Calendars.ReadWrite privilege.
This is a compilation of all APIs employed by the service from Microsoft Graph, accompanied by the corresponding required privileges for invoking each API. If specific functionalities are deemed unnecessary or certain privileges cannot be granted, this list should be consulted.
Granting all required privileges to provide the full functionality of the service is strongly recommended.
Application Credentials
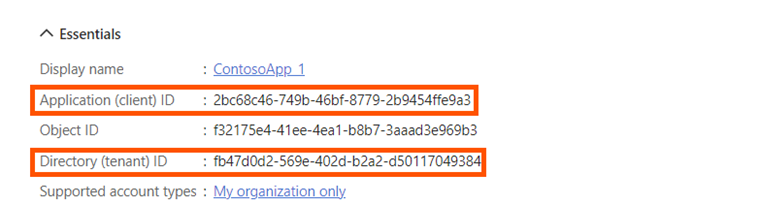
Upon successful creation of a new application, it is automatically assigned a unique application (client) ID. This ID is crucial for identifying the specific application and tenant (organization) to which requests are to be sent.
There are 3 values used to authenticate each request from the service to Microsoft:
-
Application (Client) ID
-
Tenant ID
-
Client Secret (value)
Client ID and Tenant ID values can be viewed directly on the application's Overview page:
Initially, applications do not have a secret assigned to them, so one needs to be created. To generate a new client secret, Certificates & Secrets is selected in the left menu of the application settings.
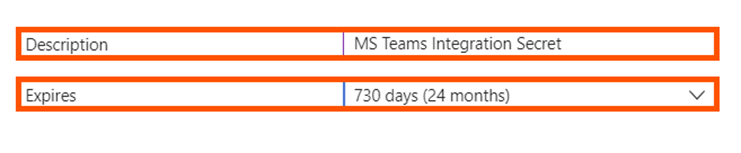
When adding a new secret value, it is essential to provide a concise description of its purpose and set an appropriate expiration date, as secrets cannot be permanent. Setting the secret to a maximum validity period of 2 years is recommended.
The expiration date for the secret can be selected from the following options. However, it is important to consider that opting for a shorter validity period will necessitate more frequent updates within the External Service Provider page.
Configuration
Activate the Resource & Capacity licence
The service license needs to be activated by the Scheer imc business consultant and can then be configurearning Suite by the admin user. At the current state, the configuration is done in "User-defined parameters" and will be moved to an individual configuration section in the configuration manager.
External Service Provider
After the license is activated, a new “Resource Account” is created. This is possible via the External service providers manager by selecting Resource Account:
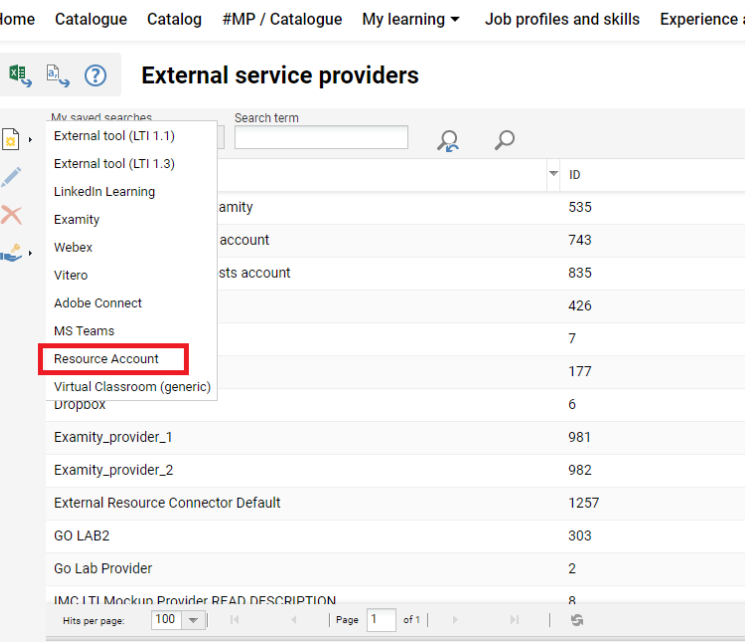
The system allows the admin to create multiple external providers of the type Resource Account. This ensures that, in a multi-tenant system, users belonging to different tenants can use different MS Exchange installations.
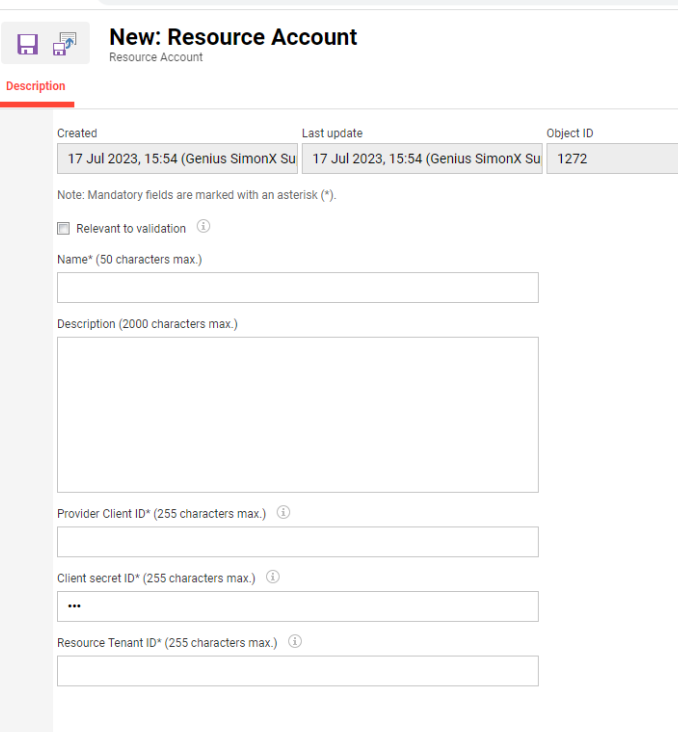
The external service provider for MS Exchange requires a client ID, Client Secret, and Tenant ID obtained via the Azure Active Directory setup (see Application credential).
Resource configuration
After the license is activated, the following configuration is located: Resource configuration in configuration manager.
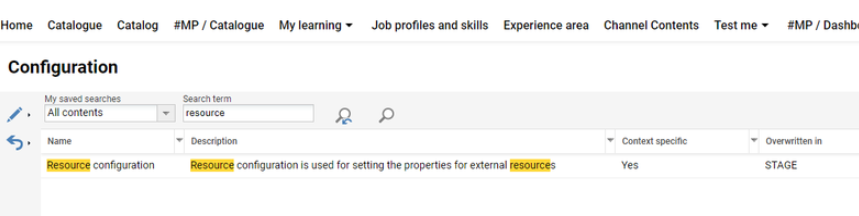
This configuration can be edited if needed. The Check Enable external resource checkbox is selected to enable the external resource configuration, and the URL of the external resource connector is added.
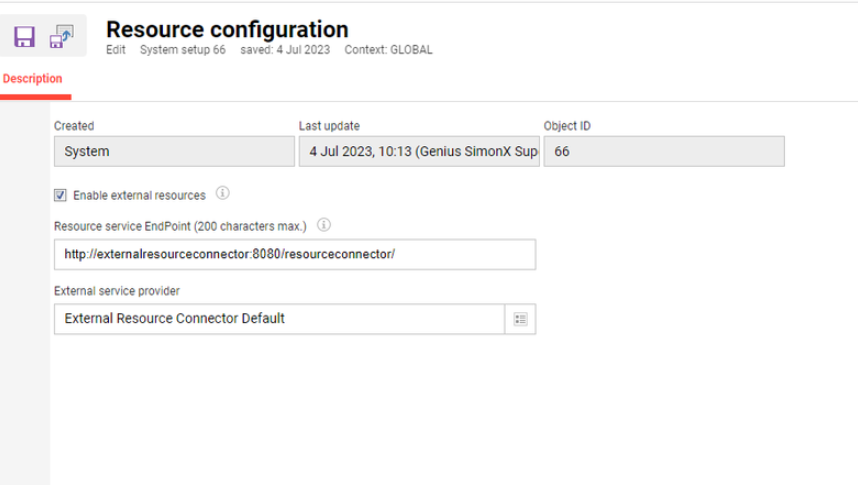
A detailed explanation of the parameters is provided in the table below:
|
Paramenter |
Description |
Example Value |
|
Enable external resources |
Used to generally enable or disable the integration |
true |
|
Resource service EndPoint |
API endpoint used for accessing resources; including external domain |
|
|
External service provider |
the external service provider used for authentication and connection to Microsoft Graph API |
here only the Resource Account external service can be seen |
Create and configure an external resource type
After the service configuration is set up, an external resource linked to the resource provided by Exchange needs to be created. For this purpose, the following is used:
-
A new Resource Type, Room, is created.
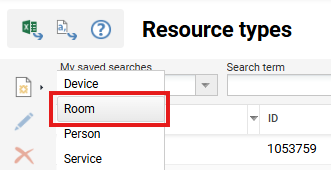
-
The meta tag tab is opened, and the meta tag Resource is provided externally (10112) is added.
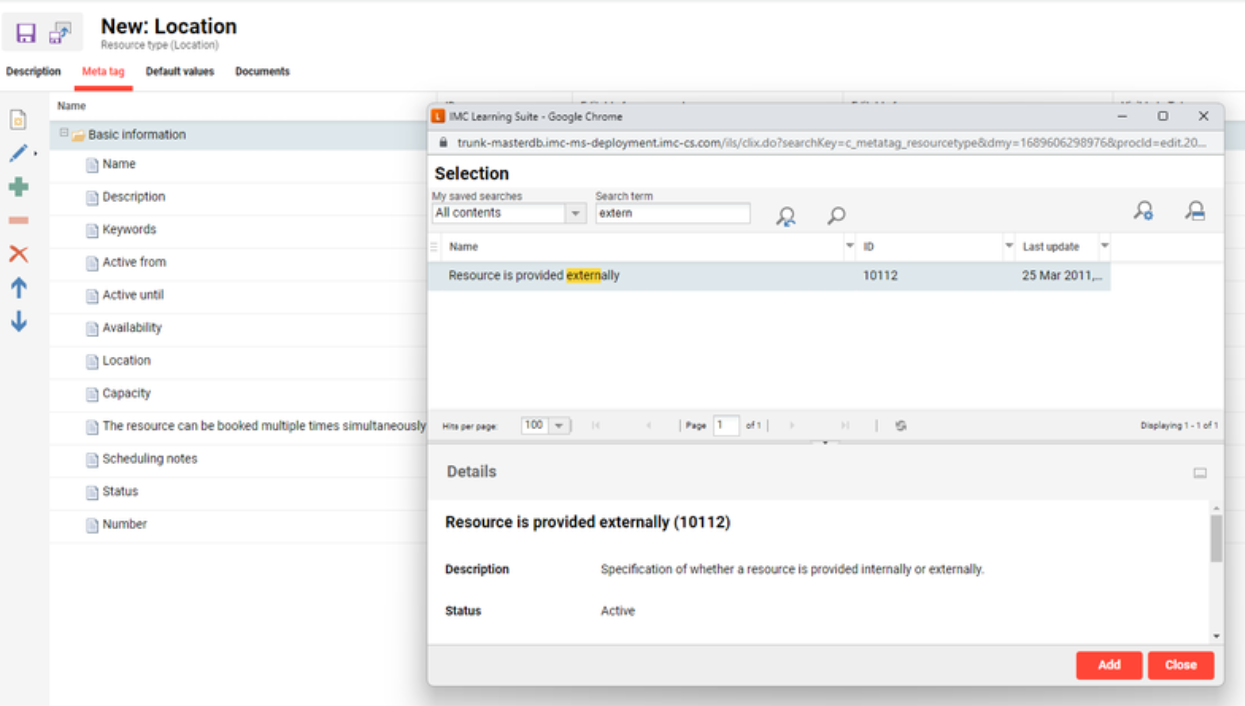
-
The default value tab is opened. Because the external resource configuration is active, 2 additional fields are available beside the meta tag: External object ID and External system ID.
|
Parameter |
Description |
Example Value |
|
Resource is provided externally (10112) |
Used to point that the resource is provided externally or not
|
checked:
unchecked:
|
|
External object ID |
this is the unique id of the resource used to be identified in MS Exchange, rooms are identified within an e-mail address. this is the unique id of the resource used to be identified in MS Exchange, rooms are identified within an e-mail address. ail address. The expiration date for the secret can be selected from the following options. However, a shorter validity period requires more frequent updates within the External Service Provider page. Field is unique for resources (only on media level)
|
|
|
External system ID |
the external system id |
MS Exchange |
Important: A resource is considered to be externally provided if: Resource is provided externally (10112) is checked AND External object ID is not empty.
Create and configure an external resource
After creating the external resource type, a new resource from that type is to be created.
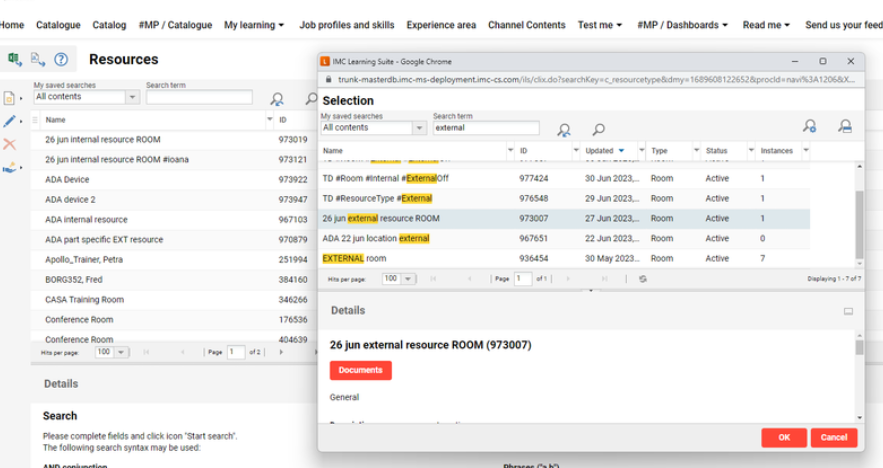
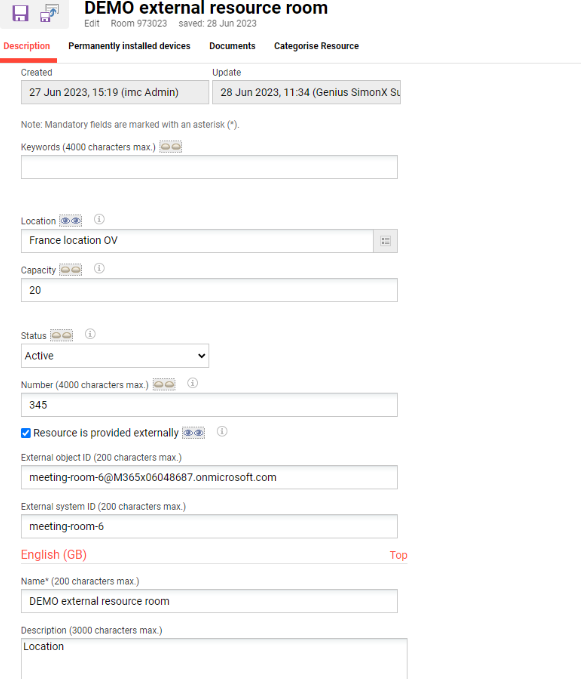
Use external resources inside imc Learning Suite
Inside courses / medias
-
A course or media with the Resource tab available is edited or created.
-
The resource tab is opened.
-
The “Add button to select an external resource” option is selected. It is enabled only if the configuration for using external resources is checked. At this point, all external resources configured as external in imc Learning Suite are displayed, ordered by availability. All data is retrieved from MS Exchange.
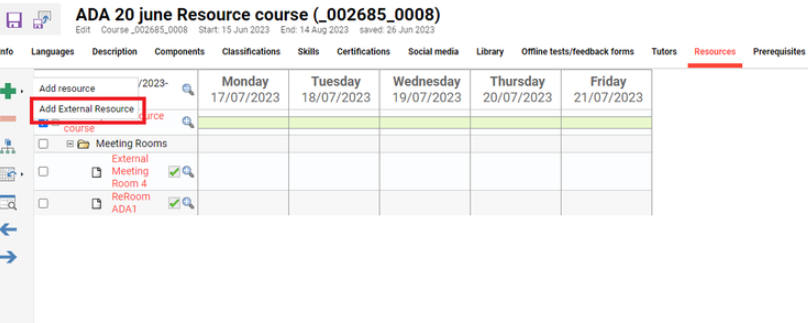
-
After this step, the resource is displayed in the calendar.
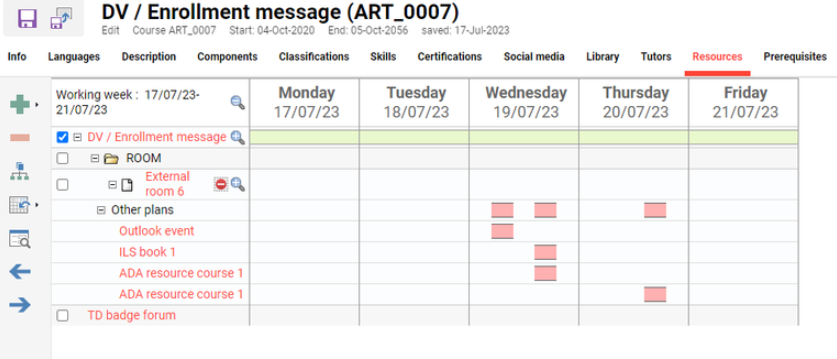
-
External resources booked as stand-alone from imc Learning Suite can be booked, created, edited, and sent e-mail. For other bookings related to component bookings or originating outside imc Learning Suite, only sending e-mail is allowed.
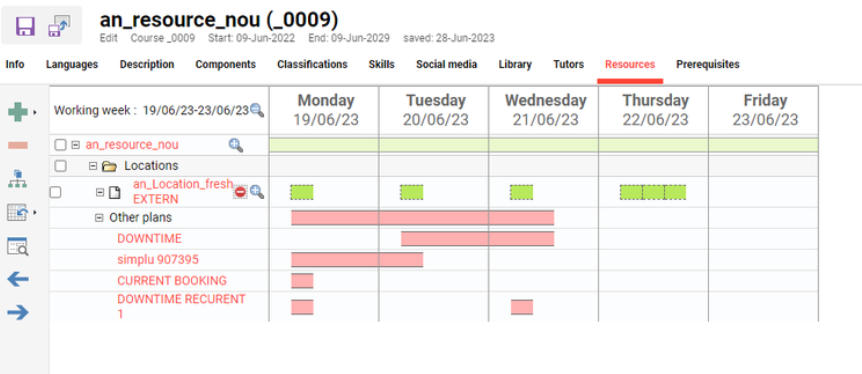
Resource Calendar
The view is limited to a maximum of one month.
External resources booked as stand-alone from imc Learning Suite can be booked, created, edited, and sent e-mail. For other bookings related to component bookings or originating outside imc Learning Suite, only sending e-mail is allowed.
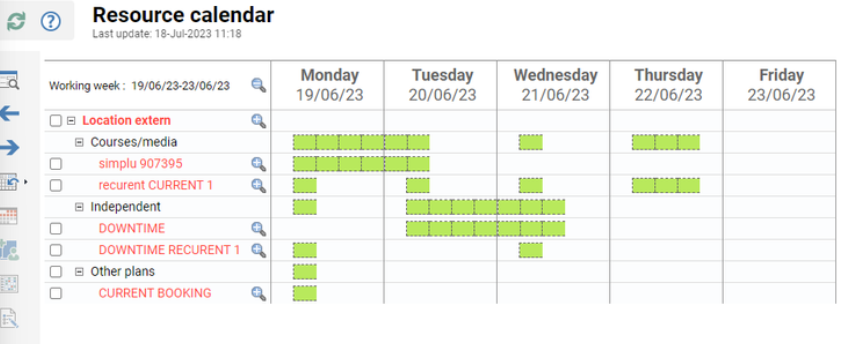
Explanation of the tree view:
-
Independent → all bookings from the resource calendar made with the LMS
-
Course/media → component bookings for this resource
-
Other plans → all bookings with no relation to the LMS