
This article explains how to create a Webex integration, generate OAuth access and refresh tokens, and configure the Webex external service provider in the imc Learning Suite (LMS).
The procedure covers the required Webex developer setup, OAuth authorisation flow, token generation request, and the LMS configuration values required for Webex meeting integration.
Introduction
The Webex integration in LMS requires OAuth values generated from a Webex integration. These values allow LMS to communicate with Webex APIs and create or manage Webex meetings for configured hosts and co-hosts.
The setup produces the following values:
-
Client ID
-
Client secret
-
OAuth Authorisation URL
-
Authorisation code
-
Access token
-
Refresh token
After you have generated the token values, you must enter them into the Webex external service provider configuration in LMS.
Do not include real client secrets, access tokens, refresh tokens, or customer account values in shared documentation. Use placeholders in examples.
Prerequisites
Confirm the following before you start the setup:
-
A Webex account with full admin rights
-
Access to create a new Webex integration
-
Postman or another tool that can send HTTP POST requests
-
Access to the LMS external service provider configuration
-
An LMS user account that will be used as the Webex account mail
-
Matching Webex accounts for all hosts and co-hosts who will create or manage meetings through LMS
Reference URLs used in this procedure:
|
Purpose |
URL |
|---|---|
|
Create Webex integration |
|
|
Redirect URL used in this workflow |
|
|
Webex token endpoint |
|
|
Webex API base URL |
Development and Testing with Webex Developer Sandbox
For development and testing purposes, Webex provides a Developer Sandbox. It provides a test Webex organisation with administrator access, allowing integrations, OAuth flows, API calls, hosts, and meetings to be tested without using a customer’s production Webex environment.
For further information on the Developer Sandbox refer to Developer Sandbox Guide.
The sandbox administrator account can be used to follow the same integration and token generation steps described in this article.
Configuration Flow
Use the following sequence to complete the Webex integration setup:
-
Create a new Webex integration.
-
Copy the Client ID, Client Secret, and OAuth Authorisation URL.
-
Open the OAuth Authorisation URL and retrieve the Authorisation code.
-
Exchange the Authorisation code for an access token and refresh token.
-
Create the Webex external service provider in LMS.
-
Verify the host and co-host requirements.
1. Create a Webex Integration
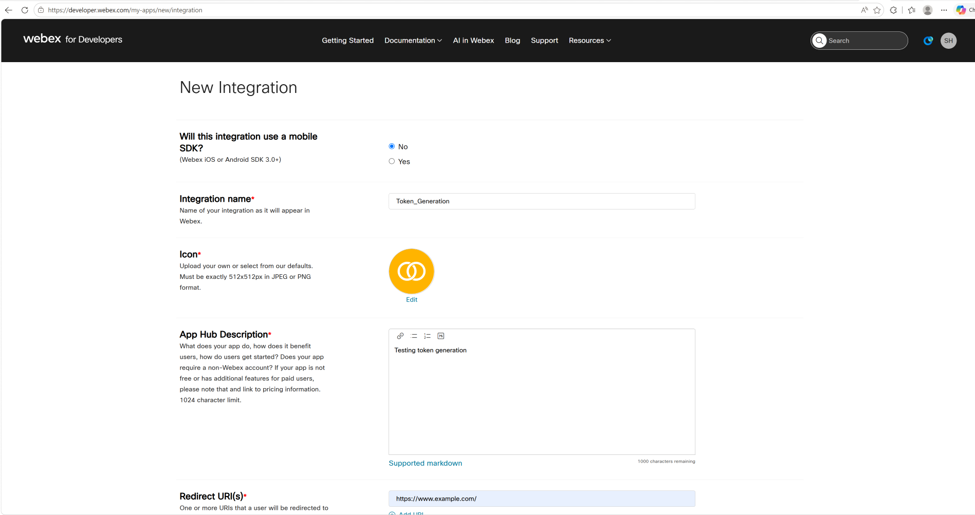
Open the Webex integration creation page:
https://developer.webex.com/my-apps/new/integration
Create a new integration and complete the required fields.
|
Field |
Required value |
|---|---|
|
Integration name |
Any suitable name can be used. |
|
Icon |
Select a default icon or upload a custom icon. |
|
App Hub Description |
Enter a description. The maximum length is 1024 characters. |
|
Redirect URL |
Use https://example.com for this workflow. |
|
Scope |
Select the scopes required for the customer setup. |
Use https://example.com as the Redirect URL because this workflow depends on copying the Authorisation code from the redirected URL. Using a different website can cause restrictions or redirect handling issues.
2. Select the Webex Scopes
Select the scopes required for the customer integration. Do not grant unnecessary scopes without customer approval.
The source setup lists the following meeting and messaging scopes as examples:
-
meeting:recordings_read
-
spark:all
-
meeting:admin_schedule_write
-
meeting:schedules_read
-
meeting:participants_read
-
meeting:admin_participants_read
-
meeting:preferences_write
-
meeting:admin_recordings_read
-
meeting:preferences_read
-
meeting:recordings_write
-
meeting:schedules_write
-
spark:kms
-
meeting:controls_write
-
meeting:admin_recordings_write
-
meeting:controls_read
-
meeting:participants_write
-
meeting:admin_schedule_read
For the host and co-host check, grant also the following Admin API permissions:
-
Create a user
-
View license usage of an organisation
-
View available roles of an organisation
After you have configured all required fields and scopes, click the Add Integration button.
3. Copy the Webex Integration Values
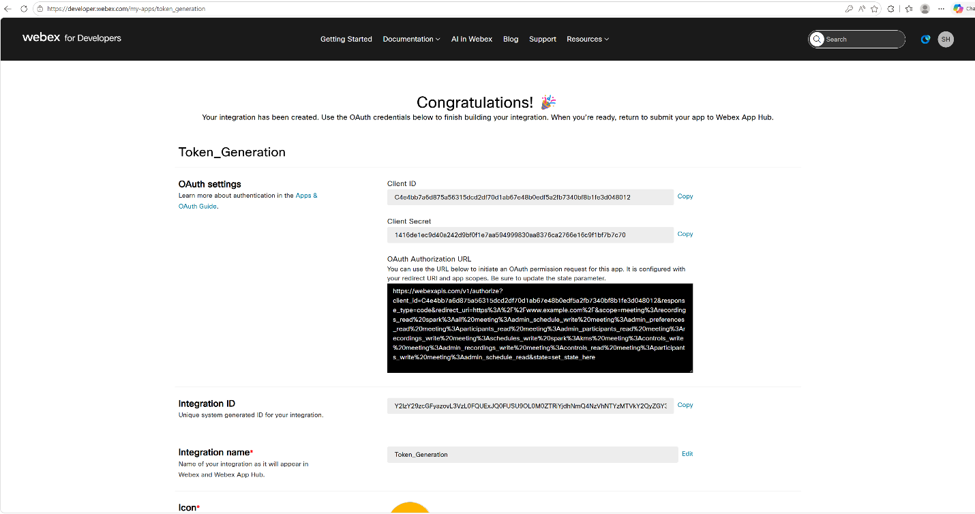
After the integration is created, Webex displays the Client ID and Client Secret.
Copy and store the following values:
-
Client ID
-
Client Secret
-
OAuth Authorisation URL
The Client ID and Client Secret are displayed only once during creation. If you do not copy them at this stage, you may need to regenerate them by creating a new integration.
4. Retrieve the Authorisation Code
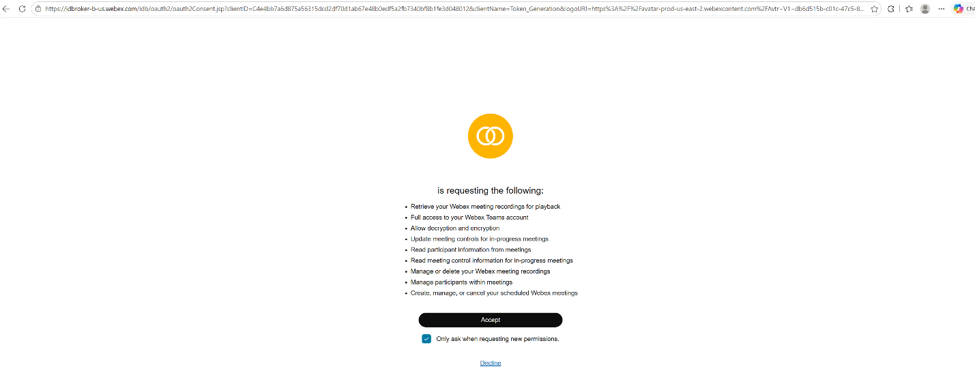
Open the OAuth Authorisation URL in a browser.
Use a different browser if the page does not load correctly or redirects to an error because of existing browser cookies.
Accept the authorisation request when prompted.
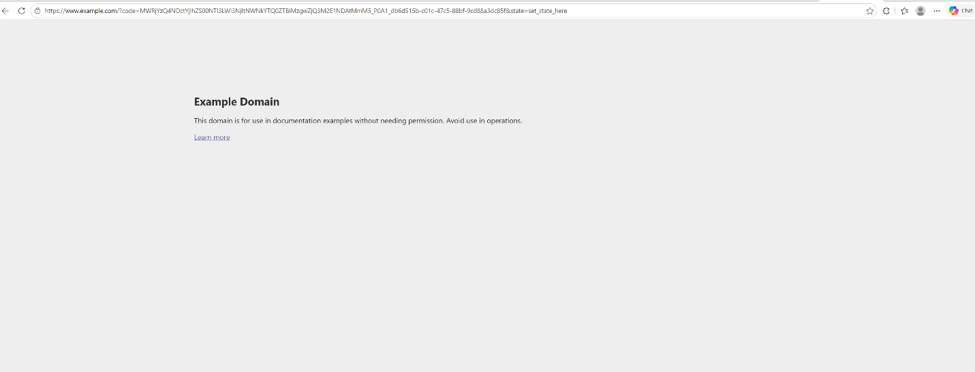
After accepting, the browser redirects to the configured Redirect URL. Copy the value of the code parameter from the redirected URL.
Example format:
https://example.com/?code={authorisationCode}
Use only the value after code= as the Authorisation code.
5. Generate the Access and Refresh Tokens
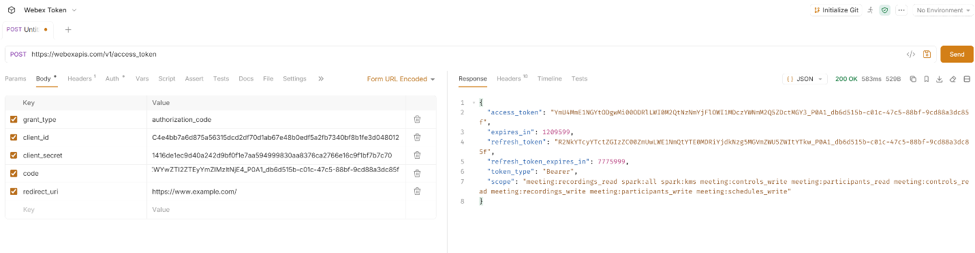
Send a POST request to the Webex token endpoint.
|
Item |
Value |
|---|---|
|
HTTP method |
POST |
|
URL |
|
|
Content type |
application/x-www-form-urlencoded |
Use the following Request Header:
|
Header |
Value |
|---|---|
|
Content type |
application/x-www-form-urlencoded |
Send the following form parameters:
|
Parameter |
Value |
|---|---|
|
grant_type |
authorisation_code |
|
client_id |
{clientID} |
|
client_secret |
{clientSecret} |
|
code |
{authorisationCode} |
|
redirect_uri |
The request should return a successful response with status 200.
The response contains the access token and refresh token. These values are required when creating the Webex external service provider in LMS.
6. Create the Webex External Service Provider in LMS
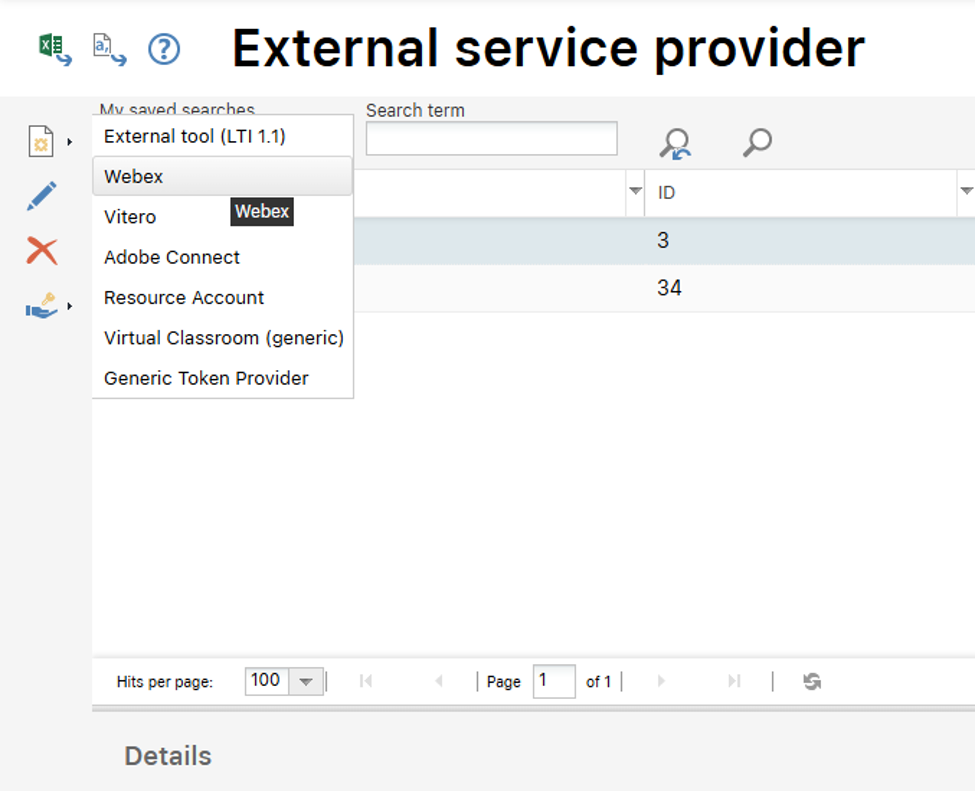
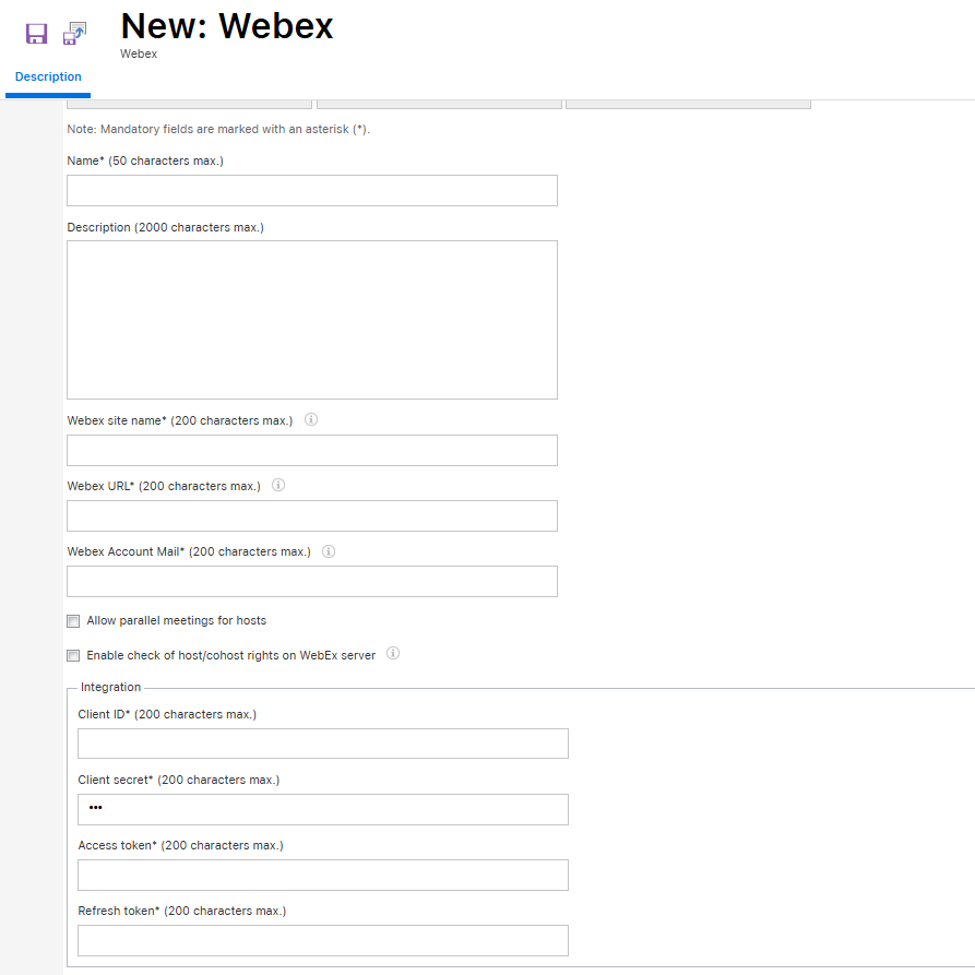
Create a new external service provider for Webex in LMS and enter the generated values.
|
Field |
Value |
|---|---|
|
Name |
Any suitable name. Maximum length is 50 characters. |
|
Webex sitename |
For LMS version 14.19.1 and later, enter the full Webex sitename, for example {customer}.webex.com. |
|
Webex URL |
|
|
Webex account mail |
Email address of the Webex account used for the integration |
|
Client ID |
Client ID copied from the Webex integration |
|
Client secret |
Client Secret copied from the Webex integration |
|
Access token |
Access token returned by the Webex token request |
|
Refresh token |
Refresh token returned by the Webex token request |
Ensure the Webex account mail meets the following conditions:
-
The user must exist in LMS.
-
The user must be assigned to the group with the Webex organiser function.
-
The same email address must exist on the Webex side.
Host and Co-host Requirements
With the configured Webex account, you can create meetings for hosts and co-hosts.
Ensure the following conditions are met:
-
Hosts and co-hosts must have Webex accounts.
-
The email address in the LMS user profile must exactly match the email address in Webex.
-
Hosts and co-hosts must have host rights on the Webex side.
-
The relevant users must be assigned to a group with the Webex organiser function in LMS.
If these conditions are not met, meeting creation or host/co-host validation can fail.
Validation Checklist
Use this checklist before considering the Webex integration ready:
-
The Webex integration was created with an admin account.
-
The redirect URL was set to https://example.com.
-
Required customer-approved scopes were selected.
-
Required Admin API permissions for host/co-host checks were granted.
-
Client ID and Client Secret were copied during integration creation.
-
OAuth Authorisation URL was copied from the Webex integration page.
-
Authorisation code was retrieved from the redirect URL.
-
The token request returned status 200.
-
The token response returned both access token and refresh token.
-
The Webex external service provider was created in LMS.
-
Webex URL is set to https://webexapis.com/v1.
-
For LMS version 14.19.1 and later, the Webex sitename contains the full site name.
-
Webex account mail exists in both LMS and Webex.
-
Hosts and co-hosts have matching email addresses in LMS and Webex.
-
Hosts and co-hosts have host rights in Webex.
-
Required users are assigned to the Webex organiser group in LMS.
Common Issues
|
Issue |
Check |
|---|---|
|
Client Secret was not copied |
The Client ID and Client Secret are displayed only once during integration creation. Create a new integration if the secret was not saved. |
|
OAuth Authorisation page opens incorrectly |
Open the OAuth Authorisation URL in another browser or clear cookies before trying again. |
|
Authorisation code is missing |
Confirm that the redirect URL is set to https://example.com and copy the value from the code parameter in the redirected URL. |
|
Token request fails |
Check grant_type, client_id, client_secret, code, redirect_uri, and the Content-Type header. |
|
Host or co-host check fails |
Confirm that the required Admin API permissions were granted to the Webex integration. |
|
Meeting creation fails for a host or co-host |
Check that the user exists in Webex, has host rights, and has the exact same email address in the LMS user profile. |
|
Webex organiser cannot be used |
Confirm that the user is assigned to the group with the Webex organiser function in LMS. |
|
Webex sitename is rejected or unclear |
For LMS version 14.19.1 and later, enter the full sitename, for example {customer}.webex.com. |