The Learning Management System (LMS) imc Learning Suite exposes a SCIM 2.0 endpoint so that external identity or HR systems can provision users and groups automatically.
This article explains how SCIM works inside LMS, which objects and operations are supported, and which configuration steps are required on the LMS side.
Use it as a practical reference for understanding SCIM behaviour in LMS and for configuring and operating SCIM-based provisioning into LMS environments.
Scope of SCIM Integration in the LMS
Functional Scope
The SCIM interface in the LMS provides a standardised way for external systems to provision and manage identities and access. The integration focuses on the following capabilities:
-
Creation of new users in the LMS based on SCIM User and Enterprise User resources
-
Update of existing users when attributes change in the source system
-
Deactivation or deletion of users so that access to the LMS is removed in a controlled way
-
Creation of groups that represent organisational or access-related structures
-
Assignment and removal of users in groups based on membership information received through SCIM
The LMS acts as a SCIM service provider. The external identity or HR system acts as the SCIM client and owns the source of truth for user data. SCIM is used to push changes from the client to LMS in near real time.
Direction of Synchronisation
The SCIM integration is designed for inbound provisioning into LMS.
-
The LMS exposes a SCIM compliant REST API.
-
The customer identity provider or HR system is responsible for calling this API and pushing changes when user or group data changes in the source system.
-
The LMS does not initiate outbound SCIM calls to other systems.
LMS Architecture Overview
Data Flow Overview
At a high level the SCIM integration in LMS follows this pattern:
-
The external identity provider or HR system determines that a change is required for a user or group, for example creation of a new user, update of attributes or change of group membership.
-
The external system calls the SCIM endpoint on the LMS using HTTPS and authenticates with either Basic authentication or a Bearer token depending on the configuration.
-
The LMS validates the request, including authentication, authorisation and mandatory attributes.
-
The LMS maps the received SCIM attributes to internal LMS user profile fields according to the configured SCIM mapping.
-
The LMS writes the changes to its database and returns an appropriate HTTP status code and response body.
External Source Definition and Mapping
The SCIM profile data source is complemented by an external source definition. This configuration describes how incoming SCIM attributes are mapped to LMS database fields.
-
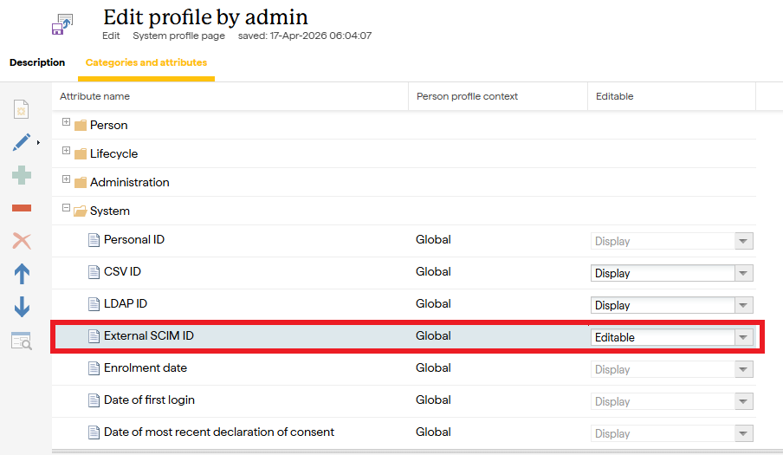
The identifier is a standard user profile field named
EXT_ID_SCIM. -
It is a text field with a maximum length of 100 characters.
-
It is used as the profile identifier attribute in the SCIM profile data source.
-
It serves as the unique link between the SCIM id or another agreed identifier and the LMS user record.
Configuration and Setup in LMS
Prerequisites
Before configuring SCIM in the LMS ensure the following prerequisites:
-
Availability of an LMS environment in the required version
-
Administrative access to the LMS configuration manager and user management
-
A service account user in LMS that will be used for SCIM authentication when Basic authentication is used
Update Profile Backend with SCIM Attributes
-
Open the user profile configuration in the LMS.
-
Ensure that the EXT_ID_SCIM attribute is available as a user profile field and is active.
-
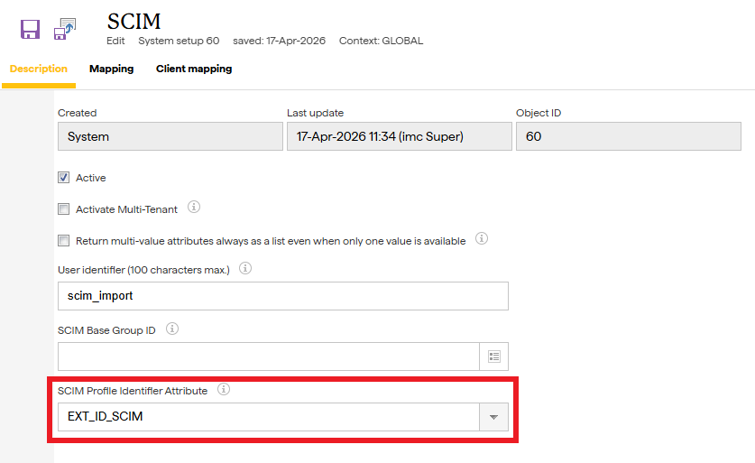
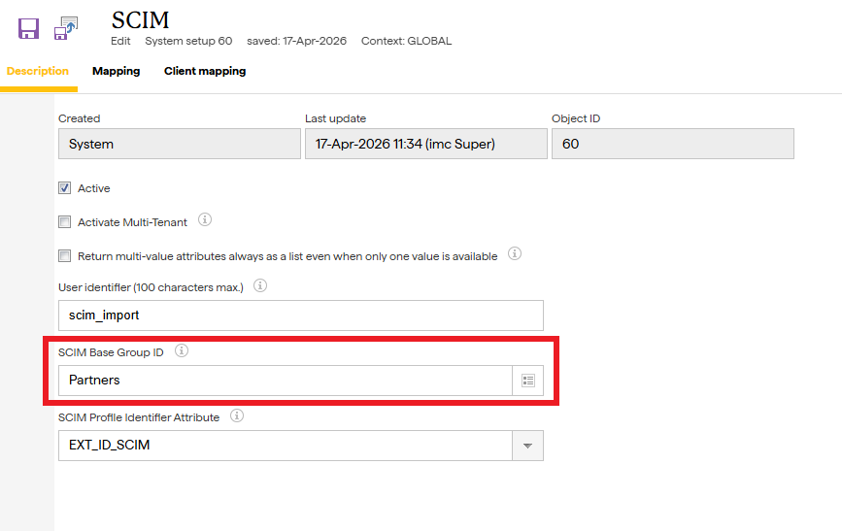
Verify that EXT_ID_SCIM is configured as the SCIM Profile Identifier Attribute for the SCIM profile data source.
-
If additional user attributes will be provisioned via SCIM, ensure that corresponding profile attributes exist in the LMS or create them as required as standard or custom text fields.
Create an LMS User for Basic Authentication
If Basic authentication is used for SCIM requests create or select a dedicated LMS user account.
-
Create a user account that represents the SCIM service.
-
Assign permissions so that this user has access to all users that will be managed via SCIM according to customer requirements.
-
Ensure that the user status is active and that the account has logged into the LMS at least once so that it is fully initialised.
-
Ensure that the EXT_ID_SCIM field of this user is not empty. If the field was added after user creation update the profile to set a suitable value.
-
Verify that at least one other user, such as a standard administrative user, also has a non-empty
EXT_ID_SCIMvalue for testing.
Configure SCIM Profile Data Source
The SCIM profile data source must be configured before any SCIM REST API call can be processed successfully.
Configuration in imc Learning Suite Versions 14.21+
-
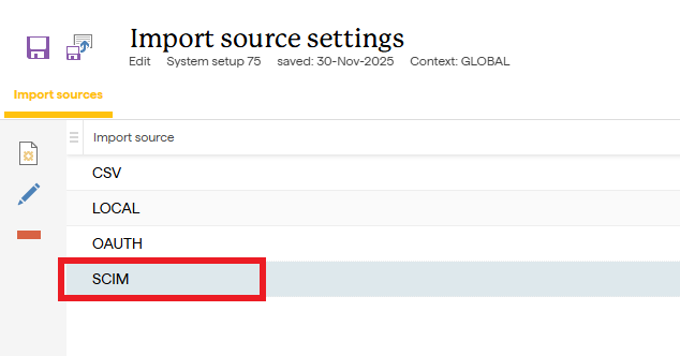
Navigate to the Configuration function and select the Import source settings menu.
-
Create a new Import source for SCIM if none exists.
-
Set the Import source to SCIM in the Settings tab.
-
Define the import condition including the profile data source context, for example GLOBAL, and the import restriction as required.
-
Configure login name and password rules for SCIM managed users as required by the customer.
Configure SCIM Mapping in the LMS
The mapping of SCIM attributes to LMS user attributes is configured in the SCIM configuration section.
-
Open the Configuration function.
-
Navigate to SCIM menu.
-
For each SCIM Source field the client will send, map it to an appropriate LMS user attribute (Target field) according to the rules described in the next section.
-
Save the configuration.
Attribute Mapping
General Principles
The SCIM specification defines a rich set of standard attributes for the User and Enterprise User resource types. Not all of these need to be used. The following principles apply for mapping into LMS:
-
If a SCIM attribute exists and a suitable LMS user attribute exists use that attribute.
-
If a SCIM attribute exists and there is no suitable standard attribute in the LMS create a custom attribute and map to it.
-
If there is no SCIM standard attribute for a required piece of information, use the ims extension format provided by the LMS SCIM implementation.
Handling Attributes with Non-text Values
Some LMS attributes expect a specific type of value instead of free text. For example, a country field can expect an internal numeric identifier taken from a predefined list of countries.
In such cases either of the following approaches can be used:
-
Configure the SCIM client to send the expected internal value, for example a country ID instead of a country name.
-
Use a mapping mechanism in LMS such as a hash table to translate human readable values from SCIM into the required internal codes.
Using ims Custom Attributes
If a required attribute does not exist in the SCIM standard schema the LMS implementation allows the use of a custom ims attribute format.
The format is ims|lms_attribute_name|value.
Guidelines for this pattern:
-
The
lms_attribute_namepart should match the LMS attribute name when possible, for clarity. -
The
valuepart contains the data to be stored in that attribute. -
The SCIM mapping in the LMS is configured so that the
imselement is interpreted correctly and written into the target attribute.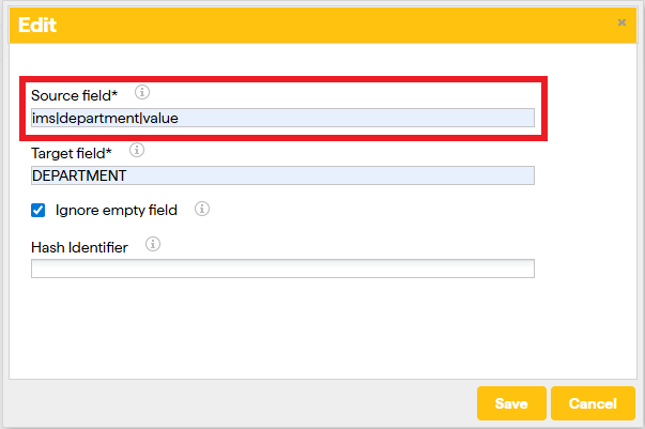
This approach provides flexibility while keeping the SCIM payload compliant.
Supported SCIM Operations in the LMS
Create User
-
HTTPS method POST
-
Resource path →
https://{{url}}/ils/restapi/lms/scim/Users -
Request body contains a SCIM User or Enterprise User resource with the required schemas and attributes
On success the LMS creates a new user record, assigns the EXT_ID_SCIM value according to the mapping and returns the created resource representation.
Update User
-
HTTPS method PUT
-
Resource path →
https://{{url}}/ils/restapi/lms/scim/Users/{id}, where{id}is the unique SCIM identifier of the user -
Request body contains the full updated representation of the user
The LMS updates the mapped attributes of the existing user. Attributes that are not present in the mapping configuration are ignored.
Retrieve User
-
HTTPS method GET
-
Retrieve by person identifier using →
https://{{url}}/ils/restapi/lms/scim/Users/{id}
The response contains the SCIM representation of the user as stored in the LMS.
Delete User
-
HTTPS method DELETE
-
Resource path →
https://{{url}}/ils/restapi/lms/scim/Users/{id}
The deletion behaviour inside the LMS matches the agreed provisioning model for the customer. In many cases this means setting a user to inactive rather than physically deleting the record.
Create Group
-
HTTPS method POST
-
Resource path →
https://{{url}}/ils/restapi/lms/scim/Groups
The request body contains a Group resource with at least a displayName and the required schema identifiers. The LMS creates the group under a predefined root group in the group manager and returns the created representation.
Update Group
-
HTTPS method PUT
-
Resource path →
https://{{url}}/ils/restapi/lms/scim/Groups
The LMS updates the mapped attributes of the existing group for example display name or description. The payload must include the external ID of the group.
Retrieve Group
-
HTTPS method GET
-
Resource path →
https://{{url}}/ils/restapi/lms/scim/Groups/{id}
The response contains the group details including the list of members if membership is requested according to the SCIM specification and configuration.
Update Group Membership with PATCH
-
HTTPS method PATCH
-
Resource path →
https://{{url}}/ils/restapi/lms/scim/Groups/{id}
The request body contains a sequence of patch operations that add or remove group members.
-
Group members are identified by their value in the members list which corresponds to the identifier used for
EXT_ID_SCIMin the LMS. -
The LMS updates the membership accordingly while keeping manual assignments in the LMS user interface unaffected if configured to do so.
Group Provisioning and Synchronisation
Group Hierarchy
Groups created through SCIM are created under a dedicated root group in the LMS group manager.
-
The root group is defined by a configuration parameter often referred to as
baseGroupId. -
SCIM created groups are stored as a flat list directly underneath this root.
This approach keeps SCIM managed groups separate from manually managed structures while still allowing flexible assignment of users.
Membership Behaviour
When member assignments are managed through SCIM the following applies:
-
Adding a member via PATCH assigns the user to the group if both the user and group already exist.
-
Removing a member via PATCH removes SCIM managed membership.
-
Group assignments created manually in the LMS interface can be configured to remain unaffected by SCIM operations where appropriate.
Authentication Methods
Two authentication methods are available:
-
Basic authentication where the client sends the credentials of the SCIM service account in the
Authorizationheader. -
Bearer token authentication where the client sends a previously obtained access token in the
Authorizationheader.
The selected method must be supported and agreed with the customer for the specific integration.