In addition to the featured highlights, there are many more innovations and improvements to discover in the product core. Core updates are listed by their category in the tables below:
Course Management
Update Various Displays with Location
Overview: The views for the Participant administration function and Multiple enrolment function (Learning status and Catalogue) have been updated to display Location information.
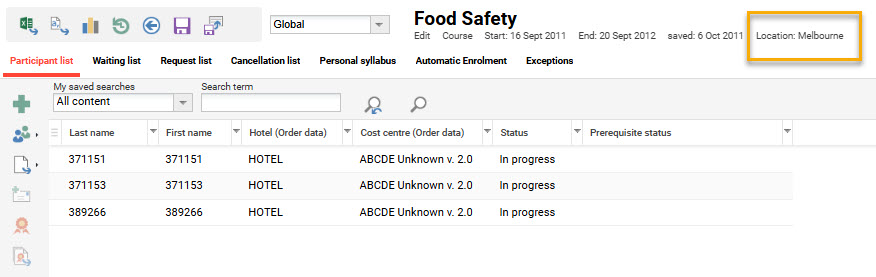
Benefits and Use Cases: Displaying the location provides administrators and supervisors better assurance that enrolment is occurring on the correct course. This can be important for classroom-based courses that are delivered across multiple locations.
Audience: Administrators and Supervisors
Setup and Access: Not required as the change is automatically applied.
Considerations and Limitations: Standard update
Testing: As an Administrator, go to the Courses function and open the Participant administration view for a course with an assigned location. The location will be visible in the line below the course name.
Risk rating: Low
Content Management
Generic Token Authentication for Media
Overview: An update to Media types and the External service provider function enables making protected media calls. This is possible via a new External service provider type that enables retrieving access tokens from an external system and makes them available for protected media calls.
This update defines which external service provider is responsible for generating access tokens for this media. Only one provider can be selected per media object. At runtime, when a learner accesses a protected media object:
-
The system identifies that this media type requires token authentication.
-
The configured connector calls the external Endpoint URL.
-
The connector receives/generates the token.
-
The system forwards the token to the media endpoint as HTTP header or Cookie using the configured name.
-
The external platform validates the token and either grants or denies access to the media.
If no provider is selected on the media, the media will behave according to standard system logic.
Benefits and Use Cases: Some external CDNs or media platforms require token-based access to media resources. To access protected media, the delivery system (LMS/portal) must attach a valid token (e.g. JWT or custom token) to each request. Benefits of the update include:
-
Protected streaming or download endpoints: Secure access to media files exposed via external CDNs or media platforms that require token-based access.
-
Multiple IdPs: Support environments where the same content must be accessible through multiple identity providers by configuring token generation accordingly.
-
Reduced custom development:
-
Instead of implementing separate token mechanisms per integration, the same generic approach can be reused across media types, reducing maintenance and complexity.
-
No need to build a dedicated token mechanism for every new media integration or customer. The generic token configuration can be reused.
-
-
Lower maintenance effort: When token endpoints, formats, or rules change on the external system, you adjust the configuration/connector instead of reworking multiple custom integrations.
-
Consistent security model: You can enforce a uniform approach to token-based access across all supported media types.
Audience: Technical administrators
Setup and Access: There are two main configurations to enable token generation which are:
-
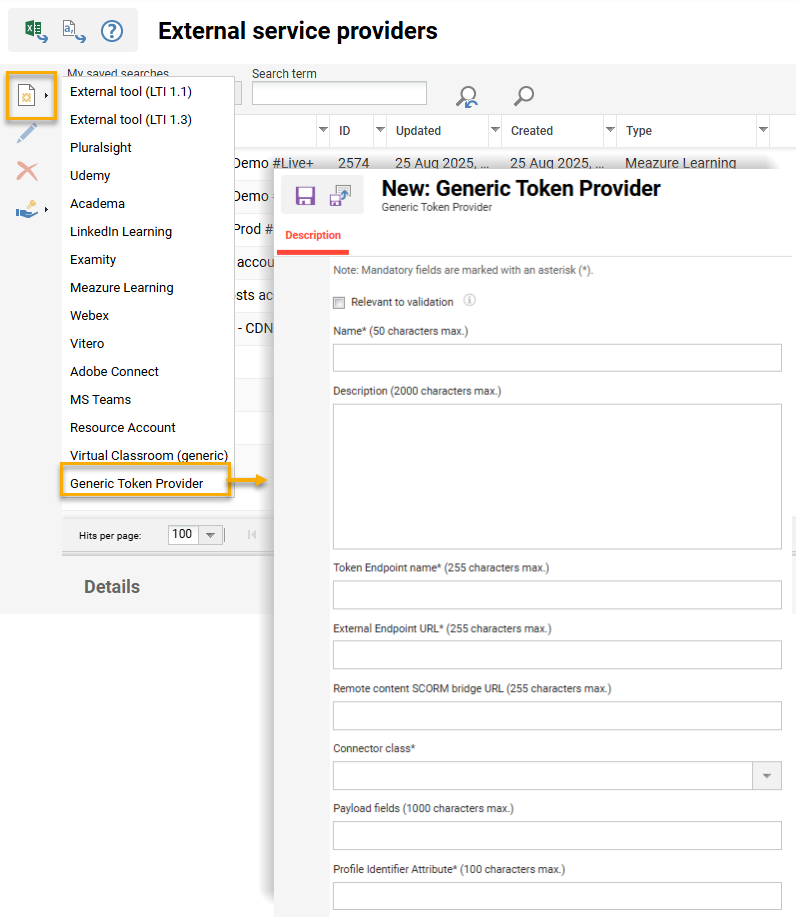
Configuration at External Service Provider function to create a Generic token provider with:
-
Name*: Internal name of this concrete token provider configuration
-
Description: Optional free‑text description for administrators
-
Token Endpoint name*: Logical or technical name of the token endpoint this provider talks to.
This value is stored in thetoken_endpoint_namefield of thegeneric_token_providertable and lets you distinguish different token services. -
External Endpoint URL*: The actual URL that the LMS calls to retrieve the token from the external system (
https://idp.customer.com/api/token/media) -
Connector class*: The technical connector implementation that knows how to call the external endpoint and extract the token from the response. Connector classes are implemented and deployed by Scheer IMC and your technical team. You just select one of the available options.
-
Payload fields: Optional list of payload fields that the connector will send to the external endpoint (for example, as query parameters or JSON fields), depending on the connector’s design.
-
Profile Identifier Attribute*: The LMS user profile attribute that will be used as “user identifier” when requesting the token. The connector will typically read this attribute from the current learner and insert it into the payload or request.
-
-
Configuration in Media type function to add the new Token Generation Provider meta tag (ID: 12077) to required media types.
Considerations and Limitations: A working token endpoint and corresponding connector implementation are required; these are not automatically created by the LMS. The exact token format (e.g. JWT) and validation logic are defined by the external system/endpoint and must be aligned during integration.
Testing: Providing you have a working token endpoint, as a System administrator you can follow these steps:
-
In the External service provider function click the Create icon and select the Generic Token Provider option.
In the new tab populate the required fields (e.g. Endpoint URL, Connector class …) and click Save. -
In the Media types function either update existing, or create new, media types with the Token Generation Provider meta tag (ID: 12077).
-
In the Media function create a new media object and select the Generic Token Provider in the Token Generation Provider meta tag (ID: 12077).
-
Assign the created media object linked to the generic token provider to either a Course or Catalogue.
-
Access the media object as a learner and the system will use the Connector class defined in the Generic Token Provider configuration.
-
If there is a successful response, the media will be displayed.
-
If there is a non-successful response, the media will not be displayed.
-
-
When accessing a media object without a Token Generation Provider, the standard behaviour is applied.
Risk rating: Low
SCORM and xAPI Manifest Upload CDN Inclusion
Overview: As a Content administrator, you are now able to upload a SCORM or xAPI package that only contains the imsmanifest.xml file with remote content. Based on this manifest, the system automatically:
-
Creates a remote SCORM or remote TinCan/xAPI media object.
-
The content is accessible via Courses, Catalogue and Preview, similar to existing local SCORM/xAPI content.
-
Plays the content via the LMS player whilst all actual content files remain on the CDN.
-
For xAPI, sends session and status data to the existing xAPI endpoints.
The major difference to the tradition package is that resource references are not pointing to a file storage of the LMS, but directly to the assets on the CDN.
Benefits and Use Cases: Security and data protection as the actual learning assets stay on the customer’s secured CDN, under their control. Reduced upload and maintenance effort with content updates for large or frequently changing content libraries. Many off-the-shelf content providers utilise this method for providing content and managing access.
Audience: System administrators
Setup and Access: No specific setup required. Simply use the existing ‘WBT’ media type that matches imsmanifest.xml file.
Considerations and Limitations: Only applicable for SCORM and TinCan/xAPI content. You also need to consider:
-
SCORM 1.2 and 2004 differ in syntax of their imsmanifest.xml file.
-
An imsmanifest.xml can refer to an other manifest (e.g. a file called "metadata.xml"), but the name of the referred file can be freely chosen.
-
If imsmanifest.xml refers to another manifest, this other manifest must also be considered!
Testing: Providing that you have a SCORM or xAPI (TinCan) package with remote content
Risk rating: Medium
Dashboard Management
Page Editor
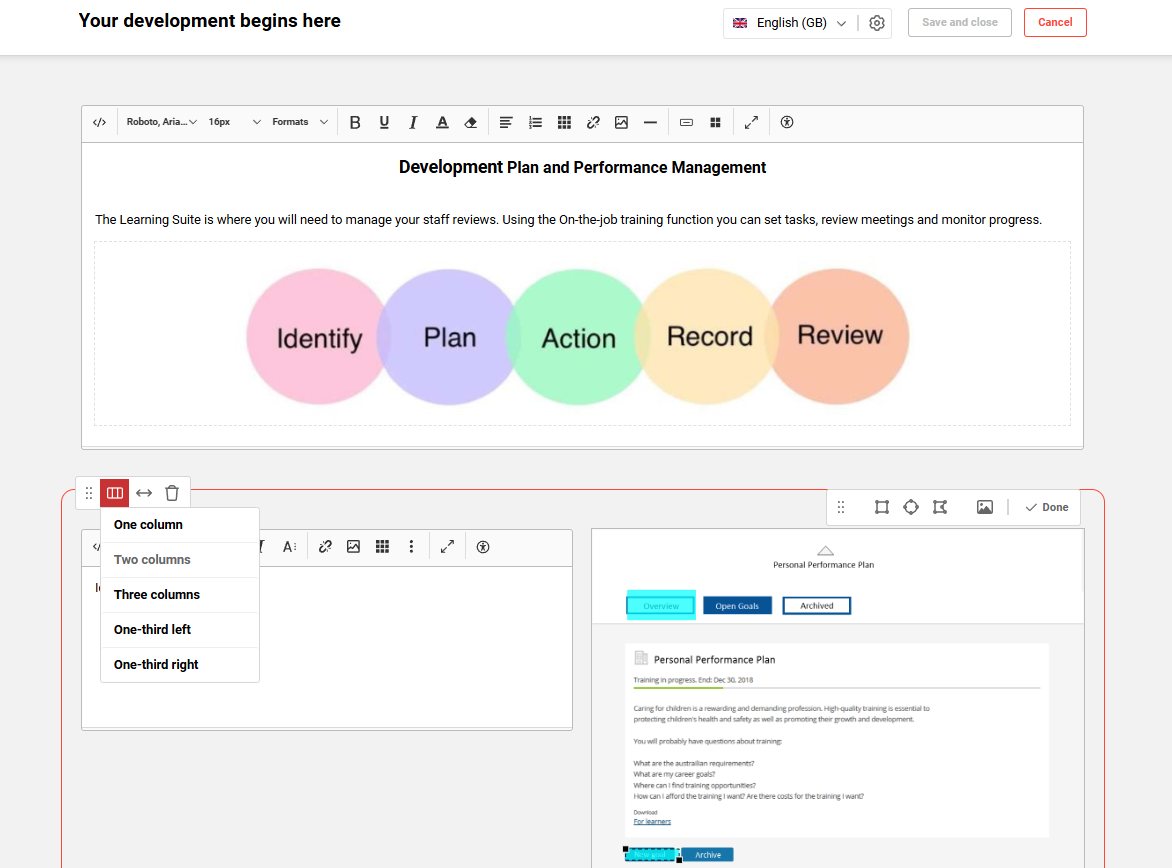
Overview: In the Dashboard pages function a new Pages option allows you to create rich, customisable pages with configurable sections, multi-column layouts, and in-page panels. Pages support custom panels including direct rich text entry, file uploads, and image maps, as well as standard panel assignment. Each section in the Page editor introduces flexibility in column layouts with up to three columns per section. The display width of each section is also configurable to either a standard or full-screen width. Within the page, all sections and panels can be rearranged via simple drag and drop.
Further details on the panel possibilities are described below:
-
Rich text: Add formatted text content directly onto a page using the Rich Text in-page panel. The built-in editor supports font selection, size selection, colour selection, table creation with up to six columns, button creation, video links from external providers such as YouTube or Vimeo, image upload, and grid creation.
-
File upload: Upload documents, images, videos, and audio files directly onto a page using the File Upload in-page panel. Panel settings include a panel name, description, title, and an info text field. Supported file types include JPG, PNG, and SVG for images, and PDF, PPTX, DOCX, XLSX, and TXT for documents.
-
Image Map: Create interactive image-based content using the Image Map in-page panel. The panel is created on a page using the third icon in the in-page panel list. After uploading an image, authors draw hotspot shapes - rectangles, circles, or free-draw areas - directly onto the image. Each hotspot supports a tooltip with a title and description that appears on hover. Hotspots can link to internal or external URLs, with the option to open links in a new tab.
-
Panel Assignment: Assign panels from the Panel Manager directly onto the page. A defined subset of panels - Feature Plugin Panel, Entry in Catalogue, Current Courses, Recommended Learning, and Mandatory Courses - supports configuration directly within the Page Editor.
The Page Editor also supports multi-language content. Panels configured in the Panel Manager automatically follow the selected page language. In-page panels use the page's default language at creation and can be translated by switching the page language and editing directly on the page.
Benefits and Use Cases: This update provides you full control over page layouts and content composition without leaving the editor. Key benefits of the new page type include:
-
The section-and-column system enables flexible, visually structured pages tailored to different audiences. Drag and drop reduces the effort of reorganising content.
-
Rich Text panels enable you to compose and style informative, visually engaging page content without switching to external tools or feature panels. The editor consolidates common WYSIWYG formatting actions into a single panel.
-
Building interactive, visually guided navigation experiences directly on the page. Hotspot-based linking and hover text turns static images into contextual entry points for related content.
-
Providing a range of downloadable or viewable files as part of the page content. Learners gain direct access to supplementary materials - documents, images, videos, and audio - without navigating away from the page.
-
Multi-language support ensures that localised content can be managed within a single page. The edit conflict warning improves collaboration with colleagues managing the same page.
-
Assigning standard panels alongside the new in-page panel options enables displaying dynamic training content related to the learner.
Audience: System administrators
Setup and Access: The new Page option is automatically available in the Dashboard pages function under the Create icon. There are no standard pages, so to utilise the new option you will need to create a new Page. This will launch the following ‘New page’ screen where a panel type can be selected, additional sections added and the page language selected.
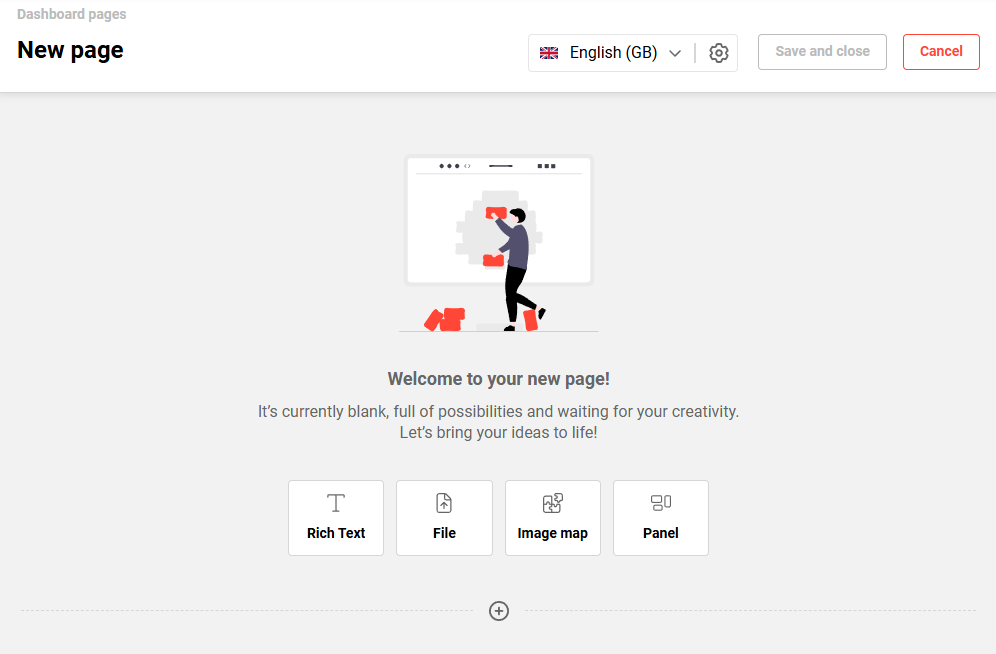
When editing a section there is a menu in the upper left corner with column options and section width. Simply select the number of desired column for the section and create/assign desired panels. For multi-language systems you will need to toggle between each required system language to create the panel content.
Once your page is created you can click the Save and close button. Like a Dashboard page, the Page will need to be assigned to a menu in the Navigation function to view. This must be a Default menu of type Dashboard. Some further configuration considerations include:
-
No configuration is required to enable Page creation, just access rights to the Dashboard pages function Create option.
-
Size limits of file uploads can be configured in Configuration function in the Upload restrictions menu.
Considerations and Limitations: Some further considerations include:
-
In-page panels are created directly within the Page and are specific for the Page.
-
Standard panels are configured in the Panels function and only those with New design support can be added to Pages.
-
Drag and Drop for panels works inside a section or to an empty column in another section, but not to another section were columns are already filled.
-
Images must be provided through a publicly accessible URL.
-
Duplication of Pages is not supported.
-
An edit conflict warning notifies authors when another user is already editing the same page. In concurrent editing scenarios, the last save overwrites the page state.
-
In the Dashboard pages function Pages are also listed in the Type column as Dashboard page.
Testing: As a System administrator, follow these steps to test:
-
Go to the Dashboard pages function, click the Create icon and select the new Page option.
-
In the new screen configure your page with at least two sections, try different amounts of columns per section, and utilise all the available panel types. Once done, click the Save and close button.
If you system is multi-language, configure the page for each language. -
Click the Clearances icon to grant clearance to required users or groups.
-
-
Next, go to the Navigation function and create a new Menu in a desired location.
-
The menu will be a ‘Default menu’ of type ‘Dashboard'. This will then show a Dashboard selection field where the new Page can be selected.
-
Name the menu for each system language.
-
In the Access rights tab add the groups that will need to view the Page. For testing purposes this can just be the System administrators (ID: 1) group.
-
Click the Save and close button.
-
-
Log out and log in once again. The new Page will now be visible in the navigation.
Risk rating: Medium
Global Search
My Learning Search Update
Overview: A large global search update improves the My Learning (Learning status) search experience. This is done by returning more consistent, configurable and predictable results. If using the global search, you can expect:
-
Inclusion of content by Planning status
-
Learning objects of the following planning statuses can be indexed and shown according to client settings:
-
Fixed
-
Cancelled
-
Completed
-
-
Courses, course templates, learning paths, and learning path templates with these statuses are considered during indexing. Only enabled object types will appear in search results, providing they are not excluded by other filters or view settings.
-
Behavior aligns with existing client configuration rules for planning status visibility.
-
-
Content area filters and counters in search
-
In both the Global search and Learning status search, the Content area filter (Catalogues, Channels, Learning status, etc.) displays a number indicating how many learning items belong to each content area.
-
When no Content area filter is selected:
The number next to each content area shows the total number of search results that:-
match the search term, and
-
belong to that content area.
-
-
When one or more Content area filters are selected:
The counters next to all content areas are recalculated based on the current filter combination (content area + all other applied filters). -
When the learner applies non–content-area filters (e.g. type, language, other filters):
The content area counters are recalculated to show the number of results that match all active filters and the respective content area. -
If a search returns zero results overall:
Content area and other filters are not shown. -
If some content areas have no matching results:
These content areas are hidden from the content area filter list. -
When the learner changes the search term:
All content area counters are updated according to the new result set, independent from the previous search. -
In the My Learning search:
Content area counters are visible and behave consistently with global search:-
visible where applicable,
-
accurate, and
-
recalculated on any filter change.
-
-
-
Stability of content area filters when navigating back from content
-
In the Advanced search, when a learner:
-
Executes a search
-
Selects a Content area (e.g. Channels or Catalogue)
-
Selects a My Learning item from “multiple sources”
-
Navigates back to advanced search
-
-
This results in:
-
All previously selected content area filters, including Channels, remaining visible and selected as before.
-
No content area filter disappearing unexpectedly after returning from a learning object detail view.
-
-
Benefits and Use Cases: The update allows your users to see only relevant Learning modes and Planning statuses (fixed/cancelled/completed) according to view settings. In the Content area filters (Catalogues, Channels, My Learning, etc.) you will see correct result counts that remain stable when navigating back and forth. These changes reduce confusion by not displaying non-desired objects, respecting client configuration settings, and accurately displaying available learning item counts per content area.
Audience: Learners
Setup and Access: The changes to result display logic will be automatically applied. These changes will only effect the customers using the Global search.
Considerations and Limitations: This update focuses on My Learning search behavior and its representation in the Global/Advanced search; it does not redesign the entire search UI or other product areas. Further considerations include:
-
Exclusion via hiddenViewSettingsFilter is guaranteed only for My Learning results. Other search sources (e.g. Catalogues, Channels, other content areas) might still show results that are not affected by the My Learning specific settings.
-
No new reporting or analytics features are introduced.
-
Performance improvements are limited to ensuring no degradation compared to the previous multiple negative filters.
Testing: Given that the Global search is already configured and in use, log in as an administrator to:
-
Check the search includes content results by the updated Planning statuses (Fixed, Cancelled, Completed). Ensure these are indexed according to settings in the Clients function Learning area settings menu.
This can include Courses, Course templates, and Learning paths. -
Check the Content area filters (Catalogues, Channels, My Learning, etc.) accurately display the result counter number for each area.
When no Content area filter is selected, the number next to each content area shows the total number of search results that match the search term. -
Check the non–content-area filters (e.g. type, language) when added recalculate the number of results in the respective content area.
-
Check that if a search returns zero results, the content areas and other filters are not shown.
-
Check that content areas with no matching results are not shown.
-
Check that when changing a search term all content area counters are updated according to the new result set, independent from the previous search.
-
Check that the My Learning (Learning status) search results are consistent with the global search My learning content area results.
Risk rating: Low
Identification Code to be Searchable
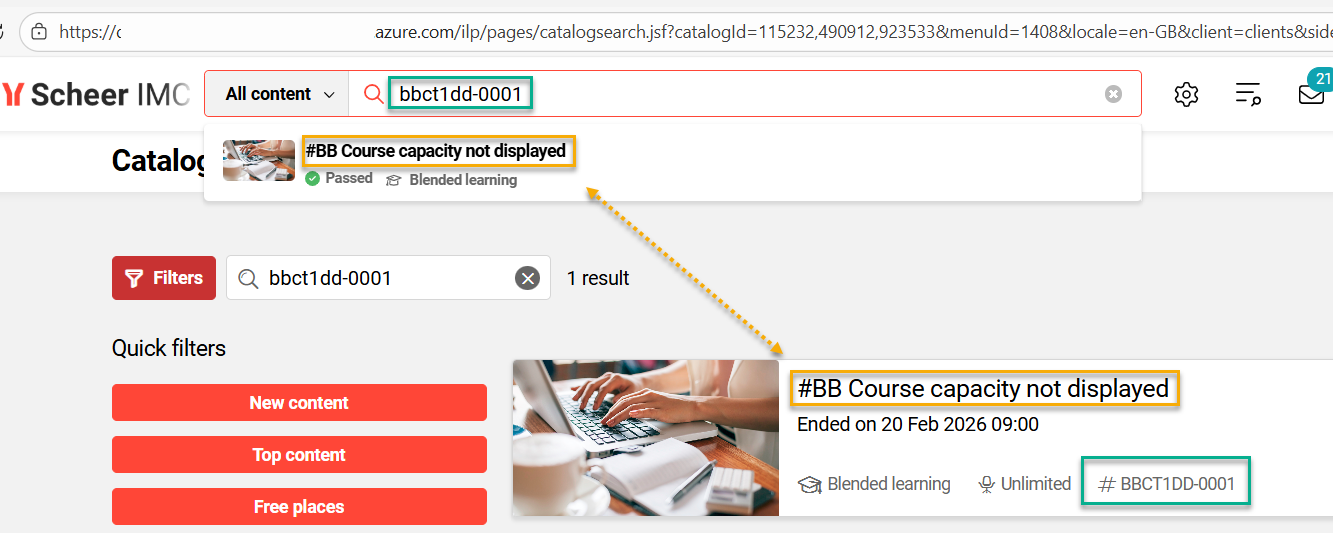
Overview: The Lexical search index has been updated to consider the Identification code. This means searches will return results where there is a match for Courses, Course templates, Learning paths, and Learning path templates. Previously, this was only possible via catalogue searches.
Benefits and Use Cases: Users can now use Identification code as a search term in the Lexical global search. This enables finding training more efficiently and accurately.
Audience: Learner
Setup and Access: The update to the search indexing will be automatically applied for customers using the Lexical search.
Considerations and Limitations: This explicitly includes the single Identification code attribute for Lexical search. Therefore, it's not considered for Semantic search and is not a generic solution to add additional meta data to the search.
Testing: Providing that Lexical search is active and the Identification code setting is enabled on Courses or Learning paths:
-
Create or locate a Course or Learning path where the Identification code is populated, but the value is not contained in the Name or Description meta tags.
-
Assign the Course and/or Learning path with an Identification code value to a catalogue.
Process the SOLR index job. -
Enter the Identification code value into the global content search field.
The Course or Learning path with the matching Identification code will display.
Risk rating: Low
Equivalence Service
Equivalency Service Extension for Passing Courses
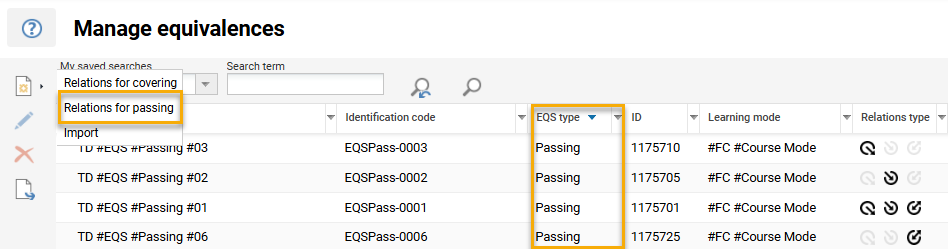
Overview: As an administrator you can create a new type of equivalence relationship that actually Passes users on courses, instead of only covering courses as passed. This update includes:
-
Ability to create Relations for passing in the Manage equivalences function to set status transitions to Passed when a dedicated cronjob is executed.
-
Enrolment status transitions to Passed as if it would be done manually in the Participation administration function.
-
Certifications and skills being awarded.
-
EQS import and export are adapted with an EQS type column supporting Coverage and Passing options.
-
Manual status changes by Manager/Learner after once set to Passed by EQS will remain.
Benefits and Use Cases: The actual course enrolment status reflects the equivalence relation. This includes all course achievements that are gained by being set to ‘Passed’ for an equivalent course. The EQS relations for passing learners are not restricted to the learning path context like the covering relations.
-
Offers full flexibility at the course level, aligning more closely with the model of versioned items and substitute courses of customers.
-
Makes substitution logic visible and actionable directly in the learning journey.
Audience: EQS Administrators
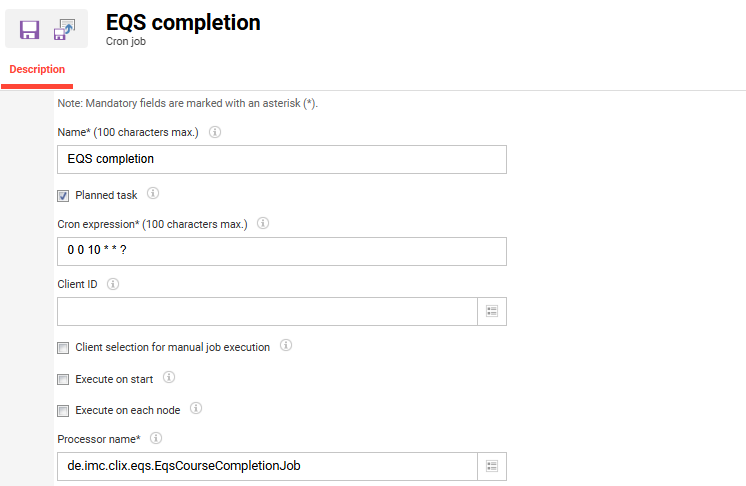
Setup and Access: In the Configuration function open the Equivalence menu, you need to activate the new Enable Equivalences setting. Next, in the Navigation function go to the Manage equivalences menu and in the Access rights tab set specific authorisation for the Create/Relations for passing option. In the Scheduled jobs function, create a new cron using the de.imc.clix.eqs.EqsCourseCompletionJob processor.
Considerations and Limitations: You must activate the Equivalence function and architecture. Feature is only active after deployment and only works with entries / equivalencies created afterwards or specifically migrated. EQS import must contain a column to specify the EQS type (passing or covering relation). If a passing relation has been deleted, the corresponding correction has to be done manually.
Executing the de.imc.clix.eqs.EqsCourseCompletionJob cron job considers the below transitions:
-
No relation → Passed
-
Enrolled → Passed
-
Started → Passed
Note: Declined, Cancelled and other enrolment statuses will not be taken into account.
Testing: Providing that the Equivalence functionality is enabled, as a System administrator you can test the changes with the following steps:
-
Go to the Manage equivalences function, click the Create icon and select the new Relations for passing option.
Create a new equivalence relationship based on this option to define which courses will be set to ‘Passed’ according to relations.
Example: Create a Relation for a Course Template where ‘This component triggers the completion of’ a specific Course. This can be done with test courses. -
Go the Courses function and locate a course derived from the Course Template. In the Participant administration view identify a user that has completed the Course.
Then go the specific Course and check in the Participant administration view that the identified user is not already enrolled. -
In the Scheduled jobs function create a new EQS Course Completion Job cron job (de.imc.clix.eqs.EqsCourseCompletionJob).
Execute the cron job and assess if learners who are Passed on equivalent courses are also passed on the target course as defined in the Manage equivalences function. The considered relationships are:-
No relation → Passed
-
Enrolled → Passed
-
Started → Passed
-
-
Return to the specific Course to see if the previously identified user has been enrolled and Passed on the specific course.
-
This can also be tested to check if Skills and Certificates are awarded.
Risk rating: Medium
Mobile View Display of Equivalencies Information
Overview: Learners who access the course catalogue on mobile devices are now able to see equivalence information. The update now displays which other courses are recognised as equivalents. This considers already fulfilled requirements via another course or which alternative courses they can take if the current course is not available.
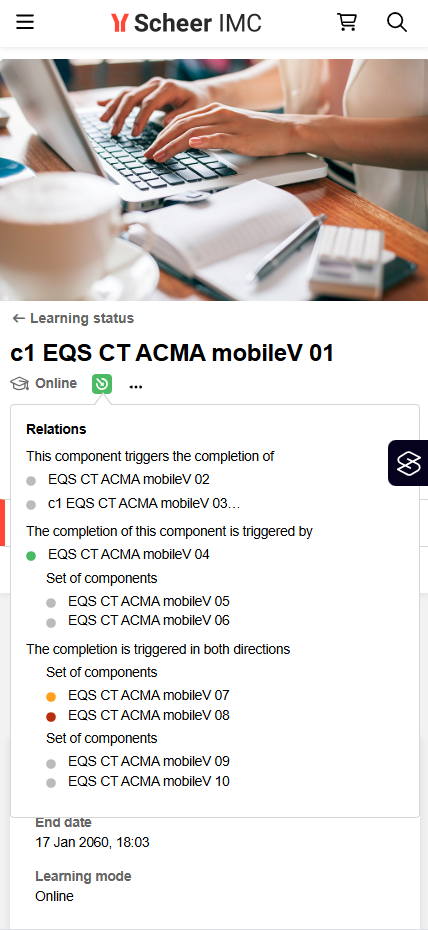
Benefits and Use Cases: Mobile users can directly see if a course they have already completed (or plan to take) is recognised as an equivalent. A consistent learner experience across desktop and mobile devices avoids confusion and support questions. This can result in higher completion rates and compliance based on equivalence considerations.
Audience: Learners
Setup and Access: The change will be automatically applied. This will be visible if the Equivalence functionality is enabled and applies to the course being viewed.
Considerations and Limitations: Requires use of the Equivalency functionality and architecture. The update only applies to the responsive mobile view and not the native applications.
Testing: Providing that the Equivalence service is enabled and course equivalencies are configured:
-
As a learner, access the Catalogue on a mobile device
-
Search for a course that has an equivalence
-
The course Description page will display any recognised equivalencies
Risk rating: Low
Notification Engine
HTML templates for Notifications and Enrolment messages
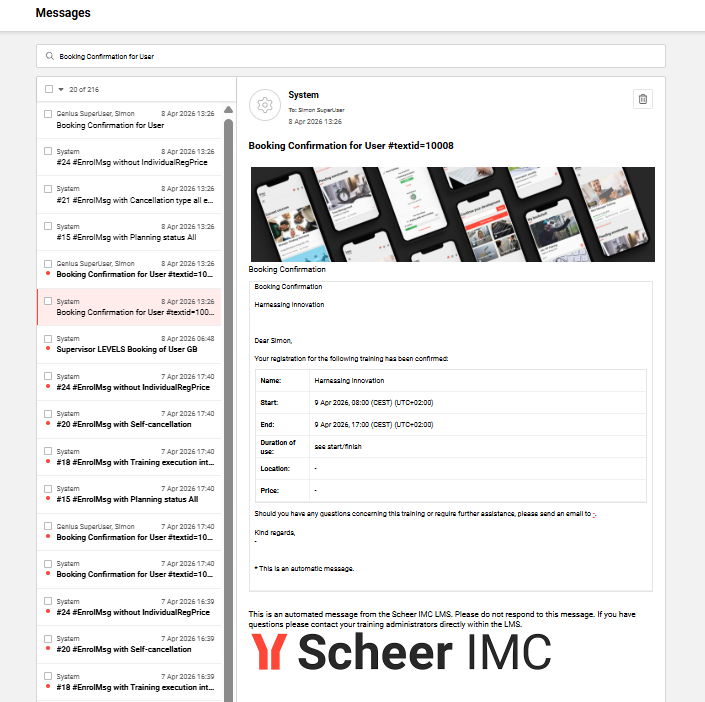
Overview: A new function enables the creation of central HTML mail templates per Provider and Client. These reusable email layouts enable defining a branded Header and Footer to be automatically applied to Notifications and Enrolment messages. Prior to sending standard Notifications and Enrolment messages, the LMS will check if the Provider of the training has a HTML mail template and if not, a subsequent check is performed to see if the recipient’s Client has a HTML mail template. The standard Notification and Enrolment message texts are then inserted into the body of the template. With this new function you can:
-
Create, edit and delete HTML templates in a dedicated manager,
-
Define header and footer per language using a WYSIWYG editor, and
-
Assign templates to Providers and Clients.
Benefits and Use Cases: As a System administrator, you can create mail design templates for each Provider and Client. This central function delivers you many benefits including:
-
Centralised management of branded HTML email layouts,
-
Consistent corporate design for outgoing emails,
-
Flexible assignment per Provider and Client with clear priority rules (Provider > Client > Standard)
-
Reduced manual formatting effort in Notifications and Enrolment messages functions,
-
Improved visual quality through inline image support (via Image button in editor), and
-
Efficiency in creating/updating a few templates instead of hundreds of individual messages.
Audience: System administrators
Setup and Access: In the Navigation function you first need to first create a new ‘Menu’. The new menu is ideally created in the Main navigation for all categories Main navigation, Settings category in the Communication structure with other email related functions. In the new tab, set the Menu type* field to Default menu and in the Default menu* field search for HTML mail template. Name the menu (e.g. HTML mail template), grant access rights for required groups, and click the Save and close icon. Log out and then log in again to view the new HTML mail Template navigation entry.
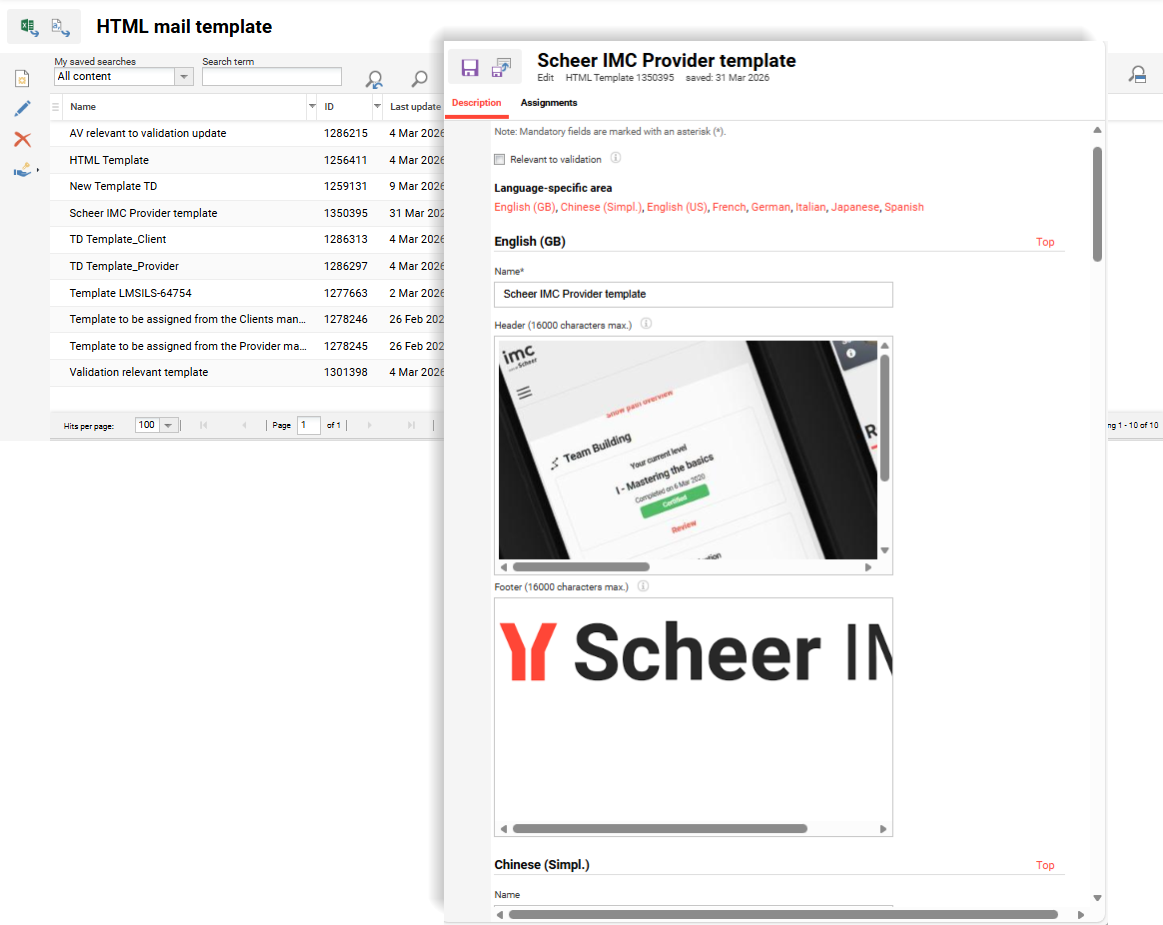
In the HTML mail template function, clicking the Create icon will open a new browser tab with two tabs:
-
Description tab: Contains read-only Created, Last updated and Object ID fields. Then there are language specific areas fields including:
-
Name*: This mandatory field is the name for the HTML template for admin purposes. It is not seen by mail recipients.
-
Header: This fields contains a WYSIWYG editor to create the Header content that will be inserted above standard messages and notifications.
-
Footer: This fields contains a WYSIWYG editor to create the Footer content that will be inserted below standard messages and notifications.
-
-
Assignments tab: Here you can add the Provider or Client the HTML mail template relates to.
Considerations and Limitations:
-
The HTML mail template is intended for generic design information.
-
Placeholders and content specific text are to be populated in the Notification and Enrolment message texts functions.
-
There is a priority consideration where multiple HTML mail templates apply to the notification or enrolment message. This is Provider specific, then Client specific and finally standard message.
Testing: Once the new HMTL mail Template menu is configured, you can follow these steps:
To test Provider related templates you can follow these steps:
-
In the HTML mail Template menu create a new template and link to a Provider.
-
Create a Course, add the Provider in the Provider meta tag (ID: 10069), and ensure the Send enrolment messages (if configured) meta tag (ID: 10132) is enabled.
-
Go to the Participant administration function of the Course and enrol a participant.
-
Log in as the participant and check the Messages function to see if a branded email based on the HTML mail Template linked to the Provider is received.
To test Client related templates you can follow these steps:
-
In the HTML mail Template menu create a new template and link to a Client.
-
Create a Course without a Provider and ensure the Send enrolment messages (if configured) meta tag is enabled.
-
Go to the Participant administration function of the Course and enrol a participant with a matching CLIENT_ID.
-
Log in as the participant and check the Messages function to see if a branded email based on the HTML mail Template linked to the Client is received.
Risk rating: Medium
Notification to Supervisor of Newly Assigned User
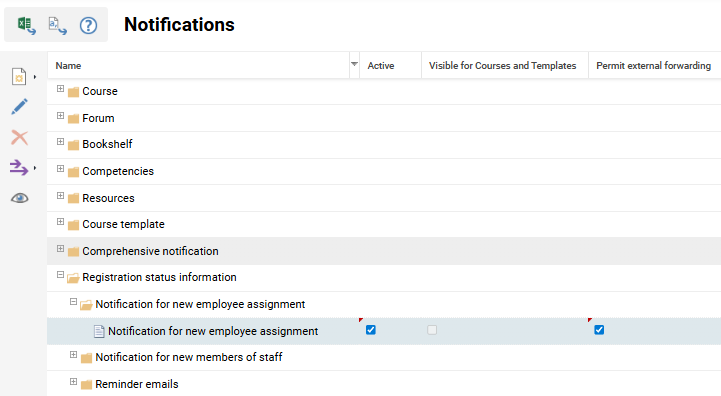
Overview: A new registration status notification called 'Notification for new employee Assignment' (ID 87) is available. You can activate this notification to alert supervisors when:
-
a new user is added to the system that reports to them,
-
a user is newly assigned to their Business Unit (BU), or
-
a supervisor for a user changes (they become a supervisor).
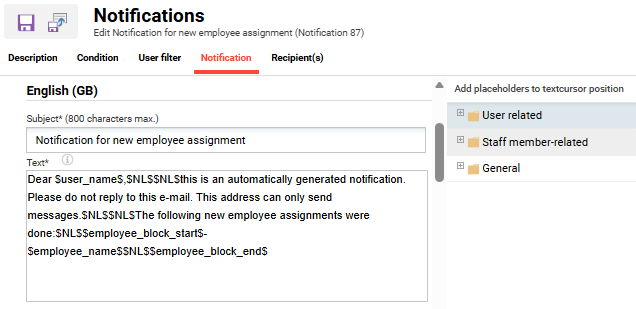
The notification trigger utilises a new cron job that processes based on the following conditions:
-
The Line Manager Relationship Type setting configured in the Configuration manager User function:
-
Superior Email (Classical): the supervisor assigned via the Supervisor email personal attribute (Person attribute SUPERIOR_EMAIL)
This also considers if the supervisor is assigned via the SUPERIOR_ID personal attribute. -
BU Group: The supervisors assigned via the Supervisor field within the BU group.
-
Both: Considers both the personal attribute and BU group linkages.
-
-
The Supervisor relationship change being performed in the Frontend and Backend profiles or import.
-
The notification sends immediately when users are imported or manually saved in the system.
-
The notification sends to the Supervisor of a BU group when a new user is assigned to the group or if a new Supervisor is assigned to the group.
Benefits and Use Cases: The notification can be used to notify Supervisors when new users are assigned that they are responsible for. Directly informing the Supervisors of new employees removes the need for manual searching. This can help ensure timely onboarding coordination and eliminate the risk of new employees going unnoticed by their supervisors.
Audience: Supervisors
Setup and Access: The new notification is automatically available in the Notification function in the Registration status information section in an ‘Inactive’ state. To enable the notification simply tick the Active column. Changes can be made to the notification by using the Edit icon.
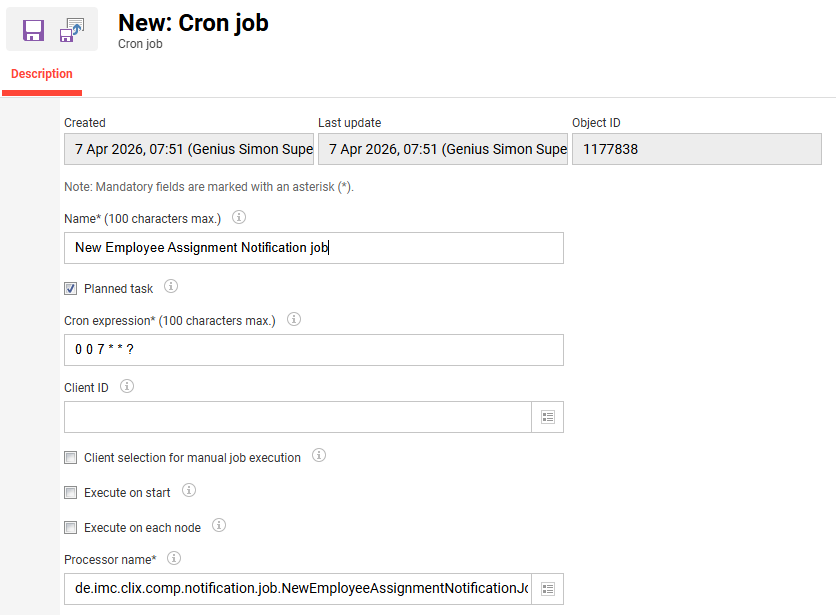
The scheduled job New Employee Assignment Notification (NewEmployeeAssignmentNotification) must be active and configured to run at an appropriate interval. The notification only sends after this job executes. The interval defined in the Cron expression* field is ideally aligned to run immediately after user import and BU imports.
Considerations and Limitations: The following considerations:
-
Supervisor replacement in a BU only the incoming supervisor. The outgoing supervisor is not notified.
-
The notification is not triggered if none of the following are configured for a user: the SUPERIOR_EMAIL attribute, the SUPERIOR_ID attribute, or a BU supervisor assignment.
-
The notification is not sent in real time. Ensure the scheduled job is active and runs at an appropriate interval based on other import jobs.
Notification delays are expected if the job runs infrequently (e.g. weekly). -
If a filter is used, the notification is sent only if both the Employee and Supervisor fulfill the filter.
Testing: As a System administrator, you can test via the following steps:
-
Activate the new Notification for new employee assignment (ID 87) notification.
-
Configure the scheduled job
NewEmployeeAssignmentNotificationJob.
Ensure an appropriate execution interval is set in the Cron expression* field based on your user import and BU group import jobs. -
In the Users function, update a user to have your email as the SUPERIOR_EMAIL or select yourself in the SUPERIOR_ID personal attribute.
-
Allowing for the Scheduled job to run, check if you have received the notification.
-
You can also test the notification by assigning yourself as a Supervisor to a BU group.
Risk rating: Low
Organisation Management
Enhanced Staff Selection for Collective Enrolment
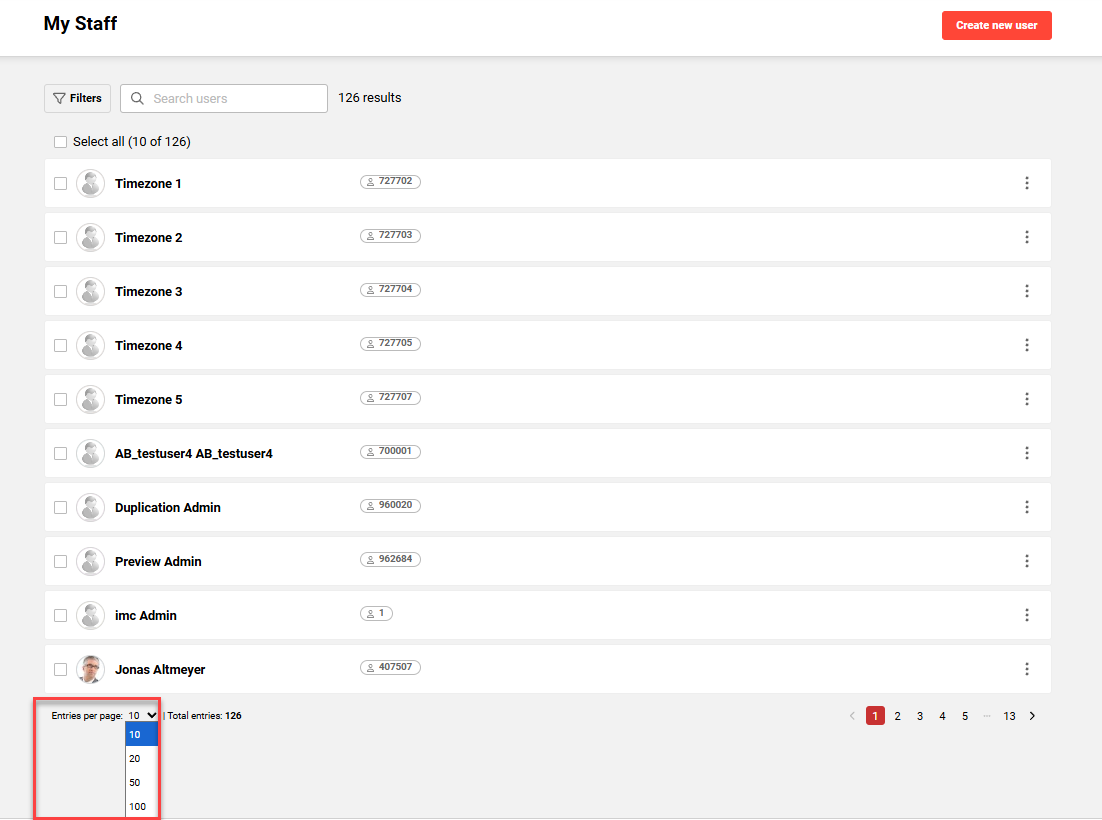
Overview: The My staff function has been updated with a dropdown to increase the displayed amount of users. Selection will enable values of 10, 20, 50, 100 (Maximum 100). Prior to the update you could only view 10 users per page and select only those visible, making large-scale enrolment slow and repetitive. The enhancement introduces:
-
A “Select all” checkbox to select all visible staff members (up to 100)
-
A drop-down menu for configuring the number of entries displayed per page (10, 20, 50, 100 entries)
-
A maximum selection limit of 100 employees, with warnings when exceeded
Benefits and Use Cases:
Superiors often manage large teams and may need to enrol many employees at once via the My staff or catalogue-based enrolment. Key benefits for supervisors include:
-
Significantly faster collective enrolment for managers with large teams.
-
Reduced manual effort by less repetition of selection across multiple pages.
-
More intuitive and scalable staff management in the frontend.
-
Consistent selection behavior across all relevant pages (My staff, Manage staff enrolment, Enrol staff member).
Audience: Supervisors
Setup and Access: The update is applied automatically. The default value is the dropdown will be set as 10 to match the previous limit.
Considerations and Limitations: When 100 users are selected a pop-up message will display “100 users have been selected. You’ve reached the maximum selection limit.”. It will still be possible to view further users in subsequent pages, but the selection checkbox will be greyed out.
Testing: Access the Managers role and open the My staff menu. There will now be a dropdown selection to choose between 10, 20, 50 and 100 records. The easiest way to have more than 10 reporting users is to temporarily make yourself a Supervisor of a large BU group.
Risk rating: Low
Process Management
Automatic Cancellation from Waiting List Reason
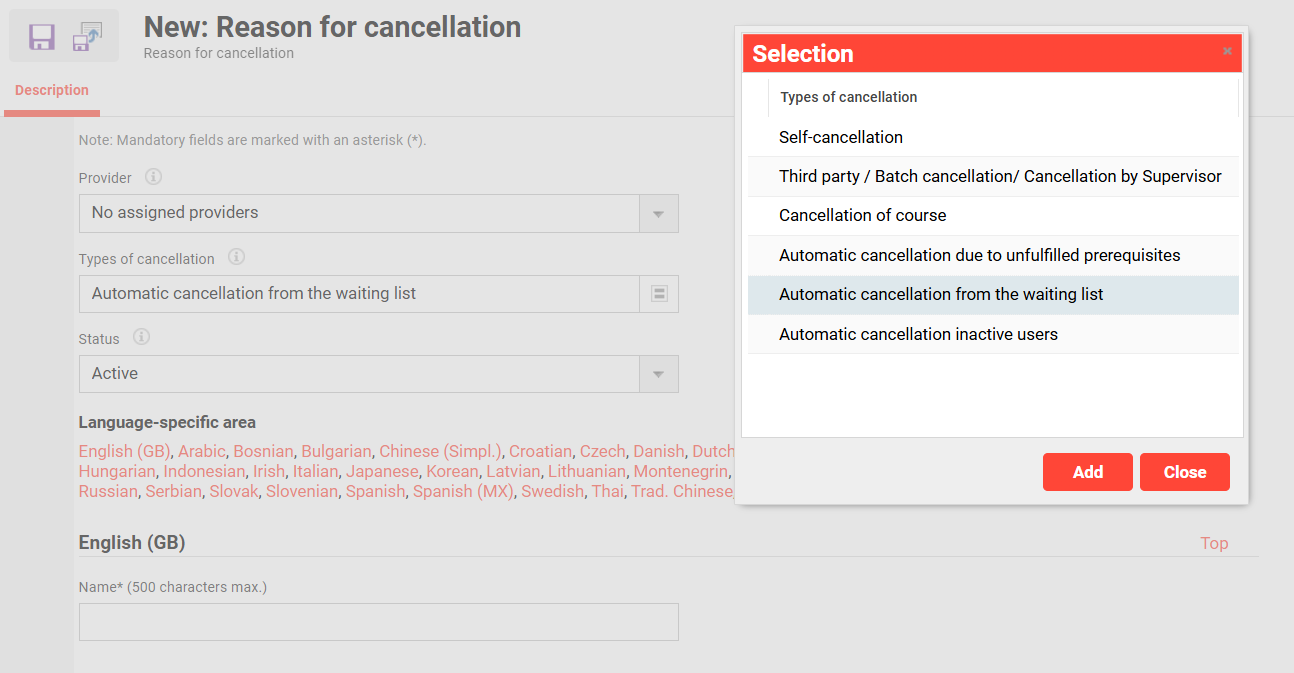
Overview: Learners who are automatically cancelled from a course waiting list prior to the start date can now be notified of the reason. This is possible via an update to the Reasons for cancellation function that with option in the Types of cancellation field. The new option is called Automatic cancellation from the waiting list.
Benefits and Use Cases: Transparent communication as Participants immediately see why they were cancelled from the waiting list instead of the unhelpful “No information” reason text.
Audience: Learners
Setup and Access: In the Reasons for cancellation, exemption and approval function you will need to create a new Reason for cancellation. The Types of cancellation field will need to be set to Automatic cancellation from the waiting list.
Considerations and Limitations: This workflow is triggered by the Automatic cancellation from the waiting list meta tag (ID 11816) for Courses and an active Waitlist. Further considerations include:
-
When an automatic cancellation from waiting list is triggered for a course based on the Automatic cancellation from waiting list meta tag, the cancellation reason for automatic cancelation is applied, based on the Provider of the course.
-
If the course does not have a Provider and no cancellation reason is defined, the behaviour will not change.
-
The WaitingListCancellationJob cron needs to be activated in the Scheduled jobs function.
-
Learning paths are not considered for this implementation, only courses.
-
Only one reason per provider is possible.
Testing: To test this workflow you will need to follow these steps:
-
Create a new Reason for cancellation with the Types of cancellation field set to Automatic cancellation from the waiting list. A specific Provider can be set or just select All.
-
In the Scheduled jobs function ensure the WaitingListCancellationJob cron is active.
-
In a date-dependent course enable the following meta tags:
-
Start date (ID 10004): Set for one day ahead of current date.
-
Planning status (ID 10072): Released
-
Maximum capacity (ID 10009): Define a small value.
-
Max. waiting-list capacity (ID 10138): Can be empty or a small value.
-
Automatic cancellation from the waiting list (ID 11816): Ticked
-
Provider (ID 10069): Only required if testing a Provider specific reason for cancellation
-
Send enrolment messages (if configured) (ID 10132): Ticked
-
-
In the Enrolment Messages function ensure that there is an active trigger for the course settings. The key filters to search are:
-
Starting state: Waiting
-
Target state: Cancelled
-
Trigger: Backend
-
Mail type: Course
-
-
In the Enrolment Message Text connected to the Enrolment Message trigger, ensure the $cancellation_reason$ is used.
-
In the Courses function access the Participant administration menu for the course.
-
In the Participant list tab add users to meet the number defined in the Maximum capacity meta tag and click Save.
-
In the Waiting list tab add at least one user and click Save and Close.
-
-
Once the course Start date has passed and the WaitingListCancellationJob cron processes, the wait listed users will be cancelled and the cancellation enrolment message will be triggered.
-
Check in the message monitor for the course for a cancellation message. Look to see if the $cancellation_reason$ placeholder correctly displays the reason defined in the Reason for cancellation of type ‘Automatic cancellation from the waiting list’.
Risk rating: Low
Share Seats Between Courses and Learning Paths via Seat Limitation
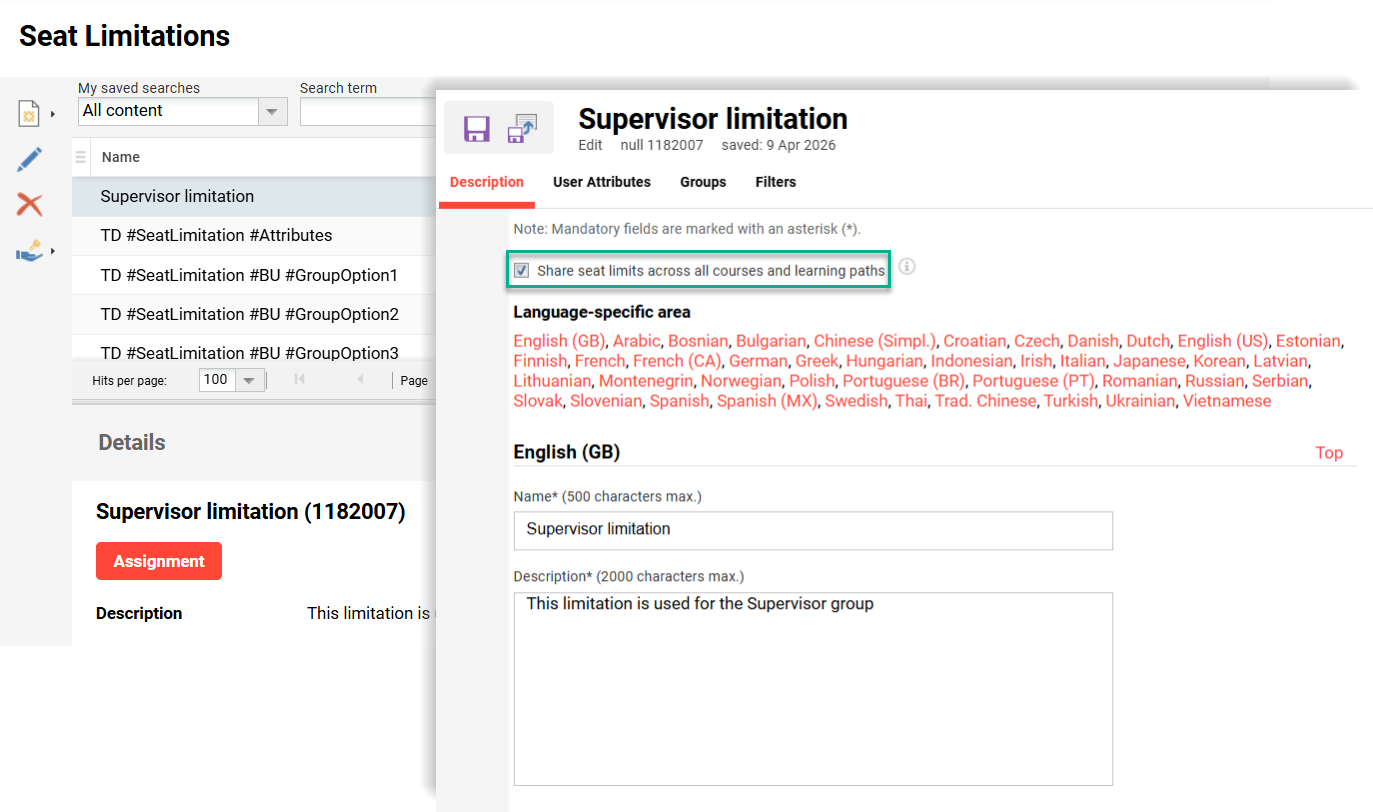
Overview: An update to the Seat limitations function now enables limitations to be shared for a group of Courses and/or Learning paths. Previously limitations could only be configured per Course or Learning path. This means that all enrolments from group members into Courses or Learning paths deducts from the same overall quota. Once this shared quota is fully used, no further enrolments will be possible for any linked Course or Learning paths. When creating or editing a entry in the Seat limitations function there is a to define if the seats are per Course or share the places for all the grouped Courses and Learning paths.
The following logic applies:
-
The available seat count is deducted globally across all linked Courses and Learning paths.
Links are established via the Seat Limitation (ID: 11988) meta tag -
Once the quota is exhausted, users will not be able to enrol in any of the linked courses.
-
Enrolment in any one of the courses affect the remaining quota for the others.
-
The same evaluation/validation and messages will be shown as for single course usage.
-
As the seats are shared for the selected Courses/Learning paths and are dependent on the seat limitation assignment, the information for admins to track and view the usage is enhanced in the “Assignment” information of the seat limitation.
Benefits and Use Cases: Administrators often need to control seats across multiple courses and learning paths, instead of managing separate seat limits per course template. The update ensures a fixed number of seats (e.g. 10 seats) is truly respected across all linked items, preventing overbooking by a group of users. Administrators gain better control and transparency over usage, as enrolments in one course directly impact the available seats of other trainings in the shared quota group.
Audience: Administrators
Setup and Access: The new Share seat limits across all courses and learning paths checkbox is automatically added to the Seat Limitations function. This includes existing entries and is defaulted to unticked.
Considerations and Limitations: The seat limitation cannot be overridden by the Administrator.
Testing: Given the Seat Limitations function is already configured and active in the Navigation, you can follow these steps:
-
Navigate to Seat Limitations function and create a seat limitation.
-
Enable ‘Share seat limits across all courses and learning paths’ option.
-
Set a limit of 10 seats.
-
Select the groups or attributes to define the users for the limitation.
-
Save the changes.
-
-
Ensure the Seat Limitation (ID: 11988) meta tag is available on two desired Courses (Course A and Course B).
-
If so, select the seat limitation group defined in the previous step.
-
If not, the Seat Limitation (ID: 11988) meta tag will need to be added at Template level, made visible at Course level and republish.
Create two new Courses from the updated Course template and select the seat limitation group.
-
-
Enrol 6 users from the Seat limitation group onto Course A.
-
Enrol 4 users from the Seat limitation group onto Course B.
The limit will now be reached. -
Try to enrol another user from the Seat limitation group to either Course.
There will be an error message preventing this.
Risk rating: Low
Prerequisite Visibility During Staff Enrolment on Courses and Learning Paths
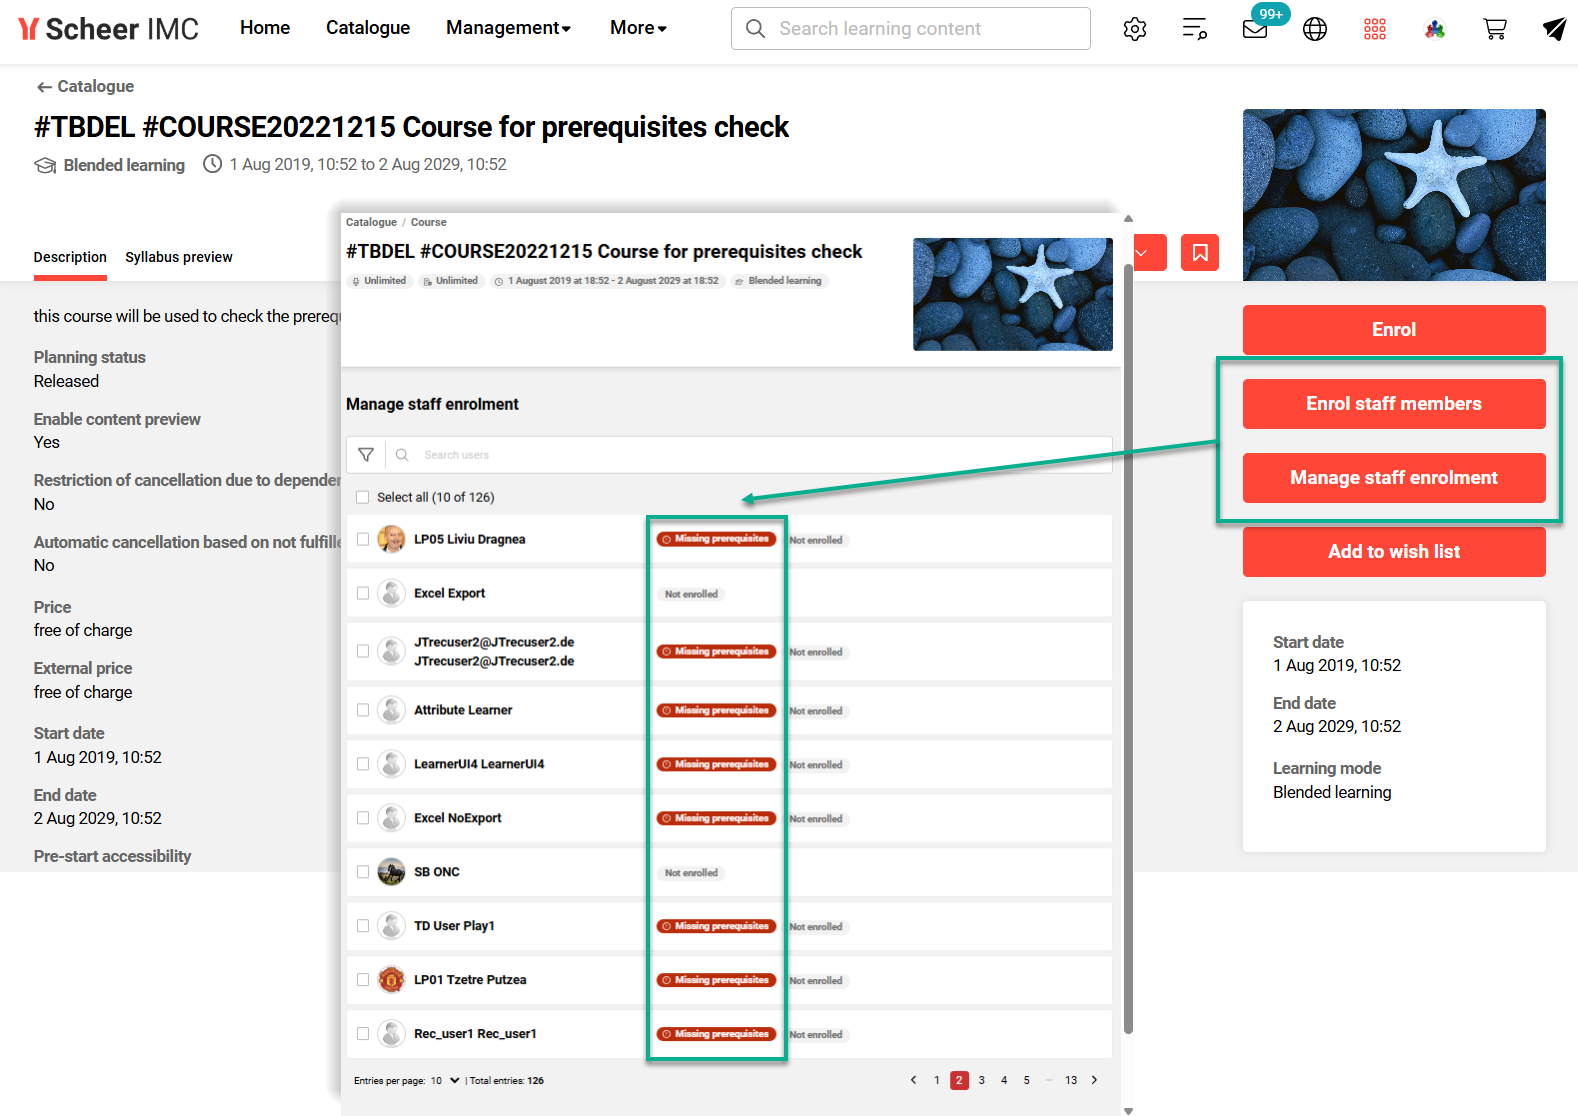
Overview: Supervisors enrolling multiple employees to a course or learning path via the catalogue are now able to identify which employees meet mandatory prerequisites. Previously this was not possible in the Enrol staff member and Manage staff enrolment views. The enhancement introduces an automatic prerequisite check when the employee list is displayed. Employees who do not meet mandatory prerequisites are marked with a “Missing prerequisites” label.
Benefits and Use Cases: Allows superiors to make more informed enrolment decisions while still retaining the option to enrol all employees. Key benefits of this update include:
-
Faster, more accurate enrolment decisions for superiors managing large teams
-
Immediate visibility into prerequisite fulfillment without navigating away
-
Reduced enrolment errors and follow‑up corrections
-
No workflow disruption as supervisors can still enrol all employees if needed
Audience: Supervisors
Setup and Access: Not required as the updated view is automatically applied where prerequisites are used.
Considerations and Limitations:
-
Only checks configured mandatory prerequisites for the chosen course / learning path.
-
There is no filter option to display only staff who meet prerequisites; the performance impact of checking all users for filter purposes would be too high.
-
Prebooking employees is not considered.
Testing: As a Supervisor, you need to access the catalogue and locate a course or learning path that requires fulfillment of mandatory prerequisites. Click the Enrol staff member button or the Manage staff enrolment button and check the display of the prerequisites.
Risk rating: Low
Reporting Engine
Target Group Usage Reporting Enhancements
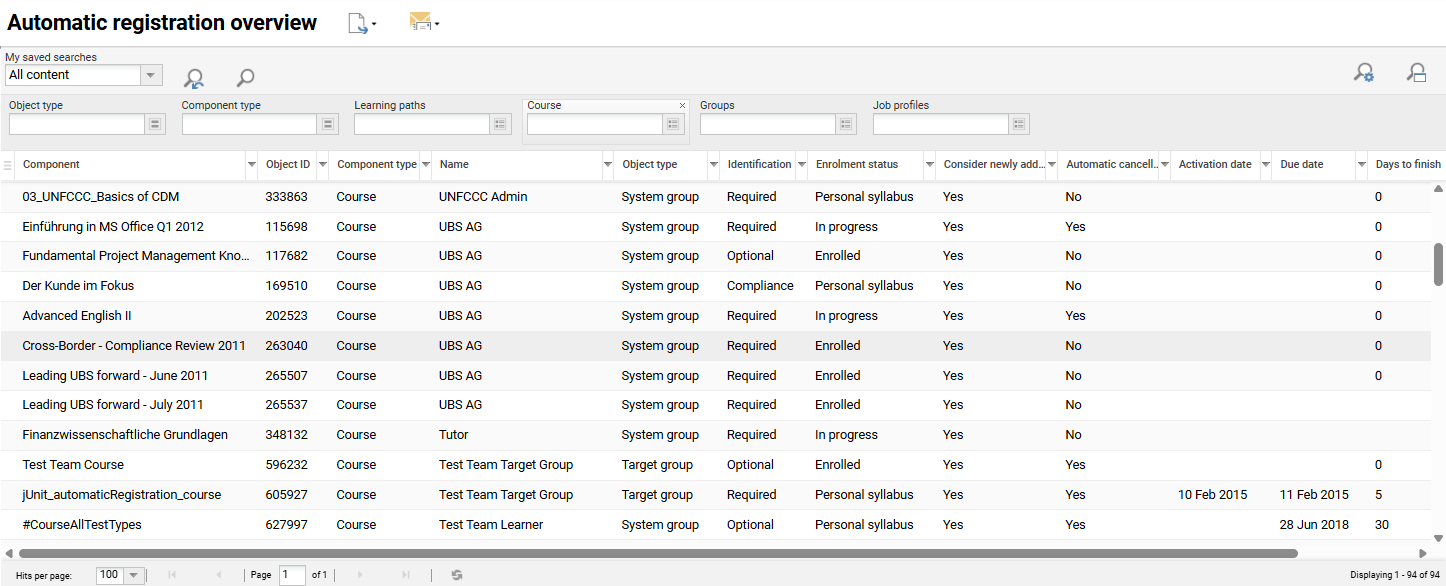
Overview: Two new standard reports are available to provide insight into which courses use which Target Groups, the rules defined within each Target Group, and how user attributes or job profiles influence enrolment logic. The two reports are:
-
Automatic Registration Overview
-
Target Group Definition Overview
Benefits and Use Cases: Administrators need visibility into how Target groups and Job profiles drive automatic enrolments. The keys benefits of these two reports include:
-
Clear visibility into automatic enrolment logic across courses and learning paths
-
Faster troubleshooting and validation of Target Group rules
-
Improved governance of job profile–based enrolments
-
Standardised reporting available to all customers without custom development
Audience: Administrators
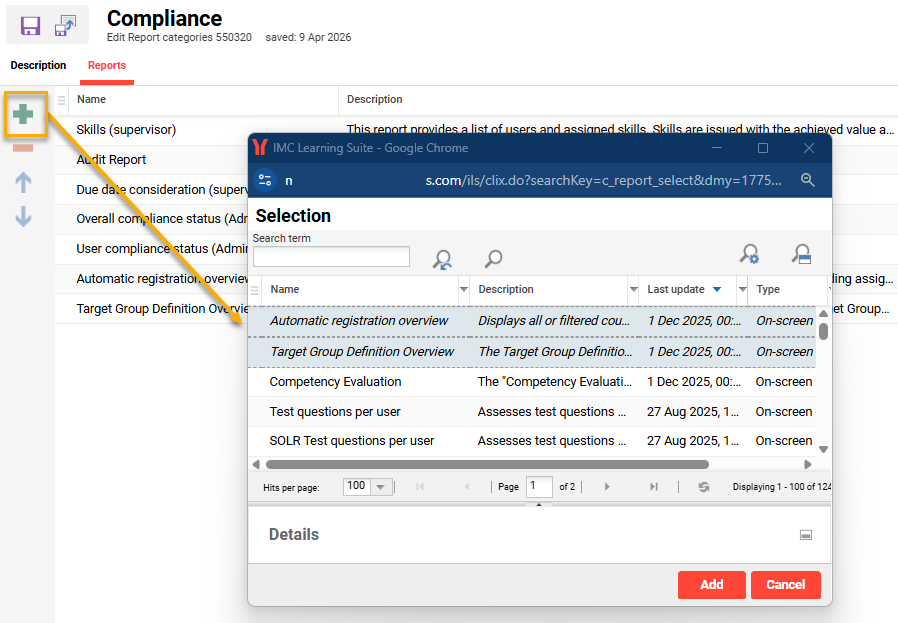
Setup and Access: The two reports will available in the Settings menu Reports function with clearance granted to the System administrator (ID: 1) group. The clearances can be updated to add further users or groups that will need to view the reports. To view the reports in the Admin category Reports menu you need to first add the reports to a report category. This is configured in the Report categories function by editing the desired report category and adding in the Reports tab.
Considerations and Limitations: No migration need or expected impact to existing customers. The main limitations include:
-
Notification Features: No email or system notifications will be triggered based on the report data or changes in Target Group assignments.
-
Custom Report Layouts: The enhancement will follow Scheer IMC’s standard reporting format and design guidelines. Customer-specific layout or branding requests are not part of this implementation.
Testing: As a System administrator, you need to go to the Report categories function, edit a category, go to the Reports tab and add the two new reports. Go the Admin role navigation and access the Reports menu. Search for the two new reports and launch them.
Risk rating: Low
Testing and Assessment
Waiting Period Between Test Attempts
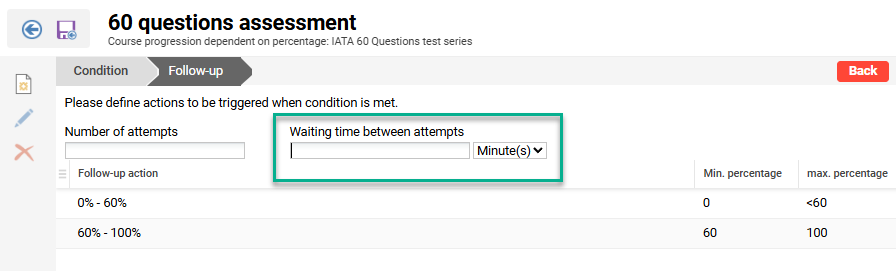
Overview: An update to course learning logic for Test components enable you to define waiting time between test attempts. This is possible via a new Waiting time between attempts field when editing Test component Learning logic with the Define rule option. Wait times can be defined in minutes, hours or days.
Benefits and Use Cases: Many participants retake tests multiple times in a row, guessing answers until eventually pass. The update ensures that Administrators can have the possibility to set a waiting period between test attempts, so when a learner attends an in-person training and attempts the associated course Test right after and then fails, they have to wait another day to try again. If they fail again, they must wait the defined time period. This will hopefully result in participants taking the tests more seriously and re-completing learning materials.
Audience: Administrators and Tutors
Setup and Access: The new field is automatically available and will be defaulted blank meaning no existing Test learning logic is impacted. To view the field you need to create or edit a course in the Courses function. The course will require a Test to be added in the Components tab. Once added, highlight the Test, click the Edit icon, expand Learning logic and select the Define rule option. In the new screen select a condition and click the Continue button. You will now see the new field.
Considerations and Limitations: Waiting time between test attempts is available for ‘Course progression dependent on percentage’ and ‘Course progression dependent on status’ OR any combination with other conditions which have at least one of the 2 already mentioned. Entering 0 or leaving the field empty means the test can be retaken at any time, without any waiting period.
Testing: As an Administrator, you can test this update by the following steps:
-
Create or edit a course that has a Test in the Components tab.
-
Highlight the Test, click the Edit icon, expand the Learning logic menu, and click Define rule.
-
Select a condition and click the Continue button.
-
Enter a value in the new Waiting time between attempts field (e.g. 15 minutes).
-
Save the course and exit.
-
Open the Participant administration function for the course and enrol yourself.
-
Open the course as a learner and fail the test.
-
Check that you can not re-attempt the Test until the defined wait time has passed.
Risk rating: Medium
Test-out Course Completion in Learning path
Overview: An update to the Tests function allows you to add Tests to the Learning path syllabus. This update is known as Test-out and can be used to automatically cover syllabus courses based on proven existing knowledge. The Test-Out can be structured into topic-based sections (e.g. test folders), where each section can be mapped to a specific course in the Learning path. If a learner passes a section of the Test-Out, the corresponding course is automatically marked as completed.
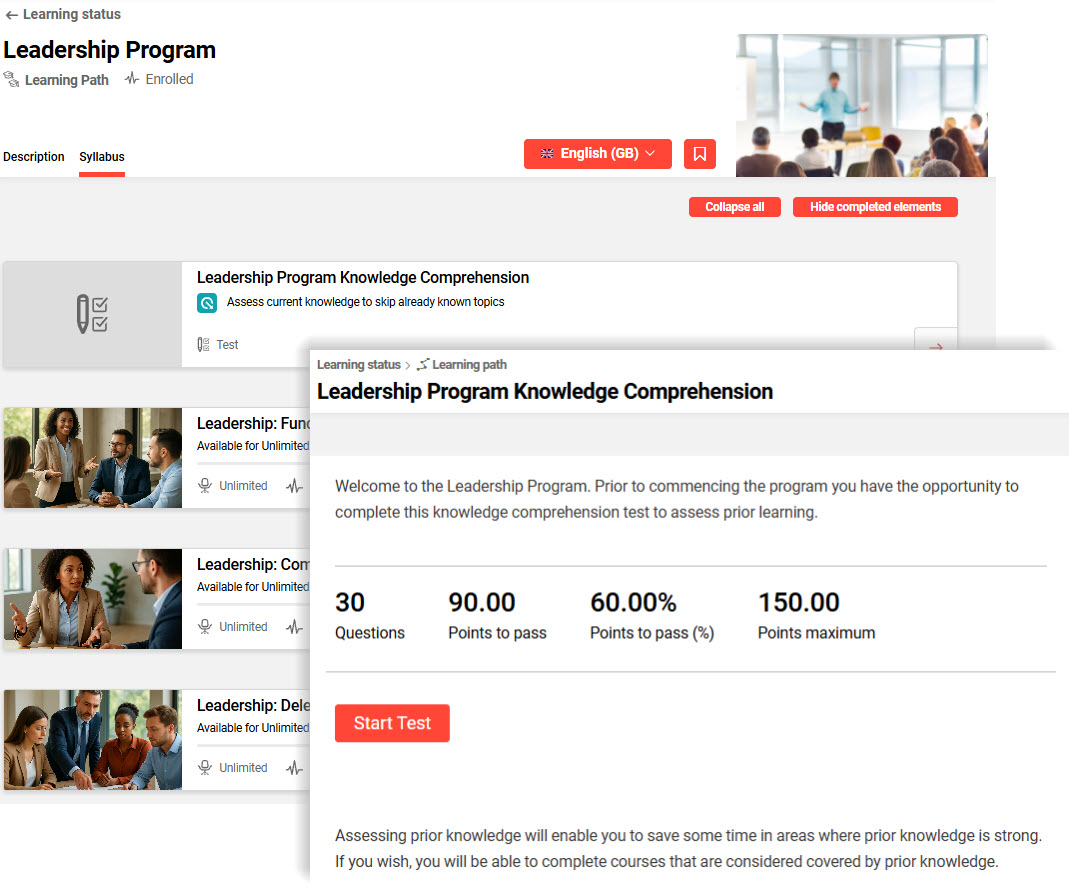
Benefits and Use Cases: This feature helps support recognition of prior learning or knowledge. Learners can save time by skipping courses for topics where Test-Out results determine required knowledge. This allows the learning path to focus on the training that is actually required, reducing unnecessary course participation.
In the example scenario there is a :
Test-Out section A → Course A
If section A is passed, Course A is automatically set to completed.
Audience: Administrators and Learners
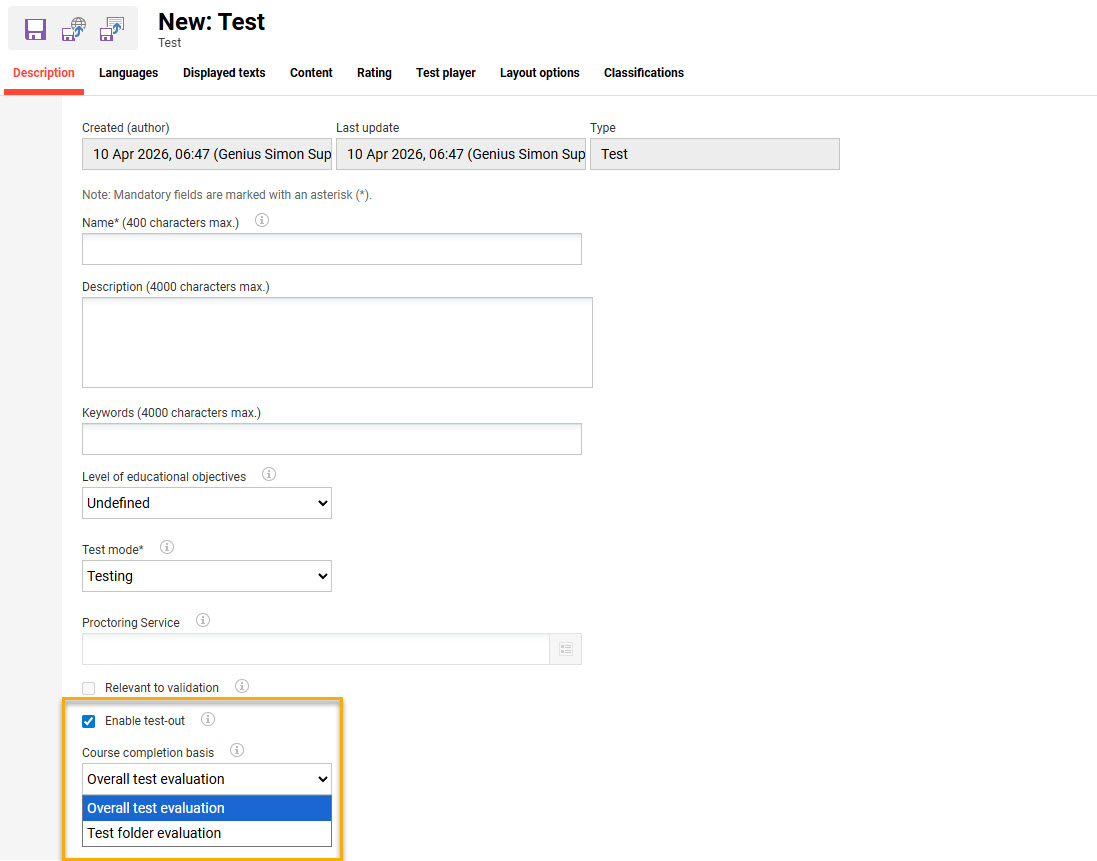
Setup and Access: The new Enable test-out checkbox is automatically added to Tests in an inactive state. Ticking this checkbox will enable the Test to be added to a Learning path as a Test-out.
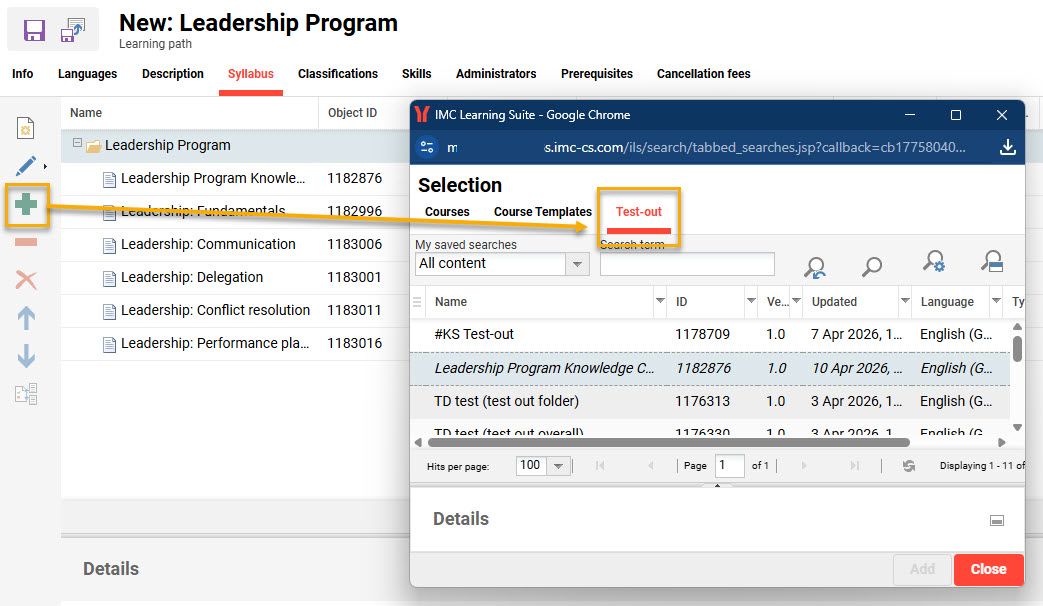
In the Learning path Syllabus tab when clicking the Add icon the pop-up now has a Test-out tab to add a Test.
In the Learning path Syllabus tab there is also now a Test-out mapping icon and a Test-out mapping column. The icon is greyed out until a Test is added to the syllabus.
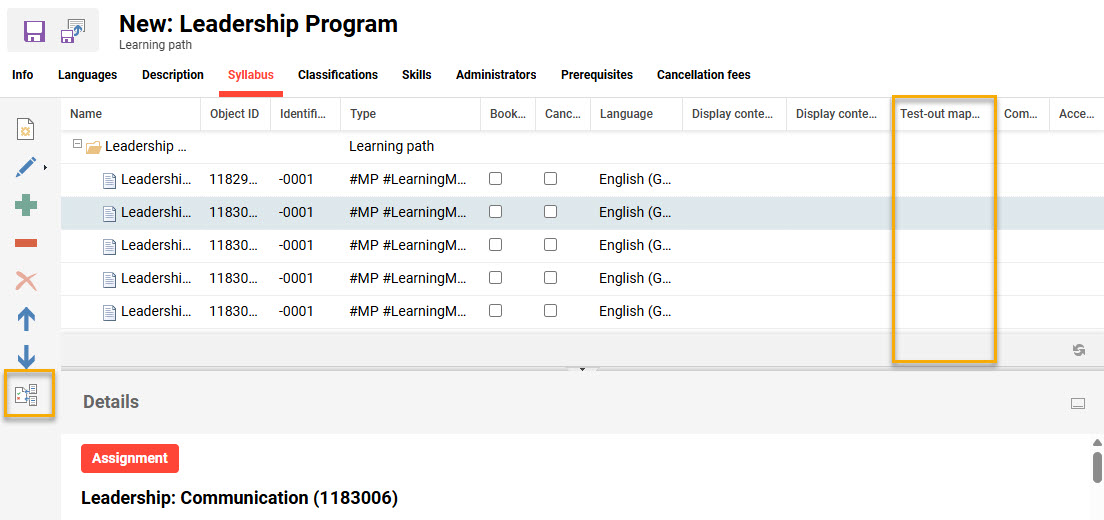
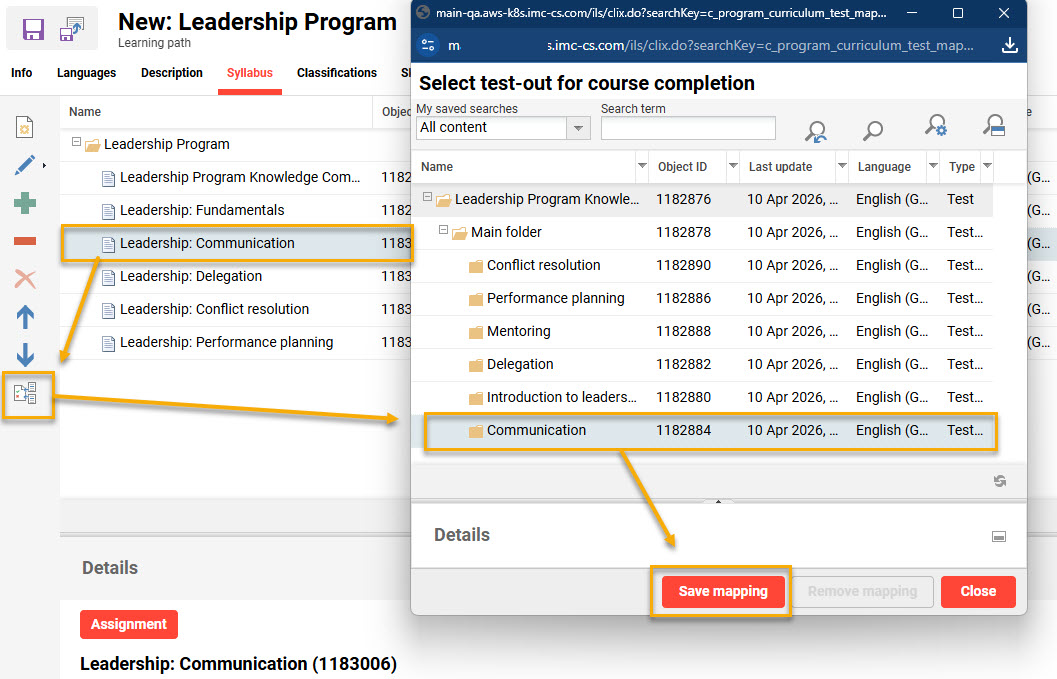
When a Test is added and a course is highlighted, clicking the Test-out mapping icon will launch a Select test-out for course completion pop-up window. Here either a folder or the Test can be selected that corresponds to the highlighted course.
Considerations and Limitations: This update is available as standard. The following limitations must be considered:
-
Courses added after the mapping has been saved will not be completed by the test.
-
Course templates can’t be mapped to a Test-out.
-
Preview inside of the Learning path syllabus is not supported.
As long as the Enable test-out checkbox is unticked, no impact.
Testing: To test the Test-out workflow you can follow these steps:
-
Tests: Create or edit a desired test.
-
Tick the Enable test-out checkbox to activate.
-
Depending on previous setting, a further setting will become active which is about to select the course completion mode:
-
Overall test evaluation
-
Test folder evaluation
-
-
→ If overall is selected, the whole test needs to be mapped to the course in order to complete it, if folder based is selected, only folders can be mapped to a course, and the folder will set the course to passed (also, if the test per se is failed, as long as that particular folder is passed, the course can be passed).
-
Learning Path: Create or edit a desired learning path.
-
Add a Test to the syllabus (only tests with Enable test-out checkbox ticked are considered).
-
Add courses to the syllabus.
-
Highlight a course(s) on the syllabus.
-
Click the Test-out mapping icon which will launch a pop-up displaying all tests contained in the syllabus.
-
for Tests with the overall evaluation mode only the test parent folder can be selected.
-
for Tests with the folder evaluation mode the parent folder or any sub-folder can be selected.
-
-
With the previous point there is no multiple test selection for a single course. It is a one test folder to one course mapping.
Risk rating: Medium