Shopify is a popular and powerful eCommerce and shopping cart tool which provides extensive functional possibilities, configurable workflows, analytics and options to boost sales by providing the possibilities for things such as discount codes and gift cards. Shopify is available as a Software-as-a-Service (SaaS) model with various subscription plans. It is a pre-requisite for imc to setup the connection that there is a valid subscription to Shopify running and that the API key details and Call Back URLs from/to the Customer’s Shopify instance is provided to imc. Any licence fees related to the Shopify subscription, or configuration of Shopify itself are not covered by imc and need to be organised directly by the Customer. The imc Shopify Connector provides an interface between the imc Learning Suite and Shopify to allow learners to add courses and learning paths to their basket via the LMS catalogue and checkout via Shopify. The imc Shopify Connector as part of the imc Learning Suite:
-
Intermediates the communication between the imc LMS and Shopify, handling the creation and update of the product catalogue automatically in Shopify with courses from the LMS catalogue
-
Allows learners to add courses and learning paths to the shopping cart, based on the price applicable to the learner (preferential prices based on group membership can be defined via the LMS)
-
Performs enrolment checks such as prerequisite fulfilment and presents learners with an enrolment form where additional data for the enrolment can be collected
-
Allows learners to remove items from their shopping cart
-
Allows learners to proceed to checkout with the items in their cart
-
Processes the enrolments based on the order payment notifications received from Shopify.
In collaboration with Shopify which:
-
Presents the checkout page, and processes the payment
-
Informs the imc Learning Suite once a payment has been confirmed successfully
-
Set up, and let the learner use discount codes at checkout
-
Access sales analytics and reporting
-
View a list of all orders
-
Configure payment options
-
Shopify supports 100’s of payment providers – see Payment Providers and Online Payment Gateways (2025)
-
Customize the checkout page
Note: imc is not a Shopify expert, we recommend the Customer to consult a Shopify expert from their exchange if they require assistance with configuring Shopify itself further than the technical interface described here in this document. A lot is configurable on the Shopify side (e.g., voucher codes, tax rules, invoice templates, configuration of many different payment processors etc) that can add a lot of value to the Customers process. A lot of documentation and support exists in the online resources and forums of Shopify. Further this document will describe the configurations and settings needed to establish the imc Shopify Connector successfully.
Learner Journey
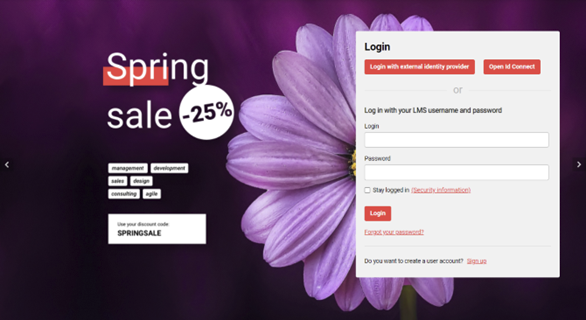
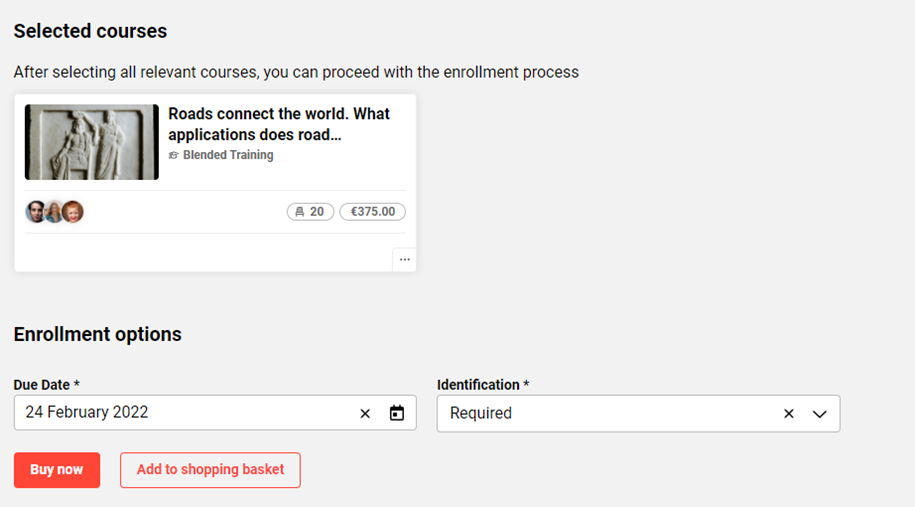
The learner journey starts in the LMS catalogue. The learner will locate the desired item, add it to the shopping cart or log in first if previously not logged in, and proceeding to the checkout.
On the checkout page the learner can provide discount codes or gift cards based on the Shopify configuration.
Once the payment is processed, the learner will be redirected to the LMS if such a redirect event is configured on the Shopify side and will be able to access the enrolled courses as soon as the transaction is finalized from the LMS side. This step might take several seconds although usually it is instantaneous.
Add to Cart
The add to cart option is presented to the learner in the following conditions:
-
The course is marked as Shopify relevant with the meta tag: Send to Shopify
-
The enrolment type of the course is “Self-enrolment”
-
There are available free places on the course or learning path
-
The Self enrolment period ends meta tag value is either not set or is set in the future
-
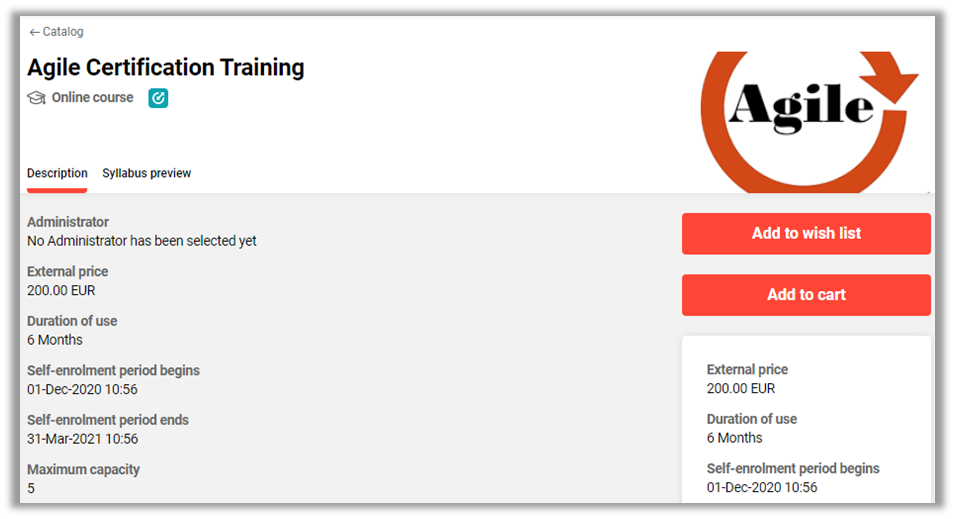
Based on the defined prices, the learner is eligible to pay a price.
Courses available free of charged can be enrolled directly without the need to go via the checkout process.
If the user is already logged in, they can add the item to the cart. As soon as the item is already in the cart, an option to remove from cart is available instead.
If the user is not already logged in, the user will be invited to login in order to add to cart. Once logged in, the user will be redirected back to the item where the add to cart option is available.
To see the current list of items available in the cart, the shopping cart icon can be selected from the top navigation.
Courses inside Learning Paths
Two workflows are supported, for learning paths purchased via Shopify:
Scenario 1: Purchase of a Learning path allows the user to directly access all courses within (for free).
It is possible to configure direct enrolment for some or all the courses in the learning path, in which case the user will be automatically enrolled and will not need to purchase the courses additionally.
Note: The direct enrolment will only be possible if the user fulfils the prerequisites and there re no other impediments for performing the automatic enrolment.
Scenario 2: User purchases the learning path to get access to courses within. They must then enrol or purchase the courses.
Once a user purchases or is enrolled to a learning path, they must then enrol to the courses in the learning path. It is possible in this scenario to have the courses themselves free of charge i.e. non Shopify relevant.
Alternatively, if the course(s) are also Shopify relevant and has a price, the learner have to add the courses to the cart and purchase.
It is possible to configure direct enrolment for some or all the courses in the learning path, in which case the user will be automatically enrolled and will not need to purchase the courses additionally.
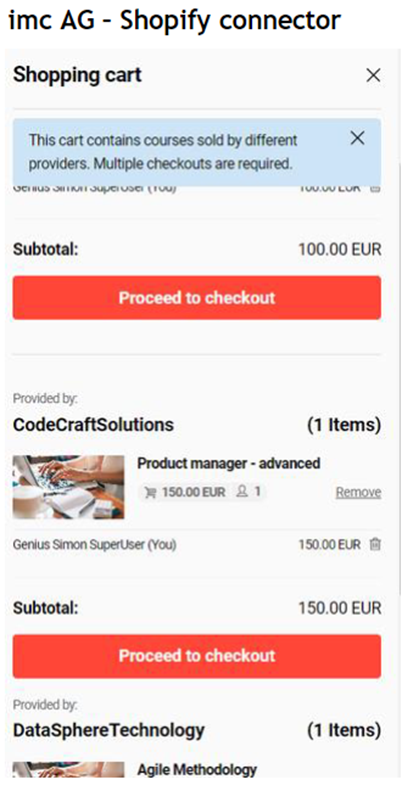
Purchasing Courses/Learning Paths from Multiple Shopify Shops
Learner is able to purchase multiple courses/learning paths which are part of multiple Shopify shops.
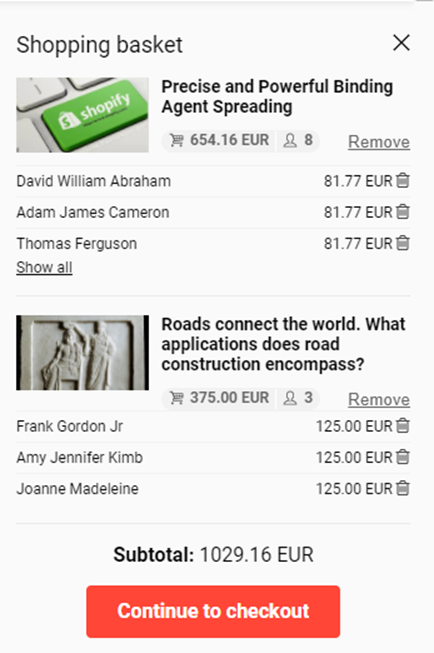
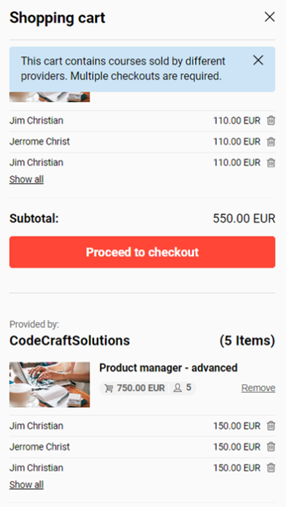
Each course/learning path will be displayed on the shopping cart based on the Provider. Provider name will be also displayed alongside the subtotal of each shop.
Separate checkouts must be performed in this case and one checkout at a time will be possible. Once the user is finalizing eg: 1/3 checkouts, the cart will be automatically opened to perform the remaining 2 checkouts. When the last checkout is successfully completed, the cart will not be opened anymore.
The payment will be handled as before, on Shopify side.
Booking on waiting list when places are not available anymore for a course/learning path
Learners are now able to book themselves on a waiting list for a course which has no available seats.
Learners will be informed via a notification when places become available with the possibility of adding the course in the cart and later be able to finalize the payment. Learners will be provided with a link inside the notification to directly navigate to the description page. Adding courses in the cart does not reserve the course. Payment still need to be successfully completed.
If places become available, the Add to cart option will be displayed again and the learners can add the item to the shopping basket. After the payment is successfully finalized, the status of the learner will be updated accordingly (from status ‘Waiting' to 'Enrolled’).
The new behavior is only supported in the self context. Supervisors, for example, are not able to bok someone else on the waiting list.
Enrolment Checks
Once the user has decided to add an item to his cart, a series of checks will be performed by the LMS to ensure that the user fulfils the conditions dictated by prerequisite definition or seat allocation. If any of these conditions is not met, the user will not be allowed to add the item to the cart.
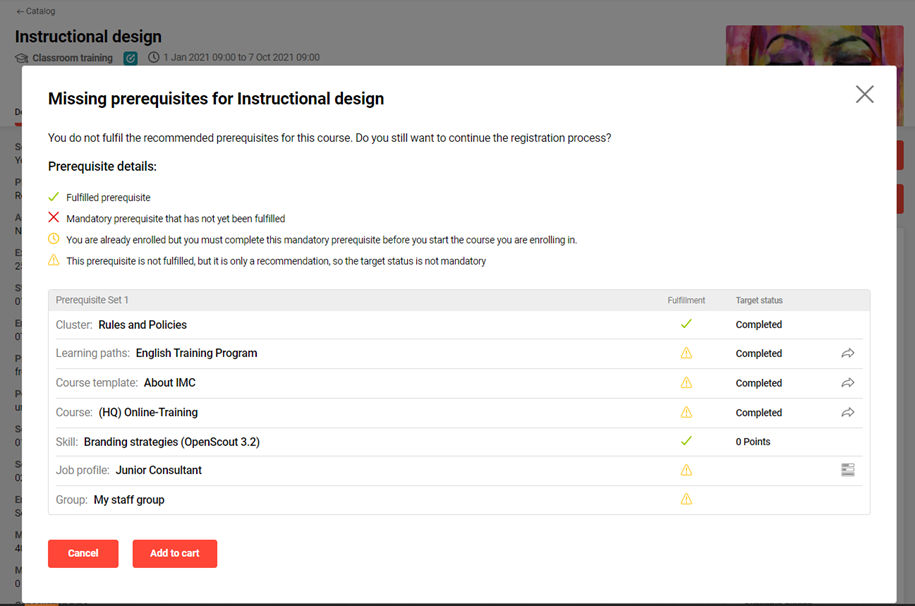
Recommended not fulfilled prerequisites will be displayed to the user with the option to proceed with the purchase.
When there are mandatory prerequisites not fulfilled, the course cannot be added to the cart. The learner will receive the information on the missing prerequisites.
In such a case, the course is not sent to the Shopify cart and no record of the attempt purchase will be recorded in Shopify.
Enrolment Form
When an enrolment form is configured for the course or learning path, the form will be presented to the learner at the time when the learner wishes to add the item to the cart.
The information will be saved in a temporary table until the enrolment is processed.
If the enrolment is not processed within 50 days after the enrolment data was provided, this data will be removed from the system, to ensure GDPR compliance.
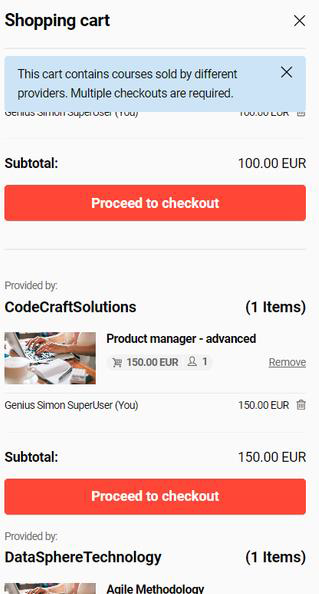
View the Shopping Cart
When the shopping cart icon is selected, the current list of items which are available in the user’s cart is displayed.

The list will show the course title, image (either the one defined for the course if available in Shopify or the default image of the item) and the price with the corresponding currency.
At the bottom of the item list, a subtotal will be calculated, based on the standard price of each item. Further taxes or discounts are only accessible in the next step once the user has proceeded to the checkout page.
In the multiple Shopify shop scenario, users will be informed that the cart containt multiple items which require separate checkouts. Provider name will be displayed for each connected shop. Subtotal will be also displayed for each shop.
Important Considerations
The shopping cart list is managed by Shopify and is based on a cookie that lasts 14 days. The time is extended whenever a new item is added to the cart. Due to this fact, the list of shopping cart items will not be accessible if the user decides to open the LMS in a new browser.
Since it is possible that changes occur in the system after the user added certain items to his cart and until they decide to checkout, there is a risk that the enrolment is no longer possible. In such cases, an e-mail will be sent to the administrator, as detailed in section E-mail address for unprocessed orders.
Checkout
Once the user has selected the “Proceed to checkout” button, they will be redirected to the checkout page where the payment information can be provided.
The name of the participant(s) will be displayed for each selected item. The language of the text displayed before the participant’s name is shown in the LMS platform language available at the time when the “Add to cart” or “Buy now” action was selected.
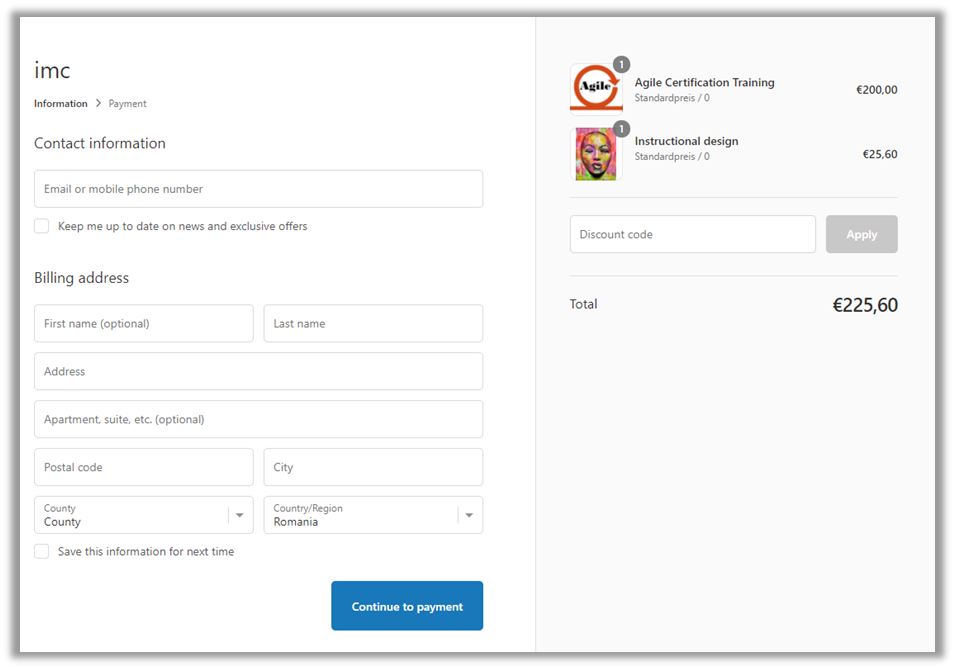
Shopify also allows the configuration of this check out page, along with changing the look and feel. If required, such skin design must be handled by the customer on Shopify directly. The imc design applied to the LMS will not automatically be carried over to the Shopify checkout page.
The fields on the checkout page, including the billing and the e-mail address, are controlled by Shopify.
Important considerations
Due to recent platform changes on Shopify side, all shops are password protected. With any paid plan, it will be possible to enable or disable this functionality. You can review the steps to add or remove the password on the official Shopify website.
Order Processing
Shopify will inform the LMS about the order and the orderer and the LMS will proceed to process the required enrolments.
If the order cannot be fulfilled entirely, an e-mail will be sent out to the configured administrative e-mail address, informing about the issue and summarizing which items could not be enrolled for the user. The admin will have the possibility to review the orders as part of the Shopify administrative backend and issue a refund accordingly.
Orders are not tracked within the LMS. The LMS only records enrolled courses and learning paths. If an order is not fulfilled in Shopify, no track records will be visible in the LMS.
Manager Journey
Supervisors and HR managers are able to purchase courses and learning paths on behalf of their employees, either individually or in bulk.
The option is available through the following workflows:
-
Selecting the desired course in the catalogue and selecting the option “Purchase for employee)
-
Selecting the desired participants via My staff and selecting the multiple enrolment option
-
Selecting an individual user via My staff and selecting the option to enrol employee
Purchase via My Staff
Courses marked as Shopify relevant will be labelled with the “Upfront payment required” flag in the list of available courses once the multiple enrolment process has been accessed.
Upon selection, the price corresponding to each employee will be displayed, together with a hint whether the user is not yet enrolled or whether they already have a status as part of the course, in which case they will not be included in the purchase process.
In addition, when prerequisites apply, only users who fulfil the prerequisites will be available for purchase, while for the other users, the manager can check the individual prerequisite status via a dedicated action.
When other enrolment conditions apply, such as the need for an enrolment form to be filled out, or conditions related to seat allocation or multiple enrolment to courses from the same template, an individual check will be required. Once the needed individual checks are performed, if the enrolment conditions allow it, the supervisor will be able to add the item to cart for that concrete employee.

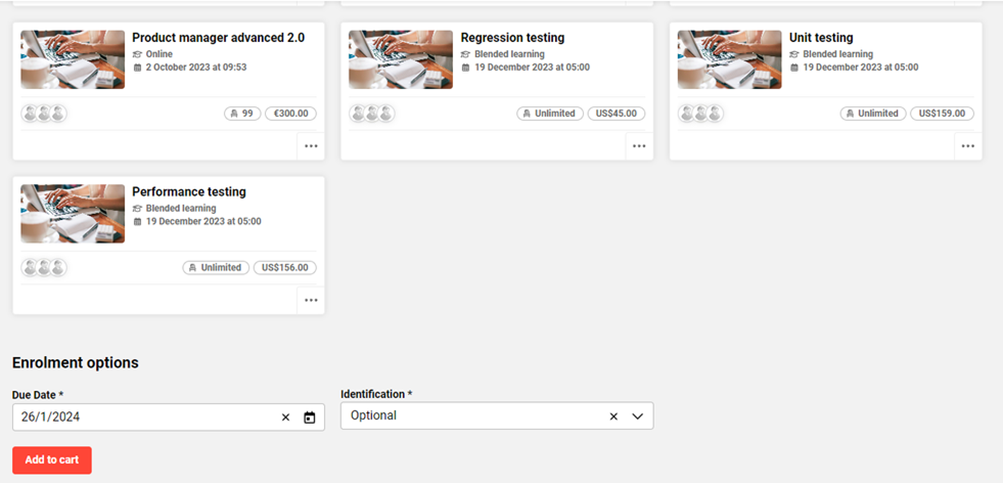
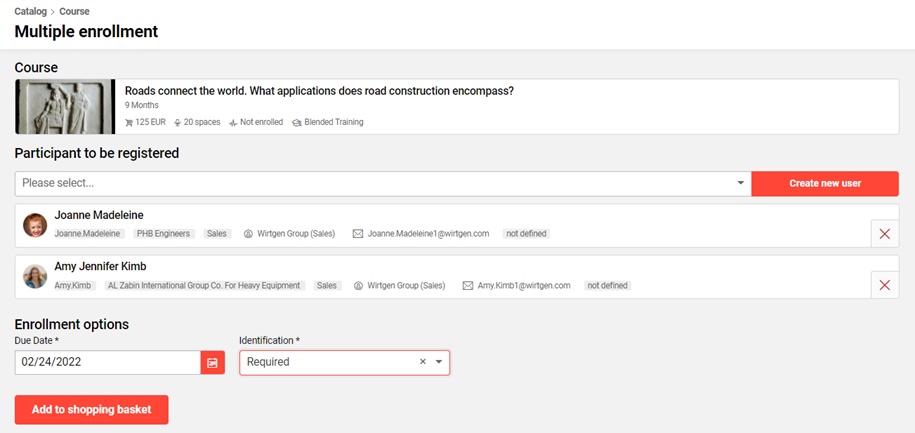
Once the eligible users are selected for enrolment, the supervisor will have the option, when configured, to provide a due date and an identification (such as Mandatory or Compliance) and proceed by either adding the selected items to the cart, or by checking out directly with the selected items.
When a combination of Shopify and non-Shopify relevant courses are available in the selection, the process will trigger the enrolment for those courses that can be enrolled directly and will add to cart the Shopify relevant courses.
When items are added to cart, the name of each selected participant will be displayed in association with the course for which they are selected for enrolment.
Supervisor can purchase courses/learning paths for multiple employees. All items will be added and displayed as below. Only adding to cart is possible in the multiple Shopify shops scenario.
After adding to cart, the supervisor will see all the employees with all the items displayed based on Provider. Subtotal of each item will be displayed.
Purchase via the Catalogue
Upon selecting the desired course via the catalogue, the supervisor will have the option to select the users who do not yet have a status on the course and proceed with the purchase process.
When enrolment conditions apply, the supervisor will only be allowed to select one participant at a time and proceed to adding to cart individually, in a process that allows the check for prerequisites, filling out an enrolment form if configured or performing checks like seat allocation or multiple enrolment for courses of the same template.
Notes: It is also possible to purchase multiple items which are part of different multiple Shopify shops directly from the catalogue.
Shopify Configuration
License for the Shopify connector
The Shopify connector is licensed within the LMS. All configurations and functions specific to Shopify are only available once the license is active. Furthermore, some configuration activities will be required by imc consulting in order to finalise the setup. Note: In case Shopify is not activated on your system and you require a license for the Shopify connector, please contact your imc account manager.
Setting up the Shopify Custom App
In order to allow the LMS to communicate with Shopify, a Shopify custom app must be created.
By accessing this https://shopify.com/partners a new Shopify partner account can be created.
The imc Learning Suite supports two types of Shopify app authentication. The type you need depends on when your Shopify app was created:
-
Legacy Private App – uses an API key and a permanent Admin API access token. This applies to Shopify private apps created before January 2026.
-
Custom App (OAuth) – uses a Client ID and Client Secret to generate short-lived Admin API access tokens automatically. Shopify requires this mode for all apps created from January 2026 onwards.
Note: Both app types are fully supported by the imc Learning Suite. Existing legacy private-app configurations continue to work and do not need to be migrated. However, if you are setting up a new Shopify integration, you must use the Custom App mode.
Option A: Legacy Private App
This is the original authentication method. If your Shopify private app was created before January 2026, follow these steps.
In Shopify:
-
Navigate to the Shopify admin backend.
-
Navigate to Settings.
-
Navigate to Apps → Develop apps.
-
Create a legacy custom app and provide the following:
-
Configure Admin API scope:
-
Set the following permissions to Read and Write:
-
Inventory -> write_inventory, read_inventory
-
Products -> read_products, write_products
-
Product listings -> read_product_listings, write_product_listings,
-
Publications -> read_publications, write_publications
-
Locations -> write_locations, read_locations
-
App name
-
Webhook API version
-
-
Configure Storefront API and enable permissions
-
Products → unauthenticated_read_product_listings, unauthenticated_read_product_inventory, unauthenticated_read_product_tags
-
Checkout → unauthenticated_read_checkouts, unauthenticated_write_checkouts
-
-
-
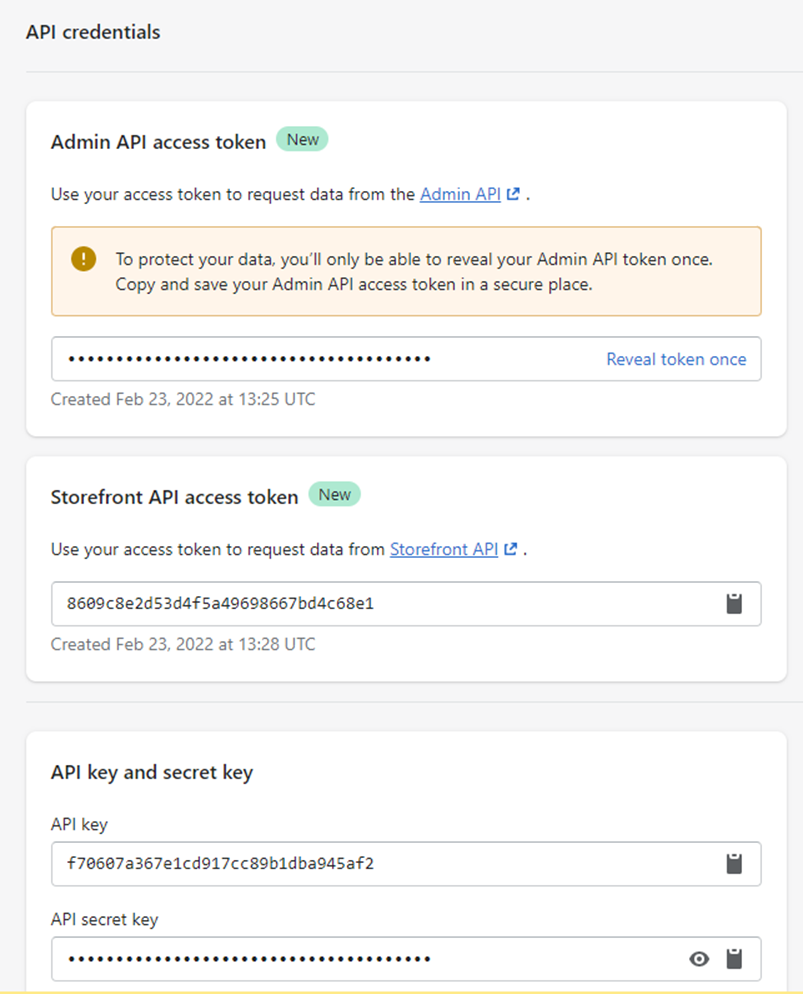
Once the app is installed, Shopify will generate the following credentials — store them securely:
-
API key
-
Admin API access token - revealed just once
-
Storefront API access token
-
API secret key
-
Option B: Custom App (OAuth) — required from January 2026
For Shopify apps created from January 2026 onwards, you must use the Custom App mode, which authenticates via Client ID and Client Secret and generates short-lived Admin API access tokens automatically.
In Shopify:
-
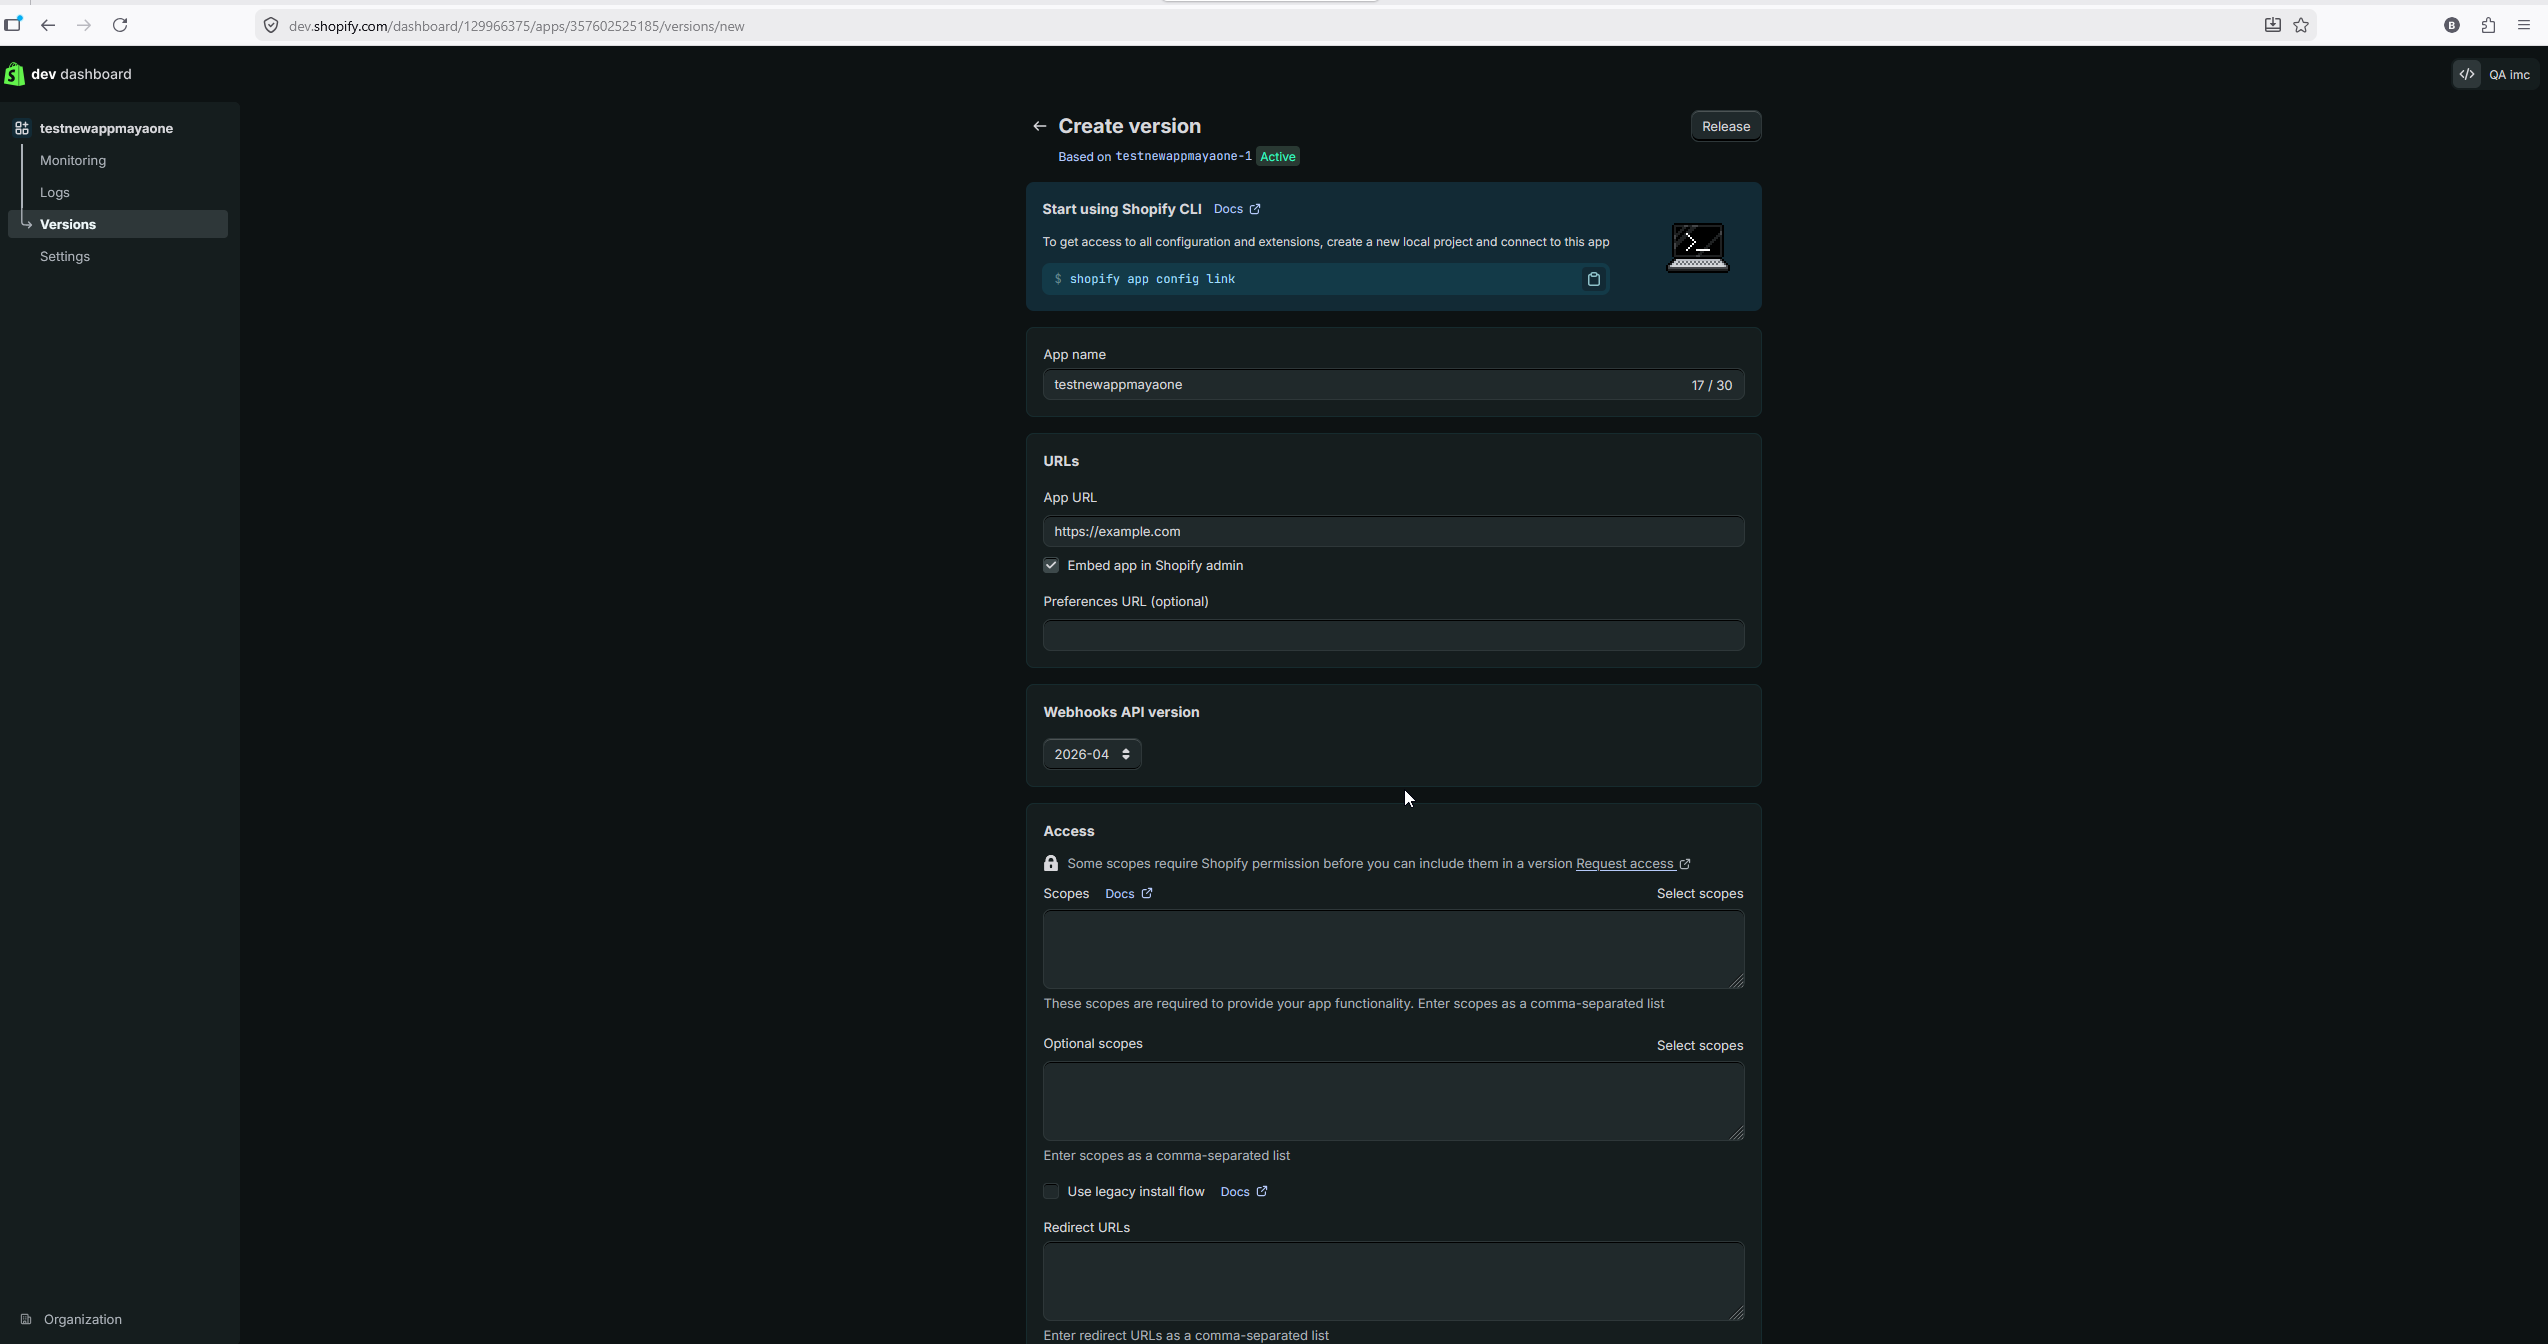
Create a new app from the Shopify Partner account / Dev Dashboard.
-
Create a version for the app.
-
Admin scopes + API version needs to be selected (same mandatory scopes like before).
-
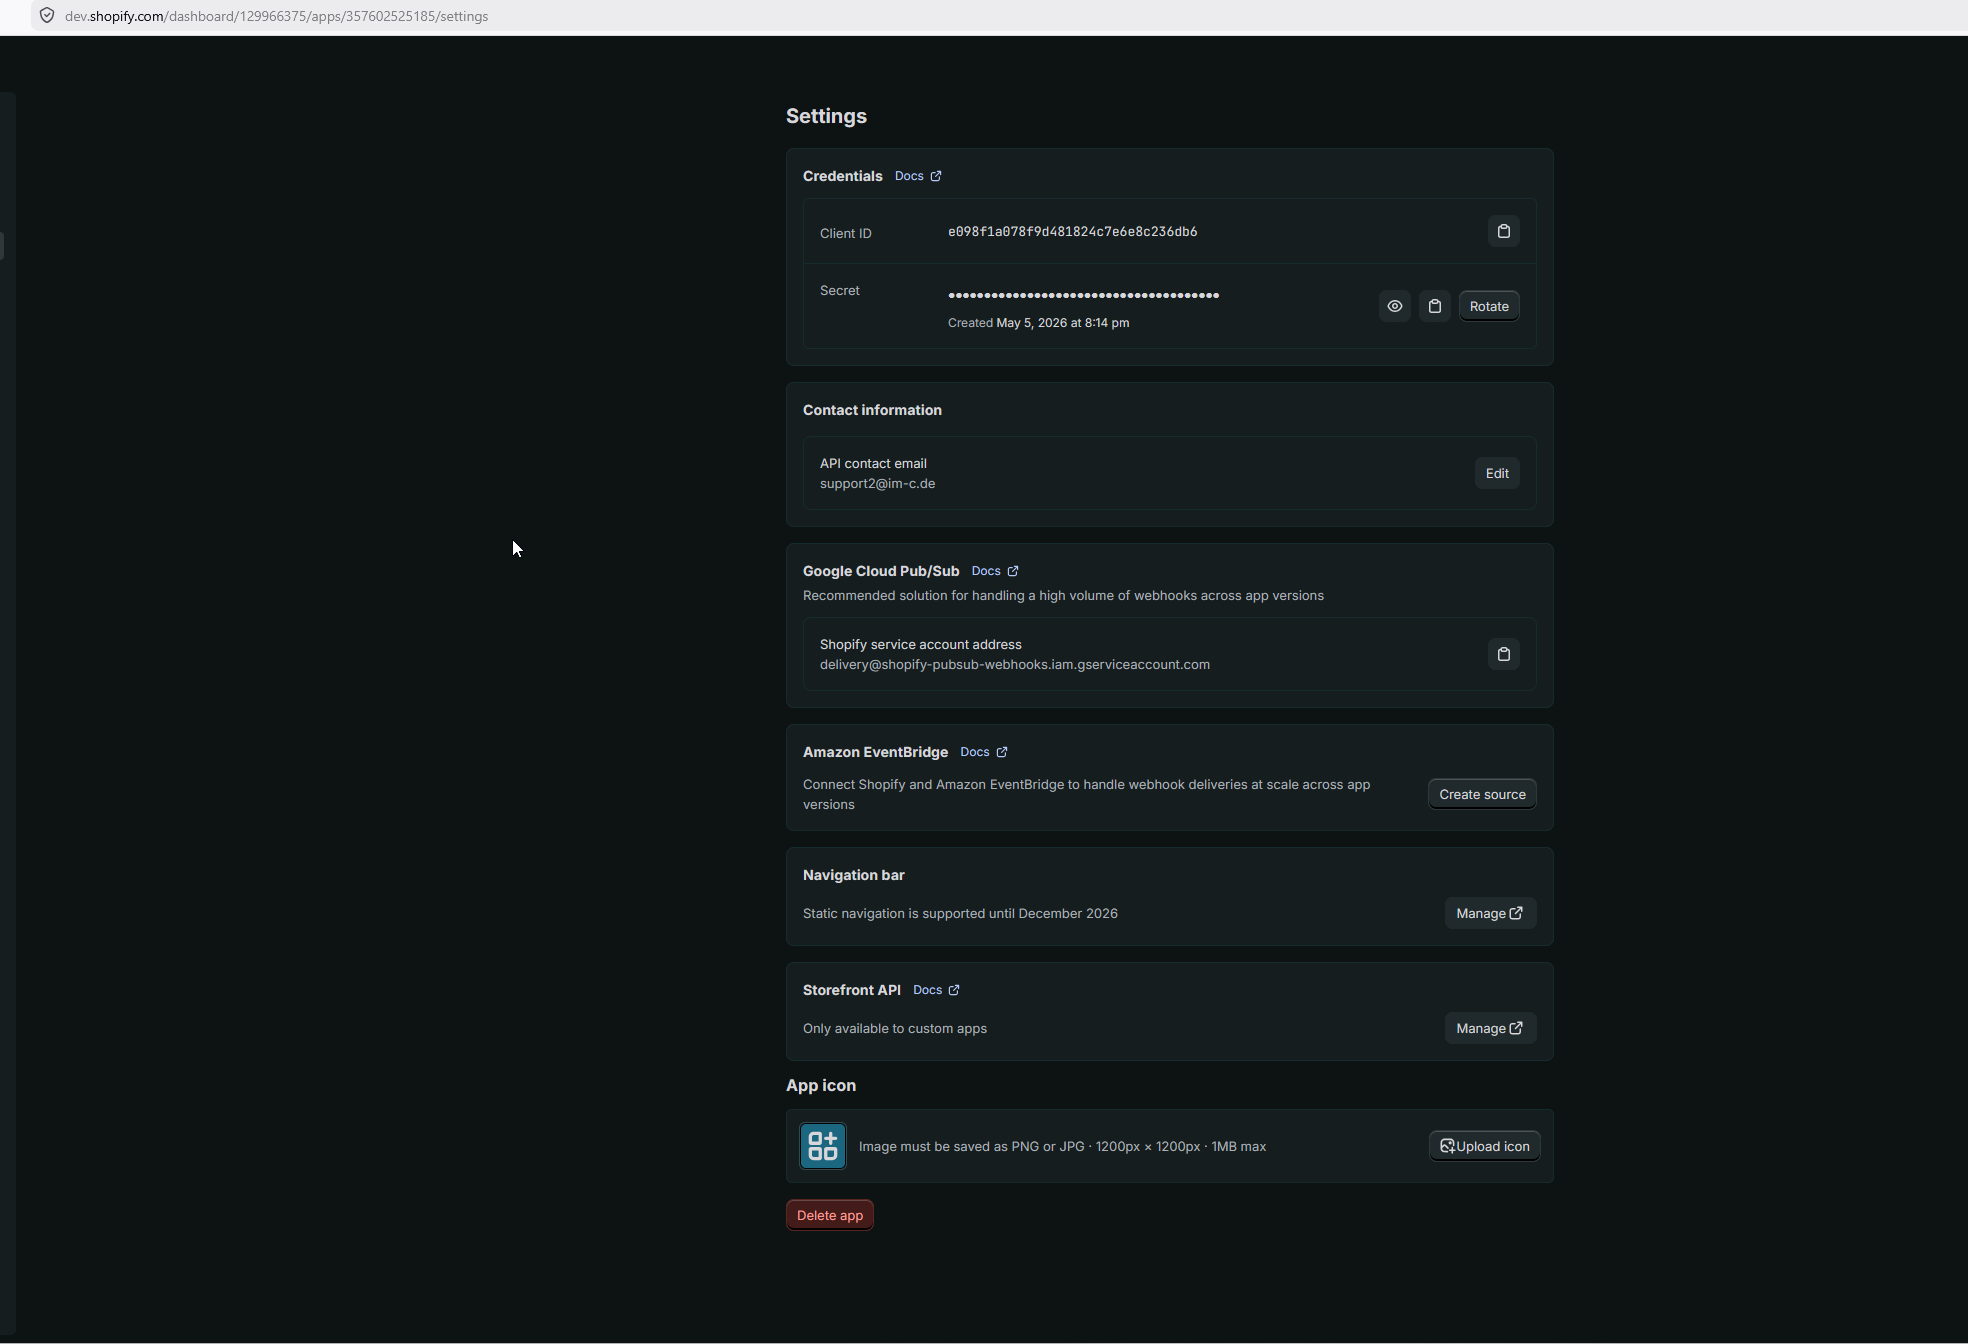
Under the app's Settings tab of the new app, locate the following credentials:
-
Secret (also referred to as Client Secret)
-
Publication ID → contains the GID of the sales channel (headless app) and the Shopify chatbot can provide that
-
-
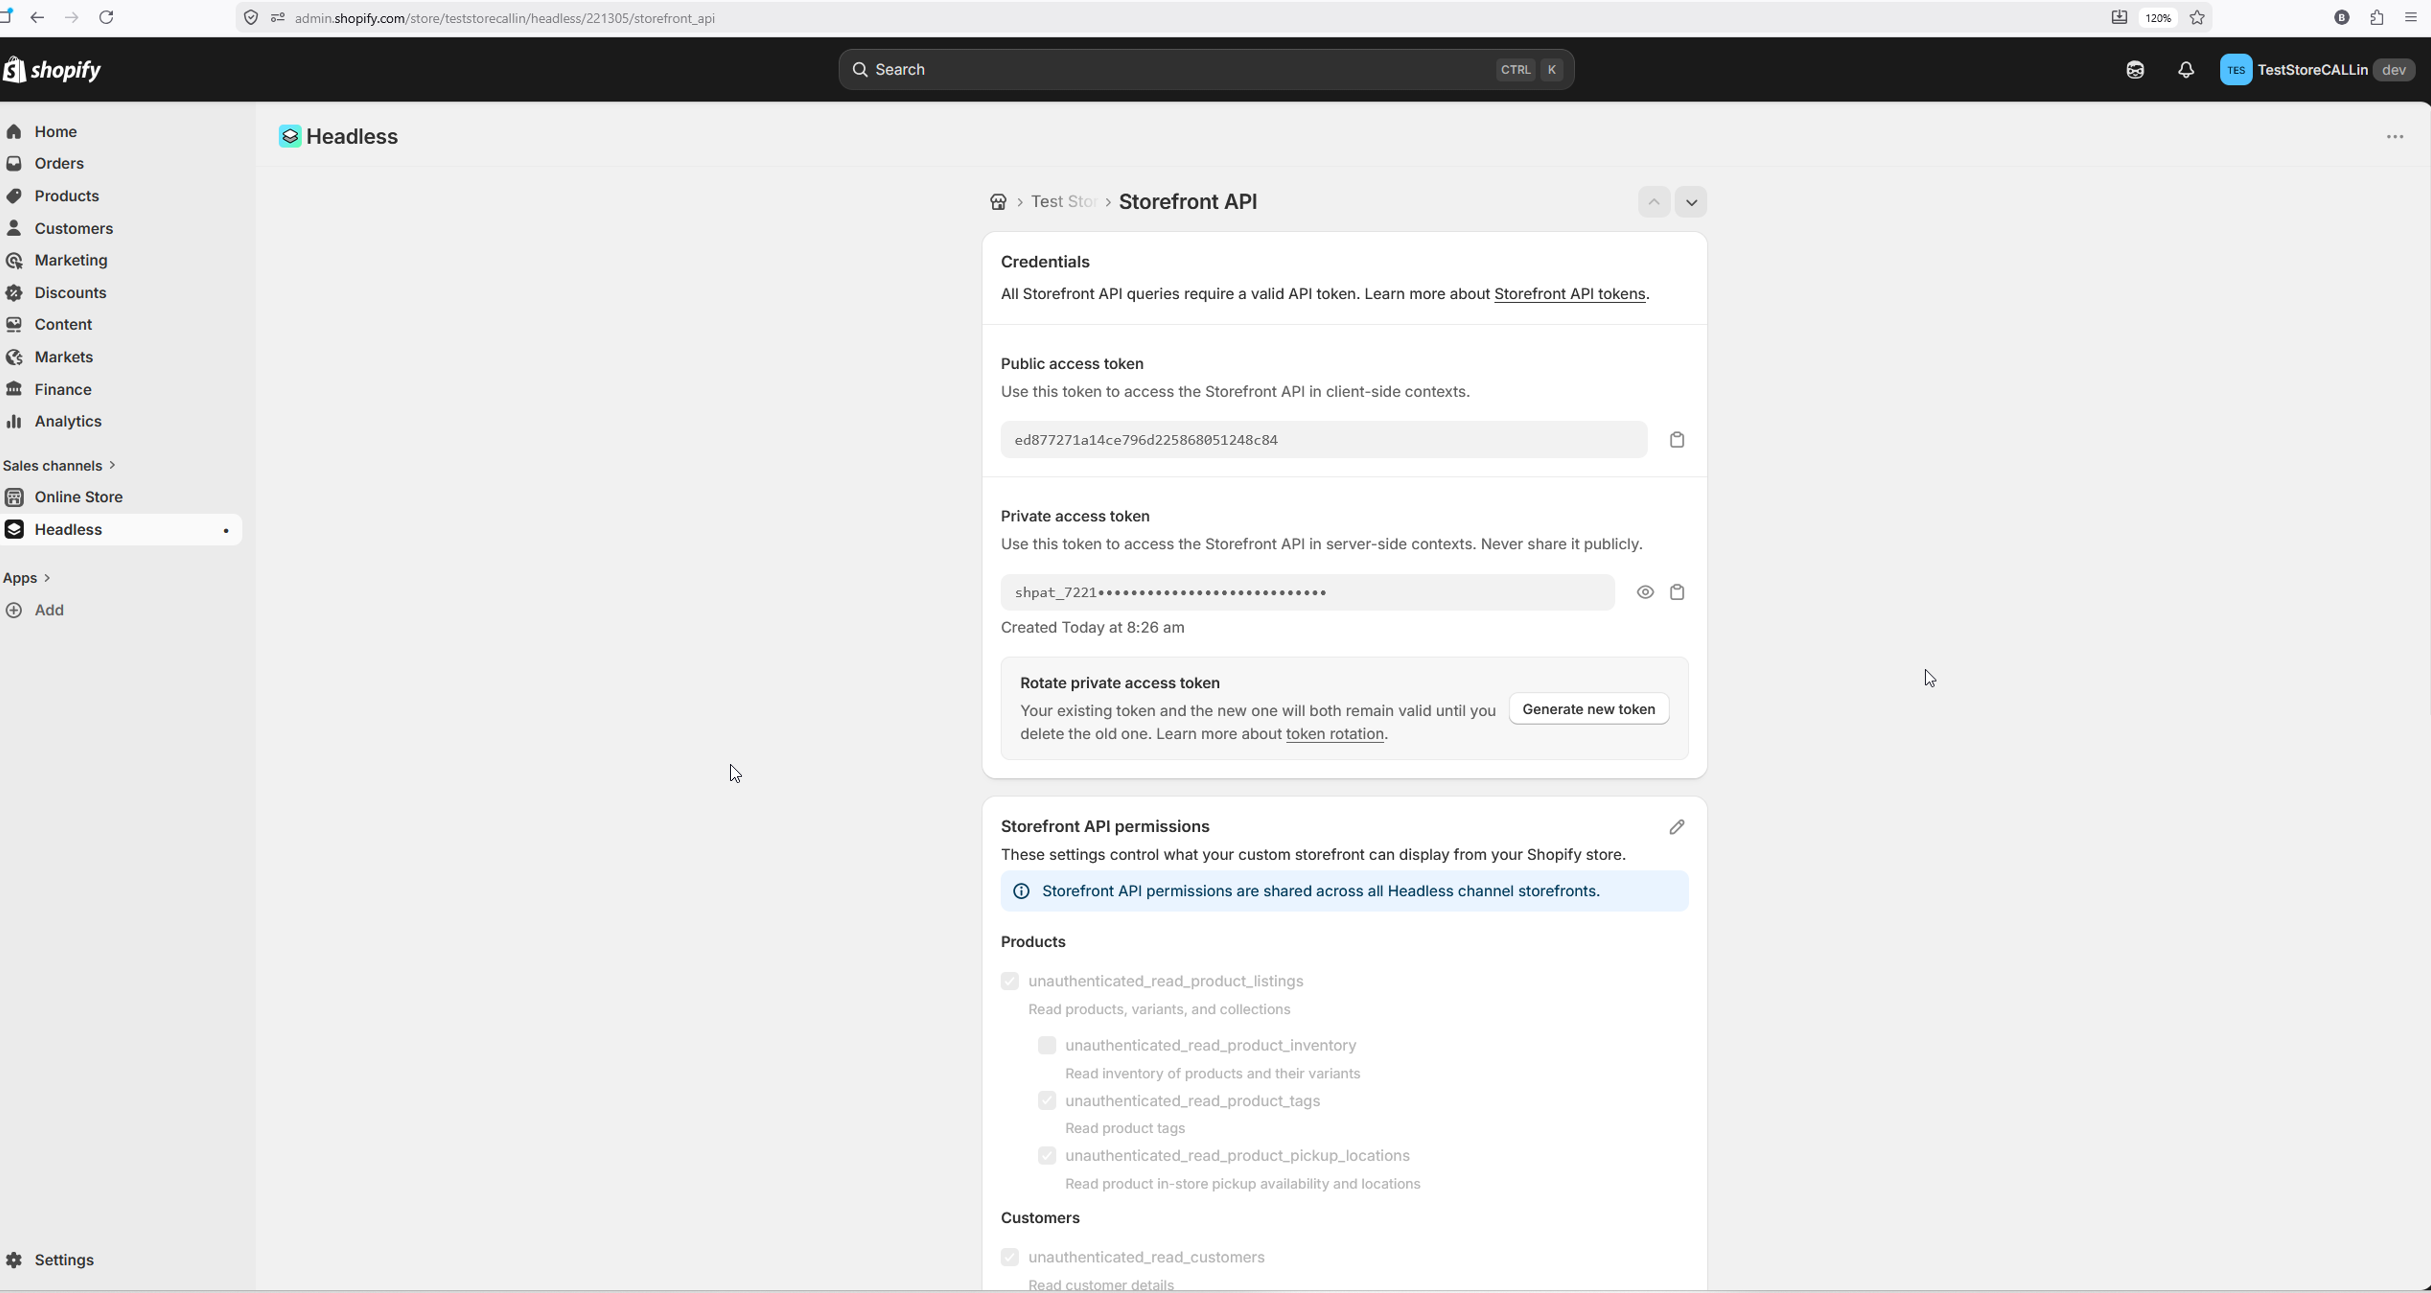
Navigate to Admin view → Settings → Apps channels → Shopify app store
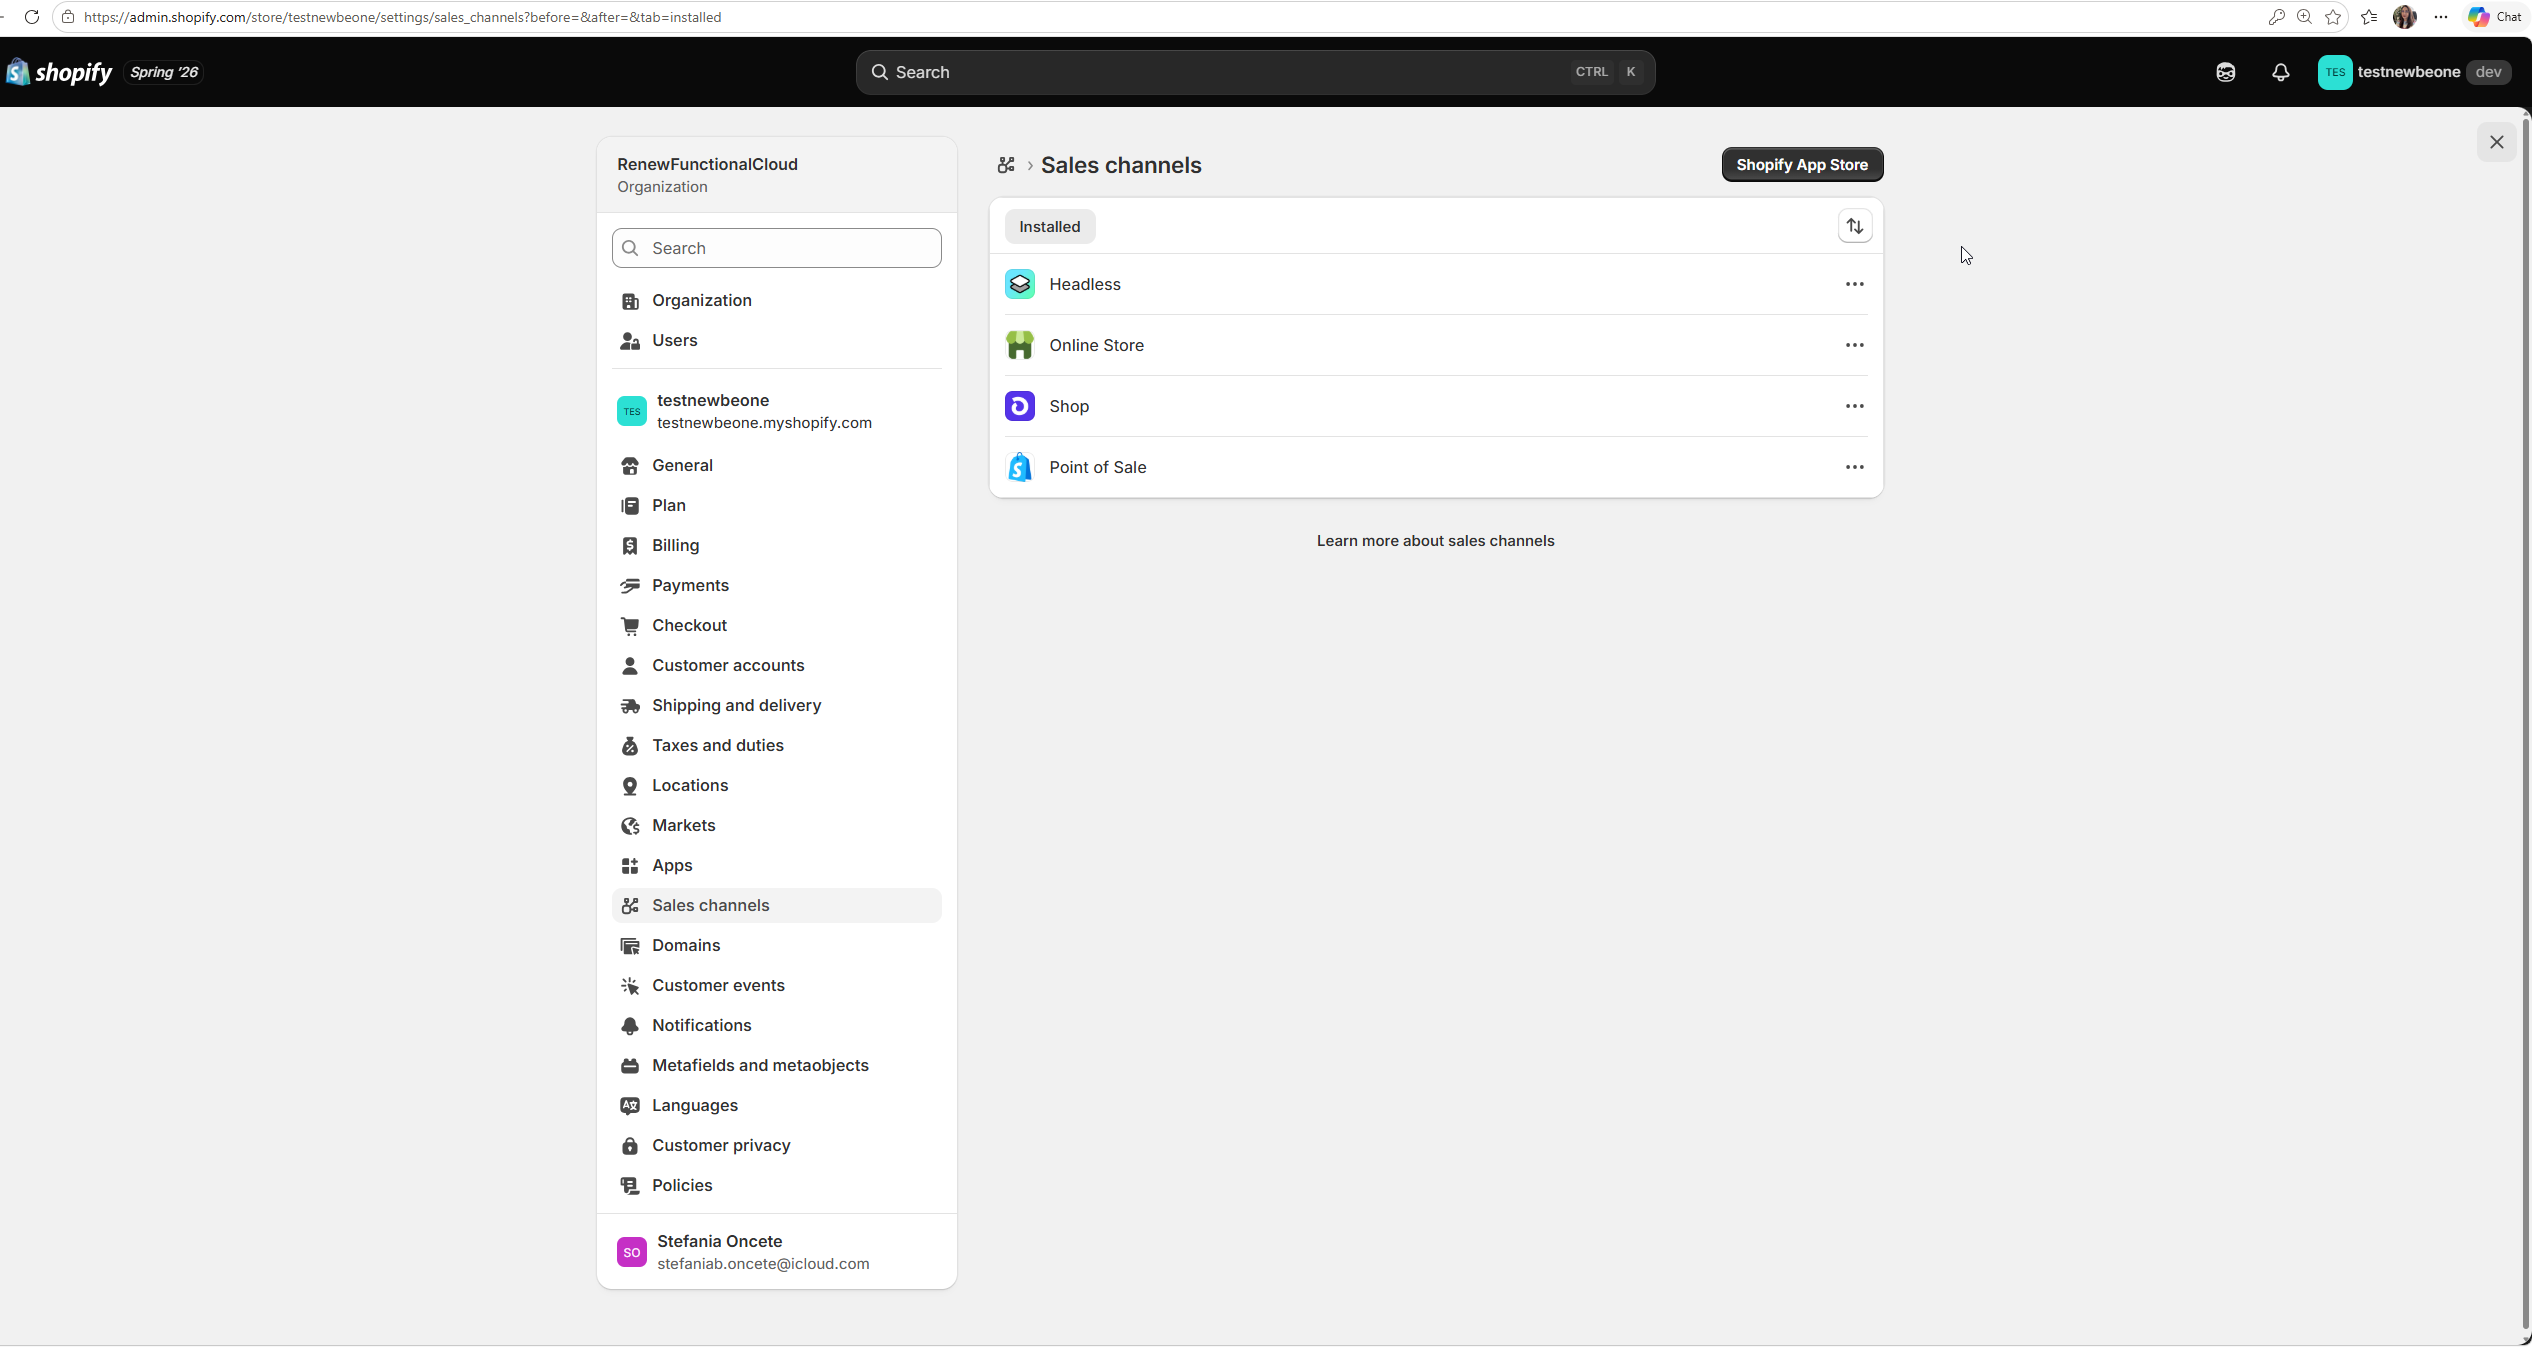
-
Search for Headless
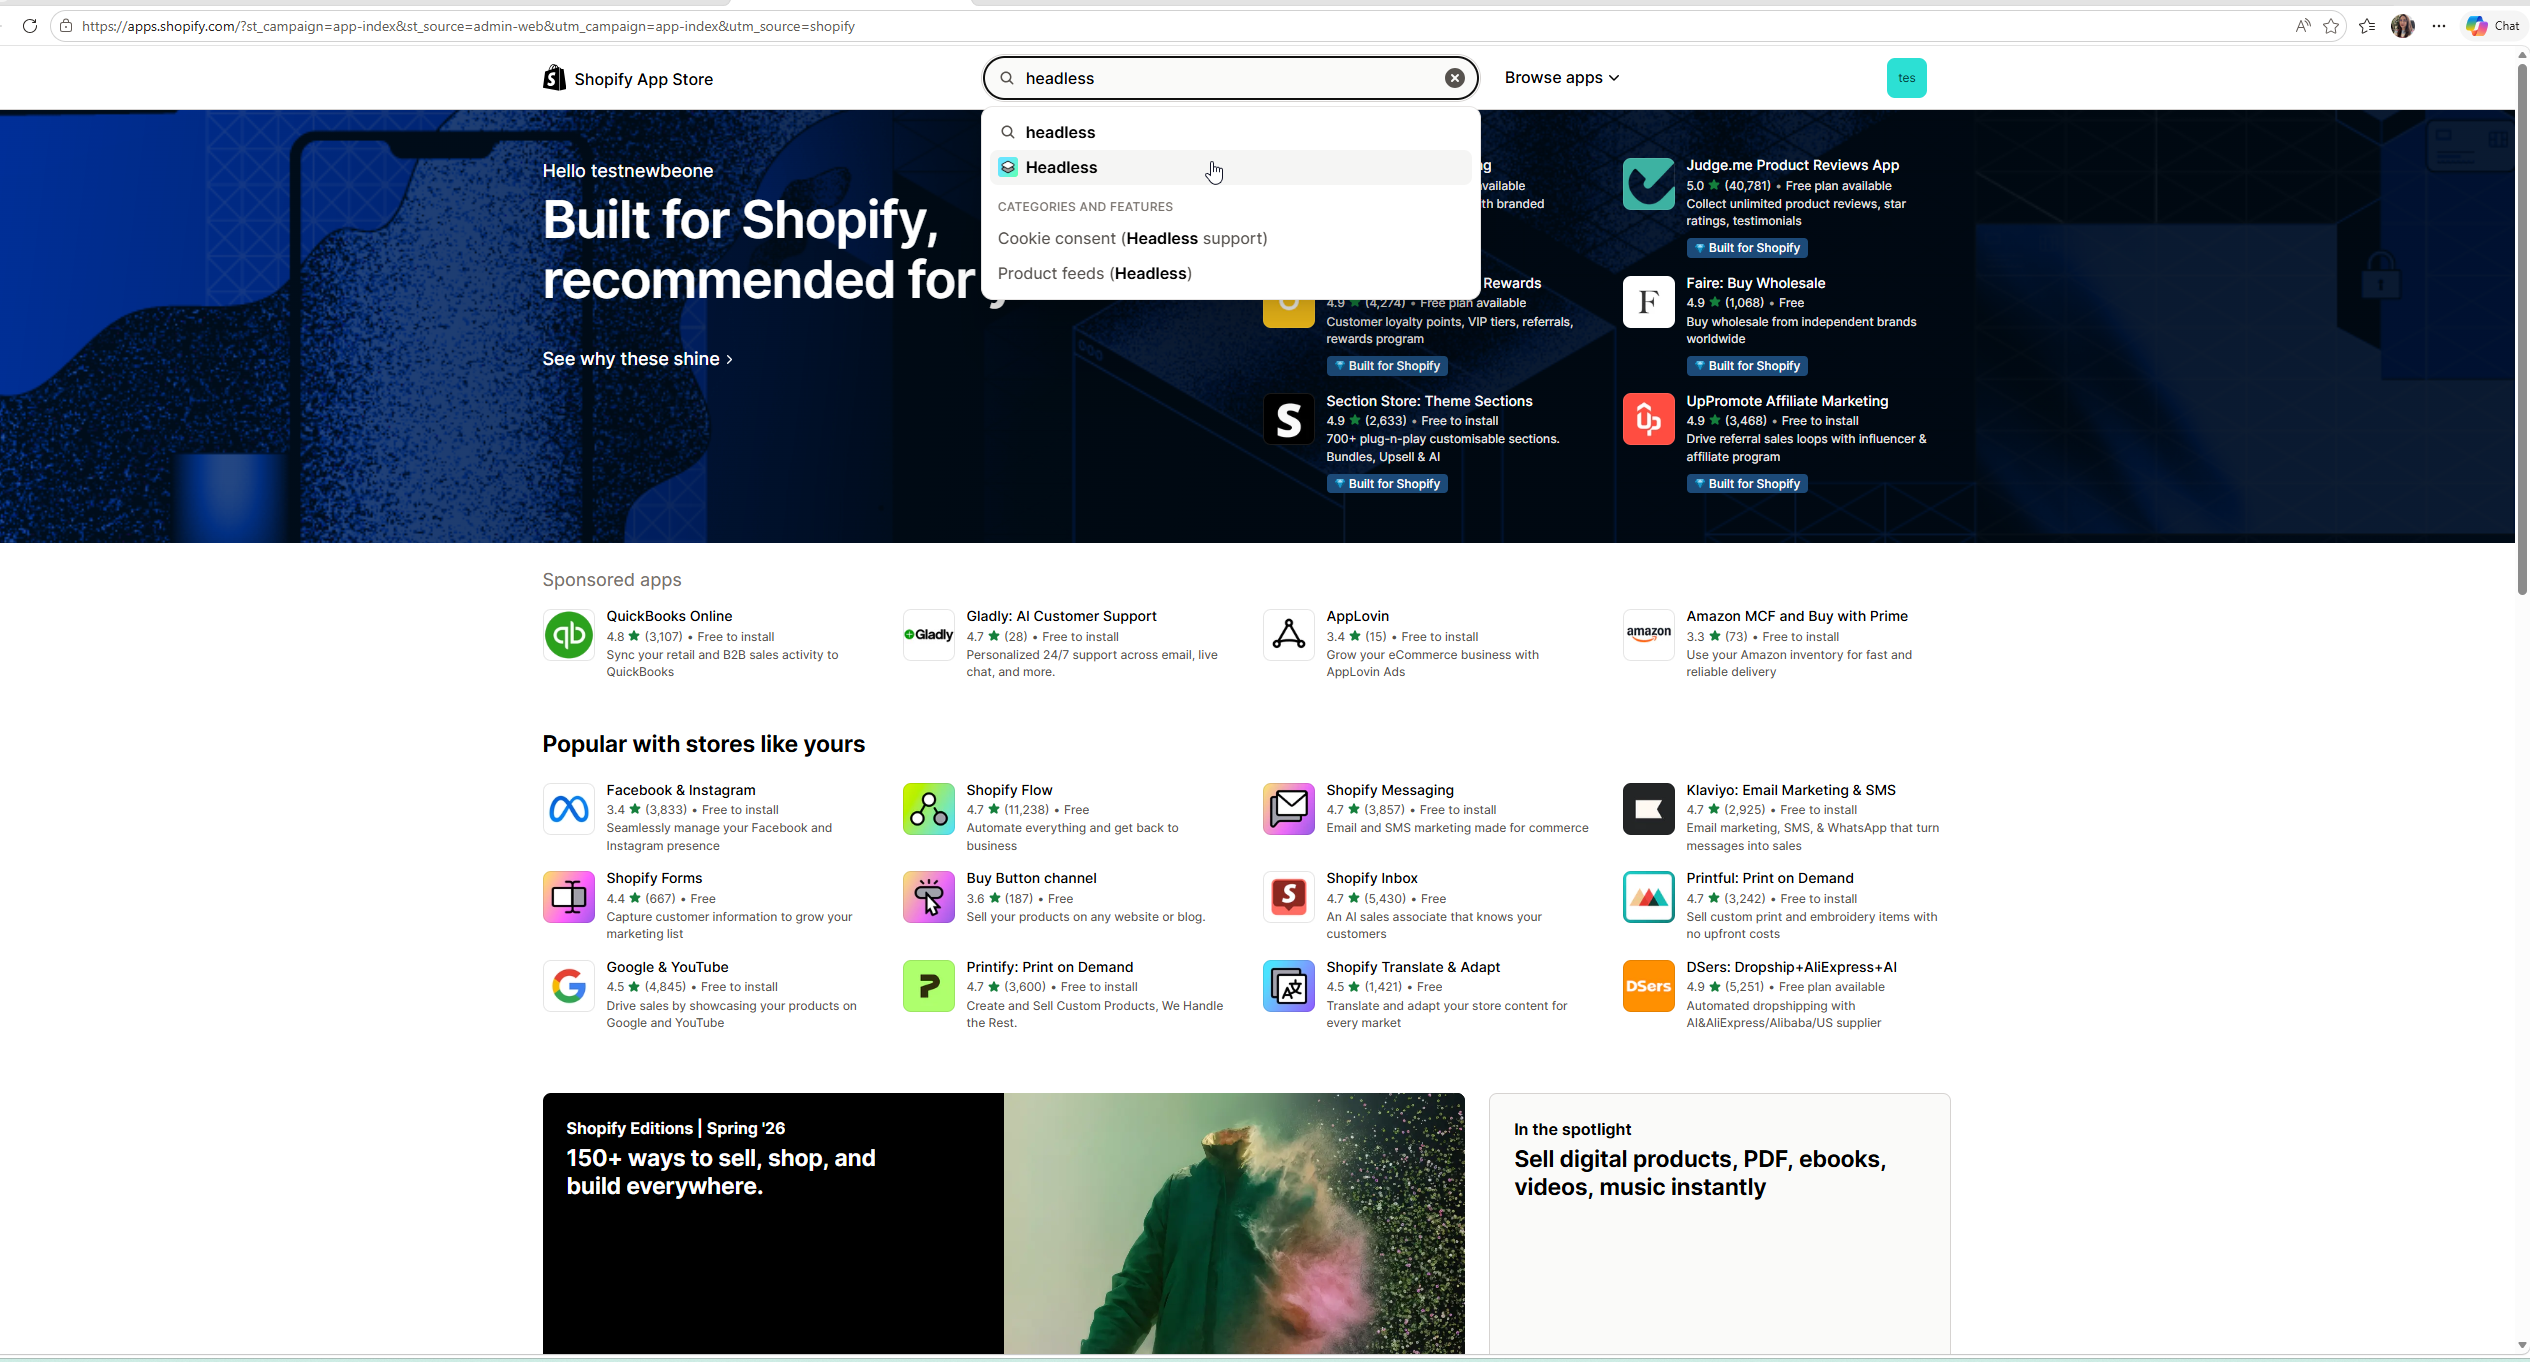
-
Install a Headless sales channel for the app (this provides the Storefront access token).
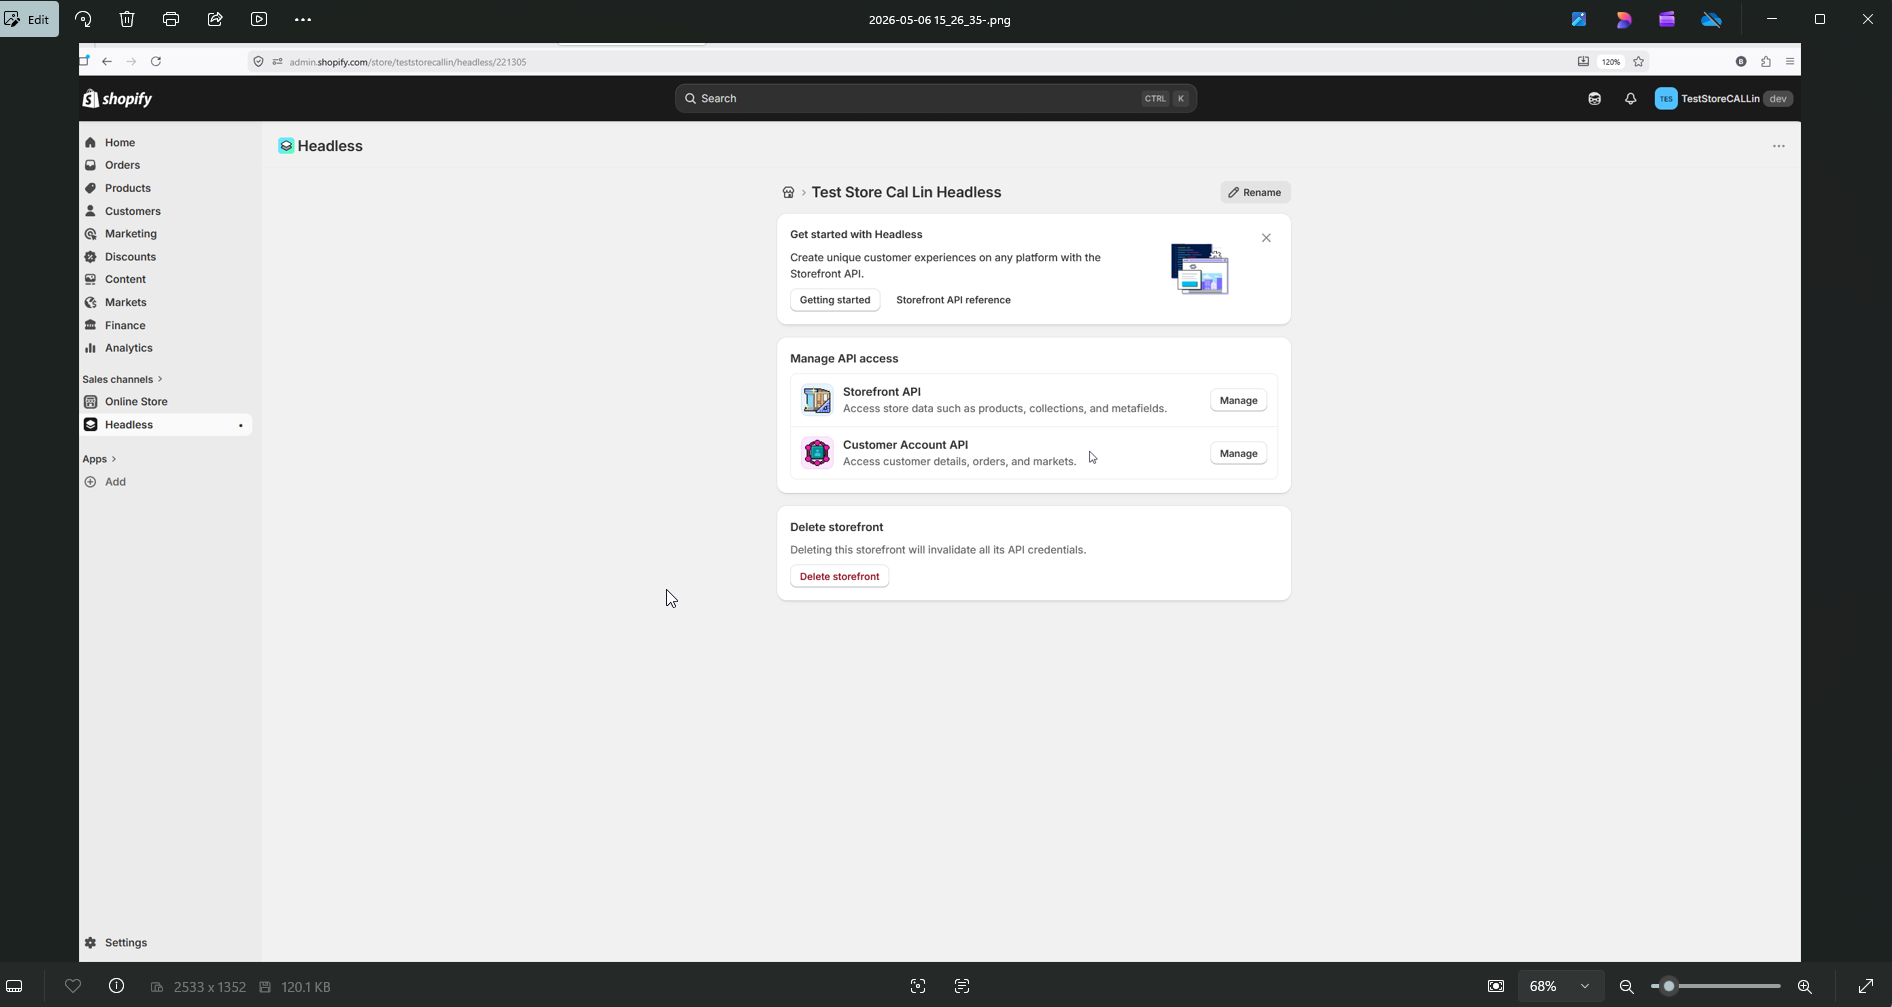
-
Define Storefront access token
-
Products → unauthenticated_read_product_listings, unauthenticated_read_product_inventory, unauthenticated_read_product_tags
-
Checkout -> unauthenticated_read_checkouts, unauthenticated_write_checkouts
-
-
Public Access token will be generate and later used for the connection with LMS.
Setting up a location for the Shopify app
-
Navigate to Locations.
-
Access the shop location.
-
The location can be found in the URL path.
Creating a Shopify Webhook
A webhook is required to allow Shopify to inform the LMS on the order payment event, which the LMS will need in order to process the enrolment of the user after the purchase.
In order to set up a webhook, you must navigate to the following section in Shopify:
http://yourshop.myshopify.com/admin/settings/notifications
Create a webhook for Order payment following the example below:
<Your LMS URL>/ils/restapi/shopify/webhook/order
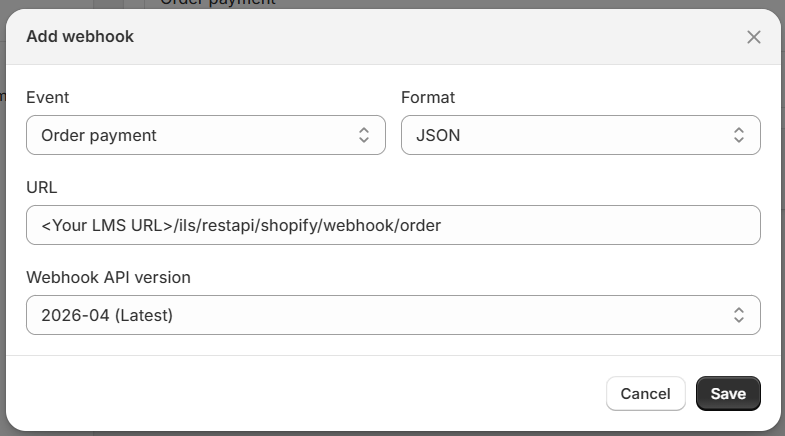
After the webhook is created, a webhook key will be provided. This value must be added in the API secret field of the LMS configuration.

Setup a Redirect URL
Once a transaction has been completed in Shopify i.e. a successful checkout has been processed, the user must be redirected back to the LMS. Shopify allows the configuration of a redirect URL where the user can be taken after the checkout process is complete. This checkout URL must be configured by the customer, on the Shopify admin interface:
From the Shopify admin section -> Settings -> Checkout -> Order processing -> Additional scripts.
In the field, you can provide the desired return URL.
imc offers two possibilities:
Option 1: Standard url back to the learning area or to any existing dashboard pages in the LMS
e.g. <script> window.location ="<your LMS URL>/pages/personalarea.jsf"; </script>
imc recommends a redirect to a dashboard to allow the system the time needed to process the enrolment.
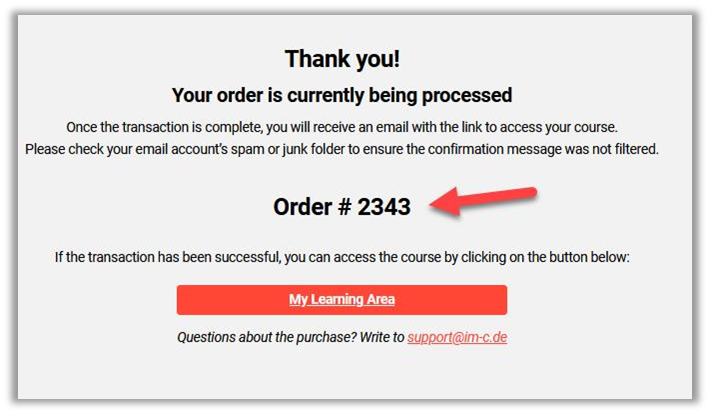
Option 2: Custom feature panel
By using a feature plugin panel, it is also possible to display the order number on an LMS dashboard, in which case the return URL could be:
<script>window.location=”<Your LMS URL>pages/new-internal-dashboard.jsf?menuId=<menuId>&locale=en-GB&showbundlekeys=false#/?dashboardId=<dashboardId>&order_id={{order_number}}"; </script>
Note: The custom feature panel is not included in the standard product and has to be setup separately. Please contact your account manager for an effort estimation.
Important considerations
Due to recent platform changes, redirects after successful payments—previously handled via custom scripts on the storefront—are no longer supported for shops created after January 1, 2025. This change is already in effect and may impact merchants relying on script-based redirection. For the official details, please also refer to the official Shopify website.
Set Shopify Language and Currency
A Shopify shop requires a store currency that can be configured by accessing the General settings: https://yourshop.myshopify.com/admin/settings/general
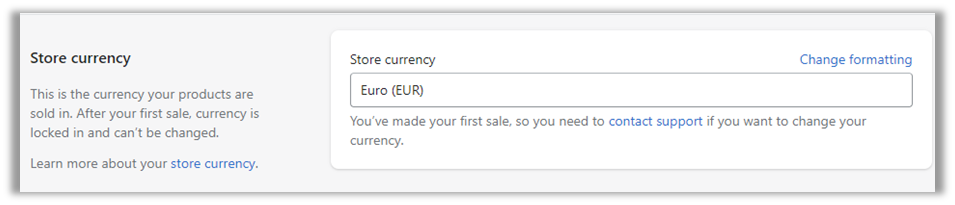
The Shopify language must be set in the languages section: https://yourshop.myshopify.com/admin/settings/languages

LMS System Configuration
Configuration Required to Connect the LMS to Shopify
The LMS administrator has the possibility to configure, system-wide, a Shopify shop that the LMS will connect to in order to create, update products and process enrolments.
The information obtained during the Shopify private app setup will be required here in order to connect the two services.
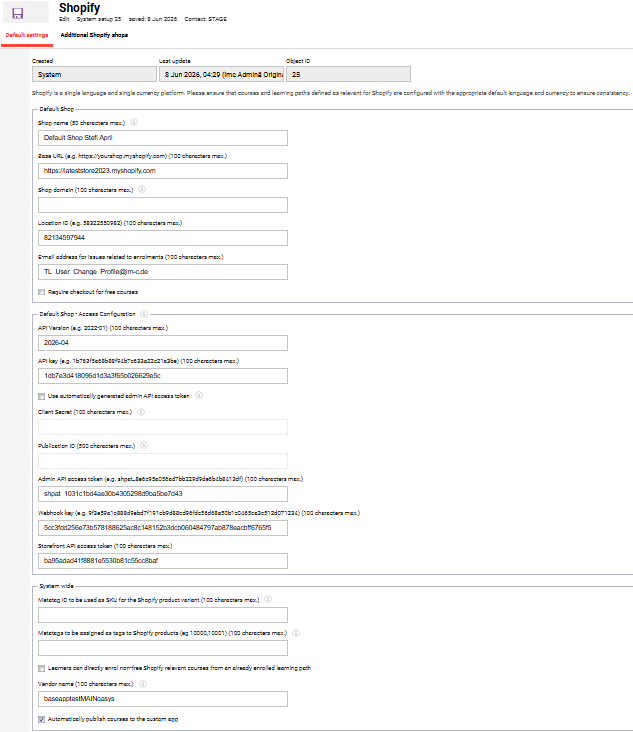
Base URL – this is the URL of your Shopify shop -> https://yourshop.myshopify.com/
API Version – Specified the Shopify API version used by the LMS. imc has tested the connector with the version 2022-01. Please use the same version unless otherwise specified by imc.
The values for API Key, Admin API access token, Storefront API access token and Webhook key obtained from Shopify should be provided in the corresponding fields in the LMS.
For the API paths, please use the following values explicitly:
API path for GET requests
/admin/api/{api-version}/products/{productId}.json
API path for creating the Shopify catalogue
/admin/api/{api-version}/products.json
API path for updating the Shopify catalogue
/admin/api/{api-version}/products/{productId}.json
Use automatically generated admin API access token checkbox - controls how the LMS authenticates with this Shopify store. Depending on the app which was created, different configurations are needed in imc Learning Suite Shopify Configuration.
-
When enabled, the store uses a client id and client secret to generate an admin API access token automatically. Publication ID must be provided as well.
-
Enter the client id in the "API User" field and the matching secret in "Client Secret".
-
Publication ID provided by Shopify chatbot and it is required together with the checkbox to publish on sales channel so that courses and learning paths that are Shopify relevant to be exported to Shopify.
-
-
When disabled, the store uses the legacy private-app authentication: "API User" holds the API key and "API Password" holds the permanent Admin API access token.
Additional Configuration Possibilities
Configuration for Additional Meta Information
As part of the Shopify configuration, a dedicated entry is available to allow adding additional information that should be added to the Shopify product, besides the information that is provided by default, as detailed in chapter Set Shopify language and currency.
An important aspect to be noted is that adding additional information will increase the time needed by the scheduled job to populate the product catalogue.
E-Mail Address for Unprocessed Orders
If the LMS is unable to process a paid order, there is a possibility to configure an emergency e-mail address where an e-mail will be sent providing information about which items from the given order could not be process.
In that event, the admin can act by either issuing a refund from Shopify or contacting the user.
This field is found in the LMS system configuration.

Specific Meta Tag to be Used as SKU for the Shopify Product Variants
Shopify product variants contain an SKU field which can be used for reporting on the Shopify side. With version 14.10 of the LMS, it is possible to define a meta tag to be used as source for the SKU value. Text meta tags are supported here.

Vendor Name
By providing a vendor name in the dedicated field, the Shopify vendor field will be populated when the product catalogue is generated by the LMS. The vendor name is used as an extra webhook security, ensuring that only requests which provide this value are processed as valid enrolment requests by the LMS.

Automatically Publish Courses in the Custom App
When generating the product catalogue and creating the corresponding courses and learning paths via the LMS into Shopify, it is possible to make these entities available for purchase automatically by enabling this setting. When disabled, the publishing is not automatically done and must be managed manually via Shopify.
Require Checkout for Free Courses
Enable this function when required that users checkout even for purchases where some of all items are free of charge, when such a process is required for invoicing purposes.
Behavior Configuration for Courses inside Learning Paths
When providing learning paths as course bundles for reduced price, it might be desired that once the learning path is purchased, the courses inside can be enrolled without additional cost. A configuration is available to determine if course enrolment from an enrolled learning path should be permitted without asking the user to purchase the course in addition.
Possibility of Configuring Multiple Shopify Shops
It is possible to also define multiple shops besides the default shop configured for allowing purchasing courses/learning paths from multiple providers connected to other Shopify shops. The differentiation between the multiple shops and courses/learning paths pertaining to different shops will be done based on Provider.
On Provider manager, an additional field is now available, called Shopify shop which will have as preselected the default Shopify shop defined on the Default Settings tab. It can be easily changed by selecting another shop from the list. The new shop has to be created in advance.
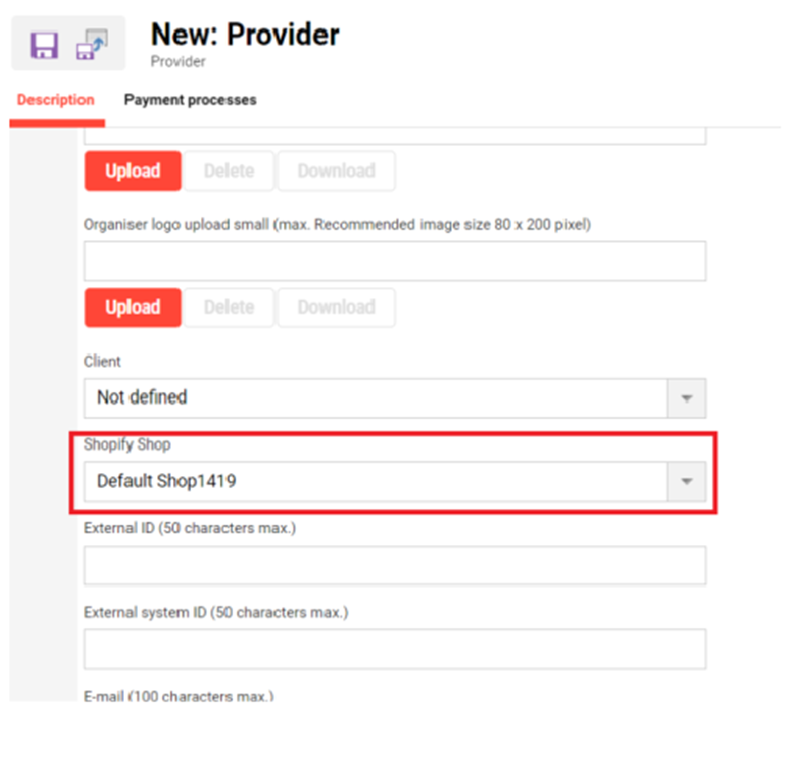
Important: In case on course/learning path level the Provider field remains empty and the item is marked as Shopify relevant, it will be connected to the default Shopify shop. If there is another shop the user wants to connect an item to, the provider needs to be selected from the field.
Notes: if Shopify is enabled on the system (licensed), the field will be displayed. Otherwise will be hidden.
On the additional tab displayed, called Additional Shopify shops, the administrator will be able to configure as many shops as desired.
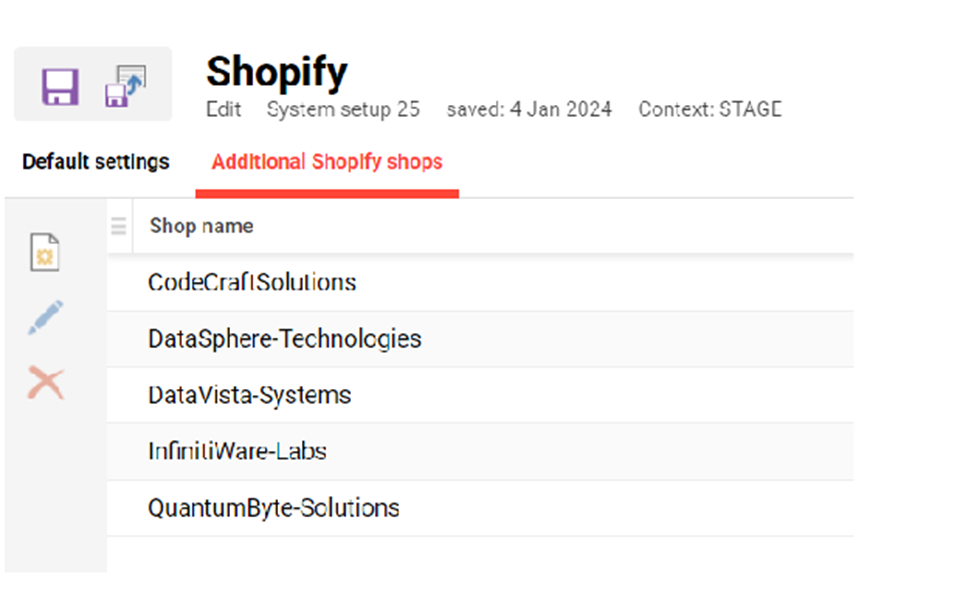
Create, edit and delete are the actions which can be performed for configuring additional shops.
Create – it will be possible to create additional shops by opening a page with several fields which contain only Shopify related configurations in order to establish a connection with Shopify. Mandatory fields are marked with an * and when saving the form, notification will be displayed if required details are not provided. Once the form is saved, the shop name will be displayed in the list.
Delete – this action will allow deleting a shop only if the course was not assigned already to a provider. In case there is a connection between the shop and the provider, the user will be informed via a notification. On one shop at a time can be deleted. Muti-selection is not possible for delete functionality. Deleting the provider before decoupling from the Shopify shop will result in the impossibility of deleting the shop, so avoiding doing this is suggested.
Populating the Shopify Product Catalogue
Meta Tag and Scheduled Job Configuration
In order to be able to purchase courses or learning paths via Shopify, the following configurations are required:
-
Each course and learning path that is expected to function with Shopify must be labelled with a meta tag and have the planning status Released. The meta tag is named “Send to Shopify (11820)”
-
Note: this meta tag must be added manually into course types, course templates, courses and learning paths. Additional effort would be required to add the meta tag to any existing objects using scripts.
-
-
Based on this meta tag, a scheduled job will periodically update the Shopify product catalogue
-
CreateOrUpdateShopifyCatalogItemsJob
-
Processor name: de.imc.clix.webservices.client.shopify.job.CreateOrUpdateShopifyCatalogItemsJob
-
This must be configured by imc consulting and the recommendation is to set the cron scheduler to run in alignment with the Solr indexing for the catalogue.
-
-
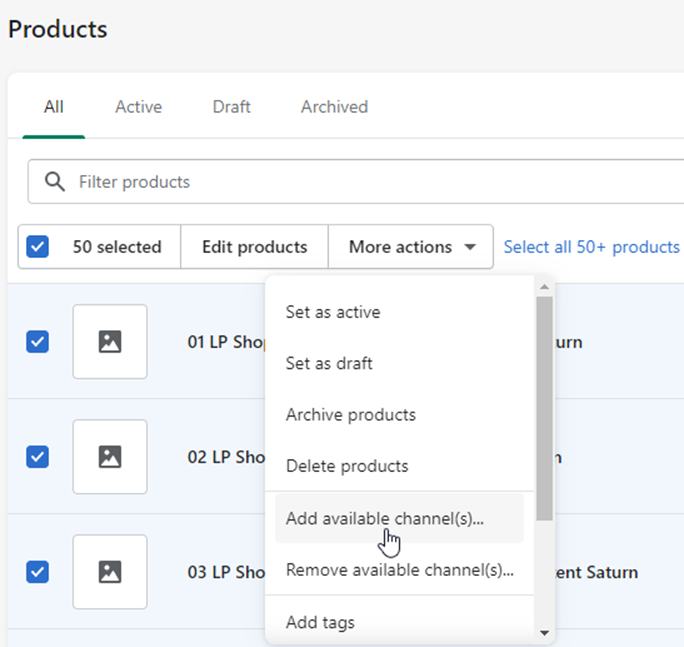
Once the courses and learning paths have been added as products to Shopify, the products must be made available to the private app so that they can be added to the cart as part of the checkout process (This is only required when an automatic publish is not desired. See above). For this step, please navigate to Shopify admin, access “All products” → select all → More actions → Add available channels → Mark the private app and click “Make products available”.
-
In order for the system to be able to process Webhooks, an additional cron job must be configured, with the recommendation to schedule it at short intervals. This cron job is responsible for identifying the received webhooks that have not been processed yet and to process them, so that the corresponding enrollments are carried through.
-
The name of the job is ShopifyProcessWebhookJob.
-
Since a Shopify shop has one default currency and one default language, the LMS only supports as part of the connector single language and single currencies. This restriction applies both for creating the product catalogue and also for the checkout process.
The default language and default currency of the item will be used.
The default language is the language marked as Basis on the Language tab of the course. The default currency is the currency specified in the External price meta tag (Id 10128).
Special attention must be given to setting up the correct default currency of an item. The default currency of the item must match the default currency of the Shopify shop, to avoid inconsistencies during checkout.
Updating the Product Catalogue
To keep the Shopify available quantity in sync with the number of free places in ILS for a course or learning path, ILS is sending an updated information in case the target status of a participant is changed to cancelled or enrolled. This means that in order to ensure there are no discrepancies, participants should not be completely removed from courses or moved without being first cancelled, respectively the participants should not be added to the course with a status other than enrolled.
In case there is a need to perform such status changes, please ensure that the cronjob is configured to run frequently to maintain the free places consistency.
When a payment is processed and the LMS is notified via the Webhook, the free places are adapted accordingly.
|
|
Since the creation and update of products in Shopify is automatically handled by the LMS, we advise to avoid any manual changes done in Shopify directly, as this might cause that products cannot be updated anymore. |
Default Meta Information Sent to Shopify
By default, the LMS will populate the following metatags from courses and learning paths, to a Shopify product:
-
Name (id: 10000)
-
Preview image (id 10950)
-
Price
For each group specific price, a separate product variant will be created.
Important: To make the image available for Shopify, the image data folder must be accessible publicly. This should be done either by imc if the system is hosted by imc or by the customer if the system is hosted on premise.
Configuration for Additional Meta Information
As part of the Shopify configuration, a dedicated entry is available to allow adding additional information that should be added to the Shopify product.
This information is based on meta tags and will be mapped to tags in Shopify.
While the LMS does not restrict the usage of any meta tag type, the only supported types are text field and selection lists. Using other meta tag types may result in a different output than expected due to formatting reasons.
An important aspect to be noted is that adding additional information will increase the time needed by the scheduled job to populate the product catalogue.
Group Specific Pricing
Within the LMS it is possible to define, for courses and learning paths, different prices for different user groups.
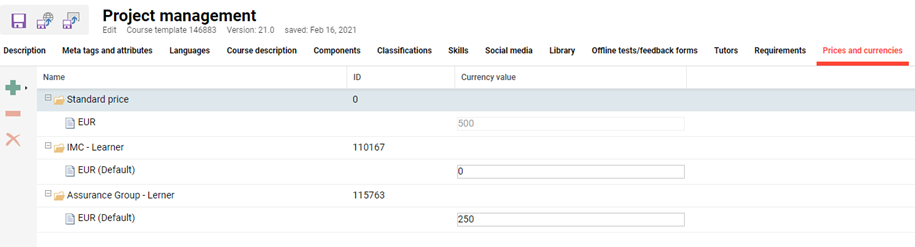
A standard price based on the External price meta tag will need to be defined. Additional preferential prices can be defined by adding the corresponding user groups and defining the applicable price.
When creating Shopify products based on such courses, a separate variant will be created for each available group.
Important – please define prices only in the currency of the Shopify shop. Defining prices in multiple currencies will result in an un-processable product creation in Shopify.
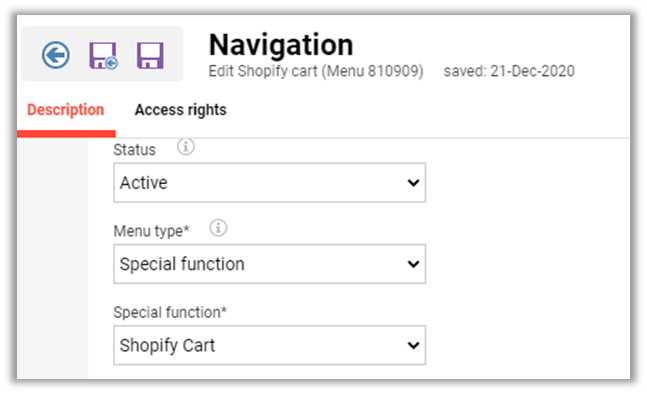
Shopping Cart Navigation Item
As part of the configuration in the LMS, a new navigation item must be made available to learners so that they are enabled to monitor the shopping cart list and proceed to checkout.
Note: Please configure the navigation in the Main navigation for all categories.
The navigation entry is a special function menu type.
Shopify Administrative View
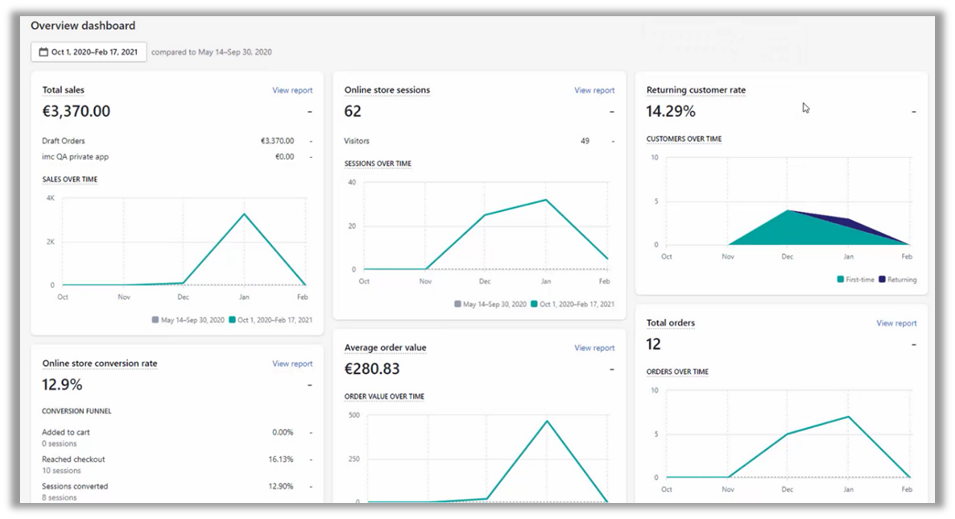
On the Shopify side, besides the creation and management of discount codes, the Shopify administrative backend provides an analytics dashboard that helps monitor sales trends, identify best-selling courses, and enable training providers to identify ways to boost sales.
Limitations
-
The LMS Shopify connector is only supported in a single language and single currencies. Customers are advised to ensure that all courses and learning paths used with Shopify have the same default language and the same default currency as the Shopify shop.
-
Booking participants via Easy course creation is not possible for Shopify relevant courses/learning paths.
-
In the context of booking on the waiting list, the meta tag Move up automatically will not be supported as this is an automatic process that is incompatible with the manual payment process. In the same context, as the current standard states, some of the enrolment checks are done when booking on the waiting list (mandatory prerequisite unfulfilled), but some are only when Adding to cart (seat allocation, enrolment forms). Notifications are sent only when user has status 'Waiting' for informing about the new available places.
-
The enhancements described in this document are only applicable for the web application and are not in scope for the native mobile apps.
-
Seat limitation is not applied in the Shopify implementation; however, seat allocation is supported and applied.