The function "Catalogues" controls the catalogue configuration settings and content assignment. It is here that main catalogues and sub-catalogues can be created, and structured, have content assigned and clearances granted. Catalogues can be created in hierarchical structures where the top level is a "Main" catalogue and the child levels are referred to as "Sub" catalogues. Clearances can be assigned to groups for each level to determine who can access each catalogue. Learners can browse catalogues for which they have been granted access rights and search for content or training opportunities.

The functional icons of the Catalogue manager will be explained in detail below.
Functions for the Management of Catalogues
Create Catalogue
Catalogues are created using the "Create" icon and the behaviour will change depending if an existing catalogue is highlighted. When no existing catalogue is highlighted a new catalogue creation tab will immediately appear, but if there is an existing catalogue highlighted there will be three options to determine where the new catalogue is to be created.
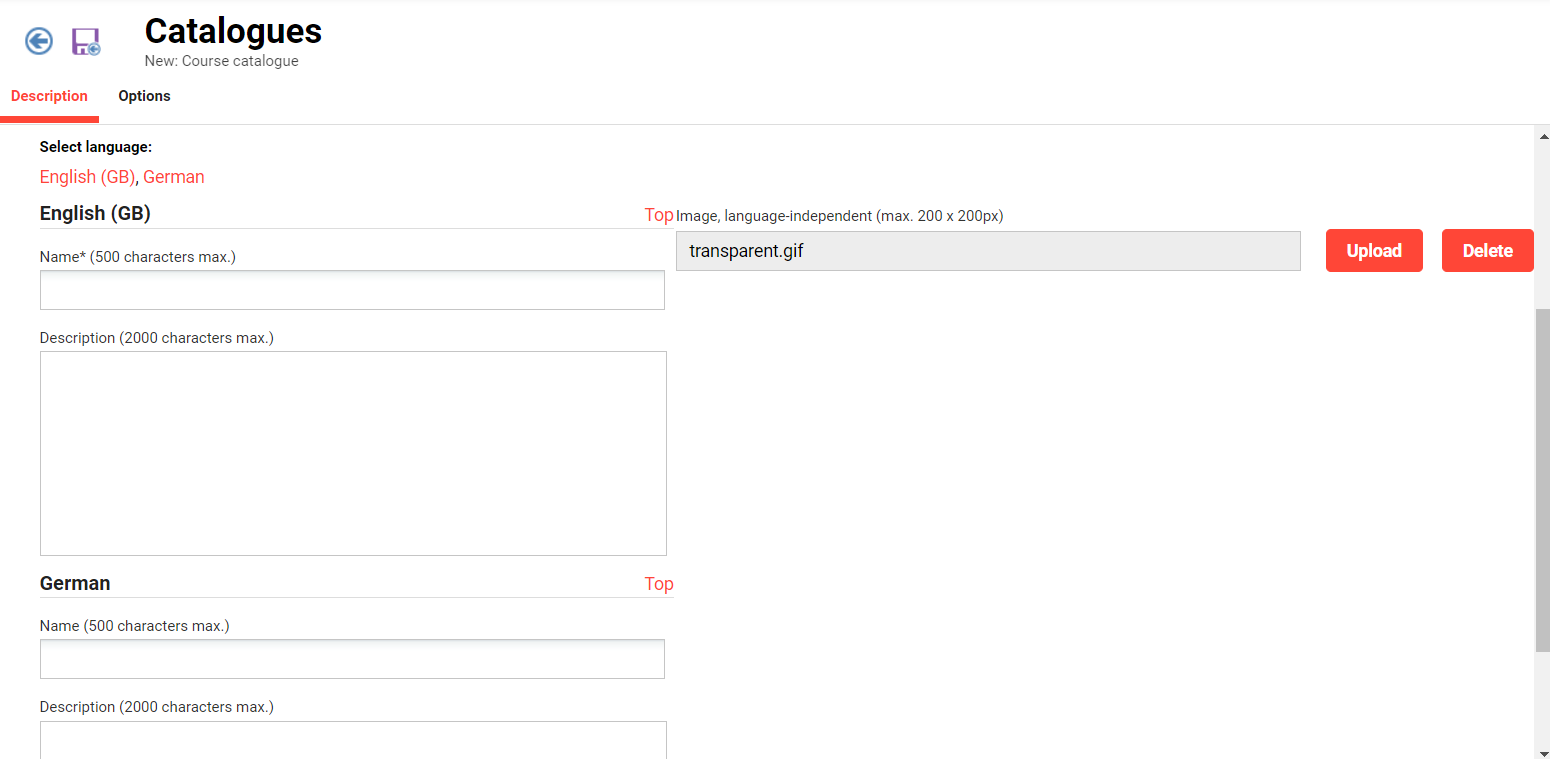
Creating "Before" or "After" a Main catalogue will create another Main catalogue and selecting "In the hierarchy" will create a Sub-catalogue. The key difference between a Main catalogue to a Sub-catalogue is the Main catalogues contain various settings and must be assigned to a Navigation point; whereas Sub-catalogues inherit settings from and display below their parent Main catalogue. The creation of each catalogue presents a "Description" tab where the following fields can be populated:
-
Name: Name of the catalogue visible to the learner.
-
Description: Describes the catalogues for admin purposes and not visible to the learner.
-
Image: Images of sub-catalogues can be viewed by learners below the search bar.
Catalogue configuration
When creating a Main catalogue the "Options" tab is where settings are configured to control assignable object types and appearance behaviours.
Displayed object types: Checkboxes control what types objects can be assigned to the main and sub catalogues. As it is not possible to directly assign Tests, Feedback forms or On-the-job Trainings to catalogues there no checkboxes for this object types.
Appearance:
-
Allow catalogue contents in main catalogue folder: If unticked the main catalogue is purely for structural purposes and would require sub-catalogues to assign content to.
-
Do not show catalogue in front end:
Normally unticked so the catalogue can be seen in the learner view. Could be ticked to prevent a catalogue structure from showing until it is complete with content assigned. -
Use for the booking of staff members by the supervisor:
When ticked the catalogue can be directly searched by supervisors in the My Staff function when click "Enrol employee" option for a staff member. If unticked the supervisor could still enrol their staff to training directly within the catalogue using the "Enrol staff members" button. -
Position of newly added contents in the catalogue content list:
When “Top of the list” is chosen, newly added content to the catalogue is added to top of the content list. When “Bottom of the list” is chosen, newly added content to the catalogue is added to bottom of the content list. By default, “Bottom of the list” is chosen. The benefit is flexibility to adjust the positioning, better visibility, prioritization and more efficient administration of the catalogue content.

Click "Save & Back" to save changes and return the Catalogue manager. If creating a main catalogue it will need to be assigned to a navigation point.
Edit Catalogue
The "Edit" icon allows the administrator with "Edit" clearance on the catalogue and "Edit" specific authorisation on the navigation point to make changes to the catalogue description or settings (if the main catalogue). Once changes are made click "Save & Back" and then click "Update search index" for changes to be visible.
Content Assignment
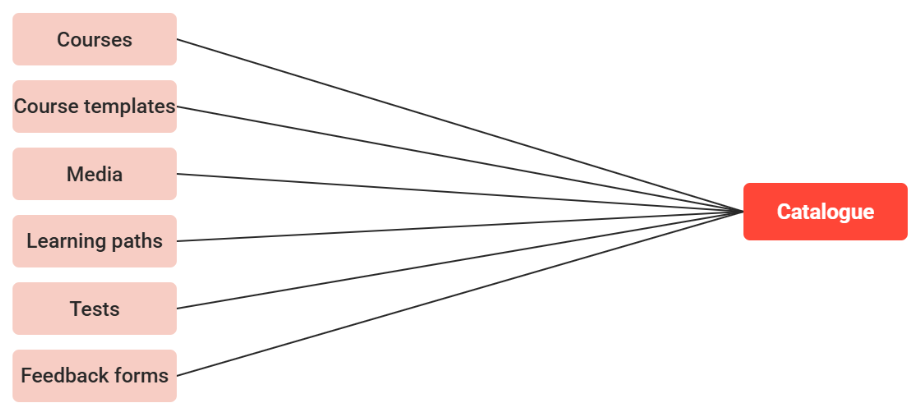
Content can be added to a highlighted catalogue by clicking the "Content assignment" icon. To ensure that only contents that can be booked, pre-booked or opened by learners are visible in the catalogue, contents need to be assigned to a previously created catalogue. The catalogue assignment allows content administrators to conduct the assignment without being able to edit the catalogue structure.
Contents can be assigned per catalogue folder. Available content types for normal catalogues include learning paths, course templates, courses, media, feedback forms and tests.
The display column indicates if the added contents are currently viewable in the catalogue by learners who have access to the appropriate catalogue folder. Their visibility can be lost due to the following circumstances:
-
The content is always available in its most recently published version, but currently only drafts of the content exist. Only one version of an object in the catalogue can ever be assigned.
-
The end date of the course or learning path was exceeded.
-
The date given in the meta tag determining display in the catalogue was exceeded.
-
The course no longer has the planning status "Released" or "Fixed".
Contents marked as top contents are highlighted in which they are displayed to learners on dashboard pages in their own top content panel. This is possible both in the public portal and in the internal area. If the panel is integrated on the dashboard, all top content of all catalogues to which the learners have access, appear automatically.

Added contents are displayed as contents of the given catalogue. The toolbar allows to add or remove further contents.
Edit
Options to Cut and Paste an already added object to a different place in the order. Useful if Client "Catalogue settings" has a "Manual" sort order.
Add
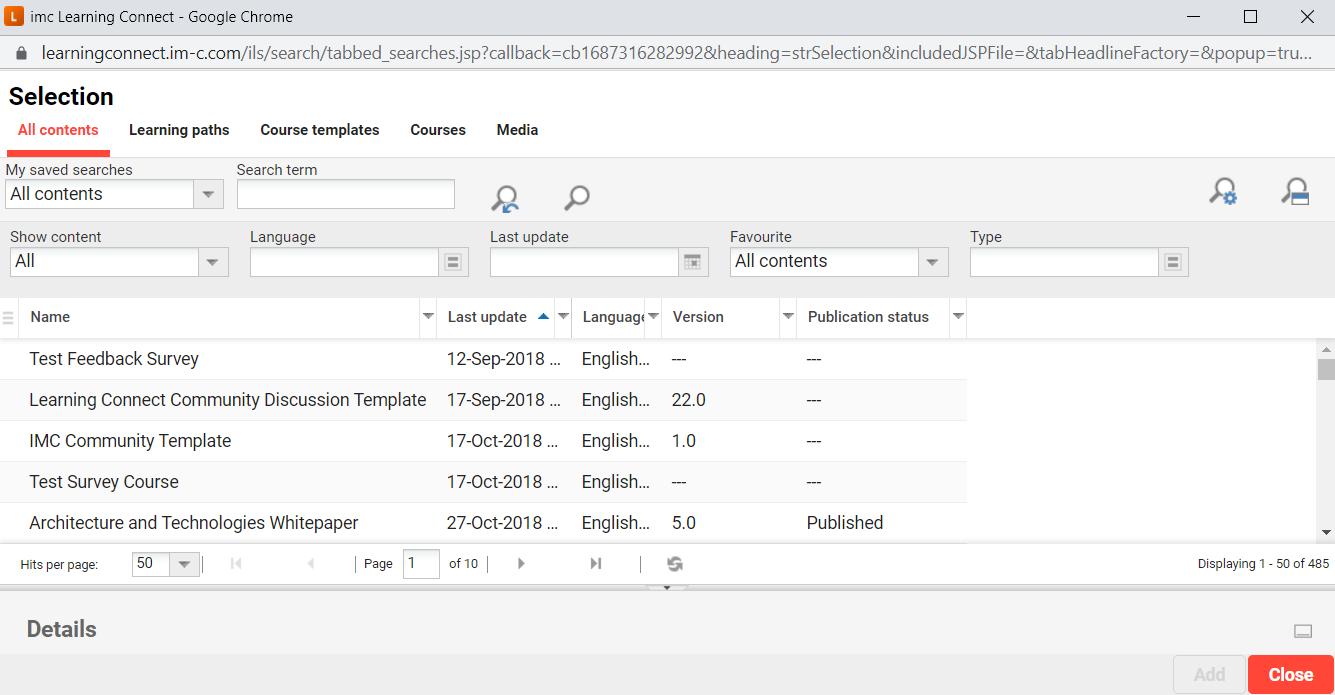
Most commonly used icon which launches a pop-up screen to select content where the available tabs will match settings in the "Options" tab of the main catalogue. For systems with a lot of content extending the search filters can help locate specific contents more efficiently. Once the desired training object or content is located, highlight it and click the "Add" button, close the pop-up, and then click “Save & Back" to process the change.
Note: The results of tests are not saved per se if the learner opens the test in the catalogue. Tests in the catalogue serves as private assessments for individual learners. The results of feedbacks and WBTs are however saved and can be evaluated.
Remove
Used to remove highlighted assigned objects. Once removed click "Save & Back" to save the changes.
Update
After edits and publication, catalogue contents can also be updated in the catalogue. Multiple contents can be selected and enabled or disabled via the appropriate icon. The status will be displayed upon enabling the appropriate checkbox in the spreadsheet.
Transfer
This icon is to transfer a highlighted object to a different catalogue.
Move Up
Highlighted objects can be moved up one place at a time. Useful if Client "Catalogue settings" has a "Manual" sort order. The order of the content displayed in the catalogue corresponds to the order in the catalogue allocation. The "Sort the contents" symbol establishes the order, which is pre-set for the entire catalogue. Depending on the setting, a dialogue enquires as to which order should be established. It is possible to select whether sorting will take place by name, object type, starting date or by upgrade date in the catalogue.
Move Down
Highlighted objects can be moved down one place at a time. Useful if Client "Catalogue settings" has a "Manual" sort order.
Preview
Opens a single highlighted object in a pop-up which is valuable to identify what assigned objects are.
Delete Catalogue
Used to completely delete highlighted catalogues. Once deleted it will not be possible to retrieve the catalogue meaning it would need to be recreated with content re-assigned if required again. An alternative of deletion is removing clearances or if a main catalogue ticking the "Do not show catalogue in front end" checkbox option.
Move Up / Down
Used to determine the order of catalogues and sub-catalogues. From the learner’s view, this will change the "Catalogues" filter order or the order below the search bar.
Clearances
Clearances for Catalogues determine which groups of users can view, edit or assign content. In addition to granting Clearance for the individual Catalogues, the main catalogue must be linked to a navigation point where required groups are also given access rights. By default all assigned contents, irrespective of their clearances, are visible to learners with clearance to view the catalogue; However, this can be changed to consider content clearance within the Clients function by ticking a checkbox in the "Catalogue settings" called "Take into account the clearances for the display of catalogue content".
Update SearchIndex
This icon is important to use after making any catalogue changes if wanting to check the changes straight away. Highlight the catalogue where changes were made and click "Update search index" to manually trigger a job to regenerate the catalogue in the learner view. The regeneration of the catalogues would normally take between 30 to 90 seconds to complete and a confirmation message will appear on screen once complete in the upper right-hand corner. There is also an automatic cron job that can be configured in the Scheduled Jobs function called "SolrIndexFullBuildJob" that could be set to execute at defined intervals to regenerate the catalogues; E.g. every 180 minutes.
Hints & Tips
-
Once any change to the catalogues are made it is a good idea to click “Update search index” to push through changes. This pushes through changes in a approximately 30 seconds rather than waiting for the next automated SOLR job to process.
-
If a main catalogue is not visible in the learner “Catalogue” view check the Main Catalogue is assigned to a navigation point, check the Clearances and in the Catalogue “Options” tab ensure the setting “Do not show catalogue in front end” is not ticked.
-
If content is not visible in the catalogue after assigning go back to the Catalogues admin function, highlight the catalogue and update the SOLR search.
-
If sub-catalogues are not visible check the Clearances and ensure there is content assigned.
-
It is possible to have public catalogues to make content available before login where clearance is granted to the client linked to the portal category. Media in a public catalogue can be accessed without an account, but courses or learning paths will require an account to enrol or request.
Related Functions
Navigation Manager
Configuration Manager - Catalogue
Catalogue Settings in Client Manager
Panels | Entry into the Catalogue
Scheduled Jobs