Here we offer guidelines for configuring the MS Teams Integration service and creating the application on the Azure Active Directory. The configuration process is divided into the following sections:
-
Creation of a new application on the Azure Active Directory (AAD) portal
-
Adding permissions to the registered application.
-
Creation of an Application Access Policy
-
Adding External Service Provider
-
Configuration of the MS Teams Integration settings
It is important to acknowledge that certain configurations within the Azure Portal have the potential to create issues or impede specific functionalities of this service. It is important to highlight that this document is unable to furnish configuration steps or information for exceptional scenarios of this nature.
Prerequisites / Limitations
-
The service (social-integration-backend) needs to be configured to be part of the delivery package.
-
A MS Teams tenant is needed (usually included in an Office 365 subscription/tenant).
-
The organizer field of the participants property cannot be updated. The organizer of the meeting cannot be modified after the meeting is created, see (Update onlineMeeting - Microsoft Graph v1.0)
-
A technical user/app needs to be created to access the Microsoft Graph API with specific permissions.
-
The frontend URL needs to be configured in the client properties.
-
The newly created Azure Active Directory Application requires Application Access Policy to enabe Virtual Classroom (meeting) functionality.
-
Some organization settings can block certain features of the integration. This document can’t offer support for the entire AAD configuration
-
Sub-course handling is not fully supported in the current MS Teams integration. Certain features may work only partially. For example, meeting invitations managed by Microsoft Teams are not fully compatible with sub-courses: if a sub-course is cancelled, participants might not automatically receive a cancellation notice.
-
The management of Microsoft Teams meeting series to use a meeting series as the basis for multiple sessions should plan alternative approaches, as it is not supported.
Benefits
Learner, Supervisor and Tutor Perspective
-
Share a course in Microsoft Teams to colleagues, team members, participants etc. to make them aware of that specific course
-
Course participants can access the course directly in Microsoft Teams (new tab in the Teams "team")
-
They can see the course context (Image, Title, Description) directly in Microsoft Teams
-
Social communication channel allowing them to chat, collaborate, share files
-
Teams are not removed when course is deleted / archived - Owners inside Teams can delete teams
-
Course specific MS teams teams are still accessible if course was completed (dependent on configuration) and can be used to add further people, e.g. for onboarding reasons
Important notice: The user is then sent to the course description page which still takes care of the access restriction, i.e. user A can share course X to user B, but user B will not be able to open the course description page.
Administrator Perspective
-
Decide if the course information can be shared / is publicly available if someone knows the URL/ API call
-
Share a course to Microsoft Teams
Functions Overview
-
Sharing visual representation of courses into Teams and Channels.
-
Creation of an individual Teams team per Course from within the course creation.
-
Representation of the course content (Syllabus) inside the course‘s team.
-
Creation/Editing/Deletion of online meetings in media / course manager
-
Attendee tracking for the online meetings
-
Inviting guest members to the organization through the service
Pre-Configuration
Creation of the Technical User / App
System Requirements
Application / Web Server
|
Product |
Version |
|---|---|
|
Tomcat |
9 |
Technology Stack
The following table provides a list of the technologies used to implement MS Teams API’s.
|
Name |
Version |
|---|---|
|
Java |
1.8 |
|
Spring Boot |
2.1.8 |
|
Gradle |
6.6.1 |
|
Microsoft Graph SDK |
5.30 |
|
Junit |
4.12 |
|
Lombok |
1.18.12 |
|
Azure Identity |
1.2.5 |
Integration Steps
Register New Application on Azure Portal.
To register a new application using the Azure Portal follow these steps:
-
Sign into Azure Portal using either a work account, school account or personal Microsoft account.
-
If your account gives you access to more than one tenant, select your account in the top right corner, and set your portal session to the Azure AD tenant that you want.
-
In the left-hand navigation pane, select the Azure Active Directory service, and then select App registrations > New registration.
-
When the Register an application page appears, enter your application's registration information.
Name - Enter a meaningful application name that will be displayed to users of the app.
Supported Account Types - Select which accounts you would like your application to support.
Accounts in this organisational directory inly (Contoso only - Single tenant)
All user and guest accounts in your directory can use your application or API.
Use this option if your target audience is internal to your organisation.
Accounts in any organisational directory (any Azure AD directory - Multitenant)
All users with a work or scholl account from Microsoft can use your application or API. This includes schools and businesses that use Office 365.
Use this option if your tearget audience is business or educational customers and to enable multitenancy.
Accounts in any organisational directory (Any Azure AD directory - Multitenant) and personal Microsoft accounts (e.g. Skype, Xbox)
All users with work or school, or personal Microsoft account can use your application or API. It includes schools and businesses that use Office 365 as well as personal accounts that are sed to sign in to services lies Xbox and Skype.
Use this option to target the widest set of Microsoft identities and to enable multitenancy.
Personal Microsoft accounts only
Personal accounts that are use to sign in to services like Xbox and Skype.
Redirect URL (optional) - Select the type of app you're building, Web or Public client (mobile & desktop), and then enter the redirect URI (or reply URL) for your application. This option is optional and can be skipped, thus there is no need to provide any values here as it is not required to fullfill the MS Teams feature.
-
When finished, click Register button.
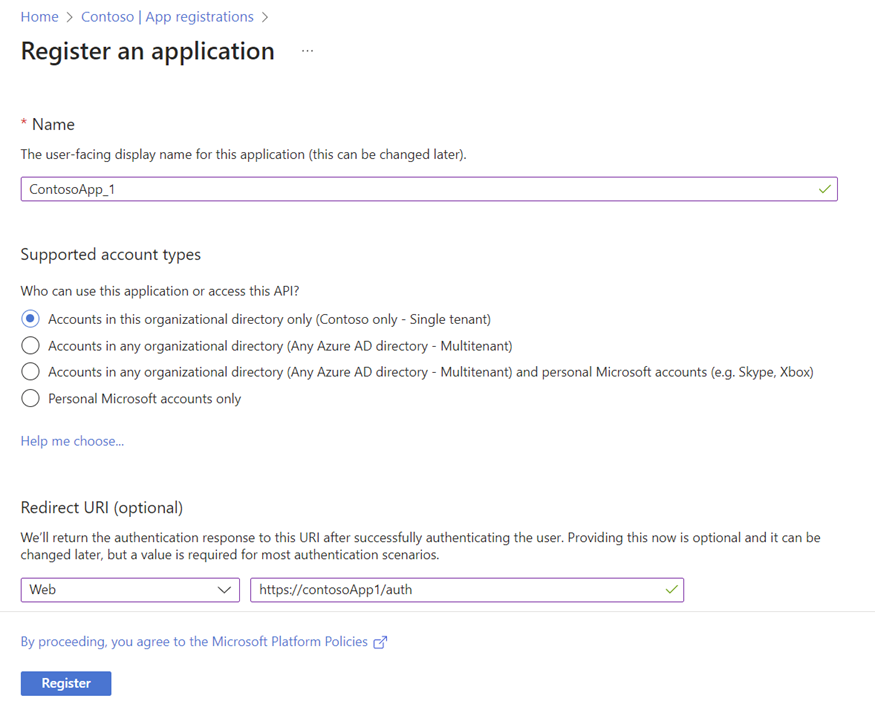
Register an application Azure AD assigns a unique application (client) ID to your app, and you are taken to your application's overview page. To add additional capabilities to your application, you can select other configuration options including branding, certificates and secrets, API permissions, and more.

Application overview page
Adding Permissions to Registered Application
Permissions are essential for enabling specific functionalities within the registered application, therefore you must create a user (there is no naming convention, you can choose a name you like). These permissions grant the necessary access rights to perform various actions, such as creating a new group, scheduling online meetings, and adding or removing members from a group.
To add permissions, perform below steps:
-
In the left-hand navigation pane, select the Azure Active Directory service, and then select App Registrations. This will list all the registered applications. Now select the newly registered application. This will redirect to the overview page of the application.
-
In the left-hand navigation pane select API Permissions.
-
Click on Add a permission button and assign the below permissions to your app at the Application level and Grant admin consent
|
Functionallity |
Privileges |
Description |
|
Group –Update,
|
Group.ReadWrite.All, TeamsTab.Create(opt), User.Read.All |
Creates a new MS Teams Group, along with the IMC LEARNING SUITE Channel Tab.
|
|
OnlineMeetings.ReadWrite.AllUser.Read.All Calendars.ReadWrite (starting with v14.25.0.0) |
Create, fetch, update and delete Online Meetings. User privilege is necessary to get the user ID(s) from the AAD |
|
|
OnlineMeetingArtifact.Read.All,
|
Get Attendance Report (time tracking) of an online meeting. User privilege is necessary to get the user ID(s) from the AAD |
|
|
Invite a Guest User (opt.) |
User.Invite.All(opt),
|
Invite a user as a guest to the tenant (organization). User privilege is necessary to get the user ID(s) from the AAD |
|
Send MS Teams Event (opt.) |
Calendars.ReadWrite |
Create an event in the user's default calendar or specified calendar. |
From the table above, you can see that 2 permissions have an optional flag (opt).
-
TeamsTab.Create
-
User.Invite.All
In the LMS configuration, these two optional permissions can be disabled. This allows you to decide whether you want newly created groups to have tabs created or not. Additionally, you can also choose whether or not to invite guest members to the organization through the imc Learning Suite. This doesn’t make the “Group” functionality optional as only part of the functionality is disabled.
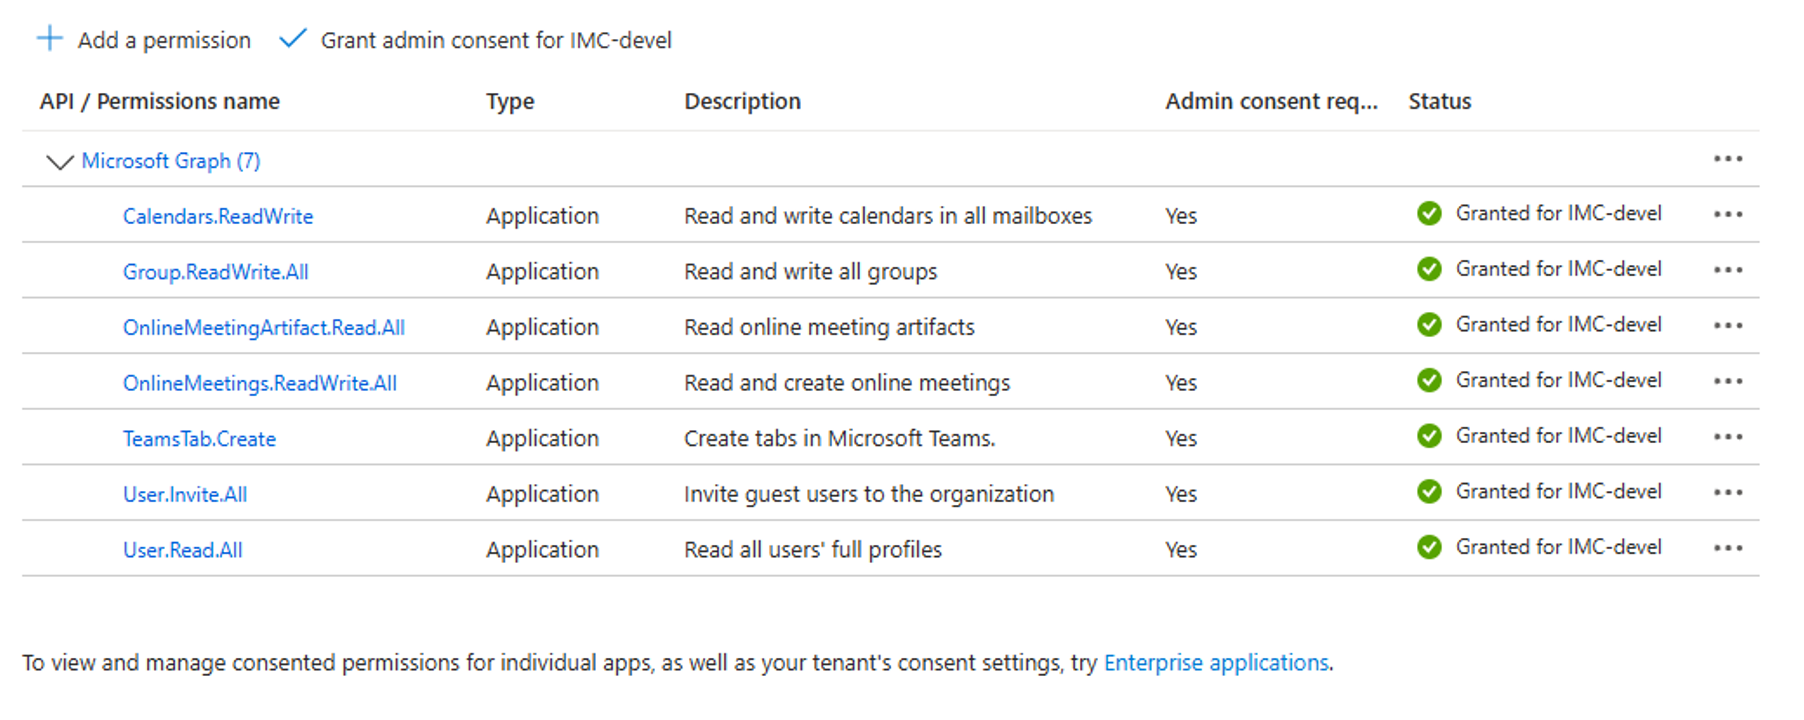
Further examples:
-
If you deem Online Meeting functionalities to be unnecessary, you can avoid granting OnlineMeetings.ReadWrite.All permission, and ignore Online Meeting functionality altogether. The rest of the service will function as intended as long as you’re not trying to create an online meeting. Trying to use Online Meeting functionalities without having the mandatory permissions will result in an error.
-
If you only wanted to use the “Group” functionalities of the MS Teams service, you would only be obligated to add Group.ReadWrite.All, User.Read.All permissions, and choose if you would use tab creation. If tab creation is unnecessary too, then it should be disabled in the configuration and permission doesn’t need to be granted.
-
If you don't include TeamsTab.Create permission, embedding LMS within a Tab in a Teams Channel will not be possible. Similarly, if you disable invite.User permission, it will not be possible to invite external people.
Minimum Required Permissions
Several service functionalities are considered optional, including guest inviting and teams tab creation, and can be disabled through the configuration page.
However, there may arise situations in which certain features of the service are deemed unnecessary or where clients may choose not to grant specific permissions. Failure to grant the necessary permissions for a specific feature will render the feature unusable. However, it is important to note that the service will remain accessible for all other features that have been granted mandatory permissions.
In such circumstances, it is important to present a list outlining the minimum required permissions for enabling each functionality within the service:
-
Group creation: Group.ReadWrite.All, User.Read.All, TeamsTab.Create (opt.)
-
Online Meetings: OnlineMeetings.ReadWrite.All, User.Read.All, Calendars.ReadWrite (starting with v14.25.0.0)
-
Attendance Tracking: OnlineMeetingArtifact.Read.All, User.Read.All
-
Guest Inviting: User.Invite.All(opt.), User.Read.All
-
Send MS Teams Event: Calendars.ReadWrite
If you decide to only use the Group functionalities of the MS Teams service, these are minimum required permissions:

Similarly, if you were only interested in using Online Meeting functionallities of the MS Teams service, the minimum required permissions would look like this:

Application Access Policy
In order to enable online meeting creation through the Microsoft Graph API, the OnlineMeetings.ReadWrite + Calendars.ReadWrite (starting with v14.25.0.0). All permission is required, but to use this permission for this API, tenant (organization) administrators must create an application access policy.

See for more information: Configure an application access policy using the cloud communications API - Microsoft Graph
Further Information on ReadWrite.All Permission
For the creation, deletion, and editing of Online Meetings the “OnlineMeetings.ReadWrite.All” permission is mandatory from Microsoft.
Microsoft therefore has some security measures in place to control who can create, view, edit, and delete meetings.
-
To create a through the API, the organization needs an application access policy as mentioned in chapter 4.1.6. This policy controls which users have the right to create online meetings.
-
Before assigning an application access policy to a user, the user needs to have a license that includes Team Services, and the user type is not a guest. To edit or delete meetings, Microsoft requires both the meeting ID and the organizer ID.
imc Learning Suite only has access to meetings created in imc Learning Suite.
-
To delete or edit meetings, a user would need an Organizer ID (User ID) and Meeting ID. In adition to that, in imc learning Suite, a user has to be part of the organizer group to be able to create online meetings.
-
Please note that only Meeting organizers from imc Learning Suite are able to manage e.g. edit or delete an online meeting that they have created. If a user doesn't have the right to do it, they can't delete meetings in imc Leanring Suite.
Application Credentials
Upon successful creation of a new application, it is automatically assigned a unique application (client) ID. This ID is crucial for identifying the specific application and tenant (organization) to which requests are to be sent.There are 3 values that are used to authenticate each request from the service to the Microsoft, and those are:
-
Application (Client) ID
-
Tenant ID
-
Client Secret (value)
Client ID and Tenant ID values, you can directly see from the applications overview page:

Initially, applications do not have a secret assigned to them, so you need to create one. To generate a new client secret, you need to click on the Certificates & Secrets in the left menu of the applications setting

When adding a new secret value, it is essential to provide a concise description of its purpose and set an appropriate expiration date, as secrets cannot be permanent. We recommend setting the secret to a maximum validity period of 2 years.
The expiration date for the secret can be selected from the following options. However, it is important to consider that opting for a shorter validity period will necessitate more frequent updates with in the External Service Provider page.

Application Client
-
The application client can manage any resource that it has permission to, but it is still limited to the resources available in the LMS system. The whole process is automated, and the application client is created with 3 IDs that can be found in the organization settings. On the other hand, delegated clients use personal login credentials.
-
Once the application client is initialized, it can be used freely. In comparison, if you would have a delegated client, you would have to provide user credentials on each call to Microsoft.
-
To create or delete meetings and groups, users must have a general license applied to them in the Azure Portal. Additionally, to create meetings, users must have an application access policy created for them, as referred to in chapter 4.1.6.
Delegated client
Allows the use of a dedicated user account to manage permissions, which improves the granularity of access control.
The basic configuration of the external service provider is described below. Here, we will only discuss the fields that are specifically relevant to delegated permissions.
-
External Service Provider
-
Permission Type - Indicates if authentication to authenticate API calls from the LMS to the Socialitnegration service are done with the application (client_id, tenant_id, client_secret + organizer) or delegated (client_id, tenant_id, client_secret + user token)
-
Redirect URL: Required from Microsoft’s side, to redirect to our LMS system once the user authentication page has been successful, to send us a user token (REQUIRED only if using delegated permissions)
-
-
System URL - During delegated authentication, we redirect a user to different parts of our system, because of that we need to have the system URL clearly defined.
System URL is pulled from 2 places:-
Configuration Manager/Client/Learned Frontend URL
-
Configuration Manager/Platform/Platform URL
-
→ If the primary is empty, the value will be selected from the secondary.
-
-
MS Teams Media type without an organizer - As delegated auth does not require an organizer meta tag, we must create media without one, by default, an organizer is required for MS Teams media type
__________________________
Microsoft Azure Portal Configuration - To set up delegated authentication type, it is required to configure the Azure Portal system:
-
Set up a new application (same as for application authentication):
Generate a new application (client_id, tenant_id, client_secret)
-
Set up the Redirect URL:
Once the application has been set, on Authentication (Preview) page, it is required to set up redirect URL. Redirect URL is composed as following: {SYSTEM-URL}/ils/restapi/lms/msteams/oauth/code (same value that should be entered in the external service provider)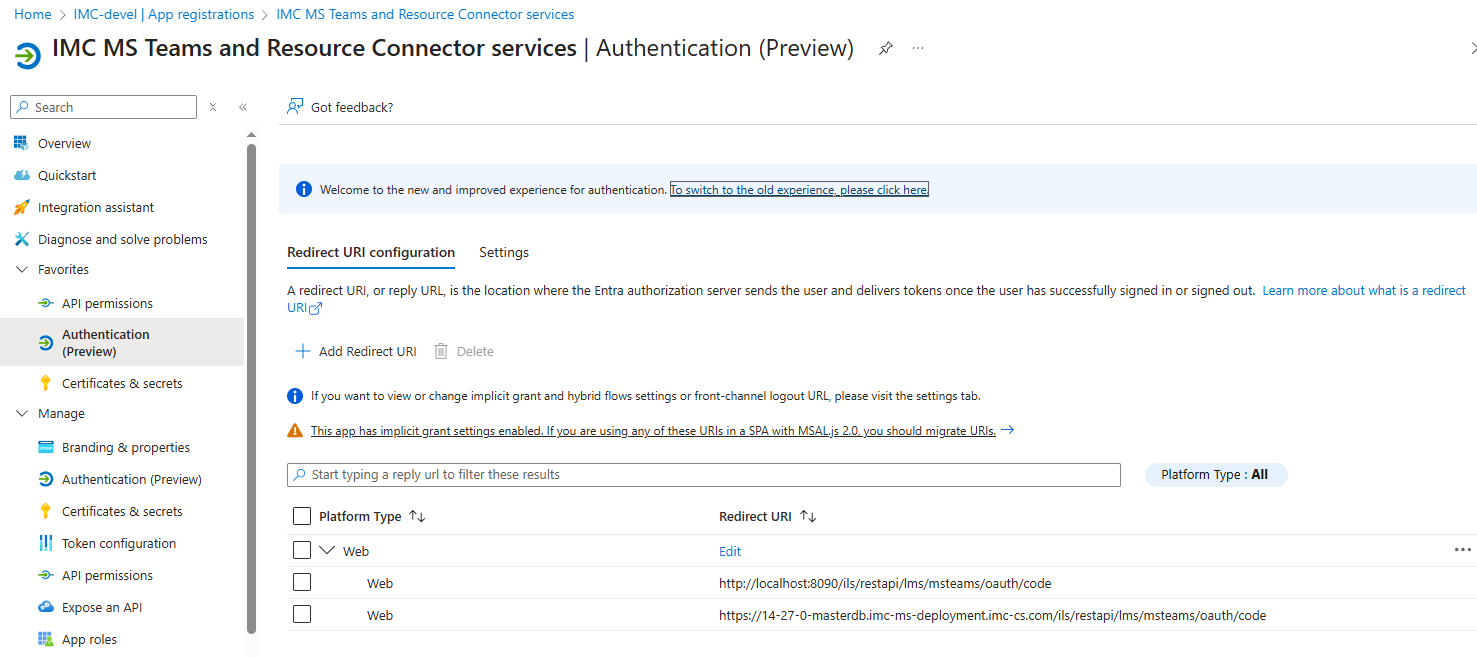
-
Set up permissions:
As for application authentication, for delegated we require certain permissions to grant users rights to create/manage resources (meetings, calendars, teams…)-
Fetch the user token (required):
-
openid→ required to sign the user in -
profile→ basic user info -
offline_access→ used for refreshing tokens
-
-
Online Meeting:
-
OnlineMeetings.ReadWrite
-
User.Read.All
-
Calendars.ReadWrite* (used for creation of calendar entries)
-
User.Invite.All*
-
-
Attendance tracking:
-
User.Read.All
-
OnlineMeetings.ReadWrite
-
OnlineMeetingArtifact.Read.All
-
-
Group creation:
-
Group.ReadWrite.All
-
User.Read.All
-
User.Invite.All*
-
TeamsTab.Create*
-
-
-
-
- Configurable permissions, which, if not used, should be disabled through configuration!
Configuration
Social Integration (MS Teams) Configuration
Main configuration is done in the configuration manager, entry “Social integration”

The Microsoft Teams service offers two distinct deployment types, which are determined by the method of imc Learning Suite deployment. The available deployment options are as follows:
-
Local Deployment: System and the service are running locally on the system
-
Kubernetes Deployment: System and the service are running within the virtual Kubernetes environment.
Description of configuration settings:
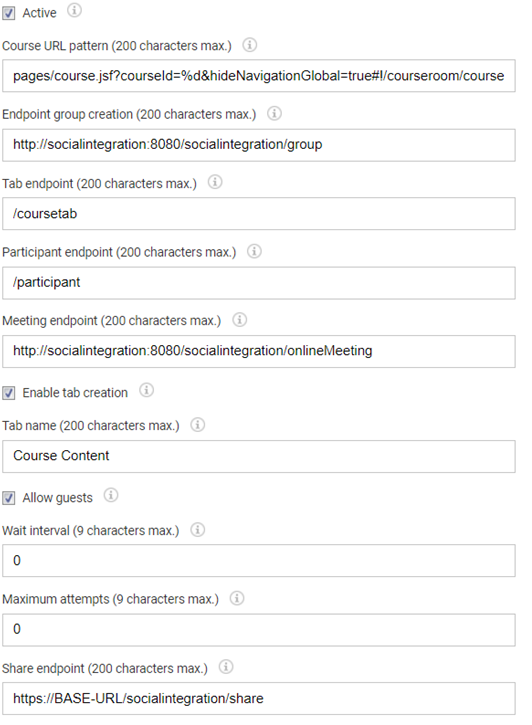
-
Active - Used to generally enable or disable the integration
-
Course URL Pattern - Value used for course sharing, as customers URL pattern is required. hideNavigationGlobal=true specifies that the navigation will not be displayed within the tab.
-
Endpoint Group Creation – API endpoint to create groups (i.e., teams); including internal domain and port value dependent on installation, e.g. Kubernetes, REALM, etc.
-
Tab Endpoint – API endpoint to create a tab with a website URL in the general channel
-
Participant endpoint – API endpoint to add and remove participants
-
Meeting endpoint – API endpoint to create online meetings (i.e., virtual classrooms) Value dependent on installation, e.g., Kubernetes, REALM etc.
-
Enable tab creation – Used to enable or disable tab creation; currently only generally
-
Tab name – Used to define the name of the channel tab
-
Allow guests – Used to define if guest inviting is enabled
-
Share endpoint – API endpoint used for sharing; including external domain Value needs to be built with customer system URL. BASE-URL corresponds to base URL of the customers system.
-
“Wait Interval” – (optional) millisecond to wait for before adding participants, "groupEndpoint" may take up to 15 minutes to create a new team
-
Max Attempts – (optional) max number of check if "groupEndpoint" created a new team, before adding new participants
It is important to note that depending on the chosen deployment type, the group creation and online meeting endpoints values within the configuration may have different values.
Group Naming Policy
A group naming policy is added to the tenant (organisation) 's External Service Provider page.
Azure Active Directory offers a group naming policy. If a group naming policy is implemented within the organisation, it is important to mirror this policy in the external service provider of the organisation.
If the group naming policy exists within the Azure Active Directory for the organisation, and the same prefix/suffix is not configured in the Learning Management System, the group creation feature may result in issues.
It is worth highlighting that even if a group naming policy is not implemented within the Azure Active Directory, it remains possible to utilize this feature within the Learning Management System. This allows for a clear differentiation between groups created through the Organisation settings and those created specifically via the Learning Management System.
Group naming policy is added on the External Service Provider page of the tenant (organisation).

Social Integration Configuration File
Editing the service configuration file for the configuration settings is now considered deprecated. However, there is one specific value that still requires modification through the service configuration file, namely userBasicAuth. This variable is essential for enabling the MS Teams sharing feature, within imc Learning Suite application.
In order to integrate an imc Learning Suite course into Teams, several values need to be retrieved from it, including the course name, URL, description, and image. To accomplish this, an administrative account is required to log in and retrieve these values. This can be achieved by logging into imc Learning Suite with the service account, although valid login credentials are necessary for this purpose.
The userBasicAuth variable stores encoded credentials that enable the service to authenticate with the provided account and retrieve the necessary values.
As previously stated, these values must be encoded in base64 format and follow the structure of "username:password".
For instance, if you are granted to generate this value for an account with the username "test-user-01" and the password "test-pass-01", it would appear as follows:
Encoded value: test-user-01:test-pass-01
Now that you have credentials generated, you need to encode them, using base64 encoding.
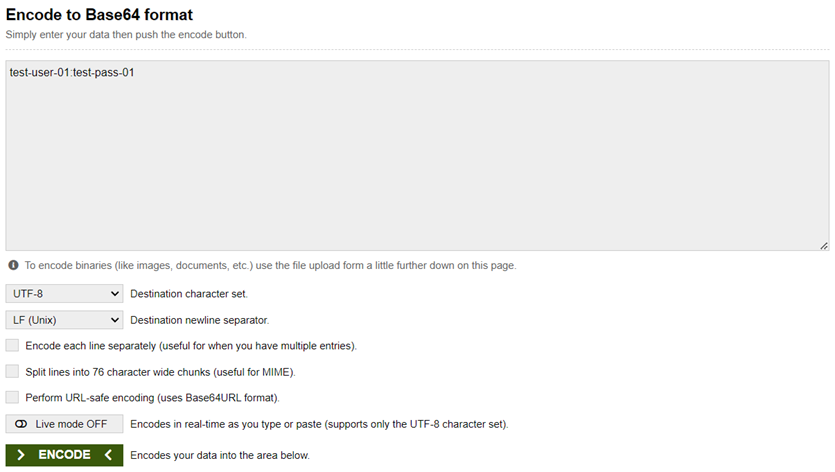
The encoding of the given value will result in the following output: dGVzdC11c2VyLTAxOnRlc3QtcGFzcy0wMQ==. Subsequently, the next course of action is, creating an ECMT ticket to the update of the userBasicAuth value within the configuration file.
To ensure a smooth and secure process, we highly recommend creating a new technical administrator account within imc Learning Suite, solely dedicated to this feature. The credential change will require an update of userBasicAuthand a new ECMT ticket.
External Service Provider for MS Teams
To be able to use MS Teams functionalities via the imc Learning Suite (meeting or group creation), the active directory credentials (client id, tenant id, client secret) for the tenant must be linked to the imc Learning Suite.
This is possible via the External service providers manager, by selecting MS Teams:
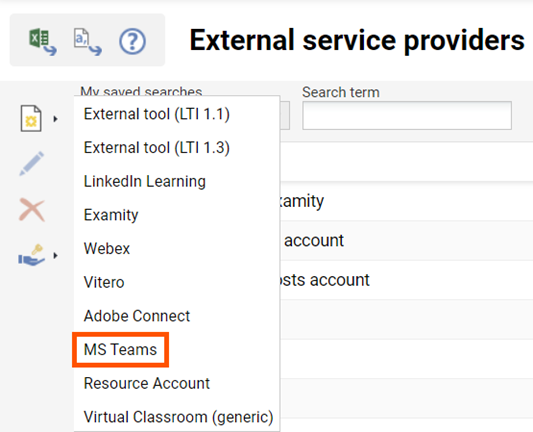
The external service provider for MS Teams requires a client ID, client secret and tenant ID that must be obtained via the Azure Active Directory setup.
Corresponding fields are available for each of the three.
The system allows you to create multiple external providers of type MS Teams. This ensures that in a multi-tenant system, users belonging to different tenants can use different Teams installations.
Media Type, Course Template and Media Creation
Prior to utilizing any features within the MS Teams integration, it is important to note that the external service provider is necessary for the creation of the online meetings and groups. Consequently, both media types involved in the creation of these meetings and groups will necessitate the inclusion of an external service provider meta tag.
Online Meeting Media Creation Type
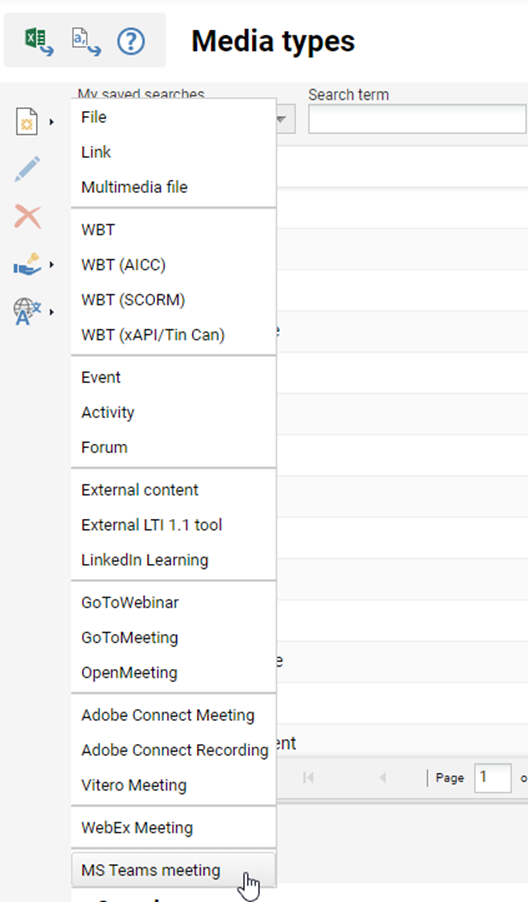
By default, the MS Teams media type will ask the admin to select the external service provider that should be used for all meetings created from the given media type.
A meeting organizer is available to be selected, but not mandatory for the media type. Both the organizer and the scheduling will be required on the media level, as it is not possible to create a meeting without scheduling or an organizer.The organizer selection is made available based on group assignment and clearances, based on the MS Teams organizer function of the group.
Special attention must be paid to the fact that the system cannot determine which organizers belong to which organizations, therefore it is advisable that dedicated groups are created for dedicated tenants. Selecting an organizer that belongs to another MS Teams installation than the one used for the particular media setup will result in the meeting not being created.
Once a media type is available, it can be released to the relevant media or course admins that can create system-wide or course specific meetings.
After the media is added to the course and the course is saved, the meeting will be created on the Microsoft side.
A successfully created meeting will display the option to open the meeting from the media deta Imc Learning Suite inside the course components tab:
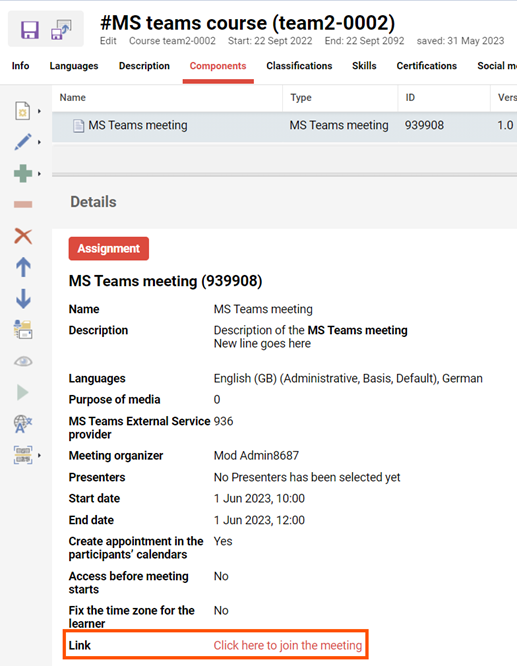
If participants are already enrolled or have started the course, they will be added as meeting attendees.
Adding participants later to the course will ensure that they are also added to the meeting.
Removing participants from the course will result in the participant being removed from the list of meeting attendees.
Administrative Options
The administrative options work in conjunction with the meta tag “Send MS Team Event".
Media types for MS Teams meetings can be configured with administrative settings via meta tags. These settings enable control over participant permissions and meeting behavior, such as chat functionality, camera and microphone usage, and lobby bypass rules. The configuration is available per media type and follows the existing meta tag based configuration approach.
Following administrative options are available:
-
Allow camera (ID: 11883)
-
Allow microphone (ID: 11885)
-
Allow reactions (ID: 11884)
-
Entry exit announcement (ID: 11887)
-
Allow breakout rooms (ID: 11893)
-
Allow recording (ID: 11892)
-
Allow transcription (ID: 11891)
-
Automatic recording (ID: 11886)
-
Allow presenters (ID: 11888)
-
Bypass meeting Lobby (ID: 11890)
-
Allow chat (ID: 11889)
MS Teams Group Course Template
In contrast to online meetings, the creation of MS Teams Groups is limited to the course level rather than the media level. To create an MS Teams Group from a course, specific meta tags need to be associated with the course.

The aforementioned meta tags are essential prerequisites for the creation of a group, in addition to the mandatory organizer meta tag at the course level.
However, it is important to note that merely having these meta tags in place does not automatically generate an MS Teams Group from a course. The process involves selecting an external service provider (or organization) for which the group is intended, followed by the selection of an organizer (or administrator) from within that organization. The administrator's email address must be registered within the Azure Organization users.
Once these two input fields have been successfully populated, setting the "Integrate in Microsoft Teams" meta tag to true will trigger an attempt to create the group from the course upon saving the course.
Any participants who are currently enrolled or have started the course will be included in the group as members. The management of group members can be achieved by enrolling or removing participants from the course.
Please note that in the current version of the service, the group cannot be viewed in the ILP. Once the group has been created, it will become visible within users' Teams applications.

Within the configuration settings of the service, there exists an option to generate a new tab during the creation of a group. This tab will incorporate the course for which the group was established, providing an embedded integration within the Teams application.
When the checkbox for "Enable tab creation" is selected, the group creation process will include the incorporation of a corresponding tab. The attribute "Tab name" will reflect the name assigned to the newly created tab within the Teams application.
Sharing imc Learning Suite into the MS Teams Group
It is possible to share imc Learning Suite courses directly through to MS Teams channels or private chats. This functionality can be achieved by utilizing the MS Teams share button, conveniently located on the course page.
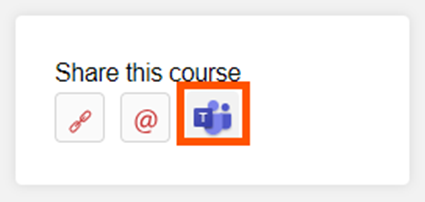
To enable course sharing, it is mandatory for the course template to have the following, “Allow Sharing” meta tag:

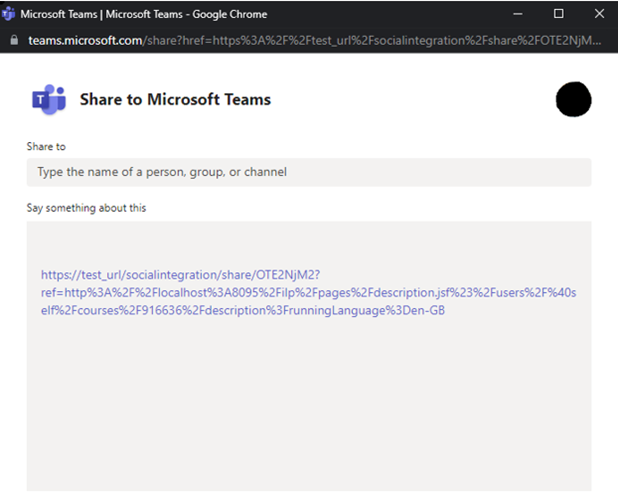
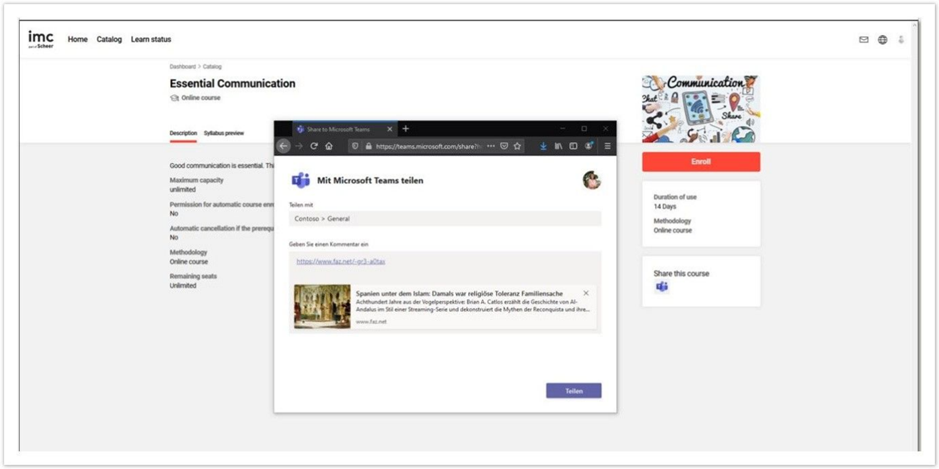
Clicking on the share icon will open a following window. The service will detect if the service application is running and prompt the logged-in user, to select which channel or private chat, they want to share course to.
If the "Teams" meta-tag is enabled, and the "Allow sharing" meta-tag is also enabled, once I save the course, a new Teams group will be created with the same name as the course I just created.
Before saving the course, make sure you add a user that has Teams enabled as the Course admin in order to generate the Teams channel.
Once the course is save and the group is created, the course creator is automatically set as group owner.
-
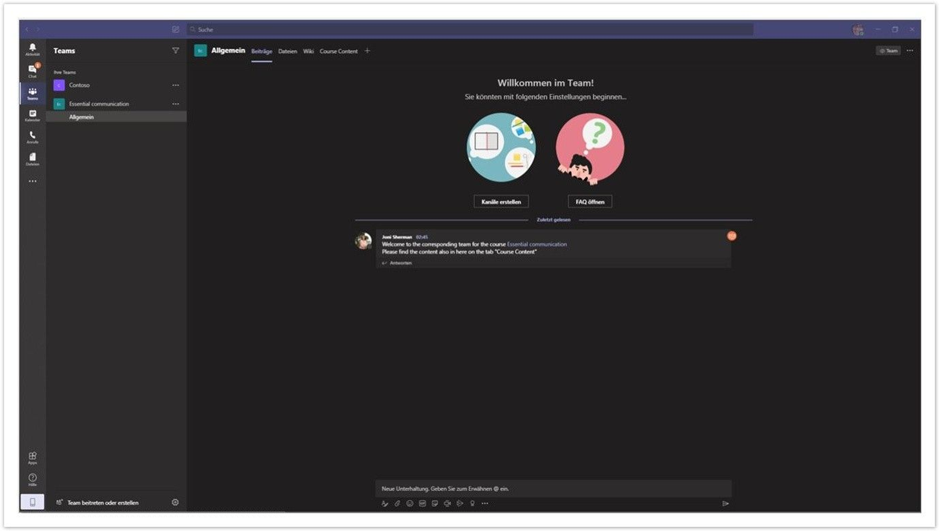
On saving the course, a team in Teams will be created that shares the name and description of the course.
-
The team has a general channel for communication as every team has.
-
The team has an additional tab that integrates a link to the course syllabus page to allow access to course material.
Further Information
Guest Invitation
The MS Teams implementation facilitates the ability for administrative users, to invite user, who are not part of the organization's (tenant's) domain, as guests to the Azure organization.
This feature is supported in both the creation of online meetings and the creation of groups. For this feature to be enabled, you need to check the “Invite Guests” checkbox in the configuration. In addition, the meta tag “Allow Sharing” must be activated in the course template.
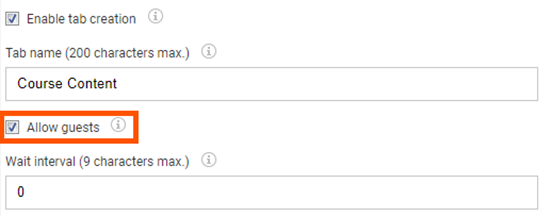
Guest users can be invited either during an online meeting or during the creation of a group. By selecting the appropriate checkbox, any members who do not belong to the organization specified with the chosen external service provider can be invited to the organization as guests. This grants them the Guest role within the organization. If participants have the meeting link and are permitted to join as guests, they can access the session. MS Teams meeting links work independently of whether the participant uses the Teams app or a web browser.
External User as Tutors in a Course
Users invited to the organization can only have the guest role; this also applies to Tutors assigned to a group for a course.
If a tutor cannot be found within the organization used to create a group/team, they are moved to the list of regular members with the role of a guest, otherwise the creation would be blocked by Microsoft. Tutors have the rights listed under this list, under the guest type.
Tutors who are not in the organization would have to be added to the organization (with a company email address) so that they are not set as guest members. Only then could they be set as an owner of the group/team, along with the actual course owner. A limitation from Mircosoft causes this.
Note: If the option “Allow guest” is inactive, then it is not possible to invite guests as mentioned in the chapter “guest invitation”. Inviting guest users to the organization is as straightforward as adding regular members to an online meeting or a group.
Reporting: Time Spent in Online Meeting
Course organizers have the capability to monitor user attendance through the imc Learning Suite LMS’s MS Teams integration. This functionality enables organizers to access essential information such as the user's initial meeting entry time, the time they last exited the meeting, and crucially, the duration of their participation. Tracking these data Imc Learning Suite is facilitated through the course instructions page.
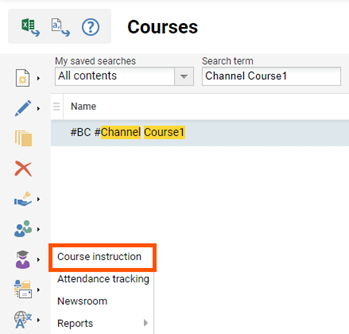
When clicking on the course instructions, you will be greeted with the following page:
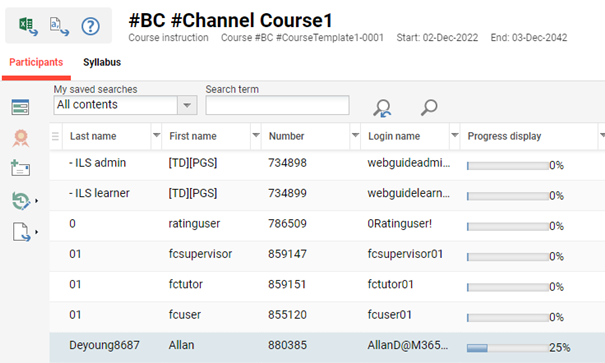
To utilize the attendance tracking feature, it is necessary to navigate to the syllabus tab and choose the specific meeting media for which tracking information is desired. Once the meeting media has been selected, on the left-hand side, clicking the "Progress Per User" button will activate an alternate view enabling the tracking of attendance for all course participants who accessed the online meeting.
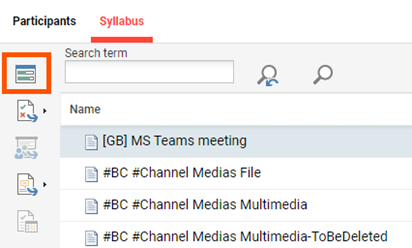

One important point to highlight is that in order to access the attendee tracking for a meeting, participants must be “in progress” in a course.
Automatic attendance tracking based status change for MS Teams meetings
Attendance status for MS Teams meetings can be determined based on the actual duration of participation. The meta tag “Required attendance time (in min.)” with the ID 11881 which is added to the media type by default allows administrators to define a required minimum attendance time for each session. If a participant meets or exceeds this defined time, their attendance status is set to “passed”. If the time is not met, the status is set to “failed”. Users need to be “in progress” for the course in order for the attendance to be tracked and to set the status to failed/passed.
The scheduled job “MSTeamsStatusSynchronize“ retrieves attendance data from MS Teams and updates the status accordingly. This automation supports training compliance by ensuring that only participants who fulfill the minimum time requirement are marked as attending. The updated status can be seen in course instruction > course progress per user.
Attendance tracking is limited to 20 sessions per course. A session is defined from the start of the meeting until all participants have left or the meeting is closed. Attendance data becomes available to administrators only after the meeting has ended and data has been fetched.
Waiting Room
If users are not invited to a meeting and they try to access it via a shared link or email they will be placed in a waiting room and the organizer must let them in manually. If you have some guest users attached to a meeting (be a presenter, attendee, or guest), they can freely enter a meeting just like any other invited user.
Maximum number of meeting attendees
Microsoft Teams imposes a general limitation on the maximum number of meeting attendees. There is no configuration option within the LMS or Azure Active Directory to define a custom maximum attendee limit, as this is not supported by Microsoft.
iCal ULR & Safe Links Settings
Please note that if you participate in a virtual appointment using the appointment invitation in your calendar, your camera and microphone may be deactivated and rendered unusable. This is due to a feature called "safe link policy" that is included in an extended Office 365 license. Along with other features, this policy provides enhanced IT security functions. Unfortunately, we are unable to offer support in configuring this feature, as it is the customer's responsibility. You may refer to the documentation provided by Microsoft for further information.
Screen Sharing within a MS Teams Meeting
Only meeting participants who will be set the role as ‘Presenter’ will be able to share their screen during the meeting. Please also see the next chapter on the roles.
Roles in Microsoft Teams Meetings
If you're organizing a meeting with multiple attendees, you may want to assign roles to each participant to determine who can do what in the meeting. There are three roles to choose from: co-organizer, presenter, and attendee. Co-organizers and presenters share most organizer permissions, while attendees are more controlled.
Below are the specific capabilities of each role.
Note: Co-Organizers are not available within imc Learning Suite.
|
Capability |
Organizer |
Co-orgnaizer |
Presenter |
Attendee |
|
Speak and share video |
|
|
|
|
|
Participate in meeting chat |
|
|
|
|
|
Share content |
|
|
|
|
|
Privately view a PowerPoint file shared by someone else |
|
|
|
|
|
Take control of someone else's PowerPoint presentation |
|
|
|
|
|
Mute other participants |
|
|
|
|
|
Prevent attendees from unmuting themselves |
|
|
|
|
|
Remove participants |
|
|
|
|
|
Admit people from the lobby |
|
|
* |
|
|
Change the roles of other participants |
|
|
|
|
|
Start or stop recording |
|
|
|
|
|
Start or stop live transcription |
|
|
|
|
|
Manage breakout rooms |
|
|
|
|
|
Change meeting options |
|
|
|
|
|
Add or remove an app |
|
|
|
|
|
Use an app* |
|
|
|
|
|
Change app settings |
|
|
|
|
*People in presenter roles who are not signed in can't see or admit others from the lobby on Teams web and desktop.


