Organisational structures can be replicated using hierarchical Business Unit (BU) Groups that create reporting lines by establishing one-to-many relationships between BU Group Supervisors and the Users within the groups. These reporting lines allow the Supervisors to view their staff in the My Staff function, view their staff in the “Supervisor” reports, perform training enrolments on behalf of their staff and approve their staffs' training requests. The BU Groups are additionally ideal for granting clearances to objects (e.g. to catalogues) and using within training enrolment workflows like automatic enrolments or prerequisites.
There are three ways that Business Unit Group structures can be created in the LMS which are:
-
Manual creation in the LMS GUI
-
Manual import using .csv in fixed format
-
Automatic interface using .xml files in fixed format
Manual Creation of BU Group Structures
The simplest way to create a basic BU Group organisational structure is by doing it manually. This approach can be ideal for smaller structures that do not undergo regular change and where there is no external source system that can provide the structure.
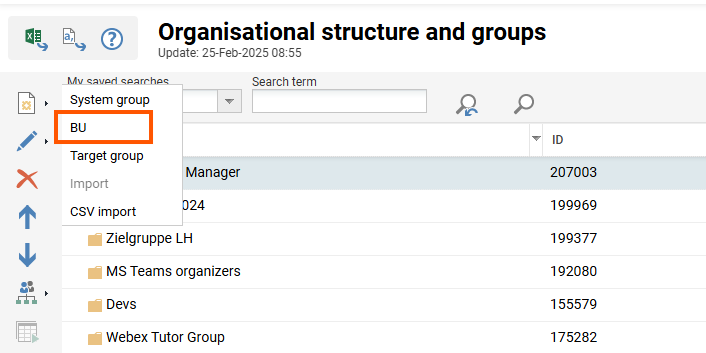
Business Unit groups are created in the “Organisational structure and groups” function accessed via the “Admin → People → Group administration” menu path. To commence creation of a group click the “Create” icon and select the “BU” option.
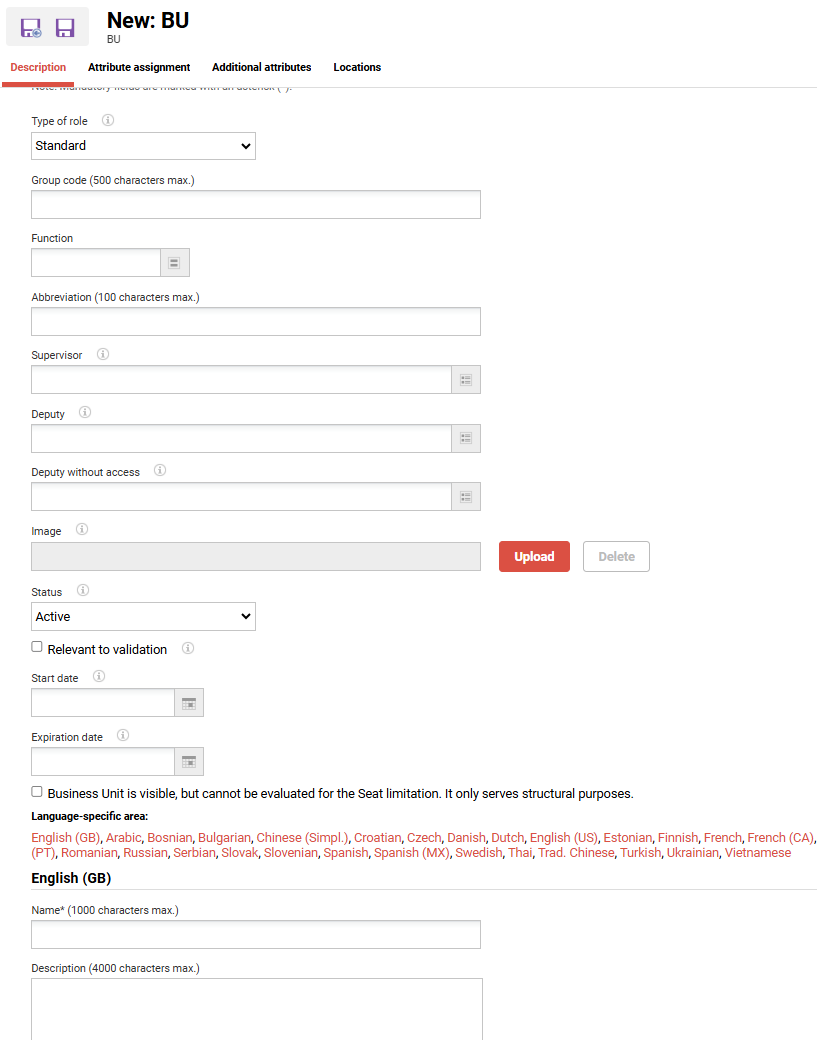
If an existing Group was highlighted when clicking create there will be a pop-up window asking whether you would like to create “Before” or “After”; if no group was highlight the tab will refresh with a screen to commence populating the new BU Group. Here only the “Description” tab fields need to be completed and below are the main meta fields to complete with descriptions:
Type of role
Normally “Standard” is used for BU Groups. Changing to “Content administration” sees all users within the group receive clearance to objects created by other users in the group. This could make sense for some BU groups where members actually create content in the LMS such as HR departments or Training teams.
Group code
This field has no actual function in the LMS, but can be used for assignment of users to the BU Group with custom business rules that look for a match of a user profile attribute value to this Group Code vale
Abbreviation
This field can also be used for the group code.
Supervisor
Enables selecting one or more users that are responsible for managing the Business Unit Group and provides them with visibility to the staff assigned to the Group. The “Deputy” field is basically the same and just does not receive email notifications that the Supervisors do.
Deputy
Deputy supervisors have the same rights as the supervisors. Deputies can be displayed in the BU profile; they are not displayed in the organisational chart.
Deputy without access
A deputy without authorisations does not receive the same settings as the superior. Rather, he acts as a contact person for certain tasks whilst the supervisor is on holiday for example. In addition, these deputies can be displayed in the BU profile but not in the organisational chart.
Status
The status must be “Active” for the Group to be used throughout the LMS. If the BU Group is no longer needed it can be made “Inactive” or deleted if a record is no longer required.
Start date
The start date can be used to automatically change the status of an BU to “active”.
Expiration date
If the end date of an BU is reached, it automatically receives the “inactive” status.
Name
Enter a name for the BU Group. This does not need to be unique, but is recommended.
Description
Optional fields can be used to describe the role of the BU Group within the organisation including Goals and Achievements which can be renamed if needed.
Visibility of BU
Business Unit is visible, but cannot be evaluated for the Seat limitation. It only serves structural purposes.
Populate these fields with details for the base BU Group and then click the “Save and Back” button.
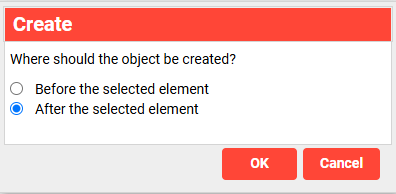
The next step is to create the first level child BU Groups from the base BU Group. To do this highlight the new base BU Group that was just created, click the”Create” icon and select “BU”.

Now ta pop-up will ask where the new group is to be created, select “In the hierarchy below the selected element” and click the “OK” button. This will once again refresh the tab with a screen to populate a new BU Group- where the “Description”' tab fields need to be completed. Keep repeating this process until the required structure has been created.
Once the structure is created it can be a good idea to give Clearances on each Group to the Supervisors so they can view their own groups in system filters.