In addition to the featured highlights, there are many more innovations and improvements to discover in the product core. Core updates are listed by their category in the tables below:
Catalogue Management
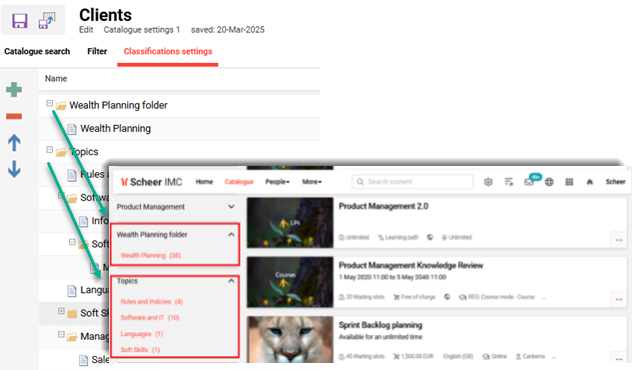
Display Only Certain Classifications in the Catalogue Filter
Overview: A new update in the Client function Catalogue settings menu enables configuration of Classifications within catalogues. A new tab enables selecting desired parent level classifications to display as well enabling/disabling their sub-classifications, and updating the display order of parent classifications. This configuration is possible per client.
Benefits and Use Cases: Learning objects can be tagged for a variety of reasons and are not always assigned to objects to aid searching. The key benefit of this enhancement is for systems with large amounts of classifications to control which are displayed within the catalogue Classification filter. A reduced number of displayed classifications will help simplify the search options.
Audience: Learners and System administrators
Setup & Access: Go to the Clients function, highlight a client, click the Settings icon and select Catalogue settings option. In the new Classification settings tab add the desired classifications to be displayed and adjust the order as required.
Considerations & Limitations: If no classifications are added, the current behavior will apply, all classifications being shown based on the catalogue content.
Testing: Open the Client function and edit the Catalogue settings menu. Update the Classification settings tab and add desired Classifications to display in the filter. Then click the Update search index icon in the catalogues menu. Then switch to the Learner category and access the Catalogue in the learner view. The Classification filter will only display the enabled classifications configured for that client.
Risk rating: Low.
Positioning Newly Added Content to Top of the Catalogue
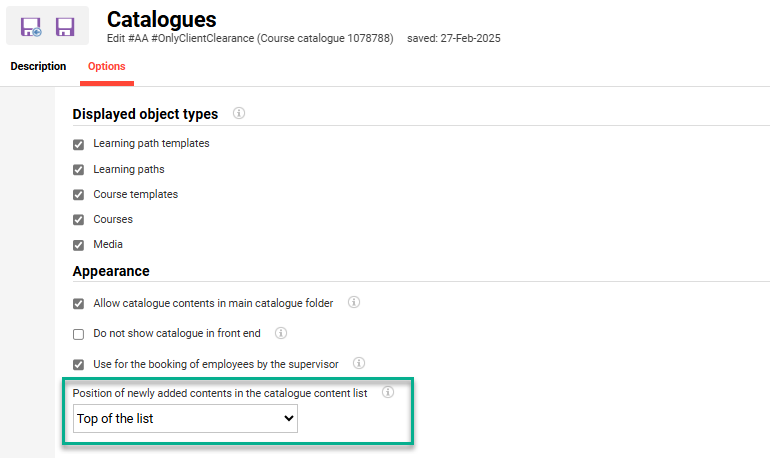
Overview: A new admin setting has been introduced in ‘Main’ catalogues Options tab that impacts the Content assignment function. The setting determines whether newly added content is automatically positioned at the top or bottom of the content list during assignment.
Benefits and Use Cases: There are various use cases and benefits for both Learners and Administrators:
-
more efficient administration of the catalogue content when new content is priority
-
flexibility remains to adjust the positioning of the catalogue content
-
better learner visibility and prioritisation of the catalogue content
Audience: Learners and Administrators
Setup & Access: The selection setting is automatically available in all “Main” catalogues with the default value ‘Bottom of the list’. This matches the previous standard behaviour. To change the setting go to the Admin category, in the Assignment menu edit the Catalogue function. Highlight a “Main” catalogue, click the Edit icon, go to the Options tab and in the Position of newly added contents in the catalogue content list field select Top of the list.
Considerations & Limitations: The learner view of the catalogue content order is determined by configuration settings including:
-
The Client function Im Tab tab Sorting field value must be “categoryId asc,categoryPosition asc” to display the new Top of the list option;
-
In the Navigation function, ‘Catalogues’ menus allow multiple ‘Main’ catalogues to be assigned. In this case content from multiple main catalogues would initially be displayed meaning the displayed content sorting order cannot be determined by the sorting of a single catalogue until the learner set filters to display results from a single “main” catalogue.
Testing: As an administrator Edit a “Main” catalogue to ensure the “Bottom of the list” is defaulted in the Options tab. Then change to “Top of the list” and click the Save and back button. With the “Main” catalogue still highlighted click the Content assignment icon. When adding content it will automatically add to the top of the list. To reflect changes in the learner view click the Update search index icon to regenerate the catalogue structure and contents.
Risk rating: Low
Course Management
Planning Status as new Search Criterion for Course Templates
Overview: The Course templates function has been updated with an optional Planning status search filter and column. This filter is a pop-up selection where one or more planning statuses can be selected. Based on the selection, the results will be adapted to show course templates that have one of the defined planning statuses.
Benefits and Use Cases: This update allows content administrators to search for course templates according to the search filter "Planning status". This could be used to restrict displayed course templates as possible with courses; e.g. by statuses Released, Locked, Fixed, Concluded and Cancelled.
Audience: Content administrators.
Setup & Access: The new filter and column will automatically be added as optional:
-
The new search filter can be activated using the “Add search criteria” option.
-
The optional column can be activated using the “Add Columns” drop down.
Considerations & Limitations: As course templates do not actually have a Planning status field, the value is derived by the default value set in the Course description tab Planning status meta tag.
Testing: In the Course templates function click the Manage search settings icon and select Add search criteria option. In the pop-up highlight Planning status and click the Add button. Maximise the search, populate the filter, and click the Search icon.
Risk rating: Low
Enrolment Date as new Sorting Criterion for Learning Status
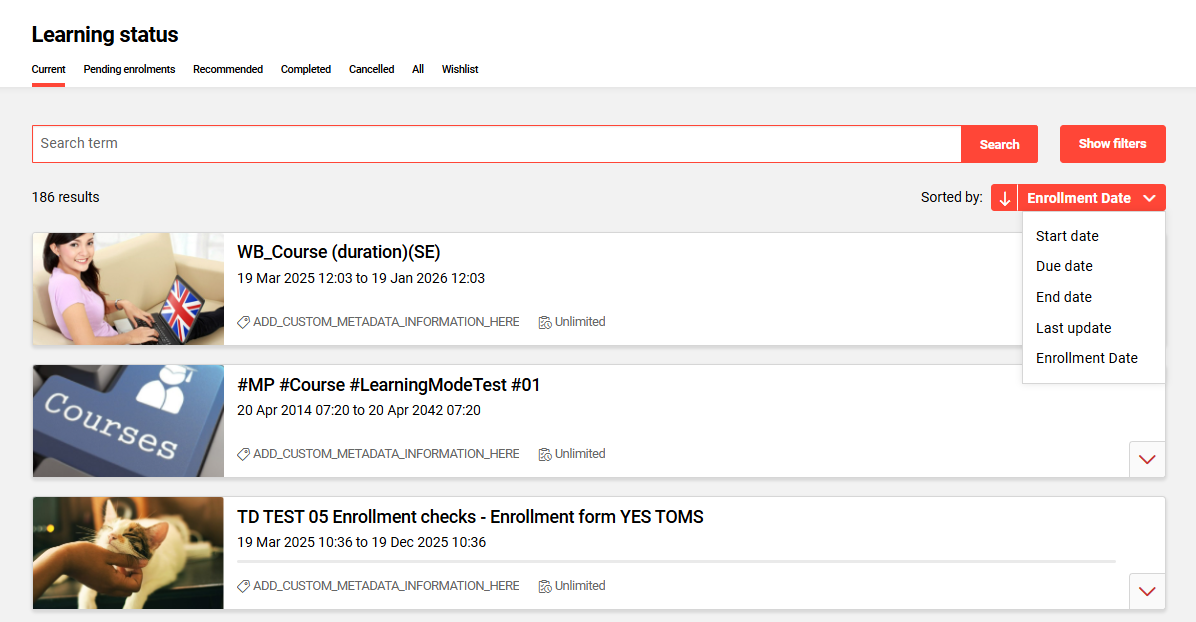
Overview: Learners can now sort their courses and learning paths in the Learning status function by Enrolment date. This can be performed either with Ascending or Descending orders.
Benefits and Use Cases: The learner can sort and find courses or learning paths according to the important reference point “Enrolment date”. For example, a learner may desire to complete the courses based on the longest or most recent enrolment times.
Audience: Learners
Setup & Access: The availability of the sort option and default order can be configured by a System administrator in the Client function Learning area settings menu. Additionally a system-wide default can be defined in the Configuration function by editing the Learning area settings option. The Manual sort options in the learning status field can be updated with the term “Enrolment date”. The Preset sorting field will have new options of “Enrolment Date Ascending” and “Enrolment Date Descending”.
Considerations & Limitations: No limitations
Testing: In the Clients function edit Learning area settings menu and add “Enrolment date” to the Manual sort options in the learning status field. Save the change and navigate to the Learner category and view the Learning status function. There will be a new Enrolment date sort option available.
Risk rating: Low
Duplicate Course Specific Event Components
Overview: Administrators can now duplicate course-specific events within a course. This significantly speeds up the creation of multi-event courses by allowing easy replication of event details without duplication of data outside the event component e.g. learning logic and assigned tutors. When duplicating an event, a confirmation mask is displayed before saving to prevent unintended notifications or calendar invites from being sent. The administrator can modify the details before finalising the duplication.
Benefits and Use Cases: Multi-event setups are commonly used where QR code attendance tracking is used. This enhancement streamlines the course administration process, reducing workload and improving efficiency.
-
Faster multi-event setup: Quickly create consecutive event sessions with minimal manual effort.
-
Reduced data entry: Common event details are copied automatically, requiring only minor adjustments; e.g. time adjustments where multiple events are in the one day.
Audience: Course administrators.
Setup & Access: No configuration needed. Course-specific events can be duplicated in courses by highlighting an event, clicking on the Create icon and selecting Duplicate. Already existing course-specific Events can be duplicated.
Considerations & Limitations: Duplication is only possible for course specific Events; this means there is no duplication possible in course templates where media must be ‘system wide’ or within the Media function.
-
Information outside of the event is not duplicated; e.g. learning logic, scheduling, and tutor assignment.
-
Editing scheduling and tutor is not possible in the duplication process else, the iCal will be sent for the wrong date to the wrong tutor first.
Testing: Create or Edit a Course and go to the Components tab. Click the Create icon, select the Media option and in the pop-up select an Event media type. Populate the fields and then save the Event as ‘Course specific’. Highlight the new event in the Components tab, click the Create icon and select the new Duplicate option.
Risk rating: Low.
Learning Paths
Learning Path Progress View if Mandatory Courses
Overview: Learners can now check for assigned learning paths to gauge their progress purely based on the completion of mandatory courses. This takes into consideration learning logic where only a definable number of courses require completion within a syllabus folder. The setting can be enabled per learning path via the “Calculation of progress based on mandatory modules of the learning path” meta tag. Prior to this update the learner could only view progress via the green bar based on all assigned courses or course templates.
Benefits and Use Cases: The standard progress bar view can be misleading for the learner, and for the Learning Coordinator, where learning x of n logic is applied. The updated calculation essentially enables learners to accurately gauge progress for select learning paths where not all courses require completion. This avoids the confusion with seeing incomplete progress for successfully completed learning paths.
Audience: Learners
Setup & Access: This requires the new “Calculation of progress based on mandatory modules of the learning path” (ID 11880) meta tag needs to be added. The meta tag can be added to learning path types and learning path templates; but will not automatically be assigned to existing learning paths. Should assignment to existing learning paths be required create a ticket in the Scheer IMC Service Desk to explore options.
Considerations & Limitations: Learning Paths with different alternative conditions in their learning logic will not be part of the enhancement. This is because the basis for calculating progress is not clear and will result in standard progress calculation being displayed. Example of unclear progress calculations include:
-
Alternative learning path completion conditions within the main folders;
-
Alternative completion conditions within a sub folder;
-
Differences in main folder completion logic compared with completion options of sub-folders; and
-
Learning logic defined for course progression order within a folder to restricting access to a course until another is completed.
The new progress calculation will not be displayed in the overall progress of the learning path under Learning status and within Learning path dashboard panels. The calculated progress will only be visible when the learning path is opened by the learner, the progress regarding the mandatory courses will be displayed.
Testing: Requires adding the new meta tag to a Learning path template and publishing. Create a new Learning path from the Learning path template. In the Description tab ensure the new Calculation of progress based on mandatory modules of the learning path” (ID 11880) meta tag is ticked and enable Concluded by Learning logic. In the Syllabus tab add a few courses to the main folder and then Edit the folder to define learning logic. Set the Required completed components / Number of conditions as 2, click the Save button, and then ‘Save and back’. Save the learning path, enrol yourself, complete a course, and check progress is 50%.
Risk rating: Low
Learning Path Access QR Code
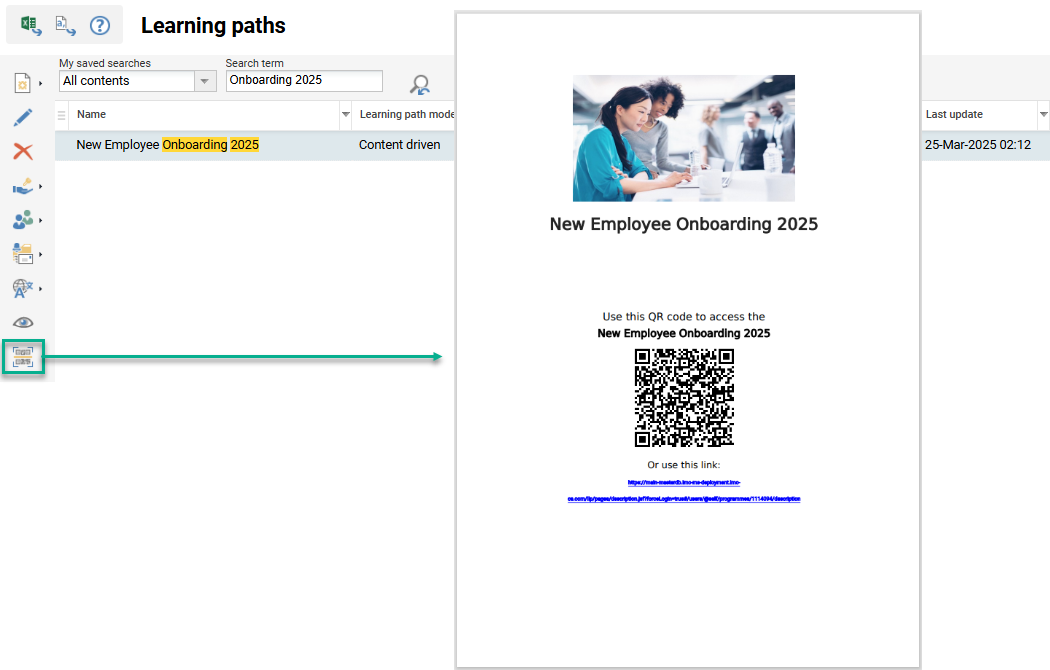
Overview: In the Learning paths function administrators can now generate a PDF document that contains a QR code and link direct to a learning path details page. This option matches the equivalent Generate QR code option that has long existed within the Courses function.
Benefits and Use Cases: With this QR code the learners have a quick access to the particular learning path. This sees it possible to directly advertise Learning paths outside of the LMS catalogue; e.g. for location specific learning paths.
Audience: Learners and Administrators
Setup & Access: No migration or configuration required as the new Generate QR code icon will automatically be available in the Learning paths function. Navigation access right configuration may be required for groups that only have only been granted Specific authorisation to the function. Learner groups accessing the QR code will also require clearance to the learning path to view the details page.
Considerations & Limitations: No QR code generation and provisioning at the learner front-end. Learners are directed to the learning path description page when they open the QR code, but no automatic enrolment takes place.
Testing: Access the Learning paths function, highlight a learning path, and click the Generate QR code icon. Access the generated PDF document in the browser Download area. Use a mobile device to scan the QR code and then login to the LMS. After login the learning path description page will open.
Risk rating: Low
Configuration Manager
Tutor Role Configuration Operating Instructions
Overview: It was requested by many customers to have i-buttons for the settings in Configuration function Tutoring menu for defining roles. This is because it was not clear when configuring Tutor roles what each checkbox setting was for and where settings had dependencies.
Benefits and Use Cases: This update helps System administrators clearly understand the access options available when configuring tutor roles.
Audience: System administrators.
Setup & Access: Not required as operating instructions will automatically be applied. If needed, each of the operating instruction texts can be adjusted in the System texts function.
Considerations & Limitations: None
Testing: As a System Administrator access the Configuration function and edit the Tutoring menu. Then when editing, or creating, a tutor role there will be an 'i' icon for each checkbox option.
Risk rating: Low
Dashboard Management
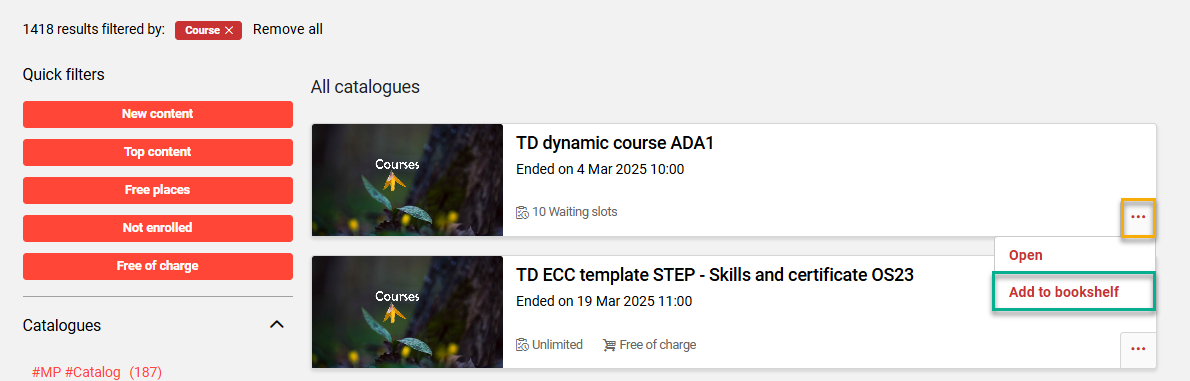
Bookshelf Favourite Function for Courses and Learning Paths
Overview: Users are now able to add Courses and Learning paths to their bookshelves to enable easy access for later use. Previously it had only be possible to add media items to a bookshelf. For courses and media this now serves as a complimenting alternative to the ‘Add to Wishlist’ button that lists on the Personal syllabus.
Benefits and Use Cases: The update enables learners fast access to flagged courses or learning paths directly from the bookshelf. This can reduce the learners need to scroll or search through comprehensive training history in the Learning status function across different statuses to find favourite content.
Audience: Learners.
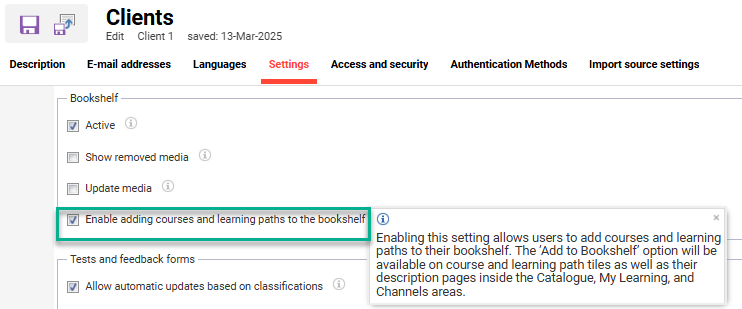
Setup & Access: With a System administrator open the Clients function, highlight a client, click the Edit icon, go to the Settings tab, find the Bookshelf section, and tick the Enable adding courses and learning paths to the bookshelf checkbox.
Considerations & Limitations: No migration required, just activation as described in the Setup & Access. The courses and learning paths will not be visible in the Bookshelf assignments function for Administrators to view assignments; likewise user assignments in the Participant administration functions.
Testing: Activate the new Enable adding courses and learning paths to the bookshelf checkbox in the Clients function. As a Learner go to the Learning status function, highlight a course or learning path and check for the new Add to bookshelf button; this can be seen by expanding the Show details button or opening a description page. As a Learner also go the Catalogue, search for a Course or Learning path and check the Add to bookshelf button is available. Finally check the Bookshelf panel on Dashboard to see if newly added Courses or Learning paths are visible.
Risk rating: High
Certificate Manager
Certificate Export
Overview: Learner certificates can be automatically generated for courses and learning path via an automated cronjob. The certificates are generated in PDF format and saved on the content server in the /data/certificate/job folder ready for collection. Certificates can also be automatically deleted via a cronjob to save space. The name of the PDF files contain the needed information in a consistent format that external tools will be able to recognise based on unique object IDs:
-
Format: revokedStatusWhenAvailable_personIDAsDefault_componentID_certificateID_majorversion_statusNumber_orderedDate_timeStamp
-
Example: rev_734899_727018_623651_8_12_2025_03_05_1741175371591.pdf.
Benefits and Use Cases: This feature streamlines certificate export for external integrations while maintaining system efficiency.
-
Automated Certificate Management:
ensures easy tracking and structured export of learner certifications -
Reduced Manual Work:
Automatically generates and deletes certificates
Audience: Administrators
Setup & Access: This implementation is not active by default and requires cronjob configuration. When configuring the cronjob, the ideal timing really depends on how many certificates need to be generated.
-
Configuration of the cronjobs in the Scheduled jobs function:
-
For generating “GenerateCertificatesJob”
Additionally a setting to select which user attribute is to be used for the file (default is person_id) name found in the Configuration manager Export menu in the Certificate Export tab. -
For deleting “DeleteCreatedCertificatesJob”
Additionally a setting to delete certificates older then x days is found in Configuration manager Export menu Certificate Export tab.
-
-
For Scheer IMC hosted solutions read access to the data folder must be requested via the Scheer IMC Support Desk.
Considerations & Limitations:
-
Language of the certificates generated: Learner user preferred language > then component language as fallback > then system language as fallback
-
Certificates of the type “Test certificate” or “Skill certificate” are not taken into account by the certificate export.
-
Only export records for successfully completed users and only for courses which have a certificate assigned.
-
Export for courses and learning paths with certificate type “System generated”.
-
Updating certificate versions on courses or learning paths will automatically generate new certificates (Depending on ‘Enrolment status’).
Testing: Requires the configuration of the GenerateCertificatesJob cronjob, defining Configuration Certificate Export settings, and access to the content server /data/certificate/job folder.
Risk rating: Medium
DOCX PDF Certificate Screen-Reader Update
Overview: When generating a PDF certificate document, the iText library used for the PDF-generation has been updated to support the conversion of the ALT text into text in the PDF. The ALT text is used to describe the image and can be read by a screen-reader without being visible when the document is displayed. This is often required for accessibility reasons and is now possible for docx-files.
Benefits and Use Cases: Visually impaired users that rely on screen-readers can know which kind of image is stored in their PDF certificate.
Audience: Learners
Setup & Access: No technical setup required. Certificate needs to be created with the Document generation mode field as either Use uploaded template (DOCX)“or Use uploaded template (DOCX) and convert to PDF.
Considerations & Limitations: The uploaded DOCX certification template will require images and have the ALT text populated.
Testing: Requires the creation of a DOCX certificate with image ALT text fields populated, assigning the certificate to a course, awarding the certificate, downloading the certificate as a PDF, and viewing with a screen-reader.
Risk rating: Low
Notification Framework
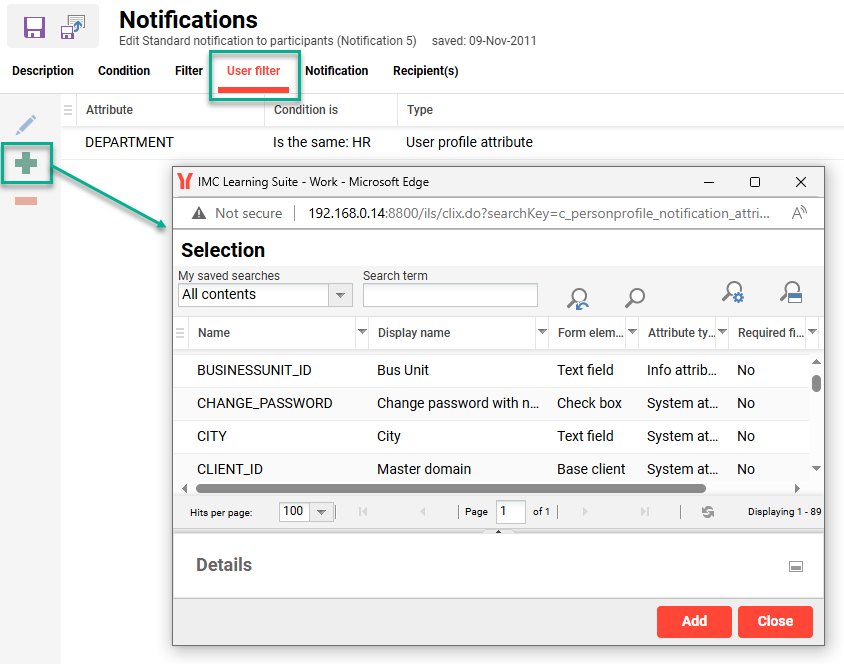
Notification Personal Attribute Filtering
Overview: A new User Filter tab is available for all standard notifications in the Notifications function. The new tab enables the Learning Suite LMS to send personalised notifications to specific users based on personal attribute values on their profiles. For example; different users can receive messages in different language styles based on personal attribute values on their profile (e.g., formal vs. informal language, accessibility require, or preferred email address). Administrators can define one or more filters based on standard or custom personal attributes (except certain types like image/upload). If multiple filters are selected they are connected via an AND operator.
Benefits and Use Cases: This enhancement enables organisations to improve engagement by delivering personalised notifications efficiently to select users.
-
Targeted Communication: Send relevant notifications to specific user groups based on their attributes.
-
Greater Personalisation: Adapt message tone and content to different audiences.
-
Consistency Across Features: Aligns notification filtering with existing enrolment message filtering.
Audience: System administrators and recipients
Setup & Access: The new User filer tab will be available by default in each notification with no added personal attributes. User-filters need to be activated if needed for relevant notifications and create duplicated notifications with other filter settings and texts.
Considerations & Limitations:
-
If user-filters are in use, they will limit the recipients. Attention is needed for the combination of filters and other notifications settings so they are valid.
-
For a large rollout of notifications Scheer IMC proposes the temporary use of the email test mode setting to prevent notifications for past events (e.g. Reminders) being sent directly to external mailboxes.
Testing: To enable a user filter go to the Notifications function and edit or duplicate an existing notification. Go to the new User filter tab and click the Add icon. In the pop-up select the desired personal attributes to be used as filters and save. Testing will then require triggering the notification based on the object types and filtered personal attribute.
Risk rating: Low