Business Unit (BU) Group Structures
Deep Dive: BU group structure and import overviews
What are BU Group Structures?
Organisational structures can be replicated in the imc Learning Suite using Business Unit (BU) groups. This is achieved by creating groups in hierarchical structures that establish reporting lines between BU group Supervisors and the Users within their groups. These reporting lines have many use cases and benefits.
BU Structure Use Cases
Establishing reporting lines in BU group structures enables Supervisors and Deputies to:
view their staff in the My Staff function
have deputies who can monitor staff training progress
view their staff in the Supervisor reports
perform training enrolments on behalf of their staff
approve their staff's training and skill requests
The BU Groups are additionally ideal for:
granting Clearances to objects (e.g. to catalogues)
targeting automatic training enrolments or recommendations
restricting training access with prerequisites
reporting based on group achievements
BU Group Structure Configuration Options
There are three methods to create Business Unit Group structures in the imc Learning Suite:
Manual creation in the LMS GUI
Manual import using .csv in fixed format
Manual or automatic interface using .xml files in fixed format
These options are described below along with benefits, creation instructions, and user assignment options.
Manual BU Group Creation
Manual group creation is the simplest method to create a basic BU group structure. This approach can be ideal for smaller structures that rarely change and where no external source system can provide the required data. Business Unit groups can be manually created in the 'Organisational structure and groups' function by clicking the 'Create' icon and selecting the 'BU' option.
Option to manually create a BU group
Creating will launch a new tab to commence populating the new BU Group. Only the 'Description' tab fields need to be completed and below are the main fields to complete with descriptions:
Type of role:
Normally Standard is used for BU Groups. Changing to Content administration sees all Users within the Group receive Clearance to objects created by other Users in the Group. This could make sense for some BU groups where members actually create content in the LMS such as HR departments or Training teams.Group Code:
This field has no actual function in the LMS, but can be used for assignment of Users to the BU Group with custom business rules that look for a match of a User Profile attribute value to this Group Code vale; the Abbreviation field can also be used for rules.Supervisor:
Enables selecting one or more Users that are responsible for managing the Business Unit Group and provides them with visibility to the staff assigned to the Group. The 'Deputy' field is basically the same and just does not receive email notifications that the Supervisors do.Status: The status must be Active for the Group to be used throughout the LMS. If the BU Group is no longer needed it can be made Inactive or deleted if a record is no longer required.
Name: Enter a name for the BU Group. This does not need to be unique, but is recommended.
Description: Optional fields can be used to describe the role of the BU Group within the organisation including Goals and Achievements which can be renamed if needed.
Populate these fields with details for the base BU Group and then click the 'Save and Back' button.
Next, to create child BU Groups, highlight the base BU Group, click the 'Create' icon, and select 'BU' option. In the pop-up select 'In the hierarchy below the selected element' option and click the 'OK' button. The tab will refresh once again with a screen to populate fields for a new BU Group. Keep repeating this process until the required structure has been achieved.
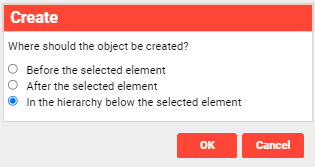
Option to create a child BU group
An example of a basic structure could look like the below where there are multiple levels within the structure replicating a traditional Division/Department/Team/Location style structure:
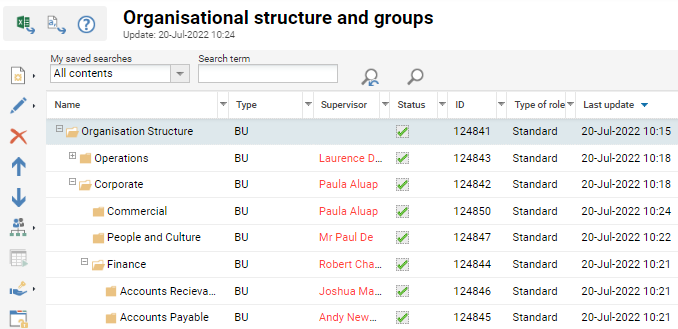
Example of a BU group structure with some expanded levels
Hint: Once the structure is created it can be a good idea to grant Clearances on each Group to the Supervisors so they can view their own groups in system filters.
CSV Import BU Group Creation
BU Group structures can be efficiently created and updated using .csv file imports. The import first requires a parent/base group to be manually created as previously described. Before importing a .csv file though it's important to understand the required format.
CSV File Format
The .csv file will need to be created in the LMS required format with supported column names, delimiters and values. The table below lists all possible columns that can be in a valid .csv file, but not all are actually required.
Column name | Details | Data Validation |
External ID | Mandatory | This column is mandatory both for creating and updating groups. If the updated group does not initially have an external ID, after the update via import, it will receive also the specified external ID. |
Internal ID | Optional if the External ID has been provided. | Can not be used for creating groups. Can only be used for updating existing groups. |
Group Type | Mandatory | One of two possible values: |
External Parent ID | Not mandatory | This ID must be a valid group id for a group that either already exists in the system or that was introduced in a previous line from the same import. Used to define that the group with the specified ID becomes the parent in the tree structure for the imported group. |
Internal parent ID | Not mandatory | This ID will be used to specify the internal parent id of the group that should be set as parent for the imported group. |
Type of role | Mandatory | One of 2 possible values → Functional Reference: |
Group code | Not mandatory | NA 500 chars long text and numeric entry |
Function | Not mandatory |
|
Initial homepage | Not mandatory | The ID of the navigation entry to be used as homepage for the corresponding group. Only valid for System Groups. |
Relevant for validation | Not mandatory | If the column is not present or empty, the relevant for validation flag will be evaluated to FALSE. |
Location settings | Not mandatory | Possible values: Add, Remove, Replace. Default is Replace. |
Location 1 | Not mandatory | Column will be repeated for each location that needs to be specified. Single value per column which can be duplicated. ID needs to be provided. |
Location comment 1 | Not mandatory | This is a text field that must contain the comment for one specific location. Ideally we can specify Location, Comment, Location, Comment so that all the required locations together with their comments can be provided. |
Abbreviation | Not mandatory | 100 characters max. Only valid for Business Units. |
Supervisor | Not mandatory | A multi value field where the supervisors can be specified based on their user name. (comma separated list of login names). Only valid for Business Units. If the configuration is to use comma as separators, the multiple usernames must be surrounded by quotation marks: e.g. "user_name_1, user_name_2". |
Deputy | Not mandatory | A multi value field where the deputy can be specified based on their user name. Only valid for Business Units. |
Deputy without access | Not mandatory | A multi value field where the deputy without access can be specified based on their user name. Only valid for Business Units. |
Status | Not mandatory | Two possible values can be specified: Active or Inactive. If the column is not present or empty the default value Active will be applied. |
Start date | Not mandatory | ISO date and time format. |
Expiration date | Not mandatory | ISO date and time forma.t |
Language 1 | Mandatory | A language code will be used to specify the language for which the name is defined in the next column. en-GB |
Name 1 | Mandatory | The name of the group that will be applied for the language specified in the previous column. |
Description 1 | Not mandatory | The description of the group in the specified language. |
Goals 1 | Not mandatory | The goals set for the group. Text attribute. Only valid for Business Units. |
Achievements 1 | Not mandatory | The achievements for the group. Only Valid for Business Units. |
Language 2 | ||
Name 2 | ||
Description 2 | ||
Goals 2 | ||
Achievements 2 |
Below is a sample file that illustrates a more basic .csv file that will be used in the next section:
Configuring the CSV File Delimiter
The delimiter can be altered between a comma, semi-colon, pipe and tab in the 'Client' function 'Settings' tab in the 'CSV group import separator' field.
Importing the CSV File
To commence the .csv import, highlight the desired BU Group that will be the base of the structure, then click the 'Create' icon and select the 'CSV import' option. In the next screen 1) click the 'Upload' button, then 2) in the pop-up choose your .csv file using the 'Choose file' button, 3) once the file is selected click the pop-up 'Upload' button, and then click the 'Continue' button to progress to the next step.

The csv file will require the LMS object ID of the base group in the Internal parent ID field.
The next step is a Simulation run that performs a trial run to test the file structure. Check the results of the simulated import in terms of group updates by viewing the downloadable import log. If there are structural errors, messages will be displayed on-screen and the import logs will provide specific error data. If the results look good, click the Continue button to progress to the import step; if there are errors update the .csv file and repeat this step.

Clicking the Continue button in the previous screen will automatically commence the .csv file import and the import results will be displayed in seconds. The browser can simply be closed rather than clicking the 'Back' button. Return to the Organisational structure and groups function, locate the base BU Group, and expand using the + symbol to reveal the imported structure.
A nice feature when using .csv imports is that updating the structure is possible using delta files that do not require the full group structure. Only the unique ID of the parent group is needed.
XML Import BU Group Creation
Many imc clients with larger BU group structures utilise the XML interface to automatically update groups, assign users, and define Supervisors. The XML file import is the most efficient and powerful method to maintain organisation structures. This is because the import can be interfaced to automatically consume an .xml file produced by an external source system. However, this approach is the most complicated as the .xml file format is specific to the imc Learning Suite and must be custom produced in the source system or an analytics tool.
Use of the .xml interface also requires an imc BU Connector licence and some imc consulting effort is required. Consultants would discuss the options, setup a base group, activate the .xml import, setup a scheduled import job, possibly write assignment rules, and coordinate the setup of an imc SFTP server account. The assigned imc consultant would provide a specification detailing the required .xml file format and possibilities; a basic sample .xml is a valid format is embedded below:
Sample_Structure_with_users.xml
Many customers order technical support to assist in file creation troubleshooting, but imc developers will not be responsible for producing xml files from customer source systems.
With an imported structure, explicit deletion of values is not considered and leaving the value for a certain column empty will keep the previous value.
User Assignment by Business Rules
The use of business rules can automatically assign users to BU groups whenever a user record is created or updated. Assignment works by matching the value of a personal attribute on the user profile to the external ID of a BU group. imc consultants would normally work with customers during implementation projects to identify relationships within the data and configure some dynamic rules. An example of a basic dynamic rule for a single personal attribute is listed below:
<co:hashTable identifier="ORG_MAPPING" defaultValue="0" comment="maps section ids">
	<co:hashTableSelectStatement isIntAttribute="false">SELECT GROUP_ID FROM PLATFORMGROUP WHERE EXTERNAL_OBJECT_ID =?</co:hashTableSelectStatement>
</co:hashTable>

<co:rule>
	<co:assignCommand context="GROUP" target="_hashval" hashident="ORG_MAPPING" index="LOCATION_ID" execute="ALWAYS" />
</co:rule>
Business rules are also able to assign Supervisors and Deputies to BU groups based on personal attribute values. These rules would normally be more advanced to consider AND / OR conditions with attributes such as a Position title and Department. The assign command part of the rule would then have a ‘type’ attribute containing value of “SUPERVISOR”, “DEPUTY1” or “DEPUTY2”.
<co:rule>
  <co:ruleConditions>
        <co:orCondition>
            <co:ruleCondition expression="POSITION_ID" matching="HASSUBSTRING" value="Manager"/>
            <co:ruleCondition expression="POSITION_ID" matching="HASSUBSTRING" value="Supervisor"/>
        </co:orCondition>
    <co:ruleConditions>
  <assignCommand context="GROUP" target="_hashval" hashident="ORG_MAPPING" index="DEPARTMENT_ID" type="SUPERVISOR" execute="ALWAYS" />
</co:rule>
For the use of business rules to assign users to BU Groups create a 2nd Level Support Ticket to request consultant support.